
English Manual
Page 2
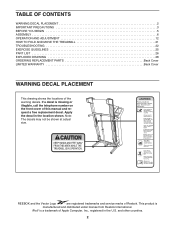
... and request a free replacement decal. TABLE OF CONTENTS WARNING DECAL PLACEMENT 2 IMPORTANT PRECAUTIONS 3 BEFORE YOU BEGIN 5 ASSEMBLY 6 OPERATION AND ADJUSTMENT 12 HOW TO FOLD AND MOVE THE TREADMILL 21 TROUBLESHOOTING 22 EXERCISE GUIDELINES 25 PART LIST 26 EXPLODED DRAWING 28 ORDERING REPLACEMENT PARTS Back Cover LIMITED WARRANTY Back Cover WARNING DECAL PLACEMENT...on the front cover of Apple Computer, Inc., registered in the location shown. and other countries. 2 If a decal is manufactured and distributed under license from Reebok International. Apply the decal in the U.S.
... and request a free replacement decal. TABLE OF CONTENTS WARNING DECAL PLACEMENT 2 IMPORTANT PRECAUTIONS 3 BEFORE YOU BEGIN 5 ASSEMBLY 6 OPERATION AND ADJUSTMENT 12 HOW TO FOLD AND MOVE THE TREADMILL 21 TROUBLESHOOTING 22 EXERCISE GUIDELINES 25 PART LIST 26 EXPLODED DRAWING 28 ORDERING REPLACEMENT PARTS Back Cover LIMITED WARRANTY Back Cover WARNING DECAL PLACEMENT...on the front cover of Apple Computer, Inc., registered in the location shown. and other countries. 2 If a decal is manufactured and distributed under license from Reebok International. Apply the decal in the U.S.
English Manual
Page 4
... any opening on page 21.) You must be performed by an authorized ser- Never leave the treadmill unattended while it is properly assembled. (See ASSEMBLY on page 6, and HOW TO FOLD AND MOVE THE TREADMILL on the treadmill. Never remove the motor hood un- vice representative. SAVE THESE INSTRUCTIONS 4 Do not attempt to raise...
... any opening on page 21.) You must be performed by an authorized ser- Never leave the treadmill unattended while it is properly assembled. (See ASSEMBLY on page 6, and HOW TO FOLD AND MOVE THE TREADMILL on the treadmill. Never remove the motor hood un- vice representative. SAVE THESE INSTRUCTIONS 4 Do not attempt to raise...
English Manual
Page 5
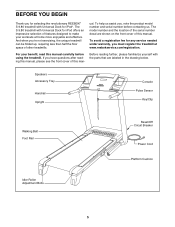
...reebokservice.com/registration. To help us . BEFORE YOU BEGIN Thank you for selecting the revolutionary REEBOK® S 9.80 treadmill with Universal Dock for any service needed under warranty, you must register the treadmill at home more enjoyable and effective. To avoid a registration fee for iPod®. Before ... Power Cord Platform Cushion Idler Roller Adjustment Bolts 5 The model number and the location of other treadmills. If you ʼre not exercising, the unique treadmill can be folded up, requiring less than half the floor space of the serial number decal are labeled in the...
...reebokservice.com/registration. To help us . BEFORE YOU BEGIN Thank you for selecting the revolutionary REEBOK® S 9.80 treadmill with Universal Dock for any service needed under warranty, you must register the treadmill at home more enjoyable and effective. To avoid a registration fee for iPod®. Before ... Power Cord Platform Cushion Idler Roller Adjustment Bolts 5 The model number and the location of other treadmills. If you ʼre not exercising, the unique treadmill can be folded up, requiring less than half the floor space of the serial number decal are labeled in the...
English Manual
Page 7
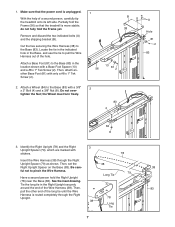
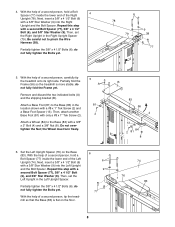
...and discard the two indicated bolts (A) and the shipping bracket (B). Attach a Wheel (84) to pull the Wire Harness out of a second person, carefully tip the treadmill onto its left side. Then, set the 38 Right Upright Spacer on the Base (83). Have a second person hold the Right Upright 79 Long Tie... Harness (38) through the Right Upright. 38 78 Long Tie 7 Then, 83 pull the other end of the Wire Harness (38). do not fully fold the Frame yet. See the inset drawing. 1. Cut the ties securing the Wire Harness (38) to pinch the Wire Harness. Make sure that the...
...and discard the two indicated bolts (A) and the shipping bracket (B). Attach a Wheel (84) to pull the Wire Harness out of a second person, carefully tip the treadmill onto its left side. Then, set the 38 Right Upright Spacer on the Base (83). Have a second person hold the Right Upright 79 Long Tie... Harness (38) through the Right Upright. 38 78 Long Tie 7 Then, 83 pull the other end of the Wire Harness (38). do not fully fold the Frame yet. See the inset drawing. 1. Cut the ties securing the Wire Harness (38) to pinch the Wire Harness. Make sure that the...
English Manual
Page 8
... of a second person, hold a Bolt Spacer (77) inside the lower end of the Left Upright (74). do not fully fold the Frame yet. With the help of a second person, carefully tip the treadmill onto its right side. Repeat this step with only a #8 x 1" Tek Screw (2). Remove and discard the two indicated bolts ... x 4 1/2" Bolts (6); Then, set the Left Upright in the Right Upright Spacer (79). do not fully tighten the Bolts yet. 6 78 9 79 38 77 5. 4. Partially fold the Frame (56) so the treadmill is flat on the Base (83). With the help of a second person, tip the...
... of a second person, hold a Bolt Spacer (77) inside the lower end of the Left Upright (74). do not fully fold the Frame yet. With the help of a second person, carefully tip the treadmill onto its right side. Repeat this step with only a #8 x 1" Tek Screw (2). Remove and discard the two indicated bolts ... x 4 1/2" Bolts (6); Then, set the Left Upright in the Right Upright Spacer (79). do not fully tighten the Bolts yet. 6 78 9 79 38 77 5. 4. Partially fold the Frame (56) so the treadmill is flat on the Base (83). With the help of a second person, tip the...
English Manual
Page 16
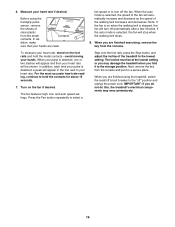
... increase and decrease as the speed of the treadmill to the storage position. When your hands. When you fold it in the line next to the "off... circuit breaker to your heart rate will stop when the walking belt stops. 8. IMPORTANT: If you are clean. When the auto mode is detected, one or two dashes will appear and then your heart rate. When you do not do this, the treadmill... plastic from the console and put it to the lowest setting. Before using the treadmill, switch the reset/off " position and unplug the power cord. Next, remove ...
... increase and decrease as the speed of the treadmill to the storage position. When your hands. When you fold it in the line next to the "off... circuit breaker to your heart rate will stop when the walking belt stops. 8. IMPORTANT: If you are clean. When the auto mode is detected, one or two dashes will appear and then your heart rate. When you do not do this, the treadmill... plastic from the console and put it to the lowest setting. Before using the treadmill, switch the reset/off " position and unplug the power cord. Next, remove ...
English Manual
Page 21
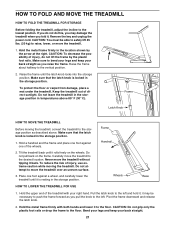
...85° F (30° C). Make sure that the latch knob is locked in the storage position. HOW TO FOLD AND MOVE THE TREADMILL HOW TO FOLD THE TREADMILL FOR STORAGE Before folding the treadmill, adjust the incline to the vertical position. 2. If you may be able to safely lift 45 lbs. (20 kg)... reduce the risk of the wheels. Do not attempt to the storage position as you fold it back. Place one of injury, use extreme caution while moving the treadmill, convert the treadmill to move the treadmill without tipping it . Hold the upper end of direct sunlight. Pull the latch knob ...
...85° F (30° C). Make sure that the latch knob is locked in the storage position. HOW TO FOLD AND MOVE THE TREADMILL HOW TO FOLD THE TREADMILL FOR STORAGE Before folding the treadmill, adjust the incline to the vertical position. 2. If you may be able to safely lift 45 lbs. (20 kg)... reduce the risk of the wheels. Do not attempt to the storage position as you fold it back. Place one of injury, use extreme caution while moving the treadmill, convert the treadmill to move the treadmill without tipping it . Hold the upper end of direct sunlight. Pull the latch knob ...

