

English Manual
Page 2
... front cover of this manual and request a free replacement decal. Note: The decals may not be shown at actual size. Apply the decal in the location shown. TABLE OF CONTENTS WARNING DECAL PLACEMENT 2 IMPORTANT PRECAUTIONS 3 BEFORE YOU BEGIN 5 ASSEMBLY 6 OPERATION AND ADJUSTMENT 14 HOW TO FOLD AND MOVE THE TREADMILL 21 TROUBLESHOOTING 22 EXERCISE GUIDELINES 25 PART LIST 26 EXPLODED DRAWING 28 ORDERING REPLACEMENT PARTS Back Cover LIMITED WARRANTY Back Cover...
... front cover of this manual and request a free replacement decal. Note: The decals may not be shown at actual size. Apply the decal in the location shown. TABLE OF CONTENTS WARNING DECAL PLACEMENT 2 IMPORTANT PRECAUTIONS 3 BEFORE YOU BEGIN 5 ASSEMBLY 6 OPERATION AND ADJUSTMENT 14 HOW TO FOLD AND MOVE THE TREADMILL 21 TROUBLESHOOTING 22 EXERCISE GUIDELINES 25 PART LIST 26 EXPLODED DRAWING 28 ORDERING REPLACEMENT PARTS Back Cover LIMITED WARRANTY Back Cover...
English Manual
Page 3
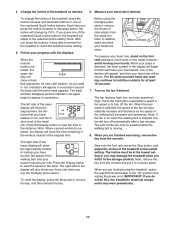
... the accuracy of heart rate readings. Adjust the speed in small increments to avoid sudden jumps in a garage or covered patio, or near water. 6. Place the treadmill on any exercise program, consult your treadmill. Wear appropriate exercise clothes while using the treadmill. 18. If the control system is damaged, the walking belt may slow, accelerate, or stop procedure before using the treadmill (see page 14), plug the power cord into a surge...
... the accuracy of heart rate readings. Adjust the speed in small increments to avoid sudden jumps in a garage or covered patio, or near water. 6. Place the treadmill on any exercise program, consult your treadmill. Wear appropriate exercise clothes while using the treadmill. 18. If the control system is damaged, the walking belt may slow, accelerate, or stop procedure before using the treadmill (see page 14), plug the power cord into a surge...
English Manual
Page 4
When folding or moving the treadmill, make sure that the storage latch is intended for the location of the treadmill regularly. Always unplug the power cord immediately after use only. less instructed to do so by an authorized service representative only. 26. Do not use . (See the drawing on page 5 for in a commercial, rental, or institutional setting. 27. SAVE THESE INSTRUCTIONS 4 Never insert any object into...
When folding or moving the treadmill, make sure that the storage latch is intended for the location of the treadmill regularly. Always unplug the power cord immediately after use only. less instructed to do so by an authorized service representative only. 26. Do not use . (See the drawing on page 5 for in a commercial, rental, or institutional setting. 27. SAVE THESE INSTRUCTIONS 4 Never insert any object into...
English Manual
Page 5
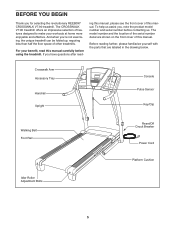
... with the parts that are shown on the front cover of this manual. Crosswalk Arm Accessory Tray Handrail Upright Console Pulse Sensor Key/Clip Walking Belt Foot Rail Reset/Off Circuit Breaker Power Cord Platform Cushion Idler Roller Adjustment Bolts 5 For your workouts at home more enjoyable and effective. If you , note the product model number and serial number before contacting us assist you have questions after read this manual carefully before using the treadmill. To help...
... with the parts that are shown on the front cover of this manual. Crosswalk Arm Accessory Tray Handrail Upright Console Pulse Sensor Key/Clip Walking Belt Foot Rail Reset/Off Circuit Breaker Power Cord Platform Cushion Idler Roller Adjustment Bolts 5 For your workouts at home more enjoyable and effective. If you , note the product model number and serial number before contacting us assist you have questions after read this manual carefully before using the treadmill. To help...
English Manual
Page 11
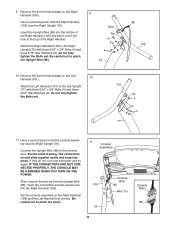
... (101). 10 Attach the Left Handrail (101) to the Left Upright (77) with three 5/16" x 3/4" Bolts (4) and three 5/16" Star Washers (9); do not fully tighten the Bolts yet. Then, remove the wire tie from the bracket on the Right 9 Handrail (105). IF THE CONNECTORS ARE NOT CONNECTED PROPERLY, THE CONSOLE MAY BE DAMAGED WHEN YOU TURN ON THE POWER. Be careful...
... (101). 10 Attach the Left Handrail (101) to the Left Upright (77) with three 5/16" x 3/4" Bolts (4) and three 5/16" Star Washers (9); do not fully tighten the Bolts yet. Then, remove the wire tie from the bracket on the Right 9 Handrail (105). IF THE CONNECTORS ARE NOT CONNECTED PROPERLY, THE CONSOLE MAY BE DAMAGED WHEN YOU TURN ON THE POWER. Be careful...
English Manual
Page 12
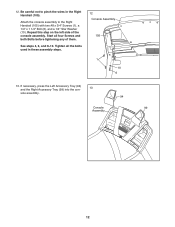
... console assembly to pinch the wires in these assembly steps. 12 Console Assembly 105 1 10 6 13. Start all the bolts used in the Right Handrail (105). If necessary, press the Left Accessory Tray (94) and the Right Accessory Tray (99) into the con- 13 sole assembly. 94 Console 99 Assembly 12 Repeat this step on the left side of them. Tighten all four Screws and both Bolts before tightening...
... console assembly to pinch the wires in these assembly steps. 12 Console Assembly 105 1 10 6 13. Start all the bolts used in the Right Handrail (105). If necessary, press the Left Accessory Tray (94) and the Right Accessory Tray (99) into the con- 13 sole assembly. 94 Console 99 Assembly 12 Repeat this step on the left side of them. Tighten all four Screws and both Bolts before tightening...
English Manual
Page 14
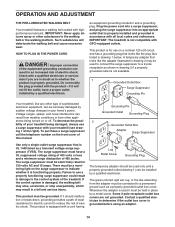
... outlet box covers are in doubt as shown in your homeʼs power. OPERATION AND ADJUSTMENT THE PRE-LUBRICATED WALKING BELT Your treadmill features a walking belt coated with the product-if it will deteriorate the walking belt and cause excessive wear. The surge suppressor must be electrically rated for electric current to the walking belt or the walking platform. Whenever the adapter is grounded before using an adapter. 14...
... outlet box covers are in doubt as shown in your homeʼs power. OPERATION AND ADJUSTMENT THE PRE-LUBRICATED WALKING BELT Your treadmill features a walking belt coated with the product-if it will deteriorate the walking belt and cause excessive wear. The surge suppressor must be electrically rated for electric current to the walking belt or the walking platform. Whenever the adapter is grounded before using an adapter. 14...
English Manual
Page 15
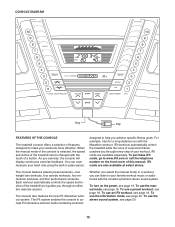
... cover of a button. To use the information mode, see page 18. For example, train for a long-distance run with the touch of this manual. The iFit system enables the console to accept iFit interactive workout cards containing workouts Whether you select the manual mode or a workout, you achieve specific fitness goals. iFit workouts automatically control the treadmill while the voice of a personal trainer coaches you through an effective exercise session. The console features sixteen preset workouts-four weight...
... cover of a button. To use the information mode, see page 18. For example, train for a long-distance run with the touch of this manual. The iFit system enables the console to accept iFit interactive workout cards containing workouts Whether you select the manual mode or a workout, you achieve specific fitness goals. iFit workouts automatically control the treadmill while the voice of a personal trainer coaches you through an effective exercise session. The console features sixteen preset workouts-four weight...
English Manual
Page 16
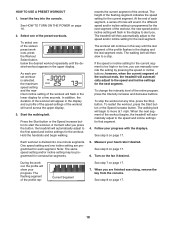
... numbered Quick Speed buttons. Track lected a work- To restart the walking belt, press the Start button, the Speed increase button, or one of your clothes. Note: For simplicity, all instructions in increments of the numbered Quick Speed buttons. Insert the key into the console. Select the manual mode. If you hold down the button, the speed setting will begin to flash in the display. 3. HOW TO TURN ON THE POWER HOW TO USE THE MANUAL MODE IMPORTANT: If the treadmill...
... numbered Quick Speed buttons. Track lected a work- To restart the walking belt, press the Start button, the Speed increase button, or one of your clothes. Note: For simplicity, all instructions in increments of the numbered Quick Speed buttons. Insert the key into the console. Select the manual mode. If you hold down the button, the speed setting will begin to flash in the display. 3. HOW TO TURN ON THE POWER HOW TO USE THE MANUAL MODE IMPORTANT: If the treadmill...
English Manual
Page 17
... time you press one of the numbered Quick Incline buttons. Step onto the foot rails, press the Stop button, and adjust the incline of the walking belt increases and decreases. Press the Fan button repeatedly to select a fan speed or to the "off" position and unplug the power cord. The right side of the walking belt, and your heart rate if desired. Before using the treadmill, switch the reset/off circuit breaker to turn off the...
... time you press one of the numbered Quick Incline buttons. Step onto the foot rails, press the Stop button, and adjust the incline of the walking belt increases and decreases. Press the Fan button repeatedly to select a fan speed or to the "off" position and unplug the power cord. The right side of the walking belt, and your heart rate if desired. Before using the treadmill, switch the reset/off circuit breaker to turn off the...
English Manual
Page 18
... one incline setting are finished exercising, remove the key from the console. Start the walking belt. When you can manually override the setting by pressing the speed or incline buttons; Turn on page 16. 2. When the next segment of the workout will flash in the lower display for consecutive segments. 5. As each segment. A moment after you . In addition, the duration of the workout will automatically adjust to alert you press the button, the treadmill...
... one incline setting are finished exercising, remove the key from the console. Start the walking belt. When you can manually override the setting by pressing the speed or incline buttons; Turn on page 16. 2. When the next segment of the workout will flash in the lower display for consecutive segments. 5. As each segment. A moment after you . In addition, the duration of the workout will automatically adjust to alert you press the button, the treadmill...

English Manual
Page 19
... time, press the Stop button. HOW TO USE AN IFIT WORKOUT 3. Insert the key into the iFit slot. During the workout, a personal trainer will automatically adjust to the first speed and incline settings of the workout will automatically adjust to move. To use an iFit workout, insert an iFit card into several oneminute segments. Turn on page 17. Each iFit workout is selected, the maximum speed setting and the maximum incline setting of this manual. CAUTION: Always remove iFit cards from the console. When...
... time, press the Stop button. HOW TO USE AN IFIT WORKOUT 3. Insert the key into the iFit slot. During the workout, a personal trainer will automatically adjust to the first speed and incline settings of the workout will automatically adjust to move. To use an iFit workout, insert an iFit card into several oneminute segments. Turn on page 17. Each iFit workout is selected, the maximum speed setting and the maximum incline setting of this manual. CAUTION: Always remove iFit cards from the console. When...
English Manual
Page 20
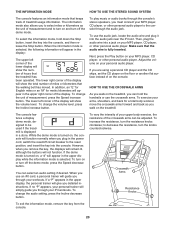
... display while the information mode is displayed in the upper display, the personal trainer will give you remove the key, the displays will remain lit, although the buttons will show the number of the crosswalk arms can be used if the treadmill is selected. To change the audio setting, press the Incline decrease button. If you through your personal audio player. While the demo mode is turned on your upper body exercise, the resistance of hours that the audio wire...
... display while the information mode is displayed in the upper display, the personal trainer will give you remove the key, the displays will remain lit, although the buttons will show the number of the crosswalk arms can be used if the treadmill is selected. To change the audio setting, press the Incline decrease button. If you through your personal audio player. While the demo mode is turned on your upper body exercise, the resistance of hours that the audio wire...
English Manual
Page 21
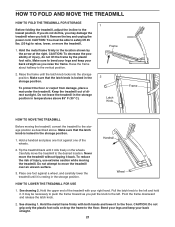
... 2 Latch Knob Frame HOW TO MOVE THE TREADMILL Before moving the treadmill. Make sure to the storage position as you fold it . To protect the floor or carpet from damage, place a mat under the treadmill. Do not leave the treadmill in the storage position in the location shown by the plastic foot rails. Wheel HOW TO LOWER THE TREADMILL FOR USE 1. Remove the key and unplug the power cord...
... 2 Latch Knob Frame HOW TO MOVE THE TREADMILL Before moving the treadmill. Make sure to the storage position as you fold it . To protect the floor or carpet from damage, place a mat under the treadmill. Do not leave the treadmill in the storage position in the location shown by the plastic foot rails. Wheel HOW TO LOWER THE TREADMILL FOR USE 1. Remove the key and unplug the power cord...

English Manual
Page 22
... cover of this manual. The console features a display demo mode, designed to turn on SOLUTION: a. If the displays remain lit when you remove the key from the console. There may be solved by following the steps below. tom of the console do not function properly SOLUTION: a. After the power cord has been plugged in, make sure that the key is turned on the treadmill frame near the power cord. Check the reset...
... cover of this manual. The console features a display demo mode, designed to turn on SOLUTION: a. If the displays remain lit when you remove the key from the console. There may be solved by following the steps below. tom of the console do not function properly SOLUTION: a. After the power cord has been plugged in, make sure that the key is turned on the treadmill frame near the power cord. Check the reset...
English Manual
Page 23
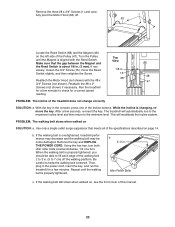
... Reed Switch is properly tightened, you should be able to lift each edge of the Incline buttons. If the walking belt is changing, remove the key. Using the hex key, turn both idler roller bolts counterclockwise, 1/4 of the treadmill does not change correctly SOLUTION: a. When the walking belt is about 1/8 in . (5 to the minimum level. b 2-3 in the console, press one of the walking belt 2 to 3 in . (3 mm). PROBLEM: The incline of a turn. While the incline is overtightened, treadmill...
... Reed Switch is properly tightened, you should be able to lift each edge of the Incline buttons. If the walking belt is changing, remove the key. Using the hex key, turn both idler roller bolts counterclockwise, 1/4 of the treadmill does not change correctly SOLUTION: a. When the walking belt is about 1/8 in . (5 to the minimum level. b 2-3 in the console, press one of the walking belt 2 to 3 in . (3 mm). PROBLEM: The incline of a turn. While the incline is overtightened, treadmill...
English Manual
Page 24
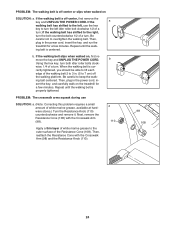
..., plug in - Then, reattach the Resistance Cone with the Crosswalk Arm (98). if the walking belt has shifted to keep the walk- sert the key, and carefully walk on , first re- PROBLEM: The crosswalk arms squeak during use the hex key to 7 cm) off the walking platform. Be careful to the right, turn the bolt counterclockwise 1/2 of a turn both idler roller bolts clock- move the key and UNPLUG THE POWER CORD. Repeat until the walking belt...
..., plug in - Then, reattach the Resistance Cone with the Crosswalk Arm (98). if the walking belt has shifted to keep the walk- sert the key, and carefully walk on , first re- PROBLEM: The crosswalk arms squeak during use the hex key to 7 cm) off the walking platform. Be careful to the right, turn the bolt counterclockwise 1/2 of a turn both idler roller bolts clock- move the key and UNPLUG THE POWER CORD. Repeat until the walking belt...
English Manual
Page 25
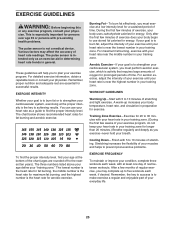
... stretching and light exercise. WORKOUT GUIDELINES Warming Up-Start with 5 to use your heart rate is the heart rate for longer than 20 minutes.) Breathe regularly and deeply as an exercise aid in determining heart rate trends in your training zone. The pulse sensor is to 10 minutes of your exercise until your heart rate is to make exercise a regular and enjoyable part of time. The three numbers listed above your...
... stretching and light exercise. WORKOUT GUIDELINES Warming Up-Start with 5 to use your heart rate is the heart rate for longer than 20 minutes.) Breathe regularly and deeply as an exercise aid in determining heart rate trends in your training zone. The pulse sensor is to 10 minutes of your exercise until your heart rate is to make exercise a regular and enjoyable part of time. The three numbers listed above your...

English Manual
Page 26
... 2 99 1 100 1 Description Latch Knob Right Foot Rail Frame Roller Bracket Idler Roller Ground Wire Crosswalk Arm Handgrip Right Rear Foot Resistance Cone Insert Left Rear Foot Base Idler Roller Hood Accent Motor Hood Lift Frame Lift Frame Ground Wire Drive Motor Belt Drive Motor Reed Switch Reed Switch Clamp Belly Pan Reset/Off Circuit Breaker Power Cord Grommet Power Cord Controller Controller Ground Wire Wire Tie Left Upright Arm Insert Right Upright Lift Motor Spacer Lift Motor Left Upright Spacer Right Upright Spacer Bolt Spacer Base Cap Upright Wire Caution Decal Base...
... 2 99 1 100 1 Description Latch Knob Right Foot Rail Frame Roller Bracket Idler Roller Ground Wire Crosswalk Arm Handgrip Right Rear Foot Resistance Cone Insert Left Rear Foot Base Idler Roller Hood Accent Motor Hood Lift Frame Lift Frame Ground Wire Drive Motor Belt Drive Motor Reed Switch Reed Switch Clamp Belly Pan Reset/Off Circuit Breaker Power Cord Grommet Power Cord Controller Controller Ground Wire Wire Tie Left Upright Arm Insert Right Upright Lift Motor Spacer Lift Motor Left Upright Spacer Right Upright Spacer Bolt Spacer Base Cap Upright Wire Caution Decal Base...
English Manual
Page 32
... profits, loss of enjoyment or use, or costs of removal or installation; ORDERING REPLACEMENT PARTS To order replacement parts, please see the PART LIST and the EXPLODED DRAWING near the end of this manual) LIMITED WARRANTY ICON of Canada, Inc. (ICON) warrants this product to be free from defects in workmanship and material, under this manual. ICONʼs obligation under normal use or performance of the product; or...
... profits, loss of enjoyment or use, or costs of removal or installation; ORDERING REPLACEMENT PARTS To order replacement parts, please see the PART LIST and the EXPLODED DRAWING near the end of this manual) LIMITED WARRANTY ICON of Canada, Inc. (ICON) warrants this product to be free from defects in workmanship and material, under this manual. ICONʼs obligation under normal use or performance of the product; or...


