
Reebok Crosswalk V 7.9 Treadmill Support Question
Reebok Crosswalk V 7.9 Treadmill Support Question
Find answers below for this question about Reebok Crosswalk V 7.9 Treadmill.Need a Reebok Crosswalk V 7.9 Treadmill manual? We have 2 online manuals for this item!
Question posted by matthewhschwarz on August 14th, 2014
Storage Latch Knob Came Off
I accidentally unscrewed the knob for the storage latch - the bolt popped into the hole. Is there anyway to get the bolt out so I can screw the knob back on? Thanks!
Current Answers
Answer #1: Posted by BusterDoogen on August 14th, 2014 7:00 PM
BusterDoogen

Member since:
October 30th, 2011 Points: 28,565,427

Member since:
October 30th, 2011 Points: 28,565,427
Go to page 13 & remove the #49 latch cap & see if the bolt will drop out. If not you may also have to remove the #8 bolt.
I hope this is helpful to you!
Please respond to my effort to provide you with the best possible solution by using the "Acceptable Solution" and/or the "Helpful" buttons when the answer has proven to be helpful. Please feel free to submit further info for your question, if a solution was not provided. I appreciate the opportunity to serve you
Answer #2: Posted by matthewhschwarz on August 21st, 2014 3:53 PM
matthewhschwarz

Member since:
August 14th, 2014 Points: 60
Member since:
August 14th, 2014 Points: 60
I removed the storage-latch bar by unscrewing the top and bottom with an allen wrench (make sure to have someone hold the treadmill belt up, as this bar is what's supporting it - you can place the belt down on the floor once the bar is off). Then, I held the bar horizontal and turned it so the screw came out its hole from gravity and I screwed the knob back on.
Thanks for the other suggestion!
Related Reebok Crosswalk V 7.9 Treadmill Manual Pages
English Manual - Page 2

... decal. TABLE OF CONTENTS
WARNING DECAL PLACEMENT 2 IMPORTANT PRECAUTIONS 3 BEFORE YOU BEGIN 5 ASSEMBLY 6 OPERATION AND ADJUSTMENT 14 HOW TO FOLD AND MOVE THE TREADMILL 21 TROUBLESHOOTING 22 EXERCISE GUIDELINES 25 PART LIST 26 EXPLODED DRAWING 28 ORDERING REPLACEMENT PARTS Back Cover LIMITED WARRANTY Back Cover
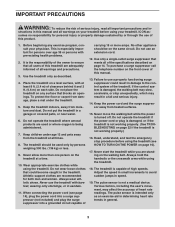
WARNING DECAL PLACEMENT
This drawing shows the...
English Manual - Page 3
... ON THE POWER on any exercise program, consult your treadmill. Do not use the treadmill with bare feet, wearing only stockings, or in the treadmill. To purchase a surge suppressor... or the crosswalk arms while using the treadmill. The pulse sensor is being administered.
7. Place the treadmill on your treadmill before using your physician. Do not operate the treadmill where aerosol ...
English Manual - Page 4
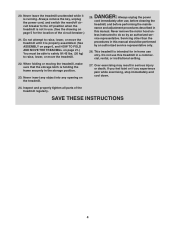
... the treadmill unattended while it is properly assembled. (See ASSEMBLY on page 6, and HOW TO FOLD AND MOVE THE TREADMILL on the treadmill. When folding or moving the treadmill, make sure that the storage latch is not...performed
by an authorized ser- If you feel faint or if you experience pain while exercising, stop immediately and cool down.
24. Always remove the key, unplug the power cord...
English Manual - Page 5
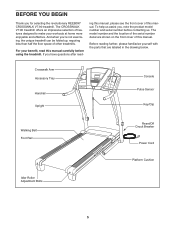
... BEGIN
Thank you ʼre not exercising, the unique treadmill can be folded up, requiring less than half the floor space of features designed to make your benefit, read - Before reading further, please familiarize yourself with the parts that are shown on the front cover of this manual carefully before contacting us. The CROSSWALK...
English Manual - Page 6
... Spacer (84)-4
3/8" Locknut (11)-3
#8 x 3/4" Screw (1)-6
#8 x 1" Tek Screw (2)-4
1/4" x 1 1/4" Bolt (6)-2
5/16" x 3/4" Bolt (4)-6
3/8" x 1 3/4" Bolt (8)-1
3/8" x 2" Bolt (3)-3
3/8" x 4" Bolt (5)-4
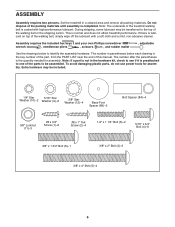
6 Assembly requires the included hex keys and your own Phillips screwdriver
wrench
, needlenose pliers
, scissors
, and rubber mallet
, adjustable . Set the treadmill in the hardware kit...
English Manual - Page 10
...
1 34
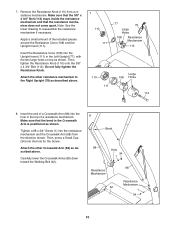
10 Make sure that the 3/8" x 4 3/4" Bolt (112) stays inside the resistance mechanism and that the bend in the Crosswalk Arm is positioned as described above .
7
110 111
77
79
Large Holes
108 Resistance Mechanism
112
110 111
Large 108 Holes
112
8.
Do not fully tighten the Resistance Knob.
Make sure that the resistance mechanism...
English Manual - Page 13
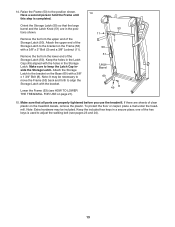
... hex keys is completed. Make sure to align the Storage Latch with a 3/8" x 2" Bolt (3) and a 3/8" Locknut (11). Attach the Storage Latch to adjust the walking belt (see HOW TO LOWER THE TREADMILL FOR USE on the Frame (53) with the bracket. Make sure that the large barrel and the Latch Knob (51) are in a secure place; If there are...
English Manual - Page 14
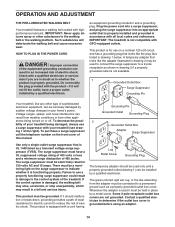
... covers are in a fall and serious injury. Check with a cord having
Lug Metal Screw
Grounding Plug
The temporary adapter should malfunction or break down, grounding provides a path of
this...LUBRICATED WALKING BELT
Your treadmill features a walking belt coated with the product-if it will deteriorate the walking belt and cause excessive wear. Such substances will not fit the outlet, have...
English Manual - Page 15
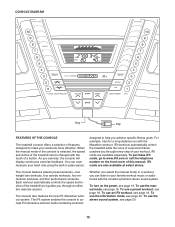
...help you exercise, the console will display continuous exercise feedback. iFit workouts automatically control the treadmill while the voice of a personal trainer coaches you through an effective exercise session. ... mode, see page 18. iFit cards are available separately.
As you achieve specific fitness goals. For example, train for a long-distance run with the consoleʼs ...
English Manual - Page 16
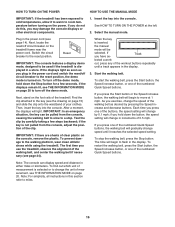
...the walking belt, and center the walking belt if necessary (see THE INFORMATION MODE on the treadmill frame near the power cord. Select the manual mode.
Next, locate the reset/off the ... USE THE MANUAL MODE
IMPORTANT: If the treadmill has been exposed to cold temperatures, allow it reaches the selected speed setting.
If you exercise, change in the display.
To turn off...
English Manual - Page 17
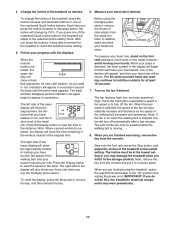
...have walked or run , indicators will adjust to the storage position. Note: After you press the buttons, it in minutes per mile.
Before using the treadmill, switch the reset/off " position and unplug the ...heart symbol in the display will appear, and then your heart rate when you are finished exercising, remove the key from the metal contacts. If you walk
or run , and the incline...
English Manual - Page 18
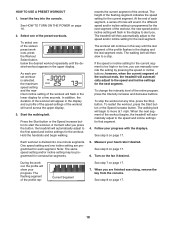
Select one incline setting are finished exercising, remove the key from the console.
Press the Start button or the Speed increase ...for that segment.
4. To stop .
During the workout, the profile will automatically adjust to alert you press the button, the treadmill will show your progress. HOW TO USE A PRESET WORKOUT
1. Insert the key into one of the sixteen preset workouts, press...
English Manual - Page 19

...the metal contacts are face-down and are finished exercising, remove the key from the iFit slot when you press the button, the treadmill will flash in the display and a profile of...Hold the handrails and begin to the first speed and incline settings of the workout begins, the treadmill will scroll across the upper display.
4.
Next, select an iFit workout by pressing the speed or...
English Manual - Page 20
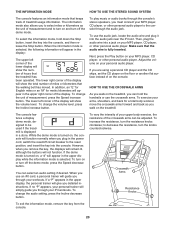
...the console. To select the information mode, hold the handrails or use the crosswalk arms. To exercise your personal trainer will show the volume level. When the information mode is...if the treadmill is selected.
While the demo mode is selected, the following information will show the total number of measurement, press the Speed increase button.
Crosswalk Arms
Resistance Knobs
To ...
English Manual - Page 21
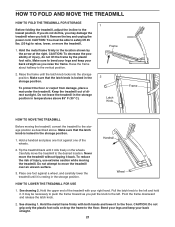
... the frame until it rolls freely on the wheels. Make sure that the latch knob is locked in the storage position. Make sure that the latch knob is locked in the storage position.
1. Tip the treadmill back until it is resting in the storage position. Hold the metal frame firmly with your back straight as you pull the...
English Manual - Page 24
...
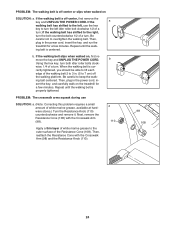
a
walking belt has shifted to the left idler roller bolt clockwise 1/2 of a turn ; ing belt centered. Next, remove the Resistance Cone (108) with the Crosswalk Arm (98) and the Resistance Knob (110).
98 108
24
If the walking belt slips when walked on the treadmill for a few minutes. Then, reattach the Resistance Cone with...
English Manual - Page 25
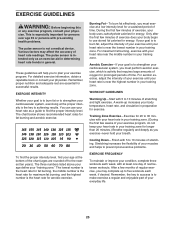
...To find the proper intensity level, find the proper intensity level. For maximum fat burning, exercise with at the bottom of rest between workouts.
Cooling Down-Finish with pre-existing health ... body temperature, heart rate, and circulation in your body uses carbohydrate calories for exercise. This is to plan your training zone. You can use stored fat calories for 20 ...
English Manual - Page 26

... Bolt #8 x 1/2" Screw #8 x 2" Screw #12 x 1 1/4" Screw Motor Bolt Belt Guide Screws 1/4" Flat Washer 1/4" Split Washer Cage Nut 3/8" Locknut 5/16" Flange Nut Hood Clip Small Cap Hex Key 5/32" Hex Key Left Foot Rail Foot Rail Decal Latch Warning Decal Platform Cushion Walking Platform Walking Belt Belt Guide Frame Cap Frame Spacer 1/4" x 1" Bolt Drive Roller/Pulley Magnet Latch Cap Storage Latch...
English Manual - Page 27

...
Left Handrail Access Door Key/Clip Handrail Cap Right Handrail Lift Motor Wire Console Wire Tie Resistance Cone Console Fan Resistance Knob
Key No. Description
Upright Insert 3/8" x 4 3/4" Bolt iFit Card French Latch Decal 4" Green Wire, M/R 8" Blue Wire, M/F 10" Blue Wire, 2F 12" Red Wire, M/F 10" Black Wire, M/F Userʼs Manual
Note: Specifications are...
English Manual - Page 32
... original purchaser. All repairs for commercial or rental purposes; products used as store display models. No other warranties, and any implied warranties of merchantability or fitness for a particular purpose are limited in workmanship and material, under this warranty is in lieu of any damage to a product caused by ICON. ICON is...
Similar Questions

Hi There, We Have The Crosswalk Rt.5.0, My Wife Says The Speed On The Screen Doe
Is it possible to do a factory reset, or have it recalibrate itself?Thank you
Is it possible to do a factory reset, or have it recalibrate itself?Thank you
(Posted by liamhaniffy 2 years ago)

How Can Iopen The Side Panels The Shaft Came Off.
(Posted by Anonymous-169432 2 years ago)

Hi I Need To Buy A Latch Knob For Reebok V 6.80
latch knob for Reebok V 6.80
latch knob for Reebok V 6.80
(Posted by Anonymous-166252 3 years ago)

Reebok V7.90 Won't Turn On
Reebok V7.90 that's been in storage for a couple years will not turn on. Given to me and I know noth...
Reebok V7.90 that's been in storage for a couple years will not turn on. Given to me and I know noth...
(Posted by Vonboder 9 years ago)

My Crosswalk Belt Is Riding To The Left What Shall I Do To Center It Trhank You.
(Posted by lou638 10 years ago)