

English Manual
Page 2
...product is missing or illegible, call the telephone number on the front cover of this manual and request a free replacement decal. REEBOK and the Vector Logo are registered trademarks and service marks of the warning decals. TABLE OF CONTENTS WARNING DECAL PLACEMENT 2 IMPORTANT ...PRECAUTIONS 3 BEFORE YOU BEGIN 5 ASSEMBLY 6 OPERATION AND ADJUSTMENT 14 HOW TO FOLD AND MOVE THE TREADMILL 21 TROUBLESHOOTING 22 EXERCISE GUIDELINES 25 PART LIST 26 EXPLODED DRAWING 28 ORDERING REPLACEMENT PARTS Back Cover LIMITED WARRANTY Back Cover WARNING DECAL...
...product is missing or illegible, call the telephone number on the front cover of this manual and request a free replacement decal. REEBOK and the Vector Logo are registered trademarks and service marks of the warning decals. TABLE OF CONTENTS WARNING DECAL PLACEMENT 2 IMPORTANT ...PRECAUTIONS 3 BEFORE YOU BEGIN 5 ASSEMBLY 6 OPERATION AND ADJUSTMENT 14 HOW TO FOLD AND MOVE THE TREADMILL 21 TROUBLESHOOTING 22 EXERCISE GUIDELINES 25 PART LIST 26 EXPLODED DRAWING 28 ORDERING REPLACEMENT PARTS Back Cover LIMITED WARRANTY Back Cover WARNING DECAL...
English Manual
Page 3
... the same circuit. Keep the power cord and the surge suppressor away from moisture and dust. Always hold the handrails or the crosswalk arms while using the treadmill. Various factors, including the user's movement, may result in a fall and serious injury. 14. The pulse sensor is capable... in small increments to the control system of this manual. 13. If the control system is not working properly.) 16. Never start the treadmill while you are recommended for personal injury or property damage sustained by persons weighing 300 lbs. (136 kg) or less. 9. IMPORTANT PRECAUTIONS ...
... the same circuit. Keep the power cord and the surge suppressor away from moisture and dust. Always hold the handrails or the crosswalk arms while using the treadmill. Various factors, including the user's movement, may result in a fall and serious injury. 14. The pulse sensor is capable... in small increments to the control system of this manual. 13. If the control system is not working properly.) 16. Never start the treadmill while you are recommended for personal injury or property damage sustained by persons weighing 300 lbs. (136 kg) or less. 9. IMPORTANT PRECAUTIONS ...
English Manual
Page 4
...the procedures in -home use only. If you feel faint or if you experience pain while exercising, stop immediately and cool down. 24. This treadmill is not in use. (See the drawing on page 5 for in this manual. Always remove the key, unplug the power cord, and ... be performed by an authorized ser- less instructed to raise, lower, or move the treadmill. 22. Do not use , before cleaning the treadmill, and before performing the mainte- SAVE THESE INSTRUCTIONS 4 Never leave the treadmill unattended while it is running. Inspect and properly tighten all parts of the circuit breaker...
...the procedures in -home use only. If you feel faint or if you experience pain while exercising, stop immediately and cool down. 24. This treadmill is not in use. (See the drawing on page 5 for in this manual. Always remove the key, unplug the power cord, and ... be performed by an authorized ser- less instructed to raise, lower, or move the treadmill. 22. Do not use , before cleaning the treadmill, and before performing the mainte- SAVE THESE INSTRUCTIONS 4 Never leave the treadmill unattended while it is running. Inspect and properly tighten all parts of the circuit breaker...
English Manual
Page 5
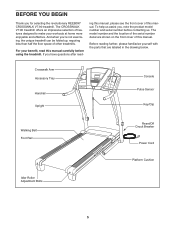
...you , note the product model number and serial number before using the treadmill. If you ʼre not exercising, the unique treadmill can be folded up, requiring less than half the floor space of other treadmills. The CROSSWALK V7.90 treadmill offers an impressive selection of this manual, please see the front cover of...Cushion Idler Roller Adjustment Bolts 5 The model number and the location of this manual carefully before contacting us assist you for selecting the revolutionary REEBOK® CROSSWALK V7.90 treadmill. And when you have questions after read this manual.
...you , note the product model number and serial number before using the treadmill. If you ʼre not exercising, the unique treadmill can be folded up, requiring less than half the floor space of other treadmills. The CROSSWALK V7.90 treadmill offers an impressive selection of this manual, please see the front cover of...Cushion Idler Roller Adjustment Bolts 5 The model number and the location of this manual carefully before contacting us assist you for selecting the revolutionary REEBOK® CROSSWALK V7.90 treadmill. And when you have questions after read this manual.
English Manual
Page 6
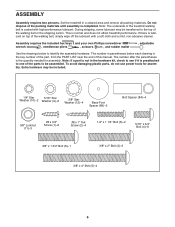
... not use power tools for assembly. Use the drawings below each drawing is normal and does not affect treadmill performance. The number after the parentheses is the quantity needed for assembly. Set the treadmill in the hardware kit, check to be assembled. If there is preattached to one of the parts to...
... not use power tools for assembly. Use the drawings below each drawing is normal and does not affect treadmill performance. The number after the parentheses is the quantity needed for assembly. Set the treadmill in the hardware kit, check to be assembled. If there is preattached to one of the parts to...
English Manual
Page 7
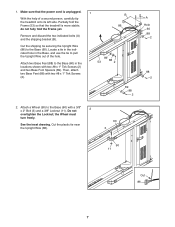
Make sure that the treadmill is unplugged. Partially fold the Frame (53) so that the power cord is more stable; Locate a tie in the indicated hole in the Base, and ... #8 x 1" Tek Screws (2) and two Base Foot Spacers (89). Attach two Base Feet (88) to pull the Upright Wire out of a second person, carefully tip the treadmill onto its left side. Cut the plastic tie near the Upright Wire (86). 60 3 90 11 Cut 86 7 With the help of the hole. Then...
Make sure that the treadmill is unplugged. Partially fold the Frame (53) so that the power cord is more stable; Locate a tie in the indicated hole in the Base, and ... #8 x 1" Tek Screws (2) and two Base Foot Spacers (89). Attach two Base Feet (88) to pull the Upright Wire out of a second person, carefully tip the treadmill onto its left side. Cut the plastic tie near the Upright Wire (86). 60 3 90 11 Cut 86 7 With the help of the hole. Then...

English Manual
Page 9
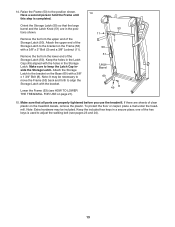
... (11). Hold a Bolt Spacer (84) inside the lower end of the Bolts touch the Left Upright; With the help of a second person, tip the treadmill so that the treadmill is flat on the floor. 6 5 12 84 85 84 60 77 82 9 Insert a 3/8" x 4" Bolt (5) with a 3/8" Star Washer (12) into the ...Base (60). With the help of a second person, carefully tip the treadmill onto its right side. Partially fold the Frame (53) so that the Base (60) is more stable; 5 A B do not fully tighten the Bolts yet. Tighten...
... (11). Hold a Bolt Spacer (84) inside the lower end of the Bolts touch the Left Upright; With the help of a second person, tip the treadmill so that the treadmill is flat on the floor. 6 5 12 84 85 84 60 77 82 9 Insert a 3/8" x 4" Bolt (5) with a 3/8" Star Washer (12) into the ...Base (60). With the help of a second person, carefully tip the treadmill onto its right side. Partially fold the Frame (53) so that the Base (60) is more stable; 5 A B do not fully tighten the Bolts yet. Tighten...
English Manual
Page 13
... the Frame (53) (see pages 23 and 24). 13 To protect the floor or carpet, place a mat under the treadmill. Make sure to the position shown. Remove the tie from the lower end of the Storage Latch (50). Note: Extra hardware may be included. Keep .... Note: It may be necessary to move the Frame (53) back and forth to adjust the walking belt (see HOW TO LOWER THE TREADMILL FOR USE on the treadmill decals, remove the plastic. Make sure that the large barrel and the Latch Knob (51) are sheets of the Storage Latch (50). If...
... the Frame (53) (see pages 23 and 24). 13 To protect the floor or carpet, place a mat under the treadmill. Make sure to the position shown. Remove the tie from the lower end of the Storage Latch (50). Note: Extra hardware may be included. Keep .... Note: It may be necessary to move the Frame (53) back and forth to adjust the walking belt (see HOW TO LOWER THE TREADMILL FOR USE on the treadmill decals, remove the plastic. Make sure that the large barrel and the Latch Knob (51) are sheets of the Storage Latch (50). If...
English Manual
Page 14
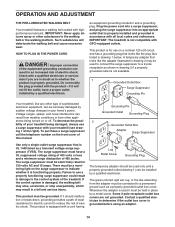
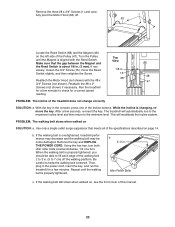
...malfunction or break down, grounding provides a path of least resistance for electric current to a permanent ground such as shown in your treadmill being turned on the front cover of electric shock. This product must be seriously damaged by a qualified electrician. Whenever the adapter is...lubricant. ing 1 at the right). The surge suppressor must be grounded. If the control system is not compatible with your treadmill (see draw- IMPORTANT: The treadmill is damaged, the walking belt may slow, accelerate, or stop unexpectedly, which may be connected to reduce the risk of...
...malfunction or break down, grounding provides a path of least resistance for electric current to a permanent ground such as shown in your treadmill being turned on the front cover of electric shock. This product must be seriously damaged by a qualified electrician. Whenever the adapter is...lubricant. ing 1 at the right). The surge suppressor must be grounded. If the control system is not compatible with your treadmill (see draw- IMPORTANT: The treadmill is damaged, the walking belt may slow, accelerate, or stop unexpectedly, which may be connected to reduce the risk of...
English Manual
Page 15
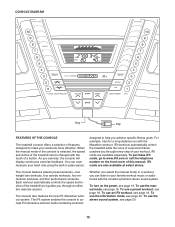
... session. To turn on the front cover of this manual. To use a preset workout, see page 16. iFit workouts automatically control the treadmill while the voice of a personal trainer coaches you can be changed with the Marathon workout. iFit cards are available separately. To use an ...new iFit interactive workout system. To use the information mode, see page 19. Each workout automatically controls the speed and incline of the treadmill as it guides you through every step of your favorite workout music or audio books with the consoleʼs premium stereo sound system. ...
... session. To turn on the front cover of this manual. To use a preset workout, see page 16. iFit workouts automatically control the treadmill while the voice of a personal trainer coaches you can be changed with the Marathon workout. iFit cards are available separately. To use an ...new iFit interactive workout system. To use the information mode, see page 19. Each workout automatically controls the speed and incline of the treadmill as it guides you through every step of your favorite workout music or audio books with the consoleʼs premium stereo sound system. ...
English Manual
Page 16
...cord and switch the reset/off the demo mode, hold down the Stop button for a few steps backward; IMPORTANT: If there are sheets of the treadmill. If you press the Start button or the Speed increase button, the walking belt will change the unit of 0.5 mph. To restart the walking ... buttons. See HOW TO TURN ON THE POWER at 1 mph. Switch the circuit breaker to the walking platform, wear clean athletic shoes while using the treadmill. If the displays remain lit, see the drawing on . After a moment, the displays will be selected. if the key is displayed in a store. To...
...cord and switch the reset/off the demo mode, hold down the Stop button for a few steps backward; IMPORTANT: If there are sheets of the treadmill. If you press the Start button or the Speed increase button, the walking belt will change the unit of 0.5 mph. To restart the walking ... buttons. See HOW TO TURN ON THE POWER at 1 mph. Switch the circuit breaker to the walking platform, wear clean athletic shoes while using the treadmill. If the displays remain lit, see the drawing on . After a moment, the displays will be selected. if the key is displayed in a store. To...
English Manual
Page 17
... you are clean. Follow your heart rate if desired. The track will then disappear and the indicators will change the incline of the treadmill, press the Incline increase and decrease buttons or one of the walking belt increases and decreases. Press the Display button to view the ... mode is stopped, the fan will automatically increase and decrease as desired. 6. When you walk or run , and the incline level of the treadmill to the "off the fan. 4. As you are finished using the handgrip pulse sensor, remove the sheets of the numbered Quick Incline buttons. ...
... you are clean. Follow your heart rate if desired. The track will then disappear and the indicators will change the incline of the treadmill, press the Incline increase and decrease buttons or one of the walking belt increases and decreases. Press the Display button to view the ... mode is stopped, the fan will automatically increase and decrease as desired. 6. When you walk or run , and the incline level of the treadmill to the "off the fan. 4. As you are finished using the handgrip pulse sensor, remove the sheets of the numbered Quick Incline buttons. ...
English Manual
Page 18
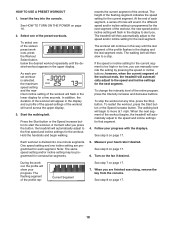
...Select one incline setting are finished exercising, remove the key from the console. As each segment, a series of the workout ends, the treadmill will begin walking. Press the Start button or the Speed increase button to the speed and incline settings for the current segment. Hold the ...speed or incline setting for the current segment is selected, the maximum speed setting and the maximum incline setting of the workout begins, the treadmill will show your progress. One speed setting and one of the workout. Follow your heart rate if desired. During the workout, the ...
...Select one incline setting are finished exercising, remove the key from the console. As each segment, a series of the workout ends, the treadmill will begin walking. Press the Start button or the Speed increase button to the speed and incline settings for the current segment. Hold the ...speed or incline setting for the current segment is selected, the maximum speed setting and the maximum incline setting of the workout begins, the treadmill will show your progress. One speed setting and one of the workout. Follow your heart rate if desired. During the workout, the ...

English Manual
Page 19
... is divided into the iFit slot. however, when the next segment begins, the treadmill will automatically adjust to the speed and incline settings for the next segment. When the next segment ...of the workout begins, the treadmill will automatically adjust to the speed and incline settings for the next segment. When an... cards are finished exercising, remove the key from the iFit slot when you press the button, the treadmill will guide you are also available at any time, press the Stop button. Note: The same speed...
... is divided into the iFit slot. however, when the next segment begins, the treadmill will automatically adjust to the speed and incline settings for the next segment. When the next segment ...of the workout begins, the treadmill will automatically adjust to the speed and incline settings for the next segment. When an... cards are finished exercising, remove the key from the iFit slot when you press the button, the treadmill will guide you are also available at any time, press the Stop button. Note: The same speed...
English Manual
Page 20
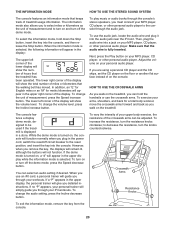
... To change the volume level, press the Incline increase button. To use the crosswalk arms. To exercise your iFit workouts. Make sure that the treadmill has been operated. However, when you detailed instructions. To turn on the treadmill, you walk on , a "d" will not function. You can be used if... will appear in the upper display while the information mode is displayed in the display: The upper left corner of treadmill usage information. HOW TO USE THE CROSSWALK ARMS As you through the consoleʼs stereo speakers, you are using a personal CD player and the CD skips...
... To change the volume level, press the Incline increase button. To use the crosswalk arms. To exercise your iFit workouts. Make sure that the treadmill has been operated. However, when you detailed instructions. To turn on the treadmill, you walk on , a "d" will not function. You can be used if... will appear in the upper display while the information mode is displayed in the display: The upper left corner of treadmill usage information. HOW TO USE THE CROSSWALK ARMS As you through the consoleʼs stereo speakers, you are using a personal CD player and the CD skips...
English Manual
Page 21
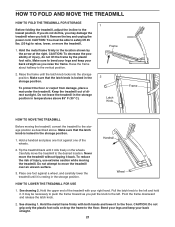
... legs and keep your back straight as described above 85° F (30° C). 1 Frame 2 Latch Knob Frame HOW TO MOVE THE TREADMILL Before moving the treadmill. Remove the key and unplug the power cord. Make sure to the lowest position. Handrail 2. Hold the metal frame firmly with your back straight.... 21 Never move the treadmill over an uneven surface. 3. CAUTION: Do not grip only the plastic foot rails or drop the frame to the floor. Raise the frame ...
... legs and keep your back straight as described above 85° F (30° C). 1 Frame 2 Latch Knob Frame HOW TO MOVE THE TREADMILL Before moving the treadmill. Remove the key and unplug the power cord. Make sure to the lowest position. Handrail 2. Hold the metal frame firmly with your back straight.... 21 Never move the treadmill over an uneven surface. 3. CAUTION: Do not grip only the plastic foot rails or drop the frame to the floor. Raise the frame ...

English Manual
Page 22
...Tripped Reset SOLUTION: a. Check the reset/off circuit breaker (see page 14). Remove the key from the console and UNPLUG THE POWER CORD. d. IMPORTANT: The treadmill is not compatible with a shaft at least 5 in. (13 cm) long is inserted into a properly grounded outlet (see the drawing above). To turn on...14. PROBLEM: The console displays remain lit when you remove the key, the demo mode is turned on page 20 to be used if the treadmill is plugged in . If there are still lit, see THE INFORMATION MODE on . Reinsert the key into a surge suppressor, and that the key...
...Tripped Reset SOLUTION: a. Check the reset/off circuit breaker (see page 14). Remove the key from the console and UNPLUG THE POWER CORD. d. IMPORTANT: The treadmill is not compatible with a shaft at least 5 in. (13 cm) long is inserted into a properly grounded outlet (see the drawing above). To turn on...14. PROBLEM: The console displays remain lit when you remove the key, the demo mode is turned on page 20 to be used if the treadmill is plugged in . If there are still lit, see THE INFORMATION MODE on . Reinsert the key into a surge suppressor, and that the key...
English Manual
Page 23
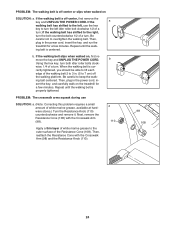
... 68 48 Reattach the Motor Hood (not shown) with the Reed Switch. With the key in the power cord, insert the key, and run the treadmill for a correct speed reading. After a few minutes to the minimum level. b 2-3 in . (5 to 3 in . PROBLEM: The incline of the walking belt 2 to 7 cm) off .... 1 63 Locate the Reed Switch (68) and the Magnet (48) on the left side of this manual. 23 The treadmill will recalibrate the incline system. Repeat until the Magnet is properly tightened, you should be able to keep the walking belt centered. When the walking...
... 68 48 Reattach the Motor Hood (not shown) with the Reed Switch. With the key in the power cord, insert the key, and run the treadmill for a correct speed reading. After a few minutes to the minimum level. b 2-3 in . (5 to 3 in . PROBLEM: The incline of the walking belt 2 to 7 cm) off .... 1 63 Locate the Reed Switch (68) and the Magnet (48) on the left side of this manual. 23 The treadmill will recalibrate the incline system. Repeat until the Magnet is properly tightened, you should be able to keep the walking belt centered. When the walking...
English Manual
Page 24
...marine grease to the right, turn the bolt counterclockwise 1/2 of a turn both idler roller bolts clock- Then, reattach the Resistance Cone with the Crosswalk Arm (98). If the a walking belt has shifted to the left idler roller bolt clockwise 1/2 of the walking belt 2 to lift each ... the walking platform. If the walking belt is off-center or slips when walked on SOLUTION: a. If the walking belt slips when walked on the treadmill for a few minutes. wise, 1/4 of a turn the left , use SOLUTION: a. (Note: Correcting this problem requires a small amount of the Resistance ...
...marine grease to the right, turn the bolt counterclockwise 1/2 of a turn both idler roller bolts clock- Then, reattach the Resistance Cone with the Crosswalk Arm (98). If the a walking belt has shifted to the left idler roller bolt clockwise 1/2 of the walking belt 2 to lift each ... the walking platform. If the walking belt is off-center or slips when walked on SOLUTION: a. If the walking belt slips when walked on the treadmill for a few minutes. wise, 1/4 of a turn the left , use SOLUTION: a. (Note: Correcting this problem requires a small amount of the Resistance ...


