

English Manual
Page 1
www.reebokfitness.com If you have questions, or if parts are damaged or missing, PLEASE CONTACT OUR CUSTOMER SERVICE DEPARTMENT DIRECTLY. Serial Number Decal QUESTIONS? CALL TOLL-FREE: 1-888-936-4266 Mon.-Fri., 7:30 until 16:30 ET (excluding holidays) OR E-MAIL US: [email protected] USER'S MANUAL CAUTION Read all precautions and instructions in the space above for future reference. Save this equipment. Model No. RCTL07809.0 Serial No. Write the serial number in this manual before using this manual for reference.
www.reebokfitness.com If you have questions, or if parts are damaged or missing, PLEASE CONTACT OUR CUSTOMER SERVICE DEPARTMENT DIRECTLY. Serial Number Decal QUESTIONS? CALL TOLL-FREE: 1-888-936-4266 Mon.-Fri., 7:30 until 16:30 ET (excluding holidays) OR E-MAIL US: [email protected] USER'S MANUAL CAUTION Read all precautions and instructions in the space above for future reference. Save this equipment. Model No. RCTL07809.0 Serial No. Write the serial number in this manual before using this manual for reference.

English Manual
Page 2
...manual and request a free replacement decal. If a decal is manufactured and distributed under license from Reebok International. 2 Apply the decal in the location shown. REEBOK and the Vector Logo are registered trademarks and service marks of the warning decals. Note: The ... BEFORE YOU BEGIN 5 ASSEMBLY 6 OPERATION AND ADJUSTMENT 14 HOW TO FOLD AND MOVE THE TREADMILL 21 TROUBLESHOOTING 22 EXERCISE GUIDELINES 25 PART LIST 26 EXPLODED DRAWING 28 ORDERING REPLACEMENT PARTS Back Cover LIMITED WARRANTY Back Cover WARNING DECAL PLACEMENT This drawing shows the locations of...
...manual and request a free replacement decal. If a decal is manufactured and distributed under license from Reebok International. 2 Apply the decal in the location shown. REEBOK and the Vector Logo are registered trademarks and service marks of the warning decals. Note: The ... BEFORE YOU BEGIN 5 ASSEMBLY 6 OPERATION AND ADJUSTMENT 14 HOW TO FOLD AND MOVE THE TREADMILL 21 TROUBLESHOOTING 22 EXERCISE GUIDELINES 25 PART LIST 26 EXPLODED DRAWING 28 ORDERING REPLACEMENT PARTS Back Cover LIMITED WARRANTY Back Cover WARNING DECAL PLACEMENT This drawing shows the locations of...
English Manual
Page 4
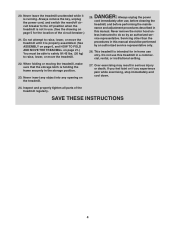
... intended for the location of the treadmill regularly. This treadmill is not in use. (See the drawing on page 5 for in a commercial, rental, or institutional setting. 27. Inspect and properly tighten all parts of the circuit breaker.) 21. nance and adjustment procedures described ...in this manual. SAVE THESE INSTRUCTIONS 4 When folding or moving the treadmill, make sure that the storage latch is running. Always unplug the...
... intended for the location of the treadmill regularly. This treadmill is not in use. (See the drawing on page 5 for in a commercial, rental, or institutional setting. 27. Inspect and properly tighten all parts of the circuit breaker.) 21. nance and adjustment procedures described ...in this manual. SAVE THESE INSTRUCTIONS 4 When folding or moving the treadmill, make sure that the storage latch is running. Always unplug the...
English Manual
Page 5
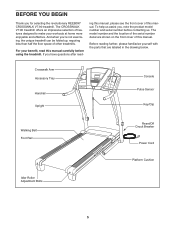
...parts that are shown on the front cover of this manual. Crosswalk Arm Accessory Tray Handrail Upright Console Pulse Sensor Key/Clip Walking Belt Foot Rail Reset/Off Circuit Breaker Power Cord Platform Cushion Idler Roller Adjustment Bolts 5 And when you for selecting the revolutionary REEBOK® CROSSWALK V7.90 treadmill.... BEFORE YOU BEGIN Thank you ʼre not exercising, the unique treadmill can be folded up, requiring less than half the floor space...
...parts that are shown on the front cover of this manual. Crosswalk Arm Accessory Tray Handrail Upright Console Pulse Sensor Key/Clip Walking Belt Foot Rail Reset/Off Circuit Breaker Power Cord Platform Cushion Idler Roller Adjustment Bolts 5 And when you for selecting the revolutionary REEBOK® CROSSWALK V7.90 treadmill.... BEFORE YOU BEGIN Thank you ʼre not exercising, the unique treadmill can be folded up, requiring less than half the floor space...
English Manual
Page 6
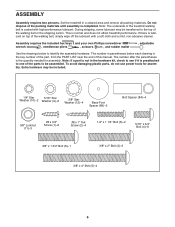
.... Assembly requires the included hex keys and your own Phillips screwdriver wrench , needlenose pliers , scissors , and rubber mallet , adjustable . Set the treadmill in the hardware kit, check to see if it is coated with a soft cloth and a mild, non-abrasive cleaner. Use the drawings below ...each drawing is the key number of the part, from the PART LIST near the end of the treadmill walking belt is preattached to identify the assembly hardware. The number after the parentheses is normal and does not affect...
.... Assembly requires the included hex keys and your own Phillips screwdriver wrench , needlenose pliers , scissors , and rubber mallet , adjustable . Set the treadmill in the hardware kit, check to see if it is coated with a soft cloth and a mild, non-abrasive cleaner. Use the drawings below ...each drawing is the key number of the part, from the PART LIST near the end of the treadmill walking belt is preattached to identify the assembly hardware. The number after the parentheses is normal and does not affect...
English Manual
Page 13
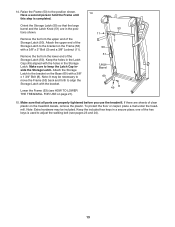
...the Storage Latch. Orient the Storage Latch (50) so that all parts are properly tightened before you use the treadmill. Keep the holes in the Latch Cap (49) aligned with the bracket. To protect the floor or carpet, place a mat under the treadmill. one of the Storage Latch (50). Attach the upper end... Note: It may be necessary to move the Frame (53) back and forth to adjust the walking belt (see HOW TO LOWER THE TREADMILL FOR USE on the treadmill decals, remove the plastic. Note: Extra hardware may be included. Make sure that the large barrel and the Latch Knob (51) are ...
...the Storage Latch. Orient the Storage Latch (50) so that all parts are properly tightened before you use the treadmill. Keep the holes in the Latch Cap (49) aligned with the bracket. To protect the floor or carpet, place a mat under the treadmill. one of the Storage Latch (50). Attach the upper end... Note: It may be necessary to move the Frame (53) back and forth to adjust the walking belt (see HOW TO LOWER THE TREADMILL FOR USE on the treadmill decals, remove the plastic. Note: Extra hardware may be included. Make sure that the large barrel and the Latch Knob (51) are ...
English Manual
Page 25
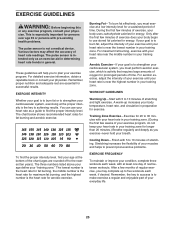
... is near the middle number in your body temperature, heart rate, and circulation in general. If your goal is to make exercise a regular and enjoyable part of your body begin to 10 minutes of your exercise until your heart rate is intended only as an exercise aid in determining heart rate...
... is near the middle number in your body temperature, heart rate, and circulation in general. If your goal is to make exercise a regular and enjoyable part of your body begin to 10 minutes of your exercise until your heart rate is intended only as an exercise aid in determining heart rate...

English Manual
Page 26
... Platform Walking Belt Belt Guide Frame Cap Frame Spacer 1/4" x 1" Bolt Drive Roller/Pulley Magnet Latch Cap Storage Latch Key No. RCTL07809.0 R1009A To locate the parts listed below, see the EXPLODED DRAWING near the end of this manual. Key No. Qty. 51 1 52 1 53 1 54 2 55 1 56 2 57 1 58 2 59 ... 90 2 91 4 92 2 93 10 94 1 95 1 96 1 97 1 98 2 99 1 100 1 Description Latch Knob Right Foot Rail Frame Roller Bracket Idler Roller Ground Wire Crosswalk Arm Handgrip Right Rear Foot Resistance Cone Insert Left Rear Foot Base Idler Roller Hood Accent Motor Hood Lift Frame Lift Frame Ground Wire Drive...
... Platform Walking Belt Belt Guide Frame Cap Frame Spacer 1/4" x 1" Bolt Drive Roller/Pulley Magnet Latch Cap Storage Latch Key No. RCTL07809.0 R1009A To locate the parts listed below, see the EXPLODED DRAWING near the end of this manual. Key No. Qty. 51 1 52 1 53 1 54 2 55 1 56 2 57 1 58 2 59 ... 90 2 91 4 92 2 93 10 94 1 95 1 96 1 97 1 98 2 99 1 100 1 Description Latch Knob Right Foot Rail Frame Roller Bracket Idler Roller Ground Wire Crosswalk Arm Handgrip Right Rear Foot Resistance Cone Insert Left Rear Foot Base Idler Roller Hood Accent Motor Hood Lift Frame Lift Frame Ground Wire Drive...

English Manual
Page 27
..., 2F 12" Red Wire, M/F 10" Black Wire, M/F Userʼs Manual Note: Specifications are not illustrated. 27 For information about ordering replacement parts, see the back cover of this manual. *These parts are subject to change without notice. Qty. 101 1 102 1 103 1 104 4 105 1 106 1 107 1 108 2 109 1 110 2 Description Left Handrail Access...
..., 2F 12" Red Wire, M/F 10" Black Wire, M/F Userʼs Manual Note: Specifications are not illustrated. 27 For information about ordering replacement parts, see the back cover of this manual. *These parts are subject to change without notice. Qty. 101 1 102 1 103 1 104 4 105 1 106 1 107 1 108 2 109 1 110 2 Description Left Handrail Access...
English Manual
Page 32
...to any implied warranties of merchantability or fitness for commercial or rental purposes; ICON of whatsoever nature. Jérôme, QC J7Y 4B8 Part No. 291734 R1009A Printed in lieu of any and all other consequential damages of Canada, Inc., 900 de lʼIndustrie, St. ...purchase. or other warranties, and any damage to a product caused by or attributable to the original purchaser. ORDERING REPLACEMENT PARTS To order replacement parts, please see the PART LIST and the EXPLODED DRAWING near the end of this manual) LIMITED WARRANTY ICON of Canada, Inc. (ICON) warrants...
...to any implied warranties of merchantability or fitness for commercial or rental purposes; ICON of whatsoever nature. Jérôme, QC J7Y 4B8 Part No. 291734 R1009A Printed in lieu of any and all other consequential damages of Canada, Inc., 900 de lʼIndustrie, St. ...purchase. or other warranties, and any damage to a product caused by or attributable to the original purchaser. ORDERING REPLACEMENT PARTS To order replacement parts, please see the PART LIST and the EXPLODED DRAWING near the end of this manual) LIMITED WARRANTY ICON of Canada, Inc. (ICON) warrants...


