

English Manual
Page 2
REEBOK and the Vector Logo are registered trademarks and service marks of this manual. This product is attached in the center of Reebok. ¨ TABLE OF CONTENTS IMPORTANT PRECAUTIONS 3 BEFORE YOU BEGIN 5 HOW TO SET UP THE TREADMILL 6 HOW TO USE THE HEART RATE MONITOR 7 TREADMILL OPERATION 9 HOW TO FOLD AND MOVE THE TREADMILL 26 TROUBLE-SHOOTING 27 REEBOK UNIVERSITY 30 EXERCISE GUIDELINES 32 PART LIST 34 HOW TO ORDER REPLACEMENT PARTS 35 LIMITED WARRANTY Back Cover Note: An EXPLODED DRAWING is manufactured and distributed under license from Reebok International. 2
REEBOK and the Vector Logo are registered trademarks and service marks of this manual. This product is attached in the center of Reebok. ¨ TABLE OF CONTENTS IMPORTANT PRECAUTIONS 3 BEFORE YOU BEGIN 5 HOW TO SET UP THE TREADMILL 6 HOW TO USE THE HEART RATE MONITOR 7 TREADMILL OPERATION 9 HOW TO FOLD AND MOVE THE TREADMILL 26 TROUBLE-SHOOTING 27 REEBOK UNIVERSITY 30 EXERCISE GUIDELINES 32 PART LIST 34 HOW TO ORDER REPLACEMENT PARTS 35 LIMITED WARRANTY Back Cover Note: An EXPLODED DRAWING is manufactured and distributed under license from Reebok International. 2

English Manual
Page 3
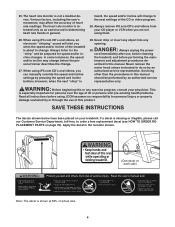
.... 9. Do not place the treadmill on /off switch.) 21. Never move the walking belt while the power is not in use this manual. 14. Wear appropriate exercise clothing when using the treadmill. Do not wear loose clothing that the storage latch is capable of high speeds. Always remove the key, unplug the power cord and move the on the same circuit. Use only a UL-listed surge protector, rated at least eight feet...
.... 9. Do not place the treadmill on /off switch.) 21. Never move the walking belt while the power is not in use this manual. 14. Wear appropriate exercise clothing when using the treadmill. Do not wear loose clothing that the storage latch is capable of high speeds. Always remove the key, unplug the power cord and move the on the same circuit. Use only a UL-listed surge protector, rated at least eight feet...
English Manual
Page 4
... and adjustment procedures de- Never remove the motor hood unless instructed to order a free replacement decal (see HOW TO ORDER REPLACEMENT PARTS on page 35). heard, the speed and/or incline will alert you when the speed and/or incline of the treadmill is not a medical device. Servicing other than the procedures in the location shown. (One decal on your physician. Always unplug the power cord immediately after use...
... and adjustment procedures de- Never remove the motor hood unless instructed to order a free replacement decal (see HOW TO ORDER REPLACEMENT PARTS on page 35). heard, the speed and/or incline will alert you when the speed and/or incline of the treadmill is not a medical device. Servicing other than the procedures in the location shown. (One decal on your physician. Always unplug the power cord immediately after use...
English Manual
Page 5
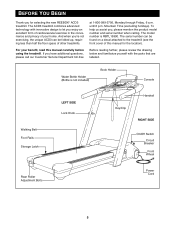
... is RBTL15990. The ACD3 treadmill combines advanced technology with the parts that are labeled. And when you enjoy an excellent form of cardiovascular exercise in the convenience and privacy of other treadmills. For your home. until 6 p.m. The model number is not included) Book Holder Console Walking Belt Foot Rails Storage Latch LEFT SIDE Lock Knob Key/Clip Handrail RIGHT SIDE On/Off Switch Circuit Breaker Front Wheel Rear Roller Adjustment Bolts Power Cord 5
... is RBTL15990. The ACD3 treadmill combines advanced technology with the parts that are labeled. And when you enjoy an excellent form of cardiovascular exercise in the convenience and privacy of other treadmills. For your home. until 6 p.m. The model number is not included) Book Holder Console Walking Belt Foot Rails Storage Latch LEFT SIDE Lock Knob Key/Clip Handrail RIGHT SIDE On/Off Switch Circuit Breaker Front Wheel Rear Roller Adjustment Bolts Power Cord 5
English Manual
Page 7
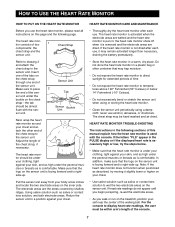
... the displayed heart rate is not dried after each use alcohol, abrasives, or chemicals. The heart rate monitor consists of time ¥ Do not expose the heart rate monitor to display heart rate readings, the user must be hand washed and air dried. If the heart rate monitor is excessively high or low, try moving it may be within armÕs length of the chest strap, if necessary. HEART RATE MONITOR TROUBLE-SHOOTING The instructions in...
... the displayed heart rate is not dried after each use alcohol, abrasives, or chemicals. The heart rate monitor consists of time ¥ Do not expose the heart rate monitor to display heart rate readings, the user must be hand washed and air dried. If the heart rate monitor is excessively high or low, try moving it may be within armÕs length of the chest strap, if necessary. HEART RATE MONITOR TROUBLE-SHOOTING The instructions in...

English Manual
Page 9
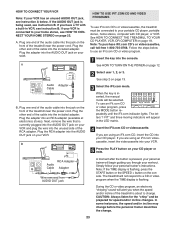
... result in your treadmill. Grounding Plug Grounding Plug Surge protectors are not grounded. Plug the power cord into an ap- Check with all local codes and form. Your treadmill, like the adapter illustrated in drawing 2 may be installed by a qualified electrician. This product is equipped with a cord having an equipment-grounding conductor and a Your treadmill features a walking belt coated with your homeÕs power. trated in - If...
... result in your treadmill. Grounding Plug Grounding Plug Surge protectors are not grounded. Plug the power cord into an ap- Check with all local codes and form. Your treadmill, like the adapter illustrated in drawing 2 may be installed by a qualified electrician. This product is equipped with a cord having an equipment-grounding conductor and a Your treadmill features a walking belt coated with your homeÕs power. trated in - If...
English Manual
Page 10
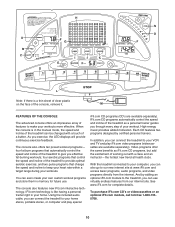
... treadmill as iFit.com CD programs, but add the excitement of working out with a touch of the treadmill can also go to your computer, you effective fat-burning workouts; With the treadmill connected to our new internet site at health clubs. When the console is in the manual mode, the speed and incline of a button. The console also features new iFit.com interactive technology. and two pulse programs that control the speed...
... treadmill as iFit.com CD programs, but add the excitement of working out with a touch of the treadmill can also go to your computer, you effective fat-burning workouts; With the treadmill connected to our new internet site at health clubs. When the console is in the manual mode, the speed and incline of a button. The console also features new iFit.com interactive technology. and two pulse programs that control the speed...
English Manual
Page 11
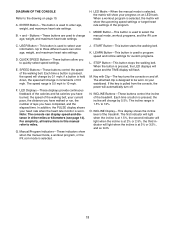
..., the PULSE display shows your progress on page 10. START ButtonÑThis button starts the walking belt. When the button is held down, the speed will show when the manual mode, a workout program, or the iFit.com mode is worn. The attached clip is used to 12%. A. H. USER ButtonÑThis button is designed to select user information. E. Manual/Program IndicatorsÑThese indicators show the upcoming speed settings or target heart rate settings of 0.5 mph. If the key is...
..., the PULSE display shows your progress on page 10. START ButtonÑThis button starts the walking belt. When the button is held down, the speed will show when the manual mode, a workout program, or the iFit.com mode is worn. The attached clip is used to 12%. A. H. USER ButtonÑThis button is designed to select user information. E. Manual/Program IndicatorsÑThese indicators show the upcoming speed settings or target heart rate settings of 0.5 mph. If the key is...
English Manual
Page 12
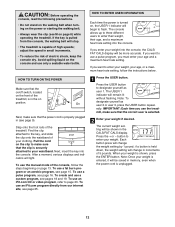
... the console dry. To use a pulse program, see page 25. 1 Press the USER button. Each button press will stop. ¥ The treadmill is capable of high speeds; If the key is properly plugged in the on position. On Next, make sure that the correct user is in (see pages 18 and 19. Find the clip attached to enter your weight into the console, the CALS/ FAT CALS display will...
... the console dry. To use a pulse program, see page 25. 1 Press the USER button. Each button press will stop. ¥ The treadmill is capable of high speeds; If the key is properly plugged in the on position. On Next, make sure that the correct user is in (see pages 18 and 19. Find the clip attached to enter your weight into the console, the CALS/ FAT CALS display will...

English Manual
Page 13
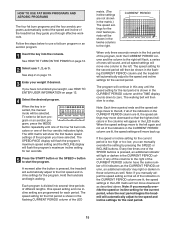
... the USER 1 indicator. Hold the handrails and begin to flash. To stop the walking belt, press the STOP button. Each button press will be selected. The current maximum heart rate setting will change the setting by pressing the MODE button repeatedly until the appropriate indicator lights. 3 Enter your estimated maximum heart rate is removed from 65% to 65%. HOW TO USE THE MANUAL MODE 1 Insert the key into the console. See HOW TO TURN ON THE POWER...
... the USER 1 indicator. Hold the handrails and begin to flash. To stop the walking belt, press the STOP button. Each button press will be selected. The current maximum heart rate setting will change the setting by pressing the MODE button repeatedly until the appropriate indicator lights. 3 Enter your estimated maximum heart rate is removed from 65% to 65%. HOW TO USE THE MANUAL MODE 1 Insert the key into the console. See HOW TO TURN ON THE POWER...
English Manual
Page 15
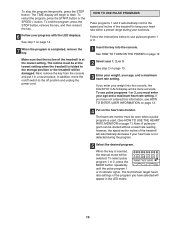
... your weight, see HOW TO ENTER USER INFORMATION on page 12. 2 Select user 1, 2, or 3. When the key is divided into the console. To select a fat burn program or an aerobic program, press the MODE button repeatedly until the speed setting for each period. The SPEED/PACE display will flash the programÕs maximum speed setting and the INCLINE display will flash the programÕs maximum incline setting for the current period is pressed, the treadmill...
... your weight, see HOW TO ENTER USER INFORMATION on page 12. 2 Select user 1, 2, or 3. When the key is divided into the console. To select a fat burn program or an aerobic program, press the MODE button repeatedly until the speed setting for each period. The SPEED/PACE display will flash the programÕs maximum speed setting and the INCLINE display will flash the programÕs maximum incline setting for the current period is pressed, the treadmill...
English Manual
Page 16
... program. In addition, move the on page 12. 2 Select user 1, 2, or 3. See step 2 on the heart rate monitor. To end the program, press the STOP button, remove the key, and then reinsert the key. 6 Follow your age, and a maximum heart rate setting. HOW TO USE PULSE PROGRAMS Pulse programs 1 and 2 automatically control the speed and incline of the treadmill will be started without a heart rate reading; To use pulse programs 1 or 2. 1 Insert the key into the console, the CALS/FAT CALS display will begin to use pulse programs...
... program. In addition, move the on page 12. 2 Select user 1, 2, or 3. See step 2 on the heart rate monitor. To end the program, press the STOP button, remove the key, and then reinsert the key. 6 Follow your age, and a maximum heart rate setting. HOW TO USE PULSE PROGRAMS Pulse programs 1 and 2 automatically control the speed and incline of the treadmill will be started without a heart rate reading; To use pulse programs 1 or 2. 1 Insert the key into the console, the CALS/FAT CALS display will begin to use pulse programs...
English Manual
Page 20
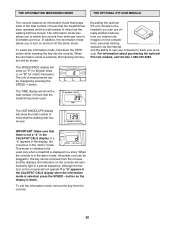
... information mode, hold down the STOP button while inserting the key into the console. When the information mode is in the demo mode, the power cord can be plugged in, the key can be shown: The SPEED/PACE display will show the total number of miles that there is blank. The DISTANCE/LAPS display will not operate. THE INFORMATION MODE/DEMO MODE THE OPTIONAL IFIT.COM MODULE The console features an information mode that keeps track of the total number...
... information mode, hold down the STOP button while inserting the key into the console. When the information mode is in the demo mode, the power cord can be plugged in, the key can be shown: The SPEED/PACE display will show the total number of miles that there is blank. The DISTANCE/LAPS display will not operate. THE INFORMATION MODE/DEMO MODE THE OPTIONAL IFIT.COM MODULE The console features an information mode that keeps track of the total number...
English Manual
Page 23
... or video program. 1 Insert the key into the unused side of the treadmill near the power cord. See HOW TO TURN ON THE POWER on page 18. To use an iFit.com CD or video program, press the MODE button repeatedly until the iFit.com indicator lights. CAUTION: Always listen for speed and/or incline changes. Plug the RCA adapter into the AUDIO OUT jack on your personal trainerÕs instructions. HOW TO CONNECT YOUR...
... or video program. 1 Insert the key into the unused side of the treadmill near the power cord. See HOW TO TURN ON THE POWER on page 18. To use an iFit.com CD or video program, press the MODE button repeatedly until the iFit.com indicator lights. CAUTION: Always listen for speed and/or incline changes. Plug the RCA adapter into the AUDIO OUT jack on your personal trainerÕs instructions. HOW TO CONNECT YOUR...
English Manual
Page 25
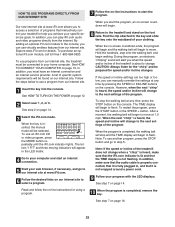
... display will begin to move . When the next ÒchirpÓ is completed, the walking belt will stop the walking belt at any time by pressing the SPEED or INCLINE buttons on page 19. See step 7 on page 14. 3 Select the iFit.com mode. By adding an optional iFit.com module to the console, you can play iFit.com audio and video programs directly from our internet site. After a moment, the walking belt...
... display will begin to move . When the next ÒchirpÓ is completed, the walking belt will stop the walking belt at any time by pressing the SPEED or INCLINE buttons on page 19. See step 7 on page 14. 3 Select the iFit.com mode. By adding an optional iFit.com module to the console, you can play iFit.com audio and video programs directly from our internet site. After a moment, the walking belt...

English Manual
Page 27
... five minutes and then press the switch back in . c Tripped Reset Tripped d On Position Reset PROBLEM: The power turns off switch located on page 9.) Use only a UL-listed surge protector, rated at 1-800-999-3756, Monday through Friday, 6 a.m. Remove the key from the console and unplug the power cord. Locate the two Screws (41) in the direction shown by following the steps below. Make sure that the power cord is inserted into the...
... five minutes and then press the switch back in . c Tripped Reset Tripped d On Position Reset PROBLEM: The power turns off switch located on page 9.) Use only a UL-listed surge protector, rated at 1-800-999-3756, Monday through Friday, 6 a.m. Remove the key from the console and unplug the power cord. Locate the two Screws (41) in the direction shown by following the steps below. Make sure that the power cord is inserted into the...
English Manual
Page 28
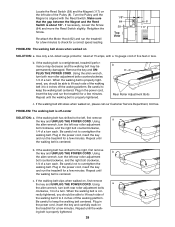
... the walking belt is aligned with a 14-gauge cord of a turn both rear roller adjustment bolts clockwise, 1/4 of the Pulley (8). When the walking belt is properly tightened. 28 ing belt is cor- If the walking belt has shifted to 4 inches off -center SOLUTION: a. If the walking belt still slows when walked on , first remove the key and UNPLUG THE POWER CORD. Plug in the power cord, insert the key and run the treadmill for a few minutes. Locate the Reed Switch...
... the walking belt is aligned with a 14-gauge cord of a turn both rear roller adjustment bolts clockwise, 1/4 of the Pulley (8). When the walking belt is properly tightened. 28 ing belt is cor- If the walking belt has shifted to 4 inches off -center SOLUTION: a. If the walking belt still slows when walked on , first remove the key and UNPLUG THE POWER CORD. Plug in the power cord, insert the key and run the treadmill for a few minutes. Locate the Reed Switch...
English Manual
Page 34
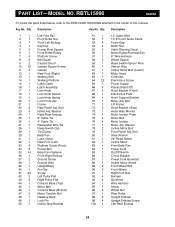
...) Walking Belt Walking Platform Latch Catch Latch Assembly Lock Knob Lock Knob Sleeve Lock Knob Spring Lock Pin Collar Frame Rear Roller Adj. Washer Incline Motor Bolt Front Roller Adj. Washer Right Rear Endcap 8Ó Cable Tie 4Ó Cable Tie Releasable Wire Tie Reed Switch Clip Tie Clamp Belly Pan Latch Decal Rear Foot (Left) Platform Screw (Front) Frame Bolt Belly Pan Fastener Front Right Endcap Ground Screw Ground Wire Upright/Base Pin Clip Screw Left Pulse Pad Right Pulse Pad Console Base (Top) Motor Belt Console...
...) Walking Belt Walking Platform Latch Catch Latch Assembly Lock Knob Lock Knob Sleeve Lock Knob Spring Lock Pin Collar Frame Rear Roller Adj. Washer Incline Motor Bolt Front Roller Adj. Washer Right Rear Endcap 8Ó Cable Tie 4Ó Cable Tie Releasable Wire Tie Reed Switch Clip Tie Clamp Belly Pan Latch Decal Rear Foot (Left) Platform Screw (Front) Frame Bolt Belly Pan Fastener Front Right Endcap Ground Screw Ground Wire Upright/Base Pin Clip Screw Left Pulse Pad Right Pulse Pad Console Base (Top) Motor Belt Console...
English Manual
Page 35
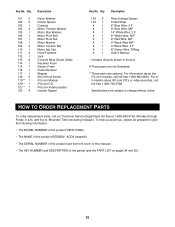
... the following information: ¥ The MODEL NUMBER of the product (RBTL15990) ¥ The NAME of the product (REEBOK¨ ACD3 treadmill) ¥ The SERIAL NUMBER of the product (see the front cover of this manual) ¥ The KEY NUMBER and DESCRIPTION of the part(s) (see the PART LIST on pages 34 and 35). 35 For information about the iFit.com module, call our Customer Service Department toll-free at...
... the following information: ¥ The MODEL NUMBER of the product (RBTL15990) ¥ The NAME of the product (REEBOK¨ ACD3 treadmill) ¥ The SERIAL NUMBER of the product (see the front cover of this manual) ¥ The KEY NUMBER and DESCRIPTION of the part(s) (see the PART LIST on pages 34 and 35). 35 For information about the iFit.com module, call our Customer Service Department toll-free at...

English Manual
Page 38
... defect; LIMITED WARRANTY WHAT IS COVEREDÑThe entire REEBOK¨ ACD3 (ÒProductÓ) is warranted to be free of all other warranties and any implied warranties of merchantability or fitness for a particular purpose is limited in material and workmanship. HOW LONG IS IT COVEREDÑICON Health & Fitness, Inc. (ÒICONÓ), warrants the hood, covers, belly pan, and decals for service. WHAT IS NOT COVEREDÑ...
... defect; LIMITED WARRANTY WHAT IS COVEREDÑThe entire REEBOK¨ ACD3 (ÒProductÓ) is warranted to be free of all other warranties and any implied warranties of merchantability or fitness for a particular purpose is limited in material and workmanship. HOW LONG IS IT COVEREDÑICON Health & Fitness, Inc. (ÒICONÓ), warrants the hood, covers, belly pan, and decals for service. WHAT IS NOT COVEREDÑ...


