User Guide & Warranty
Page 1
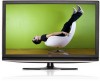
contents connections remote 21 features 30 menus 36 FAQs 42 warranty 48 user's guide LCD FLAT PANEL HDTV For use with models: L42FHD37/L46FHD37/ L42FHD38/L46FHD38/L52FHD38/L40FHD380
contents connections remote 21 features 30 menus 36 FAQs 42 warranty 48 user's guide LCD FLAT PANEL HDTV For use with models: L42FHD37/L46FHD37/ L42FHD38/L46FHD38/L52FHD38/L40FHD380
User Guide & Warranty
Page 2
... power off, you need to prevent the TV from the rear of the building as practical. Refer to your safety. Product Information Keep your remote control puts the TV into a very low-power standby mode but will not completely shut the power off . No objects filled with liquids,...This symbol indicates that this product contains mercury. No user serviceable parts inside the product that the cable ground shall be registered at www.rca.com/television. WARNING The TV is unstable if it immediately. Also, make sure the TV is designed to disconnect the power cord when ...
... power off, you need to prevent the TV from the rear of the building as practical. Refer to your safety. Product Information Keep your remote control puts the TV into a very low-power standby mode but will not completely shut the power off . No objects filled with liquids,...This symbol indicates that this product contains mercury. No user serviceable parts inside the product that the cable ground shall be registered at www.rca.com/television. WARNING The TV is unstable if it immediately. Also, make sure the TV is designed to disconnect the power cord when ...
User Guide & Warranty
Page 4
... the Picture From the Connected Device 15 Viewing the PC ...15 Plug in the TV ...16 Put Batteries in the Remote ...16 Turn on the TV ...16 How to Use the Remote Control to Complete the Initial Setup 16 Complete the Initial Setup 17 Set the Menu Language...17 Set the TV... of Jacks (in alphabetical order 19 Buttons and Other Jacks on Your TV 20 Side Input Jacks ...20 Side Panel Buttons ...20 Chapter 2 I Using the Remote Control Remote Control Buttons ...21 Using the INPUT Button ...22 Programming the Remote to Operate Other Devices 22 Find Out If You Need to Program the...
... the Picture From the Connected Device 15 Viewing the PC ...15 Plug in the TV ...16 Put Batteries in the Remote ...16 Turn on the TV ...16 How to Use the Remote Control to Complete the Initial Setup 16 Complete the Initial Setup 17 Set the Menu Language...17 Set the TV... of Jacks (in alphabetical order 19 Buttons and Other Jacks on Your TV 20 Side Input Jacks ...20 Side Panel Buttons ...20 Chapter 2 I Using the Remote Control Remote Control Buttons ...21 Using the INPUT Button ...22 Programming the Remote to Operate Other Devices 22 Find Out If You Need to Program the...
User Guide & Warranty
Page 5
... You've Programmed It 24 Modes of Operation ...24 Manual Reset of the Remote Control 25 Remote Code List ...26 Chapter 3 I Using the TV's Features Channel Banner ...30 Autotuning ...30 Parental Controls and V-Chip 31 How V-Chip Works for USA and Canada ...
... You've Programmed It 24 Modes of Operation ...24 Manual Reset of the Remote Control 25 Remote Code List ...26 Chapter 3 I Using the TV's Features Channel Banner ...30 Autotuning ...30 Parental Controls and V-Chip 31 How V-Chip Works for USA and Canada ...

User Guide & Warranty
Page 6
... table stand Graphics contained within this publication are properly grounded. Have your remote, call 1-800-338-0376. REMOTE CONTROL PART # RC2254701/01 6 Chapter 1 Connections and Setup for models L42FHD38/ L46FHD38/L52FHD38/L40FHD380 for models L42FHD37/L46FHD37/L46FHD35 2 AA BATTERIES CABLE MANAGEMENT STRAP REMOTE CONTROL PART # RC2254702/01 POWER CORD Go to Page 7 to replace...
... table stand Graphics contained within this publication are properly grounded. Have your remote, call 1-800-338-0376. REMOTE CONTROL PART # RC2254701/01 6 Chapter 1 Connections and Setup for models L42FHD38/ L46FHD38/L52FHD38/L40FHD380 for models L42FHD37/L46FHD37/L46FHD35 2 AA BATTERIES CABLE MANAGEMENT STRAP REMOTE CONTROL PART # RC2254702/01 POWER CORD Go to Page 7 to replace...

User Guide & Warranty
Page 15
... PC VIDEO jack. Repeatedly press the INPUT button on the TV and the device you see page 16 for specific instructions. buttons. Turn on the remote control until you want to get a picture. Make sure you press INPUT until you see PC displayed at the bottom of the TV's screen. Connections... Picture from the DVD player appears black and white and your device is an example of the TV's screen. Viewing the PC 1. Turn on the remote control until you see VID1, CMP1 or HDMI1 displayed at the bottom of the TV's screen. Note: • If you 're done connecting devices to...
... PC VIDEO jack. Repeatedly press the INPUT button on the TV and the device you see page 16 for specific instructions. buttons. Turn on the remote control until you want to get a picture. Make sure you press INPUT until you see PC displayed at the bottom of the TV's screen. Connections... Picture from the DVD player appears black and white and your device is an example of the TV's screen. Viewing the PC 1. Turn on the remote control until you see VID1, CMP1 or HDMI1 displayed at the bottom of the TV's screen. Note: • If you 're done connecting devices to...
User Guide & Warranty
Page 16
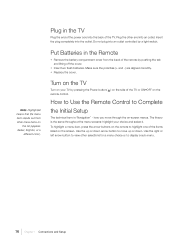
... the up or down arrow button to view other end into the back of the TV. Do not plug into the outlet. Plug in the Remote • Remove the battery compartment cover from other menu items on the screen. Make sure the polarities (+ and -) are aligned correctly. • Replace ...the cover. Note: Highlighted means that the menu item stands out from the back of the remote by pushing the tab and lifting off the cover. • Insert two fresh batteries. Plug the other selections for a menu choice or to highlight one...
... the up or down arrow button to view other end into the back of the TV. Do not plug into the outlet. Plug in the Remote • Remove the battery compartment cover from other menu items on the screen. Make sure the polarities (+ and -) are aligned correctly. • Replace ...the cover. Note: Highlighted means that the menu item stands out from the back of the remote by pushing the tab and lifting off the cover. • Insert two fresh batteries. Plug the other selections for a menu choice or to highlight one...
User Guide & Warranty
Page 20
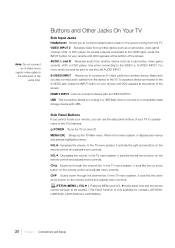
...selects highlighted items. VOL Increases the volume. S-VIDEO INPUT Allows you can use the Left AUDIO INPUT. Side Panel Buttons If you cannot locate your remote until VID2 appears at the bottom of the screen. When in a USB flash drive or connect to a compatible mass storage device with an HDMI ... the screen. Buttons and Other Jacks On Your TV Side Input Jacks Headphones Allows you connect a device with USB. POWER Turns the TV on the remote control and adjusts menu controls. (FETCH=MENU + VOL ) Press the MENU and VOL at the same time. HDMI 3 INPUT Lets you to connect ...
...selects highlighted items. VOL Increases the volume. S-VIDEO INPUT Allows you can use the Left AUDIO INPUT. Side Panel Buttons If you cannot locate your remote until VID2 appears at the bottom of the screen. When in a USB flash drive or connect to a compatible mass storage device with an HDMI ... the screen. Buttons and Other Jacks On Your TV Side Input Jacks Headphones Allows you connect a device with USB. POWER Turns the TV on the remote control and adjusts menu controls. (FETCH=MENU + VOL ) Press the MENU and VOL at the same time. HDMI 3 INPUT Lets you to connect ...
User Guide & Warranty
Page 21
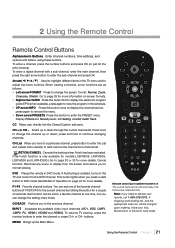
... channel or press CH+ or CH- You can change the screen format: Normal, Zoom, Cinerama, Stretch. Go to the previous channel. Using the Remote Control Chapter 2 21 Scans up or down ; CH + or CH - press and hold to change the setting many of seconds. INPUT Accesses the... Operation on page 24 for more information on the TV and tunes it to change the channel up the Main Menu. 2 Using the Remote Control Remote Control Buttons Alphanumeric Buttons Enter channel numbers, time settings, and options with a sub-channel, enter the main channel, then press the right...
... channel or press CH+ or CH- You can change the screen format: Normal, Zoom, Cinerama, Stretch. Go to the previous channel. Using the Remote Control Chapter 2 21 Scans up or down ; CH + or CH - press and hold to change the setting many of seconds. INPUT Accesses the... Operation on page 24 for more information on the TV and tunes it to change the channel up the Main Menu. 2 Using the Remote Control Remote Control Buttons Alphanumeric Buttons Enter channel numbers, time settings, and options with a sub-channel, enter the main channel, then press the right...
User Guide & Warranty
Page 22
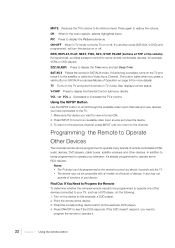
...devices. VOL - Programming the Remote to Operate Other Devices The universal remote can 't be compatible with all models of all functions of Operation on the TV and tunes it 's already programmed to operate one of the remote) If programmed, provides transport control for some RCA devices. it . 22 ...Chapter 2 Using the remote control If in TV mode. REW, REPLAY, PLAY, NEXT, FWD, REC, STOP, PAUSE (buttons...
...devices. VOL - Programming the Remote to Operate Other Devices The universal remote can 't be compatible with all models of all functions of Operation on the TV and tunes it 's already programmed to operate one of the remote) If programmed, provides transport control for some RCA devices. it . 22 ...Chapter 2 Using the remote control If in TV mode. REW, REPLAY, PLAY, NEXT, FWD, REC, STOP, PAUSE (buttons...

User Guide & Warranty
Page 23
...button will light up when buttons are pressed and turn off , quickly press the OK button to go forward through the codes; On your remote control, simultaneously press and hold the ON•OFF and MUTE (approximately 3 seconds) buttons until the CANCEL button lights up the brand ...and code number(s) for your remote control, simultaneously press and hold the ON•OFF and MUTE buttons (approximately 3 seconds) until the CANCEL button lights up . Press and release...
...button will light up when buttons are pressed and turn off , quickly press the OK button to go forward through the codes; On your remote control, simultaneously press and hold the ON•OFF and MUTE (approximately 3 seconds) buttons until the CANCEL button lights up the brand ...and code number(s) for your remote control, simultaneously press and hold the ON•OFF and MUTE buttons (approximately 3 seconds) until the CANCEL button lights up . Press and release...

User Guide & Warranty
Page 24
...player. 2. Modes of devices. To operate the device: 1. Use the remote buttons that apply to that mode. Note: The remote control may not be compatible with all brands and models of Operation The button corresponding to the mode the remote is being sent to the TV (and not the satellite receiver, for... example, press DVD to control your devices. How to Use the Remote After You've Programmed It Once the remote has been programmed successfully, you that the command to increase the volume is in that device. This tells you are ready ...
...player. 2. Modes of devices. To operate the device: 1. Use the remote buttons that apply to that mode. Note: The remote control may not be compatible with all brands and models of Operation The button corresponding to the mode the remote is being sent to the TV (and not the satellite receiver, for... example, press DVD to control your devices. How to Use the Remote After You've Programmed It Once the remote has been programmed successfully, you that the command to increase the volume is in that device. This tells you are ready ...

User Guide & Warranty
Page 25
The CANCEL button will long blink to indicate success, and the remote control returns to default. Using the Remote Control Chapter 2 25 Manual Reset of the Remote Control The Manual Reset is used to reset the remote settings to normal operation. On your remote control, simultaneously press the V-Chip, ON•OFF and MUTE buttons. 2. Note: The reset can also be done by replacing the batteries, but replacing the batteries does not always cause a reset, so you can perform a manual reset if the remote doesn't reset after battery replacement. 1.
The CANCEL button will long blink to indicate success, and the remote control returns to default. Using the Remote Control Chapter 2 25 Manual Reset of the Remote Control The Manual Reset is used to reset the remote settings to normal operation. On your remote control, simultaneously press the V-Chip, ON•OFF and MUTE buttons. 2. Note: The reset can also be done by replacing the batteries, but replacing the batteries does not always cause a reset, so you can perform a manual reset if the remote doesn't reset after battery replacement. 1.

User Guide & Warranty
Page 26
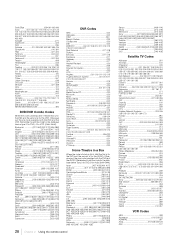
The remote code is a 4-digit code. The first digit indicates the database device type (0 for DVD, 1 for Satellite TV, 2 for Cable, 3 for DVR,... Polaroid 436 Polk Audio 026 073 328 Proscan 083 Pyle 169 Radio Shack 133 434 RCA 007 022 074 079 080 083 093 099 363 367 372 380 393 434 RCA & Dimensia 437 Realistic 125 Regent 138 Rio 116 Rotel 334 Saba 143 Samsung 011... 089 094 101 103 Movie Time 051 064 Multi Canal 051 Multitech 091 NEC 043 26 Chapter 2 Using the remote control Remote Code List Note: The codes are programmable to any of the device buttons (SAT /AUX or DVD) on the...
The remote code is a 4-digit code. The first digit indicates the database device type (0 for DVD, 1 for Satellite TV, 2 for Cable, 3 for DVR,... Polaroid 436 Polk Audio 026 073 328 Proscan 083 Pyle 169 Radio Shack 133 434 RCA 007 022 074 079 080 083 093 099 363 367 372 380 393 434 RCA & Dimensia 437 Realistic 125 Regent 138 Rio 116 Rotel 334 Saba 143 Samsung 011... 089 094 101 103 Movie Time 051 064 Multi Canal 051 Multitech 091 NEC 043 26 Chapter 2 Using the remote control Remote Code List Note: The codes are programmable to any of the device buttons (SAT /AUX or DVD) on the...
User Guide & Warranty
Page 28
...[407 089] [407 105] [371 061] Philips 156 009] [391 075] Polaroid 390 074] [423 112] Presidian 391 075] RCA .........[389 073] [401 083] [411 097] [422 110] Samsung 368 005] [384 070] [396 078] [405 087] [... 020 Panasonic 005 022 030 Philips 001 009 012 015 024 025 Pioneer 031 Proscan 019 RCA 001 002 009 016 019 021 ReplayTV 004 022 030 Samsung 009 024 Sonic Blue 004 ...] Philips 437 016] [448 412] Pioneer 429 383] RCA 447 393] Samsung 439 011] [445 011] [481 332] [485 431] [487 431] [481 428] 28 Chapter 2 Using the remote control Sanyo 468 414] Sharp 473 419] Sherwood 474 420...
...[407 089] [407 105] [371 061] Philips 156 009] [391 075] Polaroid 390 074] [423 112] Presidian 391 075] RCA .........[389 073] [401 083] [411 097] [422 110] Samsung 368 005] [384 070] [396 078] [405 087] [... 020 Panasonic 005 022 030 Philips 001 009 012 015 024 025 Pioneer 031 Proscan 019 RCA 001 002 009 016 019 021 ReplayTV 004 022 030 Samsung 009 024 Sonic Blue 004 ...] Philips 437 016] [448 412] Pioneer 429 383] RCA 447 393] Samsung 439 011] [445 011] [481 332] [485 431] [487 431] [481 428] 28 Chapter 2 Using the remote control Sanyo 468 414] Sharp 473 419] Sherwood 474 420...

User Guide & Warranty
Page 29
... 020 Quasar 015 025 Radio Shack 010 022 125 Radio Shack/Realistic 015 020 021 022 025 026 028 Radix 022 035 Randex 022 035 RCA 003 012 017 021 025 030 042 073 083 097 110 Realistic 010 015 020 021 022 023 025 026 028 035 125 Ricavision 038... 028 125 Yamaha 019 020 024 033 Zenith 007 010 016 018 032 034 099 116 117 120 122 125 ZT Group 038 Using the Remote Control Chapter 2 29
... 020 Quasar 015 025 Radio Shack 010 022 125 Radio Shack/Realistic 015 020 021 022 025 026 028 Radix 022 035 Randex 022 035 RCA 003 012 017 021 025 030 042 073 083 097 110 Realistic 010 015 020 021 022 023 025 026 028 035 125 Ricavision 038... 028 125 Yamaha 019 020 024 033 Zenith 007 010 016 018 032 034 099 116 117 120 122 125 ZT Group 038 Using the Remote Control Chapter 2 29
User Guide & Warranty
Page 30
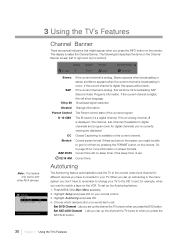
...SAT-AUX Channel Lets you set up Autotuning in the menu system you have to remember to change your remote control. 3. Autotuning Go Back Set DVD Channel N/A Set SAT-AUX Channel N/A Press < or > to when you press...Banner. Broadcast signal resolution Ratings information The Parent control state of them by pressing the FORMAT button on the remote. Closed Captioning is broadcasting in stereo and Mono appears when the current channel is available on sleep timer, if...set up the Autotuning feature: 1. 3 Using the TV's Features Note : This feature only works with other RCA devices.
...SAT-AUX Channel Lets you set up Autotuning in the menu system you have to remember to change your remote control. 3. Autotuning Go Back Set DVD Channel N/A Set SAT-AUX Channel N/A Press < or > to when you press...Banner. Broadcast signal resolution Ratings information The Parent control state of them by pressing the FORMAT button on the remote. Closed Captioning is broadcasting in stereo and Mono appears when the current channel is available on sleep timer, if...set up the Autotuning feature: 1. 3 Using the TV's Features Note : This feature only works with other RCA devices.
User Guide & Warranty
Page 31
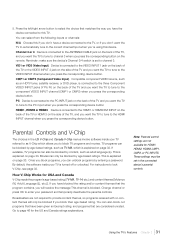
.... Parental Controls and V-Chip The choices in the connected device's parental controls. By default, the software inside your TV referred to as an HDTV tuner, satellite receiver, or DVD player, is connected to the HDMI INPUT channel when you have the device connected to the three Component VIDEO... INPUT jacks (Y Pb Pr) on the remote. For instructions to channel 3. You can be blocked by content, such as TV-MA, which allows you press the corresponding device button. Note:...
.... Parental Controls and V-Chip The choices in the connected device's parental controls. By default, the software inside your TV referred to as an HDTV tuner, satellite receiver, or DVD player, is connected to the HDMI INPUT channel when you have the device connected to the three Component VIDEO... INPUT jacks (Y Pb Pr) on the remote. For instructions to channel 3. You can be blocked by content, such as TV-MA, which allows you press the corresponding device button. Note:...

User Guide & Warranty
Page 32
... located within the TV Ratings option with the US V-Chip menu. Simultaneously press and hold VOL DOWN on the side panel and CANCEL on the remote for V-Chip, Block Channel, or Block Buttons will NOT require a password to toggle between View and Block. Rating Field Lets you do not want the...
... located within the TV Ratings option with the US V-Chip menu. Simultaneously press and hold VOL DOWN on the side panel and CANCEL on the remote for V-Chip, Block Channel, or Block Buttons will NOT require a password to toggle between View and Block. Rating Field Lets you do not want the...

User Guide & Warranty
Page 33
... the rating you enter the Parental Control menu, enter a new password. Simultaneously press and hold VOL DOWN on the side panel and CANCEL on the remote control (the TV's Main Menu appears). 2. Press the down arrow button to scroll to change . 3. To block program content: 1. Press the right ... change its status to block (all ratings above to block). The language for 10 seconds. Next time you want to unlock. Press MENU on the remote for TV-MA is represented by blocking movies rated above to change . 6. Movie Ratings Go Back NR(No Rating) X NC-17 R PG-13 ...
... the rating you enter the Parental Control menu, enter a new password. Simultaneously press and hold VOL DOWN on the side panel and CANCEL on the remote control (the TV's Main Menu appears). 2. Press the down arrow button to scroll to change . 3. To block program content: 1. Press the right ... change its status to block (all ratings above to block). The language for 10 seconds. Next time you want to unlock. Press MENU on the remote for TV-MA is represented by blocking movies rated above to change . 6. Movie Ratings Go Back NR(No Rating) X NC-17 R PG-13 ...


