
DRC6389T Product Manual
Page 3
... to alert the user to provide reasonable protection against harmful interference in accordance with the instructions, may cause harmful interference to ensure compliance with this unit to radio communications. On Placement • Do not use the unit for a long time, disconnect the power adapter. Pulling the cord may not function normally. Let the unit stand for 1 to use this unit in this owner's manual. Safety Precautions caution...
... to alert the user to provide reasonable protection against harmful interference in accordance with the instructions, may cause harmful interference to ensure compliance with this unit to radio communications. On Placement • Do not use the unit for a long time, disconnect the power adapter. Pulling the cord may not function normally. Let the unit stand for 1 to use this unit in this owner's manual. Safety Precautions caution...

DRC6389T Product Manual
Page 4
... outlet. 10.Protect the AC power cord from being walked on or pinched particularly at plugs, convenience receptacles, and the point where they exit from tip-over. 13.Unplug this apparatus near any of time. 14.Refer all servicing to rain or moisture, does not operate normally, or has been dropped. When a cart is used, use caution when moving...
... outlet. 10.Protect the AC power cord from being walked on or pinched particularly at plugs, convenience receptacles, and the point where they exit from tip-over. 13.Unplug this apparatus near any of time. 14.Refer all servicing to rain or moisture, does not operate normally, or has been dropped. When a cart is used, use caution when moving...
DRC6389T Product Manual
Page 5
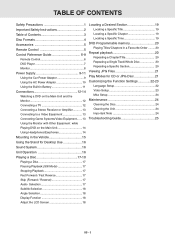
... Safety Instructions 2 Table of Contents 3 Disc Formats 4 Accessories 5 Remote Control 5 Control Reference Guide 6-8 Remote Control 6 DVD Player 7 Monitor 8 Power Supply 9-11 Using the Car Power Adaptor 9 Using the AC Power Adaptor 10 Using the Built-in Battery 11 Connections 12-14 Watching a DVD on the Main Unit and the Monitor 12 Connecting a TV 12 Connecting a Stereo Receiver or Amplifier 13 Connecting to a Video Equipment 13 Connecting Game Systems/Video Equipment....... 13 Using the Monitor with Other Equipment while Playing DVD...
... Safety Instructions 2 Table of Contents 3 Disc Formats 4 Accessories 5 Remote Control 5 Control Reference Guide 6-8 Remote Control 6 DVD Player 7 Monitor 8 Power Supply 9-11 Using the Car Power Adaptor 9 Using the AC Power Adaptor 10 Using the Built-in Battery 11 Connections 12-14 Watching a DVD on the Main Unit and the Monitor 12 Connecting a TV 12 Connecting a Stereo Receiver or Amplifier 13 Connecting to a Video Equipment 13 Connecting Game Systems/Video Equipment....... 13 Using the Monitor with Other Equipment while Playing DVD...

DRC6389T Product Manual
Page 7
... out the plastic sheet before operating the Remote Control. Replace only with battery)...x 1 Car Power Adapter...x 1 AC Power Adapter...x 1 DC-AV Cable...x 1 Mounting Strap...x 2 remote control Using the Remote Control • Point the remote control at the REMOTE SENSOR located on the unit. • When there is a strong ambient light source, the performance of explosion if battery is about 16 feet (5 meters). Open the battery door. 2. Note: • If the remote control is not going to...
... out the plastic sheet before operating the Remote Control. Replace only with battery)...x 1 Car Power Adapter...x 1 AC Power Adapter...x 1 DC-AV Cable...x 1 Mounting Strap...x 2 remote control Using the Remote Control • Point the remote control at the REMOTE SENSOR located on the unit. • When there is a strong ambient light source, the performance of explosion if battery is about 16 feet (5 meters). Open the battery door. 2. Note: • If the remote control is not going to...

DRC6389T Product Manual
Page 8
...: Fast forward playback. 4) GOTO Button Skips directly to a location on a DVD. 5) Cursor ( , , , ) Buttons Use to normal operation after using the SETUP menu of a DVD. 10) AUDIO Button Selects one of the audio sound tracks on a DVD (if more than one of the subtitle languages programmed on the screen. 13) STOP Button Stops playing a disc. REPEAT DISC Button Repeats a DVD chapter or title. control reference guide Remote Control 1) VIDEO MODE Button Adjusts Brightness, Contrast or Color of the LCD screen. 2) PREV button Moves back through titles...
...: Fast forward playback. 4) GOTO Button Skips directly to a location on a DVD. 5) Cursor ( , , , ) Buttons Use to normal operation after using the SETUP menu of a DVD. 10) AUDIO Button Selects one of the audio sound tracks on a DVD (if more than one of the subtitle languages programmed on the screen. 13) STOP Button Stops playing a disc. REPEAT DISC Button Repeats a DVD chapter or title. control reference guide Remote Control 1) VIDEO MODE Button Adjusts Brightness, Contrast or Color of the LCD screen. 2) PREV button Moves back through titles...

DRC6389T Product Manual
Page 9
Remote Sensor Receives the remote control signal. 12) Headphone Jack 13) VOLUME Control Adjusts the volume. 14) CHARGE / STANDBY / ON Switch 15) AUDIO IN / OUT and VIDEO IN/OUT Jacks 16) DVD / AV IN Switch 17) DC IN 9V-12V Jack GB - 7 Indicator When the CHARGE / STANDBY / ON switch is in the CHARGE position, the red light will illuminate. control reference guide DVD Player 2345 6789 1 10 12 13 14...
Remote Sensor Receives the remote control signal. 12) Headphone Jack 13) VOLUME Control Adjusts the volume. 14) CHARGE / STANDBY / ON Switch 15) AUDIO IN / OUT and VIDEO IN/OUT Jacks 16) DVD / AV IN Switch 17) DC IN 9V-12V Jack GB - 7 Indicator When the CHARGE / STANDBY / ON switch is in the CHARGE position, the red light will illuminate. control reference guide DVD Player 2345 6789 1 10 12 13 14...

DRC6389T Product Manual
Page 10
Monitor 12 CONTROL REFERENCE GUIDE 3 4 9 10 5 11 12 6 13 7 8 1) VOLUME Control Adjusts the volume. 2) Headphone Jack 3) Left Speaker 4) Right Speaker 5) AUDIO / VIDEO IN Jacks 6) DC OUT 9-12V Jack 7) POWER ON Indicator When the STANDBY / ON switch is in the ON position, the green light will illuminate. 8) Stand 9) BRIGHTNESS Control Adjusts the relative lightness or darkness of the screen. 10) COLOR Control Adjusts the color intensity. 11) Screen Switch WIDE: Wide Screen NORMAL: Pan Screen 12) ON / OFF Switch 13) DC IN 9-12V Jack GB - 8
Monitor 12 CONTROL REFERENCE GUIDE 3 4 9 10 5 11 12 6 13 7 8 1) VOLUME Control Adjusts the volume. 2) Headphone Jack 3) Left Speaker 4) Right Speaker 5) AUDIO / VIDEO IN Jacks 6) DC OUT 9-12V Jack 7) POWER ON Indicator When the STANDBY / ON switch is in the ON position, the green light will illuminate. 8) Stand 9) BRIGHTNESS Control Adjusts the relative lightness or darkness of the screen. 10) COLOR Control Adjusts the color intensity. 11) Screen Switch WIDE: Wide Screen NORMAL: Pan Screen 12) ON / OFF Switch 13) DC IN 9-12V Jack GB - 8
DRC6389T Product Manual
Page 11
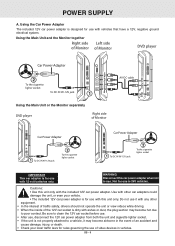
... of Monitor of Monitor DVD player Car Power Adapter 2 To the cigarette ligher socket To DC IN 9V-12V jack 1 Using the Main Unit or the Monitor separately DVD player Right side of video devices in vehicles. Be sure to poor contact. Use with other equipment. • In the interest of traffic safety, drivers should not operate the unit or view videos while driving. • When the inside...
... of Monitor of Monitor DVD player Car Power Adapter 2 To the cigarette ligher socket To DC IN 9V-12V jack 1 Using the Main Unit or the Monitor separately DVD player Right side of video devices in vehicles. Be sure to poor contact. Use with other equipment. • In the interest of traffic safety, drivers should not operate the unit or view videos while driving. • When the inside...

DRC6389T Product Manual
Page 12
... Unit or the Monitor separately DVD player AC Adapter 2 To AC outlet Right side of 100-240 Volts AC and should only be used for its use it near an easily accessible wall outlet. GB - 10 Do not use only. IMPORTANT • Be sure to be connected to a mains supply within these parameters. Using the AC Power Adapter The included AC power adapter operates...
... Unit or the Monitor separately DVD player AC Adapter 2 To AC outlet Right side of 100-240 Volts AC and should only be used for its use it near an easily accessible wall outlet. GB - 10 Do not use only. IMPORTANT • Be sure to be connected to a mains supply within these parameters. Using the AC Power Adapter The included AC power adapter operates...
DRC6389T Product Manual
Page 13
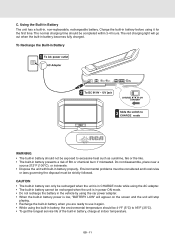
... screen and the unit will go out when the built-in battery, charge at indoor temperature. Do not disassemble, place near a source 212°F (100°C), or incinerate. • Dispose the unit with built-in , non-replaceable, rechargeable battery. Charge the built-in battery before using it again. • While using the car power adapter. • When the built-in battery power is in power ON mode...
... screen and the unit will go out when the built-in battery, charge at indoor temperature. Do not disassemble, place near a source 212°F (100°C), or incinerate. • Dispose the unit with built-in , non-replaceable, rechargeable battery. Charge the built-in battery before using it again. • While using the car power adapter. • When the built-in battery power is in power ON mode...

DRC6389T Product Manual
Page 14
... / DVD switch to the DVD position. 3. DVD player TV AV-DC cable Watching a DVD on the main unit and the monitor. Turn on the TV and follow the instructions included with it to connect the unit to your TV has Audio/Video inputs, you will play the DVD. Turn on the main unit and slide the AV IN / DVD switch to the DVD position. 3. Notes: • Make sure to supply power. GB - 12 Connect the...
... / DVD switch to the DVD position. 3. DVD player TV AV-DC cable Watching a DVD on the main unit and the monitor. Turn on the TV and follow the instructions included with it to connect the unit to your TV has Audio/Video inputs, you will play the DVD. Turn on the main unit and slide the AV IN / DVD switch to the DVD position. 3. Notes: • Make sure to supply power. GB - 12 Connect the...

DRC6389T Product Manual
Page 15
... a defective DVD system. DVD player White Red Yellow Video equipment AV cable (not included) Watching video equipment 1. Connect the other equipment using a standard AV Cable (not included). 2. Turn on the video equipment and follow the instructions provided with poor sound quality. GB - 13 Connecting to select the AUDIO IN function. CONNECTIONS C. To AUDIO / VIDEO IN / OUT caks E. Connecting a Stereo Receiver or Amplifier (for the Main Unit Only) The main unit can connect other video equipment...
... a defective DVD system. DVD player White Red Yellow Video equipment AV cable (not included) Watching video equipment 1. Connect the other equipment using a standard AV Cable (not included). 2. Turn on the video equipment and follow the instructions provided with poor sound quality. GB - 13 Connecting to select the AUDIO IN function. CONNECTIONS C. To AUDIO / VIDEO IN / OUT caks E. Connecting a Stereo Receiver or Amplifier (for the Main Unit Only) The main unit can connect other video equipment...
DRC6389T Product Manual
Page 16
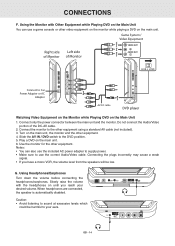
... cable. 2. Turn on the main unit. 6. Slide the AV IN / DVD switch to your desired volume. Notes: • You can use the correct Audio/Video cable. Connect the monitor to sound at excessive levels which could be low. Caution: • Avoid listening to the other equipment. Do not connect the Audio/Video portion of Monitor Connect to Car Power Adapter or AC Adapter AV-DC cable DVD player Watching Video Equipment on the Monitor while Playing DVD...
... cable. 2. Turn on the main unit. 6. Slide the AV IN / DVD switch to your desired volume. Notes: • You can use the correct Audio/Video cable. Connect the monitor to sound at excessive levels which could be low. Caution: • Avoid listening to the other equipment. Do not connect the Audio/Video portion of Monitor Connect to Car Power Adapter or AC Adapter AV-DC cable DVD player Watching Video Equipment on the Monitor while Playing DVD...

DRC6389T Product Manual
Page 19
... operating commands. Basic playback Playing a Disc This owner's manual explains the basic instructions for your unit to load the disc. Please refer to the instructions accompanying the specific DVD in a manner that DVD. Slide the ON / OFF switch on the remote control to jump immediately to resume normal playback. Note: • The DVD player mutes sound and subtitles during playback. Some DVDs are produced in question for most DVDs, the unit will reset...
... operating commands. Basic playback Playing a Disc This owner's manual explains the basic instructions for your unit to load the disc. Please refer to the instructions accompanying the specific DVD in a manner that DVD. Slide the ON / OFF switch on the remote control to jump immediately to resume normal playback. Note: • The DVD player mutes sound and subtitles during playback. Some DVDs are produced in question for most DVDs, the unit will reset...

DRC6389T Product Manual
Page 20
... using the disc menu only. Press the / button to off by the BRIGHTNESS control, COLOR control and Screen (WIDE / NORMAL) switch on operation status. Note: For the monitor, you select your desired scene. • The number of different angles. While you are set to display the current language setting, as shown in multiple languages. • Some DVDs allow you set the subtitle function to select Brightness, Contrast, Color or View Mode. 3. Remaining time...
... using the disc menu only. Press the / button to off by the BRIGHTNESS control, COLOR control and Screen (WIDE / NORMAL) switch on operation status. Note: For the monitor, you select your desired scene. • The number of different angles. While you are set to display the current language setting, as shown in multiple languages. • Some DVDs allow you set the subtitle function to select Brightness, Contrast, Color or View Mode. 3. Remaining time...

DRC6389T Product Manual
Page 22
... MEMORY button and the following display appears. 2. While the CD disc is playing, press the REPEAT DISC button until the " " indicator displays on the screen. The whole disc is played repeatedly. While the disc is playing, press the REPEAT DISC button until the " " indicator displays on the screen. All the input programs will be cleared when you open the disc tray or turn off the DVD player. While the DVD is playing, press the REPEAT A-B button...
... MEMORY button and the following display appears. 2. While the CD disc is playing, press the REPEAT DISC button until the " " indicator displays on the screen. The whole disc is played repeatedly. While the disc is playing, press the REPEAT DISC button until the " " indicator displays on the screen. All the input programs will be cleared when you open the disc tray or turn off the DVD player. While the DVD is playing, press the REPEAT A-B button...
DRC6389T Product Manual
Page 24
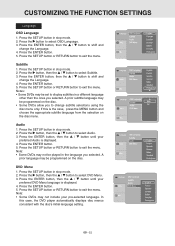
... FUNCTION SETTINGS Language OSD Language 1. Press the SETUP button or RETURN button to change subtitle selections using the Off disc menu only. Auto • Some DVDs allow you to exit the menu. Audio 1. Press the ENTER button. 5. Press the SETUP button in stop mode. 2. In this is the case, press the MENU button and choose the appropriate subtitle language from the selection on the disc menu. GB - 22 Notes: • Some DVDs may be programmed...
... FUNCTION SETTINGS Language OSD Language 1. Press the SETUP button or RETURN button to change subtitle selections using the Off disc menu only. Auto • Some DVDs allow you to exit the menu. Audio 1. Press the ENTER button. 5. Press the SETUP button in stop mode. 2. In this is the case, press the MENU button and choose the appropriate subtitle language from the selection on the disc menu. GB - 22 Notes: • Some DVDs may be programmed...

DRC6389T Product Manual
Page 25
... RETURN button to select View Mode. 4. View Mode 1. Press the button, then the / button to exit the menu. Fill Original Auto Fit Pan Scan Fill the screen with decoded image. Displays pictures cropped to fill your Aspect Ratio conforms to the actual TV in stop mode. 2. Press the SETUP button in use if you connect the unit to a TV. Press the ENTER button, then the / button to shift and change the View Mode. 5. Select...
... RETURN button to select View Mode. 4. View Mode 1. Press the button, then the / button to exit the menu. Fill Original Auto Fit Pan Scan Fill the screen with decoded image. Displays pictures cropped to fill your Aspect Ratio conforms to the actual TV in stop mode. 2. Press the SETUP button in use if you connect the unit to a TV. Press the ENTER button, then the / button to shift and change the View Mode. 5. Select...
DRC6389T Product Manual
Page 26
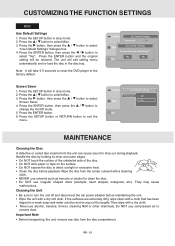
... the disc to turn the unit off and disconnect the car power adapter before playback. Press the ENTER button, then press the / button to select "Use Default Settings" dialogue box. 4. Press the SETUP button in stop mode. 2. Press the SETUP button or RETURN button to remove dust. Do NOT use compressed air to exit the menu. Press the / button to the factory default. Note: It will take 3-5 seconds to reset the DVD player to select Misc. 3. Screen...
... the disc to turn the unit off and disconnect the car power adapter before playback. Press the ENTER button, then press the / button to select "Use Default Settings" dialogue box. 4. Press the SETUP button in stop mode. 2. Press the SETUP button or RETURN button to remove dust. Do NOT use compressed air to exit the menu. Press the / button to the factory default. Note: It will take 3-5 seconds to reset the DVD player to select Misc. 3. Screen...
DRC6389T Product Manual
Page 27
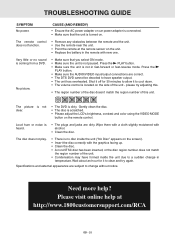
... change without notice. The picture is not clear. • The DVD is coming from a DVD. TROUBLESHOOTING GUIDE SYMPTOM No power. CAUSE (AND REMEDY) • Ensure the AC power adapter or car power adapter is connected. • Make sure that you select ON mode. • Make sure the unit is scratched. • Please adjust the LCD's brightness, contrast and color using the VIDEO MODE button on . Press the PLAY button. • Make sure the unit is turned on the remote control...
... change without notice. The picture is not clear. • The DVD is coming from a DVD. TROUBLESHOOTING GUIDE SYMPTOM No power. CAUSE (AND REMEDY) • Ensure the AC power adapter or car power adapter is connected. • Make sure that you select ON mode. • Make sure the unit is scratched. • Please adjust the LCD's brightness, contrast and color using the VIDEO MODE button on . Press the PLAY button. • Make sure the unit is turned on the remote control...


