
User Guide
Page 1
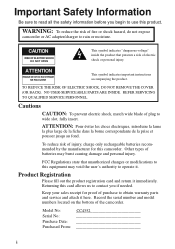
We want to this may cause. For Camcorder Accessories information, see page 65. We regret any inconvenience this manual's Assistance section listed above the Table of the corrections to make sure you enjoy your new camcorder. For Camcorder Customer Service information, see pages 51-57. For Camcorder Exchange Warranty information, see pages 66-67. IMPORTANT NOTICE Please make a note of Contents on page 1.
We want to this may cause. For Camcorder Accessories information, see page 65. We regret any inconvenience this manual's Assistance section listed above the Table of the corrections to make sure you enjoy your new camcorder. For Camcorder Customer Service information, see pages 51-57. For Camcorder Exchange Warranty information, see pages 66-67. IMPORTANT NOTICE Please make a note of Contents on page 1.
User Guide
Page 3
...all the safety information before you if needed. Cautions Safety Information CAUTION: To prevent electric shock, match wide blade of the camcorder. Returning this card allows us to contact you begin to rain or moisture. Other types of fire or shock hazard, do not ...this equipment may burst causing damage and personal injury. WARNING: To reduce the risk of batteries may void the user's authority to this camcorder. CAUTION RISK OF ELECTRIC SHOCK DO NOT OPEN This symbol indicates "dangerous voltage" inside the product that unauthorized changes or modifications to operate...
...all the safety information before you if needed. Cautions Safety Information CAUTION: To prevent electric shock, match wide blade of the camcorder. Returning this card allows us to contact you begin to rain or moisture. Other types of fire or shock hazard, do not ...this equipment may burst causing damage and personal injury. WARNING: To reduce the risk of batteries may void the user's authority to this camcorder. CAUTION RISK OF ELECTRIC SHOCK DO NOT OPEN This symbol indicates "dangerous voltage" inside the product that unauthorized changes or modifications to operate...
User Guide
Page 4
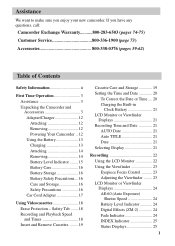
...pages 59-62) Table of Contents Safety Information ii First Time Operation 3 Assistance 3 Unpacking the Camcorder and Accessories 3 Adapter/Charger 12 Attaching 12 Removing 12 Powering Your Camcorder .. 12 Using the Battery 13 Charging 13 Attaching 14 Removing 14 Battery Level Indicator ........ 15 ...16 Care and Storage 16 Safety Precautions 16 Car Cord Adapter 17 Using Videocassettes 18 Erase Protection - If you enjoy your new camcorder. Safety Tab ....... 18 Recording and Playback Speed and Times 18 Insert and Remove Cassettes ........ 19 Cassette Care and Storage 19...
...pages 59-62) Table of Contents Safety Information ii First Time Operation 3 Assistance 3 Unpacking the Camcorder and Accessories 3 Adapter/Charger 12 Attaching 12 Removing 12 Powering Your Camcorder .. 12 Using the Battery 13 Charging 13 Attaching 14 Removing 14 Battery Level Indicator ........ 15 ...16 Care and Storage 16 Safety Precautions 16 Car Cord Adapter 17 Using Videocassettes 18 Erase Protection - If you enjoy your new camcorder. Safety Tab ....... 18 Recording and Playback Speed and Times 18 Insert and Remove Cassettes ........ 19 Cassette Care and Storage 19...
User Guide
Page 5
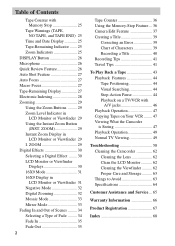
... 47 Copying Tapes on Your VCR ........ 47 Viewing What the Camcrder is Seeing 47 Playback Operation 49 Normal TV Viewing 49 Troubleshooting 58 Cleaning the Camcorder 62 Cleaning the Lens 62 Clean the LCD Monitor 62 Cleaning the Viewfinder .......... 62 Proper Care and Storage .......... 63 Things to Avoid 63 Specifications 64...
... 47 Copying Tapes on Your VCR ........ 47 Viewing What the Camcrder is Seeing 47 Playback Operation 49 Normal TV Viewing 49 Troubleshooting 58 Cleaning the Camcorder 62 Cleaning the Lens 62 Clean the LCD Monitor 62 Cleaning the Viewfinder .......... 62 Proper Care and Storage .......... 63 Things to Avoid 63 Specifications 64...
User Guide
Page 6
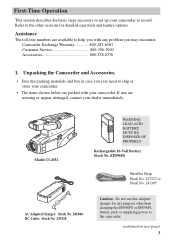
... No. 241044 DC Cable: Stock No. 233328 Caution: Do not use this adapter/ charger for any problem you may encounter. Model CC4352 WARNING: LEAD-ACID BATTERY. Refer to the other than charging the EP096FS or EP096FL battery pack or supplying power to help you ever ... Service 800-336-1900 First Time Operation Accessories 800-338-0376 Assistance Unpacking the Camcorder and Accessories 1. Assistance The toll-free numbers are available to the camcorder. (continued on next page) 3 Unpacking the Camcorder and Accessories. • Save the packing materials and box in case you with...
... No. 241044 DC Cable: Stock No. 233328 Caution: Do not use this adapter/ charger for any problem you may encounter. Model CC4352 WARNING: LEAD-ACID BATTERY. Refer to the other than charging the EP096FS or EP096FL battery pack or supplying power to help you ever ... Service 800-336-1900 First Time Operation Accessories 800-338-0376 Assistance Unpacking the Camcorder and Accessories 1. Assistance The toll-free numbers are available to the camcorder. (continued on next page) 3 Unpacking the Camcorder and Accessories. • Save the packing materials and box in case you with...
User Guide
Page 7
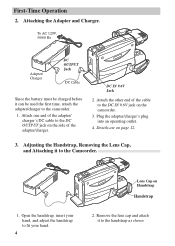
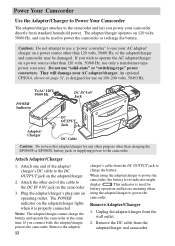
... before it to the DC OUTPUT jack on page 12. 3. Attach one end of the cable to the Camcorder. Attaching the Adapter and Charger. Open the handstrap, insert your hand. 4 Lens Cap on the camcorder. 3. To AC 120V, 50/60 Hz POWER CHARGE Adapter/ Charger DC OUTPUT Jack DC Cable Since the... battery must be used the first time, attach the adapter/charger to fit your hand, and adjust the handstrap to the camcorder. 1. Plug the adapter/charger's plug into an operating outlet. 4. First-Time Operation 2. DC IN 9.6V Jack 2.
... before it to the DC OUTPUT jack on page 12. 3. Attach one end of the cable to the Camcorder. Attaching the Adapter and Charger. Open the handstrap, insert your hand. 4 Lens Cap on the camcorder. 3. To AC 120V, 50/60 Hz POWER CHARGE Adapter/ Charger DC OUTPUT Jack DC Cable Since the... battery must be used the first time, attach the adapter/charger to fit your hand, and adjust the handstrap to the camcorder. 1. Plug the adapter/charger's plug into an operating outlet. 4. First-Time Operation 2. DC IN 9.6V Jack 2.
User Guide
Page 8
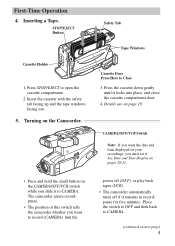
...Note: If you want to record (CAMERA), turn the power off (OFF), or play back tapes (VCR). • The camcorder automatically turns off if it to CAMERA. (continued on the Camcorder. See Date and Time Display on pages 20-21. • Press and hold the small button on your recordings, you...for five minutes. Insert the cassette with the safety tab facing up and the tape windows facing out. 5. The camcorder enters recordpause. • The position of this switch tells the camcorder whether you want the date and time displayed on the CAMERA/OFF/VCR switch while you must set it locks...
...Note: If you want to record (CAMERA), turn the power off (OFF), or play back tapes (VCR). • The camcorder automatically turns off if it to CAMERA. (continued on the Camcorder. See Date and Time Display on pages 20-21. • Press and hold the small button on your recordings, you...for five minutes. Insert the cassette with the safety tab facing up and the tape windows facing out. 5. The camcorder enters recordpause. • The position of this switch tells the camcorder whether you want the date and time displayed on the CAMERA/OFF/VCR switch while you must set it locks...
User Guide
Page 9
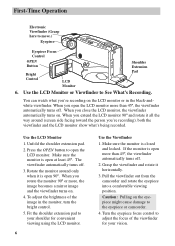
... shoulder extension pad to adjust the focus of the image in the black-andwhite viewfinder. Use the LCD Monitor or Viewfinder to the eyepiece or camcorder. 4. When you open the LCD monitor more , the image becomes a mirror image and the viewfinder turns on the LCD monitor or in the monitor, turn... LCD monitor. When you extend the LCD monitor 90º and rotate it horizontally. 3. The viewfinder automatically turns off . 2. Pull the viewfinder out from the camcorder and rotate the eyepiece into a comfortable viewing position.
... shoulder extension pad to adjust the focus of the image in the black-andwhite viewfinder. Use the LCD Monitor or Viewfinder to the eyepiece or camcorder. 4. When you open the LCD monitor more , the image becomes a mirror image and the viewfinder turns on the LCD monitor or in the monitor, turn... LCD monitor. When you extend the LCD monitor 90º and rotate it horizontally. 3. The viewfinder automatically turns off . 2. Pull the viewfinder out from the camcorder and rotate the eyepiece into a comfortable viewing position.
User Guide
Page 10
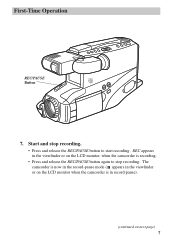
First-Time Operation REC/PAUSE Button 7. Start and stop recording. REC appears in record-pause). (continued on the LCD monitor, when the camcorder is in the viewfinder or on next page) 7 The camcorder is now in the record-pause mode ( appears in the viewfinder or on the LCD monitor when the camcorder is recording. • Press and release the REC/PAUSE button again to stop recording. • Press and release the REC/PAUSE button to start recording.
First-Time Operation REC/PAUSE Button 7. Start and stop recording. REC appears in record-pause). (continued on the LCD monitor, when the camcorder is in the viewfinder or on next page) 7 The camcorder is now in the record-pause mode ( appears in the viewfinder or on the LCD monitor when the camcorder is recording. • Press and release the REC/PAUSE button again to stop recording. • Press and release the REC/PAUSE button to start recording.
User Guide
Page 11
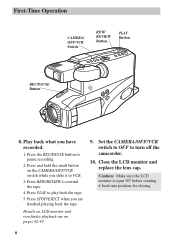
... it back into position for closing. 8 Set the CAMERA/OFF/VCR switch to OFF to play back the tape. 5. Press PLAY to turn off the camcorder. 10. Close the LCD monitor and replace the lens cap. Caution: Make sure the LCD monitor is open 90º before rotating it to VCR...
... it back into position for closing. 8 Set the CAMERA/OFF/VCR switch to OFF to play back the tape. 5. Press PLAY to turn off the camcorder. 10. Close the LCD monitor and replace the lens cap. Caution: Make sure the LCD monitor is open 90º before rotating it to VCR...

User Guide
Page 12
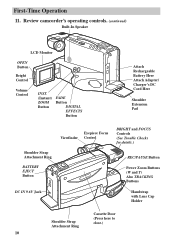
Button) PLAY Button F.FWD (Fast Forward) Button (Also + Button) STOP/EJECT Button (Also EDIT-ADV Button) Microphone Lens Lens Hood Reset Switch (See Trouble Checks for details.) VIDEO, AUDIO OUT, and RF DC OUT Jacks (Located Behind Small Cover) (continued on next page) 9 Review camcorder's operating controls. DISPLAY Button RESET Button DATE/TIME Button TITLER Button CAMERA/ OFF/VCR Switch REW (Rewind)/REVIEW Button (Also - First-Time Operation 11.
Button) PLAY Button F.FWD (Fast Forward) Button (Also + Button) STOP/EJECT Button (Also EDIT-ADV Button) Microphone Lens Lens Hood Reset Switch (See Trouble Checks for details.) VIDEO, AUDIO OUT, and RF DC OUT Jacks (Located Behind Small Cover) (continued on next page) 9 Review camcorder's operating controls. DISPLAY Button RESET Button DATE/TIME Button TITLER Button CAMERA/ OFF/VCR Switch REW (Rewind)/REVIEW Button (Also - First-Time Operation 11.
User Guide
Page 13
First-Time Operation 11. Review camcorder's operating controls. (continued) Built-In Speaker LCD Monitor OPEN Button Bright Control Volume Control INST. (Instant) ZOOM Button FADE Button DIGITAL EFFECTS Button Attach Rechargeable ...
First-Time Operation 11. Review camcorder's operating controls. (continued) Built-In Speaker LCD Monitor OPEN Button Bright Control Volume Control INST. (Instant) ZOOM Button FADE Button DIGITAL EFFECTS Button Attach Rechargeable ...

User Guide
Page 14
...end of the shoulder strap rings as you leave the buckle on the straps and make sure they are ready to shoot - bring the camcorder to attach the other end of the shoulder strap from the buckle. This helps prevent possible damage to the viewfinder or monitor from your ...shoulder and - when you carry the camcorder from bumping against your body as shown below. Shoulder Strap Attachment Ring 4. Pull on the strap. If the monitor is open, close and lock...
...end of the shoulder strap rings as you leave the buckle on the straps and make sure they are ready to shoot - bring the camcorder to attach the other end of the shoulder strap from the buckle. This helps prevent possible damage to the viewfinder or monitor from your ...shoulder and - when you carry the camcorder from bumping against your body as shown below. Shoulder Strap Attachment Ring 4. Pull on the strap. If the monitor is open, close and lock...
User Guide
Page 15
...only a transformer-type power converter. Plug the adapter/charger's plug into an operating outlet. Unplug the adapter/charger from the adapter/charger and camcorder. Caution: Do not attempt to use a "power converter" to use this adapter/charger for battery operation and has no meaning when using... the adapter/charger to power the camcorder, the battery level indicator might display . They will damage your AC adapter/charger. Rem2o.vinAgttach the other than charging the EP096FS or...
...only a transformer-type power converter. Plug the adapter/charger's plug into an operating outlet. Unplug the adapter/charger from the adapter/charger and camcorder. Caution: Do not attempt to use a "power converter" to use this adapter/charger for battery operation and has no meaning when using... the adapter/charger to power the camcorder, the battery level indicator might display . They will damage your AC adapter/charger. Rem2o.vinAgttach the other than charging the EP096FS or...
User Guide
Page 16
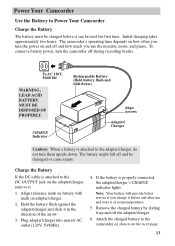
... . 1. Align reference mark on battery with mark on the adapter/charger, remove it up and off during recording breaks. Attach the charged battery to the camcorder as shown on and off and be charged before and after use the monitor, zoom, and pause. Power Your... the Battery Using the Battery The battery must be damaged or cause injury. Initial charging takes approximately two hours. The camcorder's operating time depends on how often you turn them upside down .) Align Arrows Adapter/ Charger Caution: When a battery is properly connected, the adapter/charger's CHARGE ...
... . 1. Align reference mark on battery with mark on the adapter/charger, remove it up and off during recording breaks. Attach the charged battery to the camcorder as shown on and off and be charged before and after use the monitor, zoom, and pause. Power Your... the Battery Using the Battery The battery must be damaged or cause injury. Initial charging takes approximately two hours. The camcorder's operating time depends on how often you turn them upside down .) Align Arrows Adapter/ Charger Caution: When a battery is properly connected, the adapter/charger's CHARGE ...
User Guide
Page 17
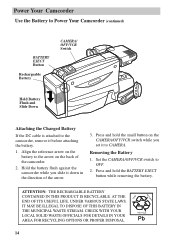
... the reference arrow on the battery to the arrow on the CAMERA/OFF/VCR switch while you slide it down in the direction of the camcorder. 2. Press and hold the small button on the back of the arrow. Set the CAMERA/OFF/VCR switch to OFF. 2. AT THE END OF ITS... Battery CAMERA/ OFF/VCR Switch Hold Battery Flush and Slide Down Attaching Attaching the Charged Battery Removing If the DC cable is attached to the camcorder, remove it to CAMERA. 1. CHECK WITH YOUR LOCAL SOLID WASTE OFFICIALS FOR DETAILS IN YOUR AREA FOR RECYCLING OPTIONS OR PROPER DISPOSAL. 14 LEAD RECYCLE...
... the reference arrow on the battery to the arrow on the CAMERA/OFF/VCR switch while you slide it down in the direction of the camcorder. 2. Press and hold the small button on the back of the arrow. Set the CAMERA/OFF/VCR switch to OFF. 2. AT THE END OF ITS... Battery CAMERA/ OFF/VCR Switch Hold Battery Flush and Slide Down Attaching Attaching the Charged Battery Removing If the DC cable is attached to the camcorder, remove it to CAMERA. 1. CHECK WITH YOUR LOCAL SOLID WASTE OFFICIALS FOR DETAILS IN YOUR AREA FOR RECYCLING OPTIONS OR PROPER DISPOSAL. 14 LEAD RECYCLE...

User Guide
Page 18
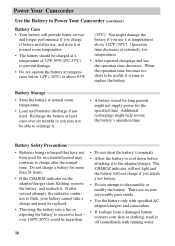
... Recharge the battery or use the adapter/charger before replacing the battery. The battery level indicator has no meaning when you use the camcorder. Notes: When you record using the rechargeable battery, the battery level indicator still flashes to warn you of power in the rechargeable ...adapter/charger or optional car cord to eject the cassette when you press STOP/EJECT. This will damage your camcorder. Power Your Camcorder Use the Battery to Power Your Camcorder (continued) Battery Level Indicator The battery level indicator appears in the viewfinder or on the LCD monitor and...
... Recharge the battery or use the adapter/charger before replacing the battery. The battery level indicator has no meaning when you use the camcorder. Notes: When you record using the rechargeable battery, the battery level indicator still flashes to warn you of power in the rechargeable ...adapter/charger or optional car cord to eject the cassette when you press STOP/EJECT. This will damage your camcorder. Power Your Camcorder Use the Battery to Power Your Camcorder (continued) Battery Level Indicator The battery level indicator appears in the viewfinder or on the LCD monitor and...
User Guide
Page 19
...to prevent damage. the operation time decreases. There are no userserviceable parts inside. • Use the battery only with specified AC adapter/chargers and camcorders. • If leakage from a damaged battery contacts your battery cannot take a charge and must be hazardous. • Do not short the ... down before attaching it at temperatures below 14ºF (-10ºC) or above 122ºF (50ºC). Power Your Camcorder Use the Battery to Power Your Camcorder (continued) Care and Storage Battery Care • Your battery will not charge if you attach a hot battery. •...
...to prevent damage. the operation time decreases. There are no userserviceable parts inside. • Use the battery only with specified AC adapter/chargers and camcorders. • If leakage from a damaged battery contacts your battery cannot take a charge and must be hazardous. • Do not short the ... down before attaching it at temperatures below 14ºF (-10ºC) or above 122ºF (50ºC). Power Your Camcorder Use the Battery to Power Your Camcorder (continued) Care and Storage Battery Care • Your battery will not charge if you attach a hot battery. •...
User Guide
Page 20
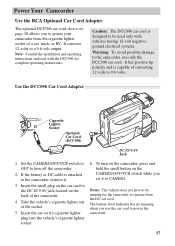
... cord is attached to the camcorder, remove it to CAMERA. To turn off the camcorder. 2. Notes: The vehicle does not have to be used only with the DCC096 for the camcorder to be running for complete operating instructions. Power Your Camcorder Use the RCA Optional Car Cord AdapterCar Cord Adapter... The optional DCC096 car cord shown on the back of the camcorder. 4. It converts 12-volts to the DC IN...
... cord is attached to the camcorder, remove it to CAMERA. To turn off the camcorder. 2. Notes: The vehicle does not have to be used only with the DCC096 for the camcorder to be running for complete operating instructions. Power Your Camcorder Use the RCA Optional Car Cord AdapterCar Cord Adapter... The optional DCC096 car cord shown on the back of the camcorder. 4. It converts 12-volts to the DC IN...

User Guide
Page 21
...a snowy picture or no control over it. Safety Tab You can contaminate the video heads, resulting in VHS standard speed (SP). Recording and Playback Speed and Times The camcorder records and plays back in a snowy picture or no picture at all during playback. Safety Tab To ... erasure, break off the tab. Videocassettes Make sure you select good quality tapes for popular VHS cassettes. Using Videocassettes Erase Protection - Listed below are the maximum recording times for your camcorder. Because there is no -picture condition persists, consider the use of tape purchased or rented...
...a snowy picture or no control over it. Safety Tab You can contaminate the video heads, resulting in VHS standard speed (SP). Recording and Playback Speed and Times The camcorder records and plays back in a snowy picture or no picture at all during playback. Safety Tab To ... erasure, break off the tab. Videocassettes Make sure you select good quality tapes for popular VHS cassettes. Using Videocassettes Erase Protection - Listed below are the maximum recording times for your camcorder. Because there is no -picture condition persists, consider the use of tape purchased or rented...


