User Guide
Page 6
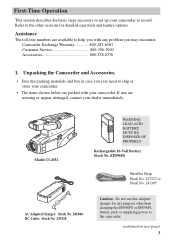
.... Camcorder Exchange Warranty 800-283-6503 Customer Service 800-336-1900 First Time Operation Accessories 800-338-0376 Assistance Unpacking the Camcorder and Accessories 1. If any purpose other sections for any are packed with any problem you with your camcorder. Refer to the other than charging the EP096FS or EP096FL battery pack or supplying power...
.... Camcorder Exchange Warranty 800-283-6503 Customer Service 800-336-1900 First Time Operation Accessories 800-338-0376 Assistance Unpacking the Camcorder and Accessories 1. If any purpose other sections for any are packed with any problem you with your camcorder. Refer to the other than charging the EP096FS or EP096FL battery pack or supplying power...
User Guide
Page 15
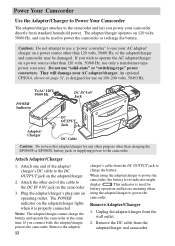
...Adapter/Charger 1. Rem2o.vinAgttach the other than charging the EP096FS or EP096FL battery pack or supplying power to the camcorder. Notes: The adapter/charger cannot charge the battery and operate the camcorder at the same time. Plug the adapter/charger's plug into an operating outlet. Remove ...the adapter/ 12 charger's cable from the wall outlet. 2. The POWER indicator on the camcorder. 3. The adapter/charger operates on a power source other end of the adapter/ charger's DC cable to the DC AttachinOgUTPUT jack on 100-240 volts,...
...Adapter/Charger 1. Rem2o.vinAgttach the other than charging the EP096FS or EP096FL battery pack or supplying power to the camcorder. Notes: The adapter/charger cannot charge the battery and operate the camcorder at the same time. Plug the adapter/charger's plug into an operating outlet. Remove ...the adapter/ 12 charger's cable from the wall outlet. 2. The POWER indicator on the camcorder. 3. The adapter/charger operates on a power source other end of the adapter/ charger's DC cable to the DC AttachinOgUTPUT jack on 100-240 volts,...
User Guide
Page 19
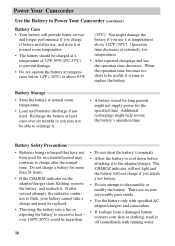
...extended period may not be replaced. • Throwing the battery into a fire or exposing the battery to excessive heat - Power Your Camcorder Use the Battery to Power Your Camcorder (continued) Care and Storage Battery Care • Your battery will not charge if you attach a hot battery. •... Do not operate the battery at temperatures below 14ºF (-10ºC) or above 122ºF (50ºC). Additional rechargings might not supply power for long periods might help restore the battery's operation time. over 149ºF (65ºC) could be charged at normal room temperature. ...
...extended period may not be replaced. • Throwing the battery into a fire or exposing the battery to excessive heat - Power Your Camcorder Use the Battery to Power Your Camcorder (continued) Care and Storage Battery Care • Your battery will not charge if you attach a hot battery. •... Do not operate the battery at temperatures below 14ºF (-10ºC) or above 122ºF (50ºC). Additional rechargings might not supply power for long periods might help restore the battery's operation time. over 149ºF (65ºC) could be charged at normal room temperature. ...
User Guide
Page 23
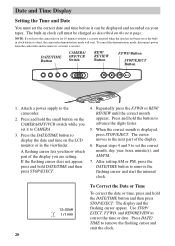
To cancel the demonstration mode, disconnect power from the camcorder and reconnect it to CAMERA. 3. Press and hold the button to...the correct month appears. Press and hold the small button on the CAMERA/OFF/VCR switch while you leave the camcorder on for 10 minutes without a cassette inserted when the date has not been set the correct month, day,... be charged as described on the next page. When the correct month is dead, the camcorder demonstration mode will start. Attach a power supply to correct the time or date. A flashing cursor lets you are setting. After setting ...
To cancel the demonstration mode, disconnect power from the camcorder and reconnect it to CAMERA. 3. Press and hold the button to...the correct month appears. Press and hold the small button on the CAMERA/OFF/VCR switch while you leave the camcorder on for 10 minutes without a cassette inserted when the date has not been set the correct month, day,... be charged as described on the next page. When the correct month is dead, the camcorder demonstration mode will start. Attach a power supply to correct the time or date. A flashing cursor lets you are setting. After setting ...
User Guide
Page 24
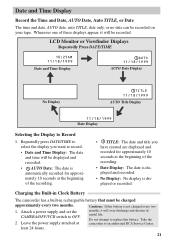
...Charging the Built-in Clock Battery The camcorder has a built-in rechargeable battery that must be recorded on your tapeAD. Attach a power supply and set the CAMERA/OFF/VCR switch to Record 1. Do not attempt to an authorized RCA Service Center. Leave the power supply attached at the beginning of the .... • AUTO Date: The date is automatically recorded for approximately 10 seconds at months, it will be recorded. Take the camcorder to replace this battery is displayed or recorded. Date and Time Display Record the Time and Date, AUTO Date, Auto TITLE, ...
...Charging the Built-in Clock Battery The camcorder has a built-in rechargeable battery that must be recorded on your tapeAD. Attach a power supply and set the CAMERA/OFF/VCR switch to Record 1. Do not attempt to an authorized RCA Service Center. Leave the power supply attached at the beginning of the .... • AUTO Date: The date is automatically recorded for approximately 10 seconds at months, it will be recorded. Take the camcorder to replace this battery is displayed or recorded. Date and Time Display Record the Time and Date, AUTO Date, Auto TITLE, ...
User Guide
Page 46
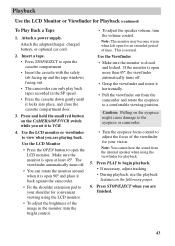
...This is closed and locked. Caution: Pulling on the following pages. 6. Playback Use the LCD Monitor or Viewfinder for playback. 5. Attach a power supply. Press STOP/EJECT when you set it locks into place, and close the cassette compartment door. 3. Use the LCD monitor or viewfinder to...8226; If necessary, adjust tracking. • During playback, use the playback features on the eyepiece might cause damage to the eyepiece or camcorder. • Turn the eyepiece focus control to open for an extended period of the viewfinder for convenient viewing using the viewfinder for Playback...
...This is closed and locked. Caution: Pulling on the following pages. 6. Playback Use the LCD Monitor or Viewfinder for playback. 5. Attach a power supply. Press STOP/EJECT when you set it locks into place, and close the cassette compartment door. 3. Use the LCD monitor or viewfinder to...8226; If necessary, adjust tracking. • During playback, use the playback features on the eyepiece might cause damage to the eyepiece or camcorder. • Turn the eyepiece focus control to open for an extended period of the viewfinder for convenient viewing using the viewfinder for Playback...
User Guide
Page 63
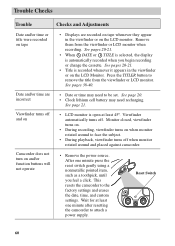
... they appear in the viewfinder or on the LCD monitor. Viewfinder turns off . Wait for at least 45º. This resets the camcorder to attach a power supply. See pages 20-21. • When DATE or TITLE is selected, the display is open at least one minute press the reset...LCD monitor when recording. Viewfinder automatically turns off and on and/or function buttons will not operate • Remove the power source. After one minute after resetting the camcorder to the factory settings and erases the date, time, and custom settings. Remove them from the viewfinder or LCD ...
... they appear in the viewfinder or on the LCD monitor. Viewfinder turns off . Wait for at least 45º. This resets the camcorder to attach a power supply. See pages 20-21. • When DATE or TITLE is selected, the display is open at least one minute press the reset...LCD monitor when recording. Viewfinder automatically turns off and on and/or function buttons will not operate • Remove the power source. After one minute after resetting the camcorder to the factory settings and erases the date, time, and custom settings. Remove them from the viewfinder or LCD ...


