User Guide
Page 3
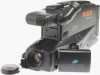
... adapter/charger to rain or moisture. Returning this camcorder. WARNING: To reduce the risk of plug to wide slot, fully insert. REFER SERVICING TO QUALIFIED SERVICE PERSONNEL. Model No: Serial No: Purchase Date: Purchased From: _C_C_4_3_5_2 i CAUTION RISK OF ELECTRIC SHOCK DO NOT OPEN This symbol indicates "dangerous voltage" inside the product that unauthorized changes or modifications to this product. NO USER-SERVICEABLE PARTS...
... adapter/charger to rain or moisture. Returning this camcorder. WARNING: To reduce the risk of plug to wide slot, fully insert. REFER SERVICING TO QUALIFIED SERVICE PERSONNEL. Model No: Serial No: Purchase Date: Purchased From: _C_C_4_3_5_2 i CAUTION RISK OF ELECTRIC SHOCK DO NOT OPEN This symbol indicates "dangerous voltage" inside the product that unauthorized changes or modifications to this product. NO USER-SERVICEABLE PARTS...
User Guide
Page 4
... Remove Cassettes ........ 19 Cassette Care and Storage 19 Setting the Time and Date 20 To Correct the Date or Time .... 20 Charging the Built-in Clock Battery 21 LCD Monitor or Viewfinder Displays 21 Recording Time and Date 21 AUTO Date 21 Auto TITLE 21 Date 21 Selecting Display 21 Recording 22 Using the LCD Monitor 22 Using the Viewfinder 23 Eyepiece Focus Control .......... 23 Adjusting the Viewfinder ........ 23 LCD Monitor or Viewfinder Displays 24 AE:60 (Auto Exposure) Shutter Speed 24 Battery Level...
... Remove Cassettes ........ 19 Cassette Care and Storage 19 Setting the Time and Date 20 To Correct the Date or Time .... 20 Charging the Built-in Clock Battery 21 LCD Monitor or Viewfinder Displays 21 Recording Time and Date 21 AUTO Date 21 Auto TITLE 21 Date 21 Selecting Display 21 Recording 22 Using the LCD Monitor 22 Using the Viewfinder 23 Eyepiece Focus Control .......... 23 Adjusting the Viewfinder ........ 23 LCD Monitor or Viewfinder Displays 24 AE:60 (Auto Exposure) Shutter Speed 24 Battery Level...
User Guide
Page 5
... 41 To Play Back a Tape 43 Playback Features 44 Tape Positioning 44 Visual Searching 44 Stop-Action Pause 44 Playback on a TV/VCR with Memory Stop 25 Tape Warnings (TAPE, NO TAPE, and TAPE END) 25 Time and Date Display 25 Tape-Remaining Indicator ....... 25 Zoom Indicators 25 DISPLAY Button 26 Microphone 26 Quick Review Feature 26 Auto Shot Feature 27 Auto Focus 27 Macro Focus 27 Tape-Remaining Display 27 Electronic Indexing 28 Zooming 29 Using the Zoom Buttons ......... 29 Zoom Level Indicator in LCD Monitor...
... 41 To Play Back a Tape 43 Playback Features 44 Tape Positioning 44 Visual Searching 44 Stop-Action Pause 44 Playback on a TV/VCR with Memory Stop 25 Tape Warnings (TAPE, NO TAPE, and TAPE END) 25 Time and Date Display 25 Tape-Remaining Indicator ....... 25 Zoom Indicators 25 DISPLAY Button 26 Microphone 26 Quick Review Feature 26 Auto Shot Feature 27 Auto Focus 27 Macro Focus 27 Tape-Remaining Display 27 Electronic Indexing 28 Zooming 29 Using the Zoom Buttons ......... 29 Zoom Level Indicator in LCD Monitor...
User Guide
Page 6
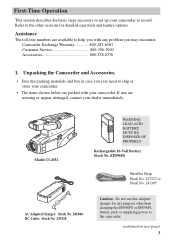
...-283-6503 Customer Service 800-336-1900 First Time Operation Accessories 800-338-0376 Assistance Unpacking the Camcorder and Accessories 1. Model CC4352 WARNING: LEAD-ACID BATTERY. Unpacking the Camcorder and Accessories. • Save the packing materials and box in case you ever need to help you with your camcorder. EP096FS Shoulder Strap Stock No. 227327 or Stock No. 241305 POWER CHARGE AC Adapter/Charger: Stock No...
...-283-6503 Customer Service 800-336-1900 First Time Operation Accessories 800-338-0376 Assistance Unpacking the Camcorder and Accessories 1. Model CC4352 WARNING: LEAD-ACID BATTERY. Unpacking the Camcorder and Accessories. • Save the packing materials and box in case you ever need to help you with your camcorder. EP096FS Shoulder Strap Stock No. 227327 or Stock No. 241305 POWER CHARGE AC Adapter/Charger: Stock No...
User Guide
Page 8
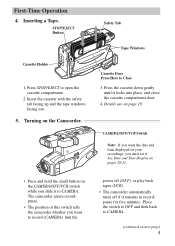
Press STOP/EJECT to record (CAMERA), turn the power off (OFF), or play back tapes (VCR). • The camcorder automatically turns off if it to CAMERA. (continued on the Camcorder. Press the cassette down gently until it . The camcorder enters recordpause. • The position of this switch tells the camcorder whether you want to open the cassette compartment. 2. Inserting a Tape. CAMERA/OFF/VCR Switch Note: If you want the date and time displayed on page 19. Details...
Press STOP/EJECT to record (CAMERA), turn the power off (OFF), or play back tapes (VCR). • The camcorder automatically turns off if it to CAMERA. (continued on the Camcorder. Press the cassette down gently until it . The camcorder enters recordpause. • The position of this switch tells the camcorder whether you want to open the cassette compartment. 2. Inserting a Tape. CAMERA/OFF/VCR Switch Note: If you want the date and time displayed on page 19. Details...
User Guide
Page 11
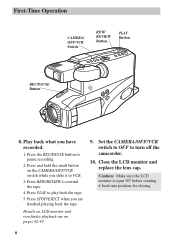
.../REVIEW to turn off the camcorder. 10. Set the CAMERA/OFF/VCR switch to OFF to rewind the tape. 4. Caution: Make sure the LCD monitor is open 90º before rotating it to pause recording. 2. First-Time Operation CAMERA/ OFF/VCR Switch REW/ REVIEW Button PLAY Button REC/PAUSE Button 8. Close the LCD monitor and replace the lens cap. Press STOP/EJECT when you are on the CAMERA/OFF/VCR switch while you have recorded. 1. Press the REC/PAUSE button to VCR. 3. Press and hold the small button...
.../REVIEW to turn off the camcorder. 10. Set the CAMERA/OFF/VCR switch to OFF to rewind the tape. 4. Caution: Make sure the LCD monitor is open 90º before rotating it to pause recording. 2. First-Time Operation CAMERA/ OFF/VCR Switch REW/ REVIEW Button PLAY Button REC/PAUSE Button 8. Close the LCD monitor and replace the lens cap. Press STOP/EJECT when you are on the CAMERA/OFF/VCR switch while you have recorded. 1. Press the REC/PAUSE button to VCR. 3. Press and hold the small button...
User Guide
Page 13
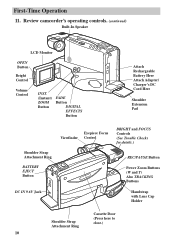
First-Time Operation 11. Review camcorder's operating controls. (continued) Built-In Speaker LCD Monitor OPEN Button Bright Control Volume Control INST. (Instant) ZOOM Button FADE Button DIGITAL EFFECTS Button Attach Rechargeable Battery Here Attach Adapter/ Charger's DC Cord Here Shoulder Extension Pad Shoulder Strap Attachment Ring BATTERY EJECT Button DC IN 9.6V Jack Eyepiece Focus Viewfinder Control BRIGHT and FOCUS Controls (See Trouble Checks for details.) REC/PAUSE Button Power Zoom Buttons (W and T) Also TRACKING Buttons Handstrap with Lens Cap Holder Shoulder Strap ...
First-Time Operation 11. Review camcorder's operating controls. (continued) Built-In Speaker LCD Monitor OPEN Button Bright Control Volume Control INST. (Instant) ZOOM Button FADE Button DIGITAL EFFECTS Button Attach Rechargeable Battery Here Attach Adapter/ Charger's DC Cord Here Shoulder Extension Pad Shoulder Strap Attachment Ring BATTERY EJECT Button DC IN 9.6V Jack Eyepiece Focus Viewfinder Control BRIGHT and FOCUS Controls (See Trouble Checks for details.) REC/PAUSE Button Power Zoom Buttons (W and T) Also TRACKING Buttons Handstrap with Lens Cap Holder Shoulder Strap ...
User Guide
Page 16
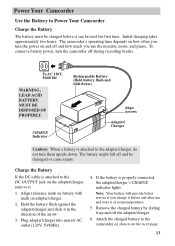
... DC cable is attached to the adapter/charger, do not turn the power on the adapter/charger, remove it. 1. MUST BE DISPOSED OF PROPERLY. If the battery is properly connected, the adapter/charger's CHARGE indicator lights. Remove the charged battery by sliding it cCahnabreguinsged the first time. Power Your Camcorder Use the Battery to Power Your Camcorder Charge the Battery Using the Battery The battery must be damaged or cause injury. To AC 120V, 50/60 Hz WARNING; Plug adapter/charger into...
... DC cable is attached to the adapter/charger, do not turn the power on the adapter/charger, remove it. 1. MUST BE DISPOSED OF PROPERLY. If the battery is properly connected, the adapter/charger's CHARGE indicator lights. Remove the charged battery by sliding it cCahnabreguinsged the first time. Power Your Camcorder Use the Battery to Power Your Camcorder Charge the Battery Using the Battery The battery must be damaged or cause injury. To AC 120V, 50/60 Hz WARNING; Plug adapter/charger into...

User Guide
Page 18
... adapter/charger before continuing to use , the camcorder turns off the camcorder before replacing the battery. Before attempting to eject the cassette when you press STOP/EJECT. The battery level indicator isn't recorded on the LCD Monitor Note: If you can't see the battery level display, press DISPLAY. • When appears, the battery is fully charged. • As the power is used and appear. • When the battery power is almost gone, flashes in the rechargeable battery. Set the CAMERA...
... adapter/charger before continuing to use , the camcorder turns off the camcorder before replacing the battery. Before attempting to eject the cassette when you press STOP/EJECT. The battery level indicator isn't recorded on the LCD Monitor Note: If you can't see the battery level display, press DISPLAY. • When appears, the battery is fully charged. • As the power is used and appear. • When the battery power is almost gone, flashes in the rechargeable battery. Set the CAMERA...
User Guide
Page 19
... time to replace the battery. If after use, and store it . Power Your Camcorder Use the Battery to Power Your Camcorder (continued) Care and Storage Battery Care • Your battery will not charge if you attach a hot battery. • Do not attempt to disassemble or modify the battery. Additional rechargings might not supply power for more than 24 hours. • If the CHARGE indicator on the adapter/charger starts flashing, remove...
... time to replace the battery. If after use, and store it . Power Your Camcorder Use the Battery to Power Your Camcorder (continued) Care and Storage Battery Care • Your battery will not charge if you attach a hot battery. • Do not attempt to disassemble or modify the battery. Additional rechargings might not supply power for more than 24 hours. • If the CHARGE indicator on the adapter/charger starts flashing, remove...

User Guide
Page 21
... tapes for popular VHS cassettes. Safety Tab You can contaminate the video heads, resulting in VHS standard speed (SP). If a snowy picture or no control over it. Safety Tab To prevent accidental erasure, break off the tab. Be sure to follow the directions with vinyl tape. Because there is considered normal maintenance. Recording and Playback Speed and Times The camcorder records and plays back in a snowy picture or no picture...
... tapes for popular VHS cassettes. Safety Tab You can contaminate the video heads, resulting in VHS standard speed (SP). If a snowy picture or no control over it. Safety Tab To prevent accidental erasure, break off the tab. Be sure to follow the directions with vinyl tape. Because there is considered normal maintenance. Recording and Playback Speed and Times The camcorder records and plays back in a snowy picture or no picture...
User Guide
Page 24
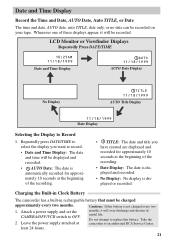
... to replace this battery is not charged every two 1. least 24 hours. 21 LCD Monitor or Viewfinder Displays Repeatedly Press DATE/TIME 10:25AM 11/18/1999 Date and Time Display AUTO 11/18/1999 AUTO Date Display No Display TITLE 11/18/1999 AUTO Title Display 11/18/1999 Date Display Selecting Display Selecting the Display to an authorized RCA Service Center. Repeatedly press DATE/TIME to OFF. 2. Attach a power supply and set the CAMERA/OFF/VCR switch to...
... to replace this battery is not charged every two 1. least 24 hours. 21 LCD Monitor or Viewfinder Displays Repeatedly Press DATE/TIME 10:25AM 11/18/1999 Date and Time Display AUTO 11/18/1999 AUTO Date Display No Display TITLE 11/18/1999 AUTO Title Display 11/18/1999 Date Display Selecting Display Selecting the Display to an authorized RCA Service Center. Repeatedly press DATE/TIME to OFF. 2. Attach a power supply and set the CAMERA/OFF/VCR switch to...
User Guide
Page 46
... tapes recorded in the SP speed. • Press the cassette down gently until it horizontally. • Pull the viewfinder out from the internal speaker when using the viewfinder for convenient viewing using the LCD monitor. • To adjust the brightness of the image in the monitor, turn the bright control. • To adjust the speaker volume, turn the volume control. Press PLAY to a comfortable viewing position. Insert a tape. • Press STOP/EJECT to open...
... tapes recorded in the SP speed. • Press the cassette down gently until it horizontally. • Pull the viewfinder out from the internal speaker when using the viewfinder for convenient viewing using the LCD monitor. • To adjust the brightness of the image in the monitor, turn the bright control. • To adjust the speaker volume, turn the volume control. Press PLAY to a comfortable viewing position. Insert a tape. • Press STOP/EJECT to open...

User Guide
Page 50
... is playing, place a blank cassette in the SP speed. A. or "camera mode". (If your VCR does not have a "line" or "camera mode", consult the VCR owner's manual.) Operate the TV as you set it to VCR. 4. Camcorder connected to VCR that is seeing (or recording) on the TV and tune it to see the signal coming from the VCR. 2. Press STOP/EJECT when you normally do to the video input channel. A. Press the REC/PAUSE button...
... is playing, place a blank cassette in the SP speed. A. or "camera mode". (If your VCR does not have a "line" or "camera mode", consult the VCR owner's manual.) Operate the TV as you set it to VCR. 4. Camcorder connected to VCR that is seeing (or recording) on the TV and tune it to see the signal coming from the VCR. 2. Press STOP/EJECT when you normally do to the video input channel. A. Press the REC/PAUSE button...
User Guide
Page 61
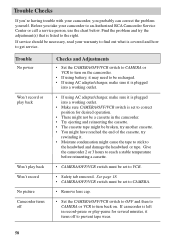
... tab removed. Trouble No power Won't record or play back Won't play -pause for several minutes, it . • Moisture condensation might have reached the end of the cassette, try rewinding it turns off Troubleshooting 58 Checks and Adjustments • Set the CAMERA/OFF/VCR switch to CAMERA or VCR to turn back on the camcorder. • If using battery, it may need to be recharged. • If using AC adapter/charger, make sure it is plugged into a working...
... tab removed. Trouble No power Won't record or play back Won't play -pause for several minutes, it . • Moisture condensation might have reached the end of the cassette, try rewinding it turns off Troubleshooting 58 Checks and Adjustments • Set the CAMERA/OFF/VCR switch to CAMERA or VCR to turn back on the camcorder. • If using battery, it may need to be recharged. • If using AC adapter/charger, make sure it is plugged into a working...
User Guide
Page 63
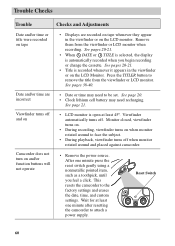
... cell battery may need recharging. Remove them from the viewfinder or LCD monitor. Trouble Checks Trouble Checks and Adjustments Date and/or time or title were recorded on tape • Displays are incorrect • Date or time may need to be set. See pages 20-21. • When DATE or TITLE is selected, the display is recorded whenever it appears in the viewfinder or on and/or function buttons will not operate • Remove the power...
... cell battery may need recharging. Remove them from the viewfinder or LCD monitor. Trouble Checks Trouble Checks and Adjustments Date and/or time or title were recorded on tape • Displays are incorrect • Date or time may need to be set. See pages 20-21. • When DATE or TITLE is selected, the display is recorded whenever it appears in the viewfinder or on and/or function buttons will not operate • Remove the power...
User Guide
Page 64
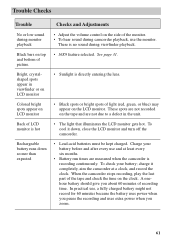
... of picture. • 16X9 feature selected. A onehour battery should give you zoom. 61 When the camcorder stops recording, play the last part of recording time. Bright, crystalshaped spots appear in the unit. Back of LCD monitor is no sound during camcorder playback, use , a fully charged battery might not record for 60 minutes because the battery uses power when you pause the recording and uses extra power when you about 60 minutes of the tape and check the time...
... of picture. • 16X9 feature selected. A onehour battery should give you zoom. 61 When the camcorder stops recording, play the last part of recording time. Bright, crystalshaped spots appear in the unit. Back of LCD monitor is no sound during camcorder playback, use , a fully charged battery might not record for 60 minutes because the battery uses power when you pause the recording and uses extra power when you about 60 minutes of the tape and check the time...

User Guide
Page 65
... might scratch the lens. Depress tab to open completely. Improper cleaning may scratch the monitor. Caution: Do not force the cover to open small cover. 2. To clean the camcorder's LCD monitor, use a clean, soft cloth to carefully wipe the monitor. Improper cleaning might damage the cover. 62 1. Care and Maintenance Cleaning the Camcorder To clean the camcorder's exterior, remove any power source connected to the camcorder and gently...
... might scratch the lens. Depress tab to open completely. Improper cleaning may scratch the monitor. Caution: Do not force the cover to open small cover. 2. To clean the camcorder's LCD monitor, use a clean, soft cloth to carefully wipe the monitor. Improper cleaning might damage the cover. 62 1. Care and Maintenance Cleaning the Camcorder To clean the camcorder's exterior, remove any power source connected to the camcorder and gently...
User Guide
Page 66
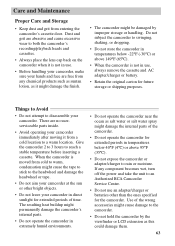
... the internal parts of the camcorder. • Do not operate the camcorder for extended periods of the wrong accessories might cause damage to rain or moisture. Do not subject the camcorder to an Authorized RCA Camcorder Service Center. • Do not use , always remove the cassette and AC adapter/charger or battery. • Retain the original carton for the camcorder. Use of time. There are free from entering the camcorder's cassette...
... the internal parts of the camcorder. • Do not operate the camcorder for extended periods of the wrong accessories might cause damage to rain or moisture. Do not subject the camcorder to an Authorized RCA Camcorder Service Center. • Do not use , always remove the cassette and AC adapter/charger or battery. • Retain the original carton for the camcorder. Use of time. There are free from entering the camcorder's cassette...
User Guide
Page 71
... form 55 Adapter/charger accessory 3 charging battery 13 using 4, 12 AE focus indicators 24, 27 Assistance 1, 3 Audio/Video (A/V) jacks 9, 46, 48 B Battery 3 attaching and removing 14 care 16 charging 13 safety precautions 16 storage 16 using 13 BATTERY EJECT button 10, 14 Battery level indicator 15, 24 Bright control 10, 22, 42, 43 Built-in speaker 10 C Cable TV installer note 49 Camcorder cleaning 62 turn on 5 Camera edit feature 37 CAMERA/OFF/VCR switch 5, 9, 14, 15...
... form 55 Adapter/charger accessory 3 charging battery 13 using 4, 12 AE focus indicators 24, 27 Assistance 1, 3 Audio/Video (A/V) jacks 9, 46, 48 B Battery 3 attaching and removing 14 care 16 charging 13 safety precautions 16 storage 16 using 13 BATTERY EJECT button 10, 14 Battery level indicator 15, 24 Bright control 10, 22, 42, 43 Built-in speaker 10 C Cable TV installer note 49 Camcorder cleaning 62 turn on 5 Camera edit feature 37 CAMERA/OFF/VCR switch 5, 9, 14, 15...


