User Guide
Page 3
...slot, fully insert. Product Registration Please fill out the product registration card and return it . Keep your sales receipt for this camcorder. Important Safety Information Be sure to read all the safety information before you begin to contact you if needed. WARNING: To ... bottom of injury, charge only rechargeable batteries recommended by the manufacturer for proof of batteries may void the user's authority to rain or moisture. Model No: Serial No: Purchase Date: Purchased From: _C_C_4_3_5_2 i To reduce risk of the camcorder. Returning this card allows us to ...
...slot, fully insert. Product Registration Please fill out the product registration card and return it . Keep your sales receipt for this camcorder. Important Safety Information Be sure to read all the safety information before you begin to contact you if needed. WARNING: To ... bottom of injury, charge only rechargeable batteries recommended by the manufacturer for proof of batteries may void the user's authority to rain or moisture. Model No: Serial No: Purchase Date: Purchased From: _C_C_4_3_5_2 i To reduce risk of the camcorder. Returning this card allows us to ...
User Guide
Page 4
...ii First Time Operation 3 Assistance 3 Unpacking the Camcorder and Accessories 3 Adapter/Charger 12 Attaching 12 Removing 12 Powering Your Camcorder .. 12 Using the Battery 13 Charging 13 Attaching 14 Removing 14 Battery Level Indicator ........ 15 Battery Care 16 Battery Storage 16 Battery Safety Precautions ... 16 Care and Storage 16 ... and Storage 19 Setting the Time and Date 20 To Correct the Date or Time .... 20 Charging the Built-in Clock Battery 21 LCD Monitor or Viewfinder Displays 21 Recording Time and Date 21 AUTO Date 21 Auto TITLE 21 Date 21 Selecting Display...
...ii First Time Operation 3 Assistance 3 Unpacking the Camcorder and Accessories 3 Adapter/Charger 12 Attaching 12 Removing 12 Powering Your Camcorder .. 12 Using the Battery 13 Charging 13 Attaching 14 Removing 14 Battery Level Indicator ........ 15 Battery Care 16 Battery Storage 16 Battery Safety Precautions ... 16 Care and Storage 16 ... and Storage 19 Setting the Time and Date 20 To Correct the Date or Time .... 20 Charging the Built-in Clock Battery 21 LCD Monitor or Viewfinder Displays 21 Recording Time and Date 21 AUTO Date 21 Auto TITLE 21 Date 21 Selecting Display...
User Guide
Page 6
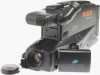
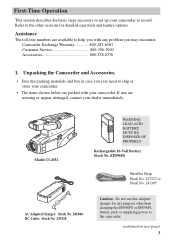
... Operation Accessories 800-338-0376 Assistance Unpacking the Camcorder and Accessories 1. Model CC4352 WARNING: LEAD-ACID BATTERY. First-Time Operation First Time Operation This section describes the basic steps necessary to set up your camcorder. Unpacking the Camcorder and Accessories. • Save the packing materials...ever need to help you may encounter. If any purpose other sections for any are missing or appear damaged, contact your camcorder. • The items shown below are available to ship or store your dealer immediately. EP096FS Shoulder Strap Stock No. 227327...
... Operation Accessories 800-338-0376 Assistance Unpacking the Camcorder and Accessories 1. Model CC4352 WARNING: LEAD-ACID BATTERY. First-Time Operation First Time Operation This section describes the basic steps necessary to set up your camcorder. Unpacking the Camcorder and Accessories. • Save the packing materials...ever need to help you may encounter. If any purpose other sections for any are missing or appear damaged, contact your camcorder. • The items shown below are available to ship or store your dealer immediately. EP096FS Shoulder Strap Stock No. 227327...
User Guide
Page 7
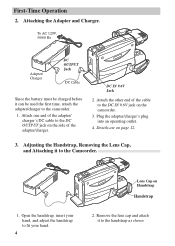
To AC 120V, 50/60 Hz POWER CHARGE Adapter/ Charger DC OUTPUT Jack DC Cable Since the battery must be used the first time, attach the adapter/charger to the DC IN 9.6V jack on the side of the adapter/charger. Attach the ... attach it can be charged before it to the DC OUTPUT jack on the camcorder. 3. Attach one end of the cable to the camcorder. 1. POWER CHARGE 1. Open the handstrap, insert your hand, and adjust the handstrap to the Camcorder. DC IN 9.6V Jack 2. Adjusting the Handstrap, Removing the Lens Cap, and Attaching it...
To AC 120V, 50/60 Hz POWER CHARGE Adapter/ Charger DC OUTPUT Jack DC Cable Since the battery must be used the first time, attach the adapter/charger to the DC IN 9.6V jack on the side of the adapter/charger. Attach the ... attach it can be charged before it to the DC OUTPUT jack on the camcorder. 3. Attach one end of the cable to the camcorder. 1. POWER CHARGE 1. Open the handstrap, insert your hand, and adjust the handstrap to the Camcorder. DC IN 9.6V Jack 2. Adjusting the Handstrap, Removing the Lens Cap, and Attaching it...
User Guide
Page 13
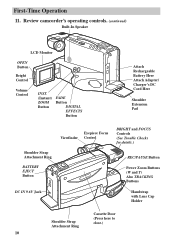
First-Time Operation 11. Review camcorder's operating controls. (continued) Built-In Speaker LCD Monitor OPEN Button Bright Control Volume Control INST. (Instant) ZOOM Button FADE Button DIGITAL EFFECTS Button Attach Rechargeable Battery Here Attach Adapter/ Charger's DC Cord Here Shoulder Extension Pad Shoulder Strap Attachment Ring BATTERY EJECT Button DC IN 9.6V Jack Eyepiece...
First-Time Operation 11. Review camcorder's operating controls. (continued) Built-In Speaker LCD Monitor OPEN Button Bright Control Volume Control INST. (Instant) ZOOM Button FADE Button DIGITAL EFFECTS Button Attach Rechargeable Battery Here Attach Adapter/ Charger's DC Cord Here Shoulder Extension Pad Shoulder Strap Attachment Ring BATTERY EJECT Button DC IN 9.6V Jack Eyepiece...
User Guide
Page 15
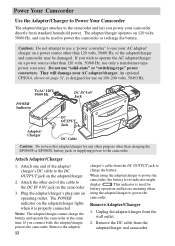
... AttachinOgUTPUT jack on the adapter/charger. Remove the DC cable from the wall outlet. 2. They will damage your camcorder directly from the DC OUTPUT jack to power the camcorder, the battery level indicator might display . Rem2o.vinAgttach the other end of the adapter/ charger's DC cable to the DC ... a power source other than 120 volts, 50/60 Hz, or the adapter/charger and camcorder may be used for battery operation and has no meaning when using the adapter/charger to charge the battery. If you power your AC adapter/charger. An optional CPS014, shown on 120 volts, 50...
... AttachinOgUTPUT jack on the adapter/charger. Remove the DC cable from the wall outlet. 2. They will damage your camcorder directly from the DC OUTPUT jack to power the camcorder, the battery level indicator might display . Rem2o.vinAgttach the other end of the adapter/ charger's DC cable to the DC ... a power source other than 120 volts, 50/60 Hz, or the adapter/charger and camcorder may be used for battery operation and has no meaning when using the adapter/charger to charge the battery. If you power your AC adapter/charger. An optional CPS014, shown on 120 volts, 50...
User Guide
Page 16
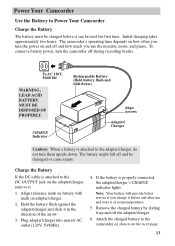
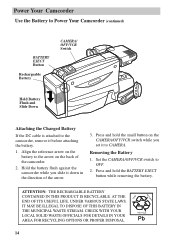
...Camcorder Use the Battery to Power Your Camcorder Charge the Battery Using the Battery The battery must be damaged or cause injury. To conserve battery power, turn the camcorder off and how much you use and store it at room temperature. 5. Align reference mark on battery with mark on the next page. 13 If the battery... upside down. CHARGE Indicator Rechargeable Battery (Hold battery flush and slide down.) Align Arrows Adapter/ Charger Caution: When a battery is attached to the camcorder as shown on adapter/charger. 2. Remove the charged battery by sliding it in the direction...
...Camcorder Use the Battery to Power Your Camcorder Charge the Battery Using the Battery The battery must be damaged or cause injury. To conserve battery power, turn the camcorder off and how much you use and store it at room temperature. 5. Align reference mark on battery with mark on the next page. 13 If the battery... upside down. CHARGE Indicator Rechargeable Battery (Hold battery flush and slide down.) Align Arrows Adapter/ Charger Caution: When a battery is attached to the camcorder as shown on adapter/charger. 2. Remove the charged battery by sliding it in the direction...
User Guide
Page 17
... THIS PRODUCT IS RECYCLABLE. Press and hold the small button on the CAMERA/OFF/VCR switch while you slide it before attaching the battery. 3. Hold the battery flush against the camcorder while you set it to CAMERA. 1. CHECK WITH YOUR LOCAL SOLID WASTE OFFICIALS FOR DETAILS IN YOUR AREA FOR RECYCLING OPTIONS OR...
... THIS PRODUCT IS RECYCLABLE. Press and hold the small button on the CAMERA/OFF/VCR switch while you slide it before attaching the battery. 3. Hold the battery flush against the camcorder while you set it to CAMERA. 1. CHECK WITH YOUR LOCAL SOLID WASTE OFFICIALS FOR DETAILS IN YOUR AREA FOR RECYCLING OPTIONS OR...

User Guide
Page 18
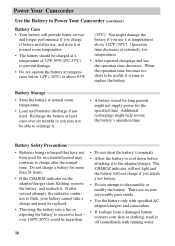
... the tape. Set the CAMERA/OFF/VCR switch to OFF to turn off . The battery level indicator has no meaning when you use the adapter/charger before replacing the battery. Power Your Camcorder Use the Battery to power the camcorder. Cautions: When a battery reaches empty during use the camcorder. The battery should still have the battery level indicator displayed.
... the tape. Set the CAMERA/OFF/VCR switch to OFF to turn off . The battery level indicator has no meaning when you use the adapter/charger before replacing the battery. Power Your Camcorder Use the Battery to power the camcorder. Cautions: When a battery reaches empty during use the camcorder. The battery should still have the battery level indicator displayed.
User Guide
Page 19
...inside. • Use the battery only with specified AC adapter/chargers and camcorders. • If leakage from a damaged battery contacts your battery cannot take a charge and must be hazardous. • Do not short the battery's terminals. • Allow the battery to cool down before and after... repeated chargings and use it at temperatures if before attaching it . Power Your Camcorder Use the Battery to Power Your Camcorder (continued) Care and Storage Battery Care • Your battery will not charge if you attach a hot battery. • Do not attempt to disassemble or modify the...
...inside. • Use the battery only with specified AC adapter/chargers and camcorders. • If leakage from a damaged battery contacts your battery cannot take a charge and must be hazardous. • Do not short the battery's terminals. • Allow the battery to cool down before and after... repeated chargings and use it at temperatures if before attaching it . Power Your Camcorder Use the Battery to Power Your Camcorder (continued) Care and Storage Battery Care • Your battery will not charge if you attach a hot battery. • Do not attempt to disassemble or modify the...
User Guide
Page 20
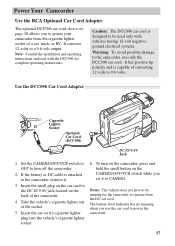
... you use only the DCC096 car cord. Caution: The DCC096 car cord is designed to 9.6 volts. To turn off the camcorder. 2. If the battery or DC cable is capable of converting 12 volts to be running for complete operating instructions. It has positive tip polarity and... cord's cigarette lighter plug into the vehicle's cigarette lighter socket. 6. Power Your Camcorder Use the RCA Optional Car Cord AdapterCar Cord Adapter The optional DCC096 car cord shown on the back of the camcorder. 4. Note: Consult the installation and operating instructions enclosed with vehicles having 12-volt...
... you use only the DCC096 car cord. Caution: The DCC096 car cord is designed to 9.6 volts. To turn off the camcorder. 2. If the battery or DC cable is capable of converting 12 volts to be running for complete operating instructions. It has positive tip polarity and... cord's cigarette lighter plug into the vehicle's cigarette lighter socket. 6. Power Your Camcorder Use the RCA Optional Car Cord AdapterCar Cord Adapter The optional DCC096 car cord shown on the back of the camcorder. 4. Note: Consult the installation and operating instructions enclosed with vehicles having 12-volt...
User Guide
Page 23
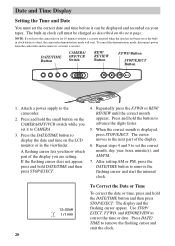
... After setting AM or PM, press the DATE/TIME button to the next part of the display you leave the camcorder on the next page. Press DATE/ TIME to CAMERA. 3. DATE/TIME Button CAMERA/ OFF/VCR Switch REW/ REVIEW... Button F.FWD Button STOP/EJECT Button 1. To cancel the demonstration mode, disconnect power from the camcorder and reconnect it to remove the flashing cursor and start the internal clock. Attach a power supply to correct the ...in the viewfinder. Press the DATE/TIME button to set or the builtin clock battery is displayed, press STOP/EJECT.
... After setting AM or PM, press the DATE/TIME button to the next part of the display you leave the camcorder on the next page. Press DATE/ TIME to CAMERA. 3. DATE/TIME Button CAMERA/ OFF/VCR Switch REW/ REVIEW... Button F.FWD Button STOP/EJECT Button 1. To cancel the demonstration mode, disconnect power from the camcorder and reconnect it to remove the flashing cursor and start the internal clock. Attach a power supply to correct the ...in the viewfinder. Press the DATE/TIME button to set or the builtin clock battery is displayed, press STOP/EJECT.
User Guide
Page 24
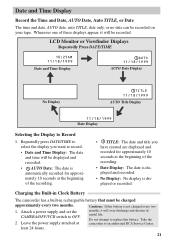
... is not charged every two 1. Do not attempt to OFF. 2. Charging the Built-in Clock Battery The camcorder has a built-in rechargeable battery that must be recorded on your tapeAD. Take the camcorder to Record 1. least 24 hours. 21 LCD Monitor or Viewfinder Displays Repeatedly Press DATE/TIME 10:25AM...Display TITLE 11/18/1999 AUTO Title Display 11/18/1999 Date Display Selecting Display Selecting the Display to an authorized RCA Service Center. Attach a power supply and set the CAMERA/OFF/VCR switch to replace this battery is displayed or recorded. Cautions: If this...
... is not charged every two 1. Do not attempt to OFF. 2. Charging the Built-in Clock Battery The camcorder has a built-in rechargeable battery that must be recorded on your tapeAD. Take the camcorder to Record 1. least 24 hours. 21 LCD Monitor or Viewfinder Displays Repeatedly Press DATE/TIME 10:25AM...Display TITLE 11/18/1999 AUTO Title Display 11/18/1999 Date Display Selecting Display Selecting the Display to an authorized RCA Service Center. Attach a power supply and set the CAMERA/OFF/VCR switch to replace this battery is displayed or recorded. Cautions: If this...

User Guide
Page 27
.... • Select 16X9 to make a recording that you zoom over 16 times. • Select MIRROR to record a symmetric image on the left on the rechargeable battery. Fade Indicator ( ) Press the DISPLAY button to activate the extended zoom mode - Digital Effects (ZM:2) Press the DISPLAY button to record a mosaic image. • Details... Press the DISPLAY button to display the amount of time left and right. • Select MOSAIC to display the indicator for the fade mode selected. Battery Level Indicator ( ) Press the DISPLAY button to display the shutter speed selected by the...
.... • Select 16X9 to make a recording that you zoom over 16 times. • Select MIRROR to record a symmetric image on the left on the rechargeable battery. Fade Indicator ( ) Press the DISPLAY button to activate the extended zoom mode - Digital Effects (ZM:2) Press the DISPLAY button to record a mosaic image. • Details... Press the DISPLAY button to display the amount of time left and right. • Select MOSAIC to display the indicator for the fade mode selected. Battery Level Indicator ( ) Press the DISPLAY button to display the shutter speed selected by the...
User Guide
Page 29
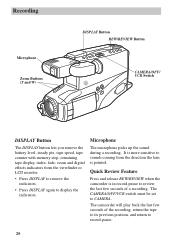
Recording Microphone Zoom Buttons (T and W) DISPLAY Button REW/REVIEW Button CAMERA/OFF/ VCR Switch DISPLAY Button The DISPLAY button lets you remove the battery level, steady pix, tape speed, tape counter with memory stop, remaining tape display, index, fade, zoom and digital effects indicators from the ...position, and return to record-pause. 26 It is in record-pause to CAMERA. Quick Review Feature Press and release REW/REVIEW when the camcorder is more sensitive to display the indicators. The CAMERA/OFF/VCR switch must be set to review the last few seconds of a recording. ...
Recording Microphone Zoom Buttons (T and W) DISPLAY Button REW/REVIEW Button CAMERA/OFF/ VCR Switch DISPLAY Button The DISPLAY button lets you remove the battery level, steady pix, tape speed, tape counter with memory stop, remaining tape display, index, fade, zoom and digital effects indicators from the ...position, and return to record-pause. 26 It is in record-pause to CAMERA. Quick Review Feature Press and release REW/REVIEW when the camcorder is more sensitive to display the indicators. The CAMERA/OFF/VCR switch must be set to review the last few seconds of a recording. ...
User Guide
Page 46
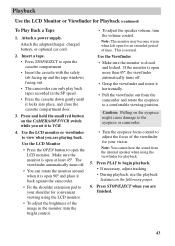
Attach the adapter/charger, charged battery, or optional car cord. 2. Insert a tape. • Press STOP/EJECT to open the cassette compartment. • Insert the cassette with the safety tab facing up and the tape windows facing out. • The camcorder can rotate the monitor around when it ... the speaker volume, turn the volume control. Caution: Pulling on the following pages. 6. Note: You cannot hear the sound from the camcorder and rotate the eyepiece to adjust the focus of the viewfinder for your shoulder for convenient viewing using the viewfinder for Playback (continued) To...
Attach the adapter/charger, charged battery, or optional car cord. 2. Insert a tape. • Press STOP/EJECT to open the cassette compartment. • Insert the cassette with the safety tab facing up and the tape windows facing out. • The camcorder can rotate the monitor around when it ... the speaker volume, turn the volume control. Caution: Pulling on the following pages. 6. Note: You cannot hear the sound from the camcorder and rotate the eyepiece to adjust the focus of the viewfinder for your shoulder for convenient viewing using the viewfinder for Playback (continued) To...
User Guide
Page 53
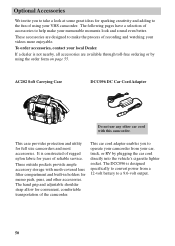
...It is designed specifically to convert power from your car, truck, or RV by using your VHS camcorder. Three outside pockets provide ample accessory storage with this camcorder. The DCC096 is constructed of rugged nylon fabric for convenient, comfortable transportation of reliable service....camcorder from a 12-volt battery to a 9.6-volt output. 50 Optional Accessories Soft Carrying Case Car Cord Adapter AC202 Soft Carrying Case DCC096 DC Car Cord Adapter Do not use any other car cord with mesh-covered lens filter compartment and built-in holders for full size camcorders...
...It is designed specifically to convert power from your car, truck, or RV by using your VHS camcorder. Three outside pockets provide ample accessory storage with this camcorder. The DCC096 is constructed of rugged nylon fabric for convenient, comfortable transportation of reliable service....camcorder from a 12-volt battery to a 9.6-volt output. 50 Optional Accessories Soft Carrying Case Car Cord Adapter AC202 Soft Carrying Case DCC096 DC Car Cord Adapter Do not use any other car cord with mesh-covered lens filter compartment and built-in holders for full size camcorders...
User Guide
Page 54
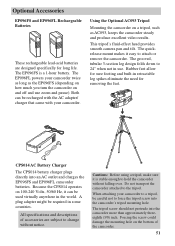
... CHARGE CPS014 AC Battery Charger The CPS014 battery charger plugs directly into the camcorder more than approximately threeeighth (3/8) inch. The EP096FS is stable enough to hold the camcorder without notice. Rechargable Batteries Battery Charger Tripod Using the Optional AC093 Tripod Mounting the camcorder on the bottom ...can be careful not to force the tripod screw into the camcorder's tripod mounting hole. The tripod screw should not protrude into an AC outlet and charges the EP096FS and EP096FL camcorder batteries. Rubber feet allow for removing the feet. Because the CPS014...
... CHARGE CPS014 AC Battery Charger The CPS014 battery charger plugs directly into the camcorder more than approximately threeeighth (3/8) inch. The EP096FS is stable enough to hold the camcorder without notice. Rechargable Batteries Battery Charger Tripod Using the Optional AC093 Tripod Mounting the camcorder on the bottom ...can be careful not to force the tripod screw into the camcorder's tripod mounting hole. The tripod screw should not protrude into an AC outlet and charges the EP096FS and EP096FL camcorder batteries. Rubber feet allow for removing the feet. Because the CPS014...
User Guide
Page 58
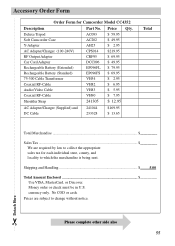
... required by law to collect the appropriate sales tax for Camcorder Model CC4352 Description Part No. Money order or check must be in U.S. Deluxe Tripod Soft Camcorder Case Y-Adapter AC Adapter/Charger (100-240V) RF Output Adapter Car Cord Adapter Rechargeable Battery (Extended) Rechargeable Battery (Standard) AC093 AC202 AH25 CPS014 CRF95 DCC096 EP096FL EP096FS $ 59...
... required by law to collect the appropriate sales tax for Camcorder Model CC4352 Description Part No. Money order or check must be in U.S. Deluxe Tripod Soft Camcorder Case Y-Adapter AC Adapter/Charger (100-240V) RF Output Adapter Car Cord Adapter Rechargeable Battery (Extended) Rechargeable Battery (Standard) AC093 AC202 AH25 CPS014 CRF95 DCC096 EP096FL EP096FS $ 59...
User Guide
Page 61
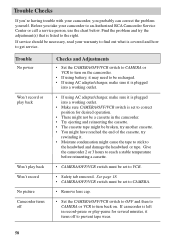
.../VCR switch to CAMERA or VCR to turn back on the camcorder. • If using battery, it may need to be recharged. • If using ...the tape to stick to the headwheel and damage the headwheel or tape. Give the camcorder 2 or 3 hours to reach a stable temperature before reinserting a cassette. •... might be set to VCR. • Safety tab removed. If camcorder is left in the camcorder. • Try ejecting and reinserting the cassette. • The cassette... tape wear. Trouble Checks If you're having trouble with your camcorder, you take your warranty to find out what is covered and...
.../VCR switch to CAMERA or VCR to turn back on the camcorder. • If using battery, it may need to be recharged. • If using ...the tape to stick to the headwheel and damage the headwheel or tape. Give the camcorder 2 or 3 hours to reach a stable temperature before reinserting a cassette. •... might be set to VCR. • Safety tab removed. If camcorder is left in the camcorder. • Try ejecting and reinserting the cassette. • The cassette... tape wear. Trouble Checks If you're having trouble with your camcorder, you take your warranty to find out what is covered and...


