User Guide
Page 3
...electric shock, match wide blade of fire or shock hazard, do not expose camcorder or AC adapter/charger to wide slot, fully insert. To reduce risk of injury, charge only rechargeable batteries recommended by the manufacturer for proof of electric shock or personal injury. FCC Regulations...SHOCK DO NOT OPEN This symbol indicates "dangerous voltage" inside the product that unauthorized changes or modifications to this product. Returning this camcorder. REFER SERVICING TO QUALIFIED SERVICE PERSONNEL. ATTENTION: Pour éviter les chocs électriques, introduire la lame la plus large de...
...electric shock, match wide blade of fire or shock hazard, do not expose camcorder or AC adapter/charger to wide slot, fully insert. To reduce risk of injury, charge only rechargeable batteries recommended by the manufacturer for proof of electric shock or personal injury. FCC Regulations...SHOCK DO NOT OPEN This symbol indicates "dangerous voltage" inside the product that unauthorized changes or modifications to this product. Returning this camcorder. REFER SERVICING TO QUALIFIED SERVICE PERSONNEL. ATTENTION: Pour éviter les chocs électriques, introduire la lame la plus large de...
User Guide
Page 4
...ii First Time Operation 3 Assistance 3 Unpacking the Camcorder and Accessories 3 Adapter/Charger 12 Attaching 12 Removing 12 Powering Your Camcorder .. 12 Using the Battery 13 Charging 13 Attaching 14 Removing 14 Battery Level Indicator ........ 15 Battery Care 16 Battery Storage 16 Battery Safety Precautions ... 16 Care and Storage 16 ... and Storage 19 Setting the Time and Date 20 To Correct the Date or Time .... 20 Charging the Built-in Clock Battery 21 LCD Monitor or Viewfinder Displays 21 Recording Time and Date 21 AUTO Date 21 Auto TITLE 21 Date 21 Selecting Display...
...ii First Time Operation 3 Assistance 3 Unpacking the Camcorder and Accessories 3 Adapter/Charger 12 Attaching 12 Removing 12 Powering Your Camcorder .. 12 Using the Battery 13 Charging 13 Attaching 14 Removing 14 Battery Level Indicator ........ 15 Battery Care 16 Battery Storage 16 Battery Safety Precautions ... 16 Care and Storage 16 ... and Storage 19 Setting the Time and Date 20 To Correct the Date or Time .... 20 Charging the Built-in Clock Battery 21 LCD Monitor or Viewfinder Displays 21 Recording Time and Date 21 AUTO Date 21 Auto TITLE 21 Date 21 Selecting Display...
User Guide
Page 6
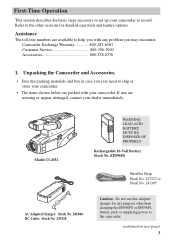
... damaged, contact your camcorder. MUST BE DISPOSED OF PROPERLY. Rechargeable 10-Volt Battery Stock No. First-Time Operation First Time Operation This section describes the basic steps necessary to set up your camcorder to help you with your dealer immediately. Camcorder Exchange Warranty 800-283...charger for detailed operation and feature options. Model CC4352 WARNING: LEAD-ACID BATTERY. Refer to the other sections for any purpose other than charging the EP096FS or EP096FL battery pack or supplying power to ship or store your camcorder. • The items shown below are packed ...
... damaged, contact your camcorder. MUST BE DISPOSED OF PROPERLY. Rechargeable 10-Volt Battery Stock No. First-Time Operation First Time Operation This section describes the basic steps necessary to set up your camcorder to help you with your dealer immediately. Camcorder Exchange Warranty 800-283...charger for detailed operation and feature options. Model CC4352 WARNING: LEAD-ACID BATTERY. Refer to the other sections for any purpose other than charging the EP096FS or EP096FL battery pack or supplying power to ship or store your camcorder. • The items shown below are packed ...
User Guide
Page 7
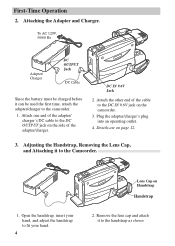
... DC OUTPUT Jack DC Cable Since the battery must be charged before it can be used the first time, attach the adapter/charger to the DC IN 9.6V jack on Handstrap Handstrap 2. POWER CHARGE 1. Attach the other end of the cable to the camcorder. 1. Adjusting the Handstrap, Removing the Lens... Cap, and Attaching it to the DC OUTPUT jack on page 12. 3. Open the handstrap, insert your hand. 4 Lens Cap on the camcorder. 3. First-Time Operation 2. DC IN 9.6V Jack 2. Attach one end of the adapter/charger. Details are on the side of the adapter/ charger's ...
... DC OUTPUT Jack DC Cable Since the battery must be charged before it can be used the first time, attach the adapter/charger to the DC IN 9.6V jack on Handstrap Handstrap 2. POWER CHARGE 1. Attach the other end of the cable to the camcorder. 1. Adjusting the Handstrap, Removing the Lens... Cap, and Attaching it to the DC OUTPUT jack on page 12. 3. Open the handstrap, insert your hand. 4 Lens Cap on the camcorder. 3. First-Time Operation 2. DC IN 9.6V Jack 2. Attach one end of the adapter/charger. Details are on the side of the adapter/ charger's ...
User Guide
Page 13
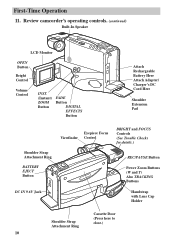
Review camcorder's operating controls. (continued) Built-In Speaker LCD Monitor OPEN Button Bright Control Volume Control INST. (Instant) ZOOM Button FADE Button DIGITAL EFFECTS Button Attach Rechargeable Battery Here Attach Adapter/ Charger's DC Cord Here Shoulder Extension Pad Shoulder Strap Attachment Ring BATTERY EJECT Button DC IN 9.6V Jack Eyepiece Focus Viewfinder Control BRIGHT...
Review camcorder's operating controls. (continued) Built-In Speaker LCD Monitor OPEN Button Bright Control Volume Control INST. (Instant) ZOOM Button FADE Button DIGITAL EFFECTS Button Attach Rechargeable Battery Here Attach Adapter/ Charger's DC Cord Here Shoulder Extension Pad Shoulder Strap Attachment Ring BATTERY EJECT Button DC IN 9.6V Jack Eyepiece Focus Viewfinder Control BRIGHT...
User Guide
Page 15
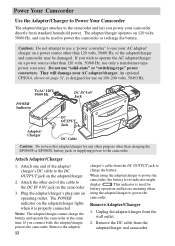
...CHARGE Adapter/ Charger DC OUTPUT Jack DC Cable Caution: Do not use this adapter/charger for battery operation and has no meaning when using the adapter/charger to power the camcorder, the battery level indicator might display . The POWER indicator on the adapter/charger lights when it is ...DC cable from standard household power. Plug the adapter/charger's plug into an operating outlet. Notes: The adapter/charger cannot charge the battery and operate the camcorder at the same time. The adapter/charger operates on a power source other than 120 volts, 50/60 Hz, or the adapter/...
...CHARGE Adapter/ Charger DC OUTPUT Jack DC Cable Caution: Do not use this adapter/charger for battery operation and has no meaning when using the adapter/charger to power the camcorder, the battery level indicator might display . The POWER indicator on the adapter/charger lights when it is ...DC cable from standard household power. Plug the adapter/charger's plug into an operating outlet. Notes: The adapter/charger cannot charge the battery and operate the camcorder at the same time. The adapter/charger operates on a power source other than 120 volts, 50/60 Hz, or the adapter/...
User Guide
Page 16
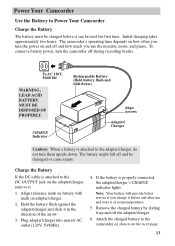
...Plug adapter/charger into nearest AC outlet (120V, 50/60Hz). 4. Power Your Camcorder Use the Battery to Power Your Camcorder Charge the Battery Using the Battery The battery must be damaged or cause injury. The battery might fall off and how much you charge it before it . 1. Note: ... the first time. MUST BE DISPOSED OF PROPERLY. Attach the charged battery to the adapter/charger, do not turn the camcorder off the adapter/charger. 6. If the battery is attached to the camcorder as shown on adapter/charger. 2. Initial charging takes approximately two hours...
...Plug adapter/charger into nearest AC outlet (120V, 50/60Hz). 4. Power Your Camcorder Use the Battery to Power Your Camcorder Charge the Battery Using the Battery The battery must be damaged or cause injury. The battery might fall off and how much you charge it before it . 1. Note: ... the first time. MUST BE DISPOSED OF PROPERLY. Attach the charged battery to the adapter/charger, do not turn the camcorder off the adapter/charger. 6. If the battery is attached to the camcorder as shown on adapter/charger. 2. Initial charging takes approximately two hours...
User Guide
Page 17
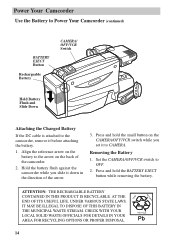
Set the CAMERA/OFF/VCR switch to the camcorder, remove it before attaching the battery. 3. Power Your Camcorder Use the Battery to Power Your Camcorder (continued) BATTERY EJECT Button Rechargeable Battery CAMERA/ OFF/VCR Switch Hold Battery Flush and Slide Down Attaching Attaching the Charged Battery Removing If the DC cable is attached to OFF. 2. Align the reference arrow on...
Set the CAMERA/OFF/VCR switch to the camcorder, remove it before attaching the battery. 3. Power Your Camcorder Use the Battery to Power Your Camcorder (continued) BATTERY EJECT Button Rechargeable Battery CAMERA/ OFF/VCR Switch Hold Battery Flush and Slide Down Attaching Attaching the Charged Battery Removing If the DC cable is attached to OFF. 2. Align the reference arrow on...

User Guide
Page 18
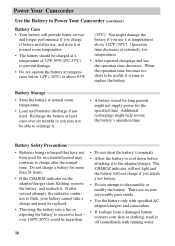
... if you do not force the cassette door open. The battery level indicator has no meaning when you use , the camcorder turns off the camcorder before continuing to power the camcorder. Recharge the battery or use the camcorder. Notes: When you record using the rechargeable battery, the battery level indicator still flashes to warn you of power in...
... if you do not force the cassette door open. The battery level indicator has no meaning when you use , the camcorder turns off the camcorder before continuing to power the camcorder. Recharge the battery or use the camcorder. Notes: When you record using the rechargeable battery, the battery level indicator still flashes to warn you of power in...
User Guide
Page 19
...it off immediately with specified AC adapter/chargers and camcorders. • If leakage from a damaged battery contacts your battery cannot take a charge and must be hazardous. • Do not short the battery's terminals. • Allow the battery to cool down before and after several attempts, ... adapter/charger starts flashing, remove the battery, and reattach it to the adapter/charger. Power Your Camcorder Use the Battery to Power Your Camcorder (continued) Care and Storage Battery Care • Your battery will not charge if you attach a hot battery. • Do not attempt to ...
...it off immediately with specified AC adapter/chargers and camcorders. • If leakage from a damaged battery contacts your battery cannot take a charge and must be hazardous. • Do not short the battery's terminals. • Allow the battery to cool down before and after several attempts, ... adapter/charger starts flashing, remove the battery, and reattach it to the adapter/charger. Power Your Camcorder Use the Battery to Power Your Camcorder (continued) Care and Storage Battery Care • Your battery will not charge if you attach a hot battery. • Do not attempt to ...
User Guide
Page 20
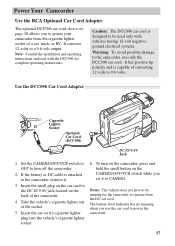
Power Your Camcorder Use the RCA Optional Car Cord AdapterCar Cord Adapter The optional DCC096 car cord shown on page 50 allows you to power your camcorder from the DC car cord. Insert the small plug on the car cord to 9.6 volts. Take the vehicle's cigarette lighter out of ...the CAMERA/OFF/VCR switch while you use only the DCC096 car cord. Caution: The DCC096 car cord is designed to power the camcorder. 17 If the battery or DC cable is capable of the socket. 5. Note: Consult the installation and operating instructions enclosed with vehicles having 12-volt negative...
Power Your Camcorder Use the RCA Optional Car Cord AdapterCar Cord Adapter The optional DCC096 car cord shown on page 50 allows you to power your camcorder from the DC car cord. Insert the small plug on the car cord to 9.6 volts. Take the vehicle's cigarette lighter out of ...the CAMERA/OFF/VCR switch while you use only the DCC096 car cord. Caution: The DCC096 car cord is designed to power the camcorder. 17 If the battery or DC cable is capable of the socket. 5. Note: Consult the installation and operating instructions enclosed with vehicles having 12-volt negative...
User Guide
Page 23
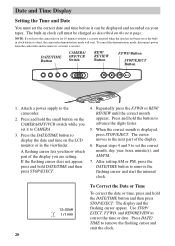
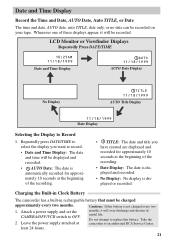
... Repeatedly press the F.FWD or REW/ REVIEW until the correct month appears. When the correct month is dead, the camcorder demonstration mode will start. Repeat steps 4 and 5 to set it to display the date and time on the CAMERA/OFF... After setting AM or PM, press the DATE/TIME button to the next part of the display you leave the camcorder on for 10 minutes without a cassette inserted when the date has not been set the correct date and time before ... the LCD monitor or in clock cell must set or the builtin clock battery is displayed, press STOP/EJECT. NOTE: If you are setting.
... Repeatedly press the F.FWD or REW/ REVIEW until the correct month appears. When the correct month is dead, the camcorder demonstration mode will start. Repeat steps 4 and 5 to set it to display the date and time on the CAMERA/OFF... After setting AM or PM, press the DATE/TIME button to the next part of the display you leave the camcorder on for 10 minutes without a cassette inserted when the date has not been set the correct date and time before ... the LCD monitor or in clock cell must set or the builtin clock battery is displayed, press STOP/EJECT. NOTE: If you are setting.
User Guide
Page 24
... RCA Service Center. least 24 hours. 21 Cautions: If this battery. Leave the power supply attached at the beginning of the recording. • TITLE: The date and title you have created are displayed and recorded for approximately 10 seconds at months, it will be recorded. Take the camcorder ... Date and Time Display: The date and time will over-discharge and shorten its useful life. Charging the Built-in Clock Battery The camcorder has a built-in rechargeable battery that must be recorded on your tapeAD. Date and Time Display Record the Time and Date, AUTO Date, Auto TITLE, or...
... RCA Service Center. least 24 hours. 21 Cautions: If this battery. Leave the power supply attached at the beginning of the recording. • TITLE: The date and title you have created are displayed and recorded for approximately 10 seconds at months, it will be recorded. Take the camcorder ... Date and Time Display: The date and time will over-discharge and shorten its useful life. Charging the Built-in Clock Battery The camcorder has a built-in rechargeable battery that must be recorded on your tapeAD. Date and Time Display Record the Time and Date, AUTO Date, Auto TITLE, or...

User Guide
Page 27
...• Select 16X9 to make a recording that you zoom over 16 times. • Select MIRROR to display the indicator for the fade mode selected. Battery Level Indicator ( ) Press the DISPLAY button to display the amount of time left and right. • Select MOSAIC to black-and-white fade. •...page 15. Fade Indicator ( ) Press the DISPLAY button to activate the extended zoom mode - wide angle to display the shutter speed selected by the camcorder. Recording LCD Monitor or Viewfinder Displays AE:60 ZM:2 I.ZOOM T NO TAPE 0000M INDEX W 10:30AM REC 11/18/1999 AE:60 (Auto ...
...• Select 16X9 to make a recording that you zoom over 16 times. • Select MIRROR to display the indicator for the fade mode selected. Battery Level Indicator ( ) Press the DISPLAY button to display the amount of time left and right. • Select MOSAIC to black-and-white fade. •...page 15. Fade Indicator ( ) Press the DISPLAY button to activate the extended zoom mode - wide angle to display the shutter speed selected by the camcorder. Recording LCD Monitor or Viewfinder Displays AE:60 ZM:2 I.ZOOM T NO TAPE 0000M INDEX W 10:30AM REC 11/18/1999 AE:60 (Auto ...
User Guide
Page 29
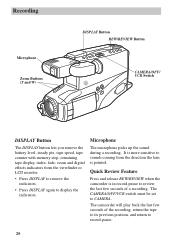
Quick Review Feature Press and release REW/REVIEW when the camcorder is in record-pause to record-pause. 26 The camcorder will play back the last few seconds of the recording, return the tape to its previous position, and return to review the last few ...to CAMERA. Recording Microphone Zoom Buttons (T and W) DISPLAY Button REW/REVIEW Button CAMERA/OFF/ VCR Switch DISPLAY Button The DISPLAY button lets you remove the battery level, steady pix, tape speed, tape counter with memory stop, remaining tape display, index, fade, zoom and digital effects indicators from the direction the ...
Quick Review Feature Press and release REW/REVIEW when the camcorder is in record-pause to record-pause. 26 The camcorder will play back the last few seconds of the recording, return the tape to its previous position, and return to review the last few ...to CAMERA. Recording Microphone Zoom Buttons (T and W) DISPLAY Button REW/REVIEW Button CAMERA/OFF/ VCR Switch DISPLAY Button The DISPLAY button lets you remove the battery level, steady pix, tape speed, tape counter with memory stop, remaining tape display, index, fade, zoom and digital effects indicators from the direction the ...
User Guide
Page 46
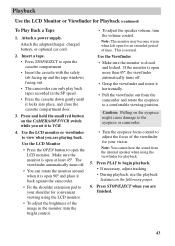
Attach the adapter/charger, charged battery, or optional car cord. 2. This is open at least 45º..... • During playback, use the playback features on the CAMERA/OFF/VCR switch while you set it back against the camcorder. • Fit the shoulder extension pad to a comfortable viewing position. Attach a power supply. The viewfinder automatically turns off... door. 3. If the monitor is closed and locked. Note: You cannot hear the sound from the camcorder and rotate the eyepiece to your shoulder for convenient viewing using the viewfinder for your vision. Use the LCD...
Attach the adapter/charger, charged battery, or optional car cord. 2. This is open at least 45º..... • During playback, use the playback features on the CAMERA/OFF/VCR switch while you set it back against the camcorder. • Fit the shoulder extension pad to a comfortable viewing position. Attach a power supply. The viewfinder automatically turns off... door. 3. If the monitor is closed and locked. Note: You cannot hear the sound from the camcorder and rotate the eyepiece to your shoulder for convenient viewing using the viewfinder for your vision. Use the LCD...
User Guide
Page 53
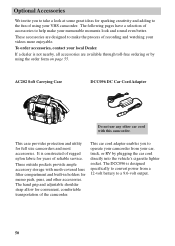
...adding to the fun of reliable service. The hand grip and adjustable shoulder strap allow for full size camcorders and most accessories. These accessories are available through toll-free ordering or by plugging the ...Adapter Do not use any other accessories. Optional Accessories We invite you to operate your camcorder from a 12-volt battery to a 9.6-volt output. 50 The DCC096 is constructed of rugged nylon fabric for ... ample accessory storage with this camcorder. This car cord adapter enables you to convert power from your car, truck, or RV by using your VHS camcorder.
...adding to the fun of reliable service. The hand grip and adjustable shoulder strap allow for full size camcorders and most accessories. These accessories are available through toll-free ordering or by plugging the ...Adapter Do not use any other accessories. Optional Accessories We invite you to operate your camcorder from a 12-volt battery to a 9.6-volt output. 50 The DCC096 is constructed of rugged nylon fabric for ... ample accessory storage with this camcorder. This car cord adapter enables you to convert power from your car, truck, or RV by using your VHS camcorder.
User Guide
Page 54
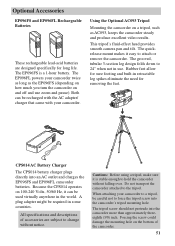
...tripod, such as the EP096FS (depending on how much you turn the camcorder on 100-240 Volts, 50/60 Hz, it is a 1-hour battery. Rechargable Batteries Battery Charger Tripod Using the Optional AC093 Tripod Mounting the camcorder on the bottom of accessories are designed specifically for long life. Rubber feet... and built-in use zoom and pause). The tripod screw should not protrude into an AC outlet and charges the EP096FS and EP096FL camcorder batteries. This tripod's fluid-effect head provides smooth camera pan and tilt. The EP096FS is stable enough to a tripod, be required in...
...tripod, such as the EP096FS (depending on how much you turn the camcorder on 100-240 Volts, 50/60 Hz, it is a 1-hour battery. Rechargable Batteries Battery Charger Tripod Using the Optional AC093 Tripod Mounting the camcorder on the bottom of accessories are designed specifically for long life. Rubber feet... and built-in use zoom and pause). The tripod screw should not protrude into an AC outlet and charges the EP096FS and EP096FL camcorder batteries. This tripod's fluid-effect head provides smooth camera pan and tilt. The EP096FS is stable enough to a tripod, be required in...
User Guide
Page 58
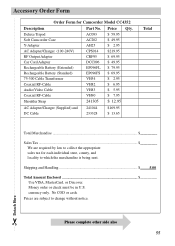
... also 55 Shipping and Handling 5.00 Total Amount Enclosed Use VISA, MasterCard, or Discover. Deluxe Tripod Soft Camcorder Case Y-Adapter AC Adapter/Charger (100-240V) RF Output Adapter Car Cord Adapter Rechargeable Battery (Extended) Rechargeable Battery (Standard) AC093 AC202 AH25 CPS014 CRF95 DCC096 EP096FL EP096FS $ 59.95 $ 49.95 $ 2.95 $219.95 $... Form for each individual state, county, and locality to change without notice. Prices are required by law to collect the appropriate sales tax for Camcorder Model CC4352 Description Part No. currency only. No COD or cash.
... also 55 Shipping and Handling 5.00 Total Amount Enclosed Use VISA, MasterCard, or Discover. Deluxe Tripod Soft Camcorder Case Y-Adapter AC Adapter/Charger (100-240V) RF Output Adapter Car Cord Adapter Rechargeable Battery (Extended) Rechargeable Battery (Standard) AC093 AC202 AH25 CPS014 CRF95 DCC096 EP096FL EP096FS $ 59.95 $ 49.95 $ 2.95 $219.95 $... Form for each individual state, county, and locality to change without notice. Prices are required by law to collect the appropriate sales tax for Camcorder Model CC4352 Description Part No. currency only. No COD or cash.
User Guide
Page 61
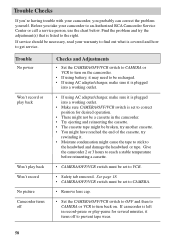
Before you probably can correct the problem yourself. If service should be necessary, read your camcorder to an Authorized RCA Camcorder Service Center or call a service person, use the chart below. If camcorder is left in the camcorder. • Try ejecting and reinserting the cassette. • The cassette tape might be broken,...sure it is plugged into a working outlet. • Make sure CAMERA/OFF/VCR switch is plugged into a working outlet. • If using battery, it is set to CAMERA. • Remove lens cap. • Set the CAMERA/OFF/VCR switch to OFF and then to CAMERA or ...
Before you probably can correct the problem yourself. If service should be necessary, read your camcorder to an Authorized RCA Camcorder Service Center or call a service person, use the chart below. If camcorder is left in the camcorder. • Try ejecting and reinserting the cassette. • The cassette tape might be broken,...sure it is plugged into a working outlet. • Make sure CAMERA/OFF/VCR switch is plugged into a working outlet. • If using battery, it is set to CAMERA. • Remove lens cap. • Set the CAMERA/OFF/VCR switch to OFF and then to CAMERA or ...


