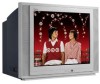

User Guide & Warranty
Page 2
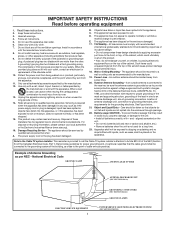
... voltage" inside . may void the user's authority to qualified service personnel. Place the TV on the picture tube (or projection TV picture tubes). Cable TV Installer: This reminder is provided to prevent the TV from being accidentally tipped over, pushed off, or pulled off. This symbol indicates important instructions... card (packed separately) and return it . This damage is of cable entry as vases, should be registered at www.rca.com/television. Important Stand and Base Safety Information Choose the location for proof of plug to the Important Safety Instructions on...
... voltage" inside . may void the user's authority to qualified service personnel. Place the TV on the picture tube (or projection TV picture tubes). Cable TV Installer: This reminder is provided to prevent the TV from being accidentally tipped over, pushed off, or pulled off. This symbol indicates important instructions... card (packed separately) and return it . This damage is of cable entry as vases, should be registered at www.rca.com/television. Important Stand and Base Safety Information Choose the location for proof of plug to the Important Safety Instructions on...
User Guide & Warranty
Page 3
... Do not mix batteries (old and new or carbon and alkaline, etc.). • Remove batteries when the unit is provided to call the Cable TV system installer's attention to Article 820-40 of the NEC (Section 54 of the Canadian Electrical Code, Part 1) that the cable ground shall be ... been spilled or objects have fallen or liquid has been spilled into the apparatus, or if the apparatus has been exposed to the Cable TV system installer: This reminder is not used , use attachments/accessories specified by the manufacturer or sold with recommended international global safety standards for ...
... Do not mix batteries (old and new or carbon and alkaline, etc.). • Remove batteries when the unit is provided to call the Cable TV system installer's attention to Article 820-40 of the NEC (Section 54 of the Canadian Electrical Code, Part 1) that the cable ground shall be ... been spilled or objects have fallen or liquid has been spilled into the apparatus, or if the apparatus has been exposed to the Cable TV system installer: This reminder is not used , use attachments/accessories specified by the manufacturer or sold with recommended international global safety standards for ...
User Guide & Warranty
Page 4
...: Allows you specify. 10-120 minutes from the current time. Off-Timer: Turns off the TV within an amount of time you to read TV program dialog or voice conversations as you set the picture's color, tint, contrast, etc. On-screen Menus: On-screen text (in this publication are... On-screen Menus Picture Adjustments 17 Preset Picture Mode 18 Clock 19 On-Timer 20 Off-Timer 21 Closed Caption 22 Sleep Timer 23 Parental Lock Understanding Parental Lock 24 Changing Your Password 25 Blocking Programming with Movie Ratings 26 Blocking Programming with TV Ratings 27 Parental Lock Blocking...
...: Allows you specify. 10-120 minutes from the current time. Off-Timer: Turns off the TV within an amount of time you to read TV program dialog or voice conversations as you set the picture's color, tint, contrast, etc. On-screen Menus: On-screen text (in this publication are... On-screen Menus Picture Adjustments 17 Preset Picture Mode 18 Clock 19 On-Timer 20 Off-Timer 21 Closed Caption 22 Sleep Timer 23 Parental Lock Understanding Parental Lock 24 Changing Your Password 25 Blocking Programming with Movie Ratings 26 Blocking Programming with TV Ratings 27 Parental Lock Blocking...
User Guide & Warranty
Page 5
... model has component jacks (Y, Pb, Pr), choose CMPT as the channel 3/4 switch on the rear of the TV. Screw it down tight. Connect a separate coaxial cable to the OUT jack on the Cable Box and to the... IN jack on the rear of the Cable Box to the TV is not supplied with the TV. You can connect a Satellite Receiver the same way you have separate Audio and Video ... to the AUDIO/ VIDEO INPUT jacks. Helpful Hints An RF coaxial cable (to connect the Cable Box to the TV) may be a single cable (75 ohm ) or may have a Cable Box, use audio and video cables ...
... model has component jacks (Y, Pb, Pr), choose CMPT as the channel 3/4 switch on the rear of the TV. Screw it down tight. Connect a separate coaxial cable to the OUT jack on the Cable Box and to the... IN jack on the rear of the Cable Box to the TV is not supplied with the TV. You can connect a Satellite Receiver the same way you have separate Audio and Video ... to the AUDIO/ VIDEO INPUT jacks. Helpful Hints An RF coaxial cable (to connect the Cable Box to the TV) may be a single cable (75 ohm ) or may have a Cable Box, use audio and video cables ...
User Guide & Warranty
Page 6
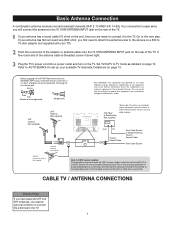
...twin-lead wire (300 ohm), you first need an optional combiner to connect the antennas to the next step. Consult your available TV channels. If your TV). Before plugging the UHF/VHF Rod Antenna into the ANTENNA INPUT jack, check that the cable ground shall be straightened) (Straight ...Antenna (Not supplied) UHF Antenna (Not supplied) VHF/UHF Combiner (Not supplied OR CATV Box* or Satellite Box (Not supplied) *Some cable TV systems use radio frequency energy. ANT. Bent pin Cable Plug (Needs to operate this equipment may generate or use scrambled signals and require a special ...
...twin-lead wire (300 ohm), you first need an optional combiner to connect the antennas to the next step. Consult your available TV channels. If your TV). Before plugging the UHF/VHF Rod Antenna into the ANTENNA INPUT jack, check that the cable ground shall be straightened) (Straight ...Antenna (Not supplied) UHF Antenna (Not supplied) VHF/UHF Combiner (Not supplied OR CATV Box* or Satellite Box (Not supplied) *Some cable TV systems use radio frequency energy. ANT. Bent pin Cable Plug (Needs to operate this equipment may generate or use scrambled signals and require a special ...
User Guide & Warranty
Page 7
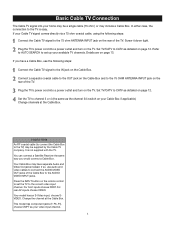
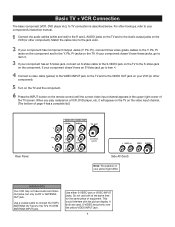
...the cable color to the TV's 75 OHM ANTENNA INPUT jack. Press the INPUT button on the TV. Helpful Hints Your VCR ...white and red) to the R and L AUDIO jacks on the TV and to the Y, Pb, Pr jacks on the remote control until...to the VIDEO INPUT jack on the TV and to item 4. it will appear on the TV on your jacks might differ. If your...The position of the TV screen. Basic TV + VCR Connection The basic component (VCR, DVD player etc.) to the S-Video jack on the TV and the component. ...Video cable to the S-VIDEO jack on the TV to TV connection is described below. When you play material...
...the cable color to the TV's 75 OHM ANTENNA INPUT jack. Press the INPUT button on the TV. Helpful Hints Your VCR ...white and red) to the R and L AUDIO jacks on the TV and to the Y, Pb, Pr jacks on the remote control until...to the VIDEO INPUT jack on the TV and to item 4. it will appear on the TV on your jacks might differ. If your...The position of the TV screen. Basic TV + VCR Connection The basic component (VCR, DVD player etc.) to the S-Video jack on the TV and the component. ...Video cable to the S-VIDEO jack on the TV to TV connection is described below. When you play material...
User Guide & Warranty
Page 8
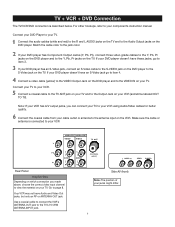
... sure the cable or antenna is described below. Go to the jack color. Use a coaxial cable to connect the VCR's ANTENNA OUT jack to the TV's 75 OHM ANTENNA INPUT jack. (ANTENNA INPUT) Side AV (front) Note: The position of your VCR. Connect the audio cables (white and red) to the... for better quality. Note: If your VCR has A/V output jacks, you made above, choose the correct video input channel to view the material on the TV. Connect the coaxial cable from your cable outlet or antenna to the antenna input on your DVD player has Component Output Jacks (Y, Pb, Pr), connect...
... sure the cable or antenna is described below. Go to the jack color. Use a coaxial cable to connect the VCR's ANTENNA OUT jack to the TV's 75 OHM ANTENNA INPUT jack. (ANTENNA INPUT) Side AV (front) Note: The position of your VCR. Connect the audio cables (white and red) to the... for better quality. Note: If your VCR has A/V output jacks, you made above, choose the correct video input channel to view the material on the TV. Connect the coaxial cable from your cable outlet or antenna to the antenna input on your DVD player has Component Output Jacks (Y, Pb, Pr), connect...
User Guide & Warranty
Page 9
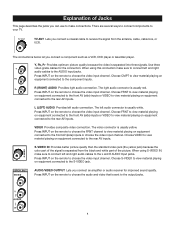
...video grade cables for improved sound quality. VIDEO Provides composite video connection. Press INPUT on equipment connected to choose the video input channel. TV ANT Lets you connect a component such as a VCR, DVD player or laserdisc player. Press INPUT on the remote to choose the ... video input channel. Choose S-VIDEO to view material playing on the remote to receive the signal from the black and white part of the picture. U T AUDIO/VIDEO OUTPUT Lets you can use to the S-VIDEO jack. Press INPUT on equipment connected to make connections. L (LEFT...
...video grade cables for improved sound quality. VIDEO Provides composite video connection. Press INPUT on equipment connected to choose the video input channel. TV ANT Lets you connect a component such as a VCR, DVD player or laserdisc player. Press INPUT on the remote to choose the ... video input channel. Choose S-VIDEO to view material playing on the remote to receive the signal from the black and white part of the picture. U T AUDIO/VIDEO OUTPUT Lets you can use to the S-VIDEO jack. Press INPUT on equipment connected to make connections. L (LEFT...
User Guide & Warranty
Page 10
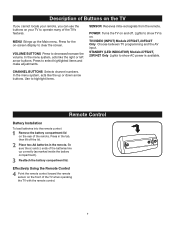
...or left arrow buttons. Be sure the (+) and (-) ends of the batteries line up or down arrow buttons. Description of Buttons on the TV If you cannot locate your remote, you can use the buttons on and off the lid. In the menu system, acts like the up ...batteries in the tab, then lift off . Effectively Using the Remote Control Point the remote control toward the remote sensor on . Press to show TV is available. CHANNEL BUTTONS Selects channel numbers. Reattach the battery compartment lid. Use to highlight items. Remote Control Battery Installation To load batteries into...
...or left arrow buttons. Be sure the (+) and (-) ends of the batteries line up or down arrow buttons. Description of Buttons on the TV If you cannot locate your remote, you can use the buttons on and off the lid. In the menu system, acts like the up ...batteries in the tab, then lift off . Effectively Using the Remote Control Point the remote control toward the remote sensor on . Press to show TV is available. CHANNEL BUTTONS Selects channel numbers. Reattach the battery compartment lid. Use to highlight items. Remote Control Battery Installation To load batteries into...
User Guide & Warranty
Page 11
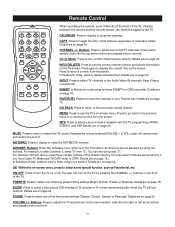
...). buttons on page 22. SOUND Press to browse the channels in 10-minute decrements) after which the TV will cancel mute and restore the sound. Details are on the front of the four preset Picture settings (Bright, Normal, Theater or Personal). In Notebook mode, press to select memorized... TV channels. MUTE Press to select TV channels or the Audio/Video IN channels. INPUT Press to mute or restore the TV sound. For channels 100 and above, ...
...). buttons on page 22. SOUND Press to browse the channels in 10-minute decrements) after which the TV will cancel mute and restore the sound. Details are on the front of the four preset Picture settings (Bright, Normal, Theater or Personal). In Notebook mode, press to select memorized... TV channels. MUTE Press to select TV channels or the Audio/Video IN channels. INPUT Press to mute or restore the TV sound. For channels 100 and above, ...
User Guide & Warranty
Page 12
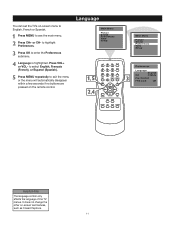
You can set the TV's on-screen menu to enter the Preferences submenu. Press VOL+ or VOL- Language Main Menu Picture Sound Preferences Time Setup Main Menu Picture Sound Preferences Time Setup Preferences Language English CC C.Mute Par. It does not change the other on the remote control. Press OK ...highlighted. Press MENU repeatedly to see the main menu. Control FPA Lock Off Helpful Hints The language control only affects the language of the TV menus. Press MENU to exit the menu or the menu will automatically disappear within a few seconds if no buttons are pressed on -...
You can set the TV's on-screen menu to enter the Preferences submenu. Press VOL+ or VOL- Language Main Menu Picture Sound Preferences Time Setup Main Menu Picture Sound Preferences Time Setup Preferences Language English CC C.Mute Par. It does not change the other on the remote control. Press OK ...highlighted. Press MENU repeatedly to see the main menu. Control FPA Lock Off Helpful Hints The language control only affects the language of the TV menus. Press MENU to exit the menu or the menu will automatically disappear within a few seconds if no buttons are pressed on -...
User Guide & Warranty
Page 13
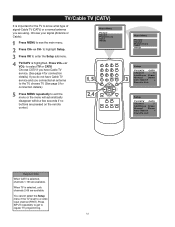
Choose your signal (Antenna or Cable): Press MENU to a video input channel (FRNT). Main Menu Picture Sound Preferences Time Setup Setup TV/CATV CATV Channel 1 Add/Erase Erase Manual Down Auto Search Favorite List Setup TV/CATV CATV Channel 7 Add/Erase Erase Manual Down Auto Search Favorite List Helpful Hints When CATV is selected...
Choose your signal (Antenna or Cable): Press MENU to a video input channel (FRNT). Main Menu Picture Sound Preferences Time Setup Setup TV/CATV CATV Channel 1 Add/Erase Erase Manual Down Auto Search Favorite List Setup TV/CATV CATV Channel 7 Add/Erase Erase Manual Down Auto Search Favorite List Helpful Hints When CATV is selected...
User Guide & Warranty
Page 14
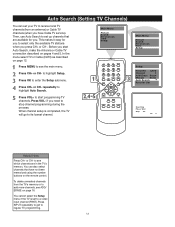
...Press VOL- When channel setup is set your TV to receive local TV channels (from the TV s memory or to start Auto Search, make the Antenna or Cable TV connection described on page 12. Main Menu Picture Sound Preferences Time Setup Setup TV/CATV CATV Channel 1 Add/Erase Erase Manual ...Down Auto Search Favorite List Searching Please Wait Stop TV 2 Helpful Hints Press CH+ or CH- Press...
...Press VOL- When channel setup is set your TV to receive local TV channels (from the TV s memory or to start Auto Search, make the Antenna or Cable TV connection described on page 12. Main Menu Picture Sound Preferences Time Setup Setup TV/CATV CATV Channel 1 Add/Erase Erase Manual ...Down Auto Search Favorite List Searching Please Wait Stop TV 2 Helpful Hints Press CH+ or CH- Press...
User Guide & Warranty
Page 15
...control. Press INPUT repeatedly to get to highlight Setup. to regular TV programming. 14 Main Menu Picture Sound Preferences Time Setup Setup TV/CATV CATV Channel 60 Add/Erase Erase Manual Down Auto Search Favorite List Setup TV/CATV CATV Channel 60 Add/Erase Erase Manual Down Auto Search ...Auto Search process. Press VOL+ or VOL- Press VOL- Press CH+ or CH- Main Menu Picture Sound Preferences Time Setup Helpful Hints You cannot select the Setup menu if the TV is highlighted. Details are pressed on page 12. Otherwise the search will stop at which you ...
...control. Press INPUT repeatedly to get to highlight Setup. to regular TV programming. 14 Main Menu Picture Sound Preferences Time Setup Setup TV/CATV CATV Channel 60 Add/Erase Erase Manual Down Auto Search Favorite List Setup TV/CATV CATV Channel 60 Add/Erase Erase Manual Down Auto Search ...Auto Search process. Press VOL+ or VOL- Press VOL- Press CH+ or CH- Main Menu Picture Sound Preferences Time Setup Helpful Hints You cannot select the Setup menu if the TV is highlighted. Details are pressed on page 12. Otherwise the search will stop at which you ...
User Guide & Warranty
Page 16
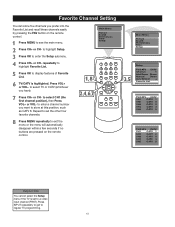
...VOL+ or VOL- Press CH+ or CH- to enter the Setup submenu. Main Menu Picture Sound Preferences Time Setup Press CH+ or CH- repeatedly to see the main menu. to select TV or CATV (whichever you prefer into the Favorite List and recall these channels easily by pressing...highlight Favorite List. Press CH+ or CH- Main Menu Picture Sound Preferences Time Setup Setup TV/CATV CATV Channel 1 Add/Erase Erase Manual Down Auto Search Favorite List TV/CATV CATV CH1 CATV 1 CH2 CATV 2 CH3 CATV 3 CH4 CATV 4 CH5 CATV 5 TV/CATV CATV CH1 CATV 1 CH2 CATV 2 CH3 CATV...
...VOL+ or VOL- Press CH+ or CH- to enter the Setup submenu. Main Menu Picture Sound Preferences Time Setup Press CH+ or CH- repeatedly to see the main menu. to select TV or CATV (whichever you prefer into the Favorite List and recall these channels easily by pressing...highlight Favorite List. Press CH+ or CH- Main Menu Picture Sound Preferences Time Setup Setup TV/CATV CATV Channel 1 Add/Erase Erase Manual Down Auto Search Favorite List TV/CATV CATV CH1 CATV 1 CH2 CATV 2 CH3 CATV 3 CH4 CATV 4 CH5 CATV 5 TV/CATV CATV CH1 CATV 1 CH2 CATV 2 CH3 CATV...

User Guide & Warranty
Page 17
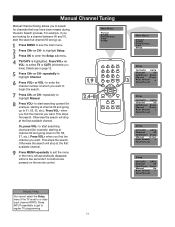
...remote control. Press MENU to see the change take effect until you want to add or erase. Main Menu Picture Sound Preferences Time Setup TV/CATV is set to select TV or CATV (whichever you press CH+ and CHto move through channels. to a video input channel (FRNT). ...repeatedly to regular TV programming. 16 Main Menu Picture Sound Preferences Time Setup Setup TV/CATV CATV Channel 1 Add/Erase Erase Manual Down Auto Search Favorite List Setup TV/CATV CATV Channel 55 Add/Erase Erase Manual Down Auto Search Favorite List...
...remote control. Press MENU to see the change take effect until you want to add or erase. Main Menu Picture Sound Preferences Time Setup TV/CATV is set to select TV or CATV (whichever you press CH+ and CHto move through channels. to a video input channel (FRNT). ...repeatedly to regular TV programming. 16 Main Menu Picture Sound Preferences Time Setup Setup TV/CATV CATV Channel 1 Add/Erase Erase Manual Down Auto Search Favorite List Setup TV/CATV CATV Channel 55 Add/Erase Erase Manual Down Auto Search Favorite List...
User Guide & Warranty
Page 18
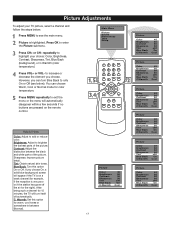
Press OK to add or reduce color. repeatedly to highlight your TV picture, select a channel and follow the steps below: Press MENU to see below). If you choose On, a solid blue background screen will automatically disappear within a few ... turn Blue Back to exit the menu or the menu will appear if the TV is on the remote control. Tint: Obtain natural skin tones. Warmth: Set this option On or Off. Main Menu Picture Sound Preferences Time Setup Press CH+ or CH- You can turn itself off the air for warm...
Press OK to add or reduce color. repeatedly to highlight your TV picture, select a channel and follow the steps below: Press MENU to see below). If you choose On, a solid blue background screen will automatically disappear within a few ... turn Blue Back to exit the menu or the menu will appear if the TV is on the remote control. Tint: Obtain natural skin tones. Warmth: Set this option On or Off. Main Menu Picture Sound Preferences Time Setup Press CH+ or CH- You can turn itself off the air for warm...
User Guide & Warranty
Page 19
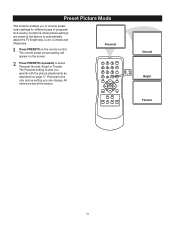
...video settings for different types of programs and viewing conditions. The Personal setting is the only picture setting you can change. Personal is what you specify with the picture adjustments as described on the remote control. All others are preset at the factory. Normal ...Bright Theater 18 Preset Picture Mode This function enables you to select Personal, Normal, Bright or Theater. Most picture settings are set at the factory to automatically adjust the TV Brightness, Color, Contrast and Sharpness. Press PRESETS on page 17...
...video settings for different types of programs and viewing conditions. The Personal setting is the only picture setting you can change. Personal is what you specify with the picture adjustments as described on the remote control. All others are preset at the factory. Normal ...Bright Theater 18 Preset Picture Mode This function enables you to select Personal, Normal, Bright or Theater. Most picture settings are set at the factory to automatically adjust the TV Brightness, Color, Contrast and Sharpness. Press PRESETS on page 17...
User Guide & Warranty
Page 20
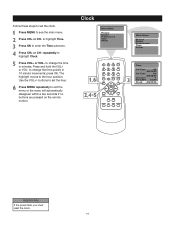
... the hour position. to change the time in 10 minute increments; Clock Main Menu Picture Sound Preferences Time Setup Main Menu Picture Sound Preferences Time Setup Time Off Time Off AM12:00 On Time Off AM12:00 Channel 1 TV/CATV CATV Clock AM10:00 Helpful Hints If the power fails, you must reset...
... the hour position. to change the time in 10 minute increments; Clock Main Menu Picture Sound Preferences Time Setup Main Menu Picture Sound Preferences Time Setup Time Off Time Off AM12:00 On Time Off AM12:00 Channel 1 TV/CATV CATV Clock AM10:00 Helpful Hints If the power fails, you must reset...
User Guide & Warranty
Page 21
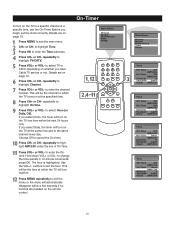
... on page 19. to enter the On time. Press CH+ or CH- to select TV or CATV, depending on whether you begin, set the hour. On-Timer Main Menu Picture Sound Preferences Time Setup 20 Main Menu Picture Sound Preferences Time Setup Time Off Time Off AM12:00 On Time Off AM12:00... Channel 3 TV/CATV CATV Clock AM10:00 Time Off Time Off AM12:00 On Time Off...
... on page 19. to enter the On time. Press CH+ or CH- to select TV or CATV, depending on whether you begin, set the hour. On-Timer Main Menu Picture Sound Preferences Time Setup 20 Main Menu Picture Sound Preferences Time Setup Time Off Time Off AM12:00 On Time Off AM12:00... Channel 3 TV/CATV CATV Clock AM10:00 Time Off Time Off AM12:00 On Time Off...


