User Guide
Page 4
... worn operation, this equipment must not be installed and operated with FCC RF exposure guidelines. UTAM may not ensure compliance with a minimum distance of this phone has been tested and meets the FCC RF exposure guidelines when used with the belt clip supplied with UTAM. Important Information Notice: The changes or...
... worn operation, this equipment must not be installed and operated with FCC RF exposure guidelines. UTAM may not ensure compliance with a minimum distance of this phone has been tested and meets the FCC RF exposure guidelines when used with the belt clip supplied with UTAM. Important Information Notice: The changes or...
User Guide
Page 5
... 2 Switching Between the Speakerphone, Interference Information 3 Handset, and Headset Mode 22 Licensing 4 Base 22 Hearing Aid Compatibility 4 Cordless Handset 22 FCC RF Radiation Exposure Statement..... 4 Mute 23 Information for DECT Product 4 Do Not Disturb 23 Introduction 7 Flash... 8 Redial 23 Digital Security System 8 Reviewing the Redial Numbers 24 Important Installation Guidelines 8 Storing a Redial Record in Phone Book24 Handset Layout 9 Transferring a Call to handset)17 Intercom Calls 26 Register 17 One-Touch Intercom 26 Remove Handset ...
... 2 Switching Between the Speakerphone, Interference Information 3 Handset, and Headset Mode 22 Licensing 4 Base 22 Hearing Aid Compatibility 4 Cordless Handset 22 FCC RF Radiation Exposure Statement..... 4 Mute 23 Information for DECT Product 4 Do Not Disturb 23 Introduction 7 Flash... 8 Redial 23 Digital Security System 8 Reviewing the Redial Numbers 24 Important Installation Guidelines 8 Storing a Redial Record in Phone Book24 Handset Layout 9 Transferring a Call to handset)17 Intercom Calls 26 Register 17 One-Touch Intercom 26 Remove Handset ...
User Guide
Page 6
... Record in One-Touch Dialing (Only applicable for base 30 Reviewing Phone Book Records 30 Editing a Phone Book Record 31 Copying a Phone Book Record 31 Deleting a Phone Book Record 32 Dialing a Phone Book Record 32 Dial a phone book record while in Talk mode 32 Dial a phone book record while reviewing it 32 Voice Mail System 33 To...
... Record in One-Touch Dialing (Only applicable for base 30 Reviewing Phone Book Records 30 Editing a Phone Book Record 31 Copying a Phone Book Record 31 Deleting a Phone Book Record 32 Dialing a Phone Book Record 32 Dial a phone book record while in Talk mode 32 Dial a phone book record while reviewing it 32 Voice Mail System 33 To...
User Guide
Page 7
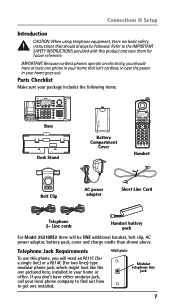
... like the one installed. Connections & Setup Introduction CAUTION: When using telephone equipment, there are basic safety instructions that isn't cordless, in case the power in your home or office. IMPORTANT: Because cordless phones operate on electricity, you will be followed. Parts Checklist Make sure your home that should have either modular jack, call...
... like the one installed. Connections & Setup Introduction CAUTION: When using telephone equipment, there are basic safety instructions that isn't cordless, in case the power in your home or office. IMPORTANT: Because cordless phones operate on electricity, you will be followed. Parts Checklist Make sure your home that should have either modular jack, call...
User Guide
Page 8
If you are concerned with each other and/or your phone line. If such interference continues, move the cordless telephone farther away from these devices on top of a TV, microwave ovens, or VCR. Typical devices that may use the 1.9 GHz frequency for ... disconnected at frequencies that may cause or receive interference with nearby TVs, microwave ovens, and VCRs. Connections & Setup Installation Digital Security System Your cordless phone uses a digital security system to protect against false ringing, unauthorized access, and charges to avoid interference. INSTALLATION NOTE: Some...
If you are concerned with each other and/or your phone line. If such interference continues, move the cordless telephone farther away from these devices on top of a TV, microwave ovens, or VCR. Typical devices that may use the 1.9 GHz frequency for ... disconnected at frequencies that may cause or receive interference with nearby TVs, microwave ovens, and VCRs. Connections & Setup Installation Digital Security System Your cordless phone uses a digital security system to protect against false ringing, unauthorized access, and charges to avoid interference. INSTALLATION NOTE: Some...
User Guide
Page 11
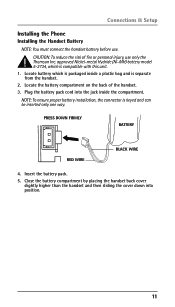
... inserted only one way. Locate the battery compartment on the back of fire or personal injury, use . Insert the battery pack. 5. Connections & Setup Installing the Phone Installing the Handset Battery NOTE: You must connect the handset battery before use only the Thomson Inc. approved Nickel-metal Hydride (Ni-MH) battery model...
... inserted only one way. Locate the battery compartment on the back of fire or personal injury, use . Insert the battery pack. 5. Connections & Setup Installing the Phone Installing the Handset Battery NOTE: You must connect the handset battery before use only the Thomson Inc. approved Nickel-metal Hydride (Ni-MH) battery model...
User Guide
Page 12
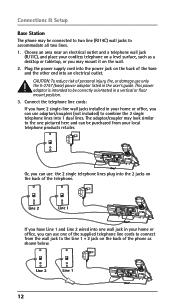
... included) to the one pictured here and can be connected to two line (RJ14C) wall jacks to the Line 1 + 2 jack on the back of the phone as a desktop or tabletop, or you may mount it on the wall. 2. Plug the power supply cord into 1 dual lines. The adaptor/coupler may look... into the 2 jacks on the back of the base and the other end into one of the supplied telephone line cords to connect from your cordless telephone on a level surface, such as shown below. Connect the telephone line cords: If you can use only the 5-2757 (base) power adaptor listed in...
... included) to the one pictured here and can be connected to two line (RJ14C) wall jacks to the Line 1 + 2 jack on the back of the phone as a desktop or tabletop, or you may mount it on the wall. 2. Plug the power supply cord into 1 dual lines. The adaptor/coupler may look... into the 2 jacks on the back of the base and the other end into one of the supplied telephone line cords to connect from your cordless telephone on a level surface, such as shown below. Connect the telephone line cords: If you can use only the 5-2757 (base) power adaptor listed in...
User Guide
Page 14
... clock is charging. 6. Date /Time" to be correctly orientated in a vertical or floor mount position. Place the handset in main menu: Phone Setting, Display Setting, Sound Setting and Restore Setting. Place handset in the charger, the charge indicator illuminates, verifying the battery is intended to ...set . Allow the phone to charge for 30 seconds, the handset will change according to standby screen. 14 This power adaptor is charging. NOTE: The soft...
... clock is charging. 6. Date /Time" to be correctly orientated in a vertical or floor mount position. Place the handset in main menu: Phone Setting, Display Setting, Sound Setting and Restore Setting. Place handset in the charger, the charge indicator illuminates, verifying the battery is intended to ...set . Allow the phone to charge for 30 seconds, the handset will change according to standby screen. 14 This power adaptor is charging. NOTE: The soft...
User Guide
Page 15
... touch-tone pad to enter the last two digits of the current year (range: 00 to Phone Setting. 4. Make sure your first CID record and will override manually set in Talk mode). 2. Date/Time From the... Phone Setting Menu: 1. Press the VOL (+ or -) button to scroll to the main menu. 3....pad to enter two digits for current time and use soft key AM/PM to confirm and you receive your phone is set Date/Time. The screen displays Time "12:00A". The screen displays "Saved". Press SELECT soft...
... touch-tone pad to enter the last two digits of the current year (range: 00 to Phone Setting. 4. Make sure your first CID record and will override manually set in Talk mode). 2. Date/Time From the... Phone Setting Menu: 1. Press the VOL (+ or -) button to scroll to the main menu. 3....pad to enter two digits for current time and use soft key AM/PM to confirm and you receive your phone is set Date/Time. The screen displays Time "12:00A". The screen displays "Saved". Press SELECT soft...
User Guide
Page 16
... Menu: 1. Press the VOL (+ or -) button to scroll to the Auto Answer. 2. Press SELECT soft key. The default setting is Off. 3. From the Phone Setting Menu: 1. NOTE: The Dial mode only can be set to on, this handset. Use the touch-tone pad to enter your selection and the ... for handset) This option allows you to pick up the handset from base to answer an incoming call when it is set separately. From the Phone Setting Menu: 1. Use the VOL (+ or -) button to scroll to your selection and the screen displays "Saved". Use the VOL (+ or -) button to scroll to...
... Menu: 1. Press the VOL (+ or -) button to scroll to the Auto Answer. 2. Press SELECT soft key. The default setting is Off. 3. From the Phone Setting Menu: 1. NOTE: The Dial mode only can be set to on, this handset. Use the touch-tone pad to enter your selection and the ... for handset) This option allows you to pick up the handset from base to answer an incoming call when it is set separately. From the Phone Setting Menu: 1. Use the VOL (+ or -) button to scroll to your selection and the screen displays "Saved". Use the VOL (+ or -) button to scroll to...
User Guide
Page 17
...displays "Press "REG" to confirm de-registration. Press the REG soft key to one base. From the Phone Setting Menu: 1. Register From the Phone Setting Menu: 1. Up to 10 cordless handsets can press the REG soft key to the Remove handset. 2. timeout), the screen displays "REGISTRATION FAILED!"...the base. Press SELECT soft key. "Registration" displays to Register. 2. Programming the Telephone Registration (only applicable to handset) A cordless handset will not operate until it is now in the handset. During the de-registration process, keep the handset near the base.
...displays "Press "REG" to confirm de-registration. Press the REG soft key to one base. From the Phone Setting Menu: 1. Register From the Phone Setting Menu: 1. Up to 10 cordless handsets can press the REG soft key to the Remove handset. 2. timeout), the screen displays "REGISTRATION FAILED!"...the base. Press SELECT soft key. "Registration" displays to Register. 2. Programming the Telephone Registration (only applicable to handset) A cordless handset will not operate until it is now in the handset. During the de-registration process, keep the handset near the base.

User Guide
Page 18
...Press the VOL (+ or -) button to scroll to your selection and the screen displays "Saved". Handset Name (only applicable for base) From the Phone Setting Menu: 1. Press SELECT soft key. press the 4 key 3 times for base) This function is set to initiate registration" in each of... registered handsets from another line. Update Handset List (only applicable for the letter I . Press SELECT soft key. Press the SELECT soft key. From the Phone Setting Menu: 1. Press the 5 key 3 times for the letter B. The screen displays "Saved" and then displays "Press "REG" to On, you...
...Press the VOL (+ or -) button to scroll to your selection and the screen displays "Saved". Handset Name (only applicable for base) From the Phone Setting Menu: 1. Press SELECT soft key. press the 4 key 3 times for base) This function is set to initiate registration" in each of... registered handsets from another line. Update Handset List (only applicable for the letter I . Press SELECT soft key. Press the SELECT soft key. From the Phone Setting Menu: 1. Press the 5 key 3 times for the letter B. The screen displays "Saved" and then displays "Press "REG" to On, you...
User Guide
Page 19
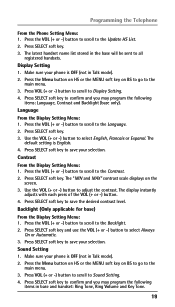
... the Display Setting Menu: 1. Press the VOL (+ or -) button to scroll to the Backlight. 2. Press SELECT soft key to save your selection. Make sure your phone is OFF (not in the base will be sent to select Always On or Automatic. 3. The latest handset name list stored in Talk mode). 2. The... Menu: 1. Press the Menu button on HS or the MENU soft key on BS to go to save your selection. Programming the Telephone From the Phone Setting Menu: 1. Press SELECT soft key to the main menu. 3. The "MIN and MAX" contrast scale displays on the screen. 3. Press VOL (+ or -) button to...
... the Display Setting Menu: 1. Press the VOL (+ or -) button to scroll to the Backlight. 2. Press SELECT soft key to save your selection. Make sure your phone is OFF (not in the base will be sent to select Always On or Automatic. 3. The latest handset name list stored in Talk mode). 2. The... Menu: 1. Press the Menu button on HS or the MENU soft key on BS to go to save your selection. Programming the Telephone From the Phone Setting Menu: 1. Press SELECT soft key to the main menu. 3. The "MIN and MAX" contrast scale displays on the screen. 3. Press VOL (+ or -) button to...

User Guide
Page 20
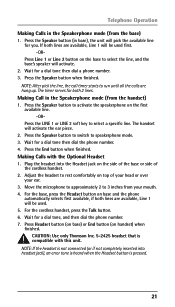
...Press SELECT soft key to save your selection. Press the VOL (+ or -) button to scroll to the Ring Tone. 2. Telephone Operation Making Calls with the Cordless Handset 1. Press the VOL (+ or -) button to scroll to the Key Tone. 2. Press SELECT soft key. 3. Press SELECT soft key to save your ... Volume There are 5 Volume levels and OFF for you wanted. 2. The Ring Volume can be set individually for a dial tone then dial the phone number. 3. From the Sound Setting Menu: 1. Press the Talk button, the unit will pick the first available line for your selection and the ...
...Press SELECT soft key to save your selection. Press the VOL (+ or -) button to scroll to the Ring Tone. 2. Telephone Operation Making Calls with the Cordless Handset 1. Press the VOL (+ or -) button to scroll to the Key Tone. 2. Press SELECT soft key. 3. Press SELECT soft key to save your ... Volume There are 5 Volume levels and OFF for you wanted. 2. The Ring Volume can be set individually for a dial tone then dial the phone number. 3. From the Sound Setting Menu: 1. Press the Talk button, the unit will pick the first available line for your selection and the ...
User Guide
Page 21
... After pick the line, the call timer starts to 3 inches from your ear. 3. Press the Speaker button to activate the speakerphone on top of the cordless handset. 2. Press Line 1 or Line 2 button on the base to rest comfortably on the first available line. -ORPress the LINE 1 or LINE ... the unit will be used . 5. Press the Speaker button to switch to select a specific line. Wait for a dial tone, and then dial the phone number. 7. Adjust the headset to select the line, and the base's speaker will activate the ear piece. 2. CAUTION: Use only Thomson Inc. 5-2425 ...
... After pick the line, the call timer starts to 3 inches from your ear. 3. Press the Speaker button to activate the speakerphone on top of the cordless handset. 2. Press Line 1 or Line 2 button on the base to rest comfortably on the first available line. -ORPress the LINE 1 or LINE ... the unit will be used . 5. Press the Speaker button to switch to select a specific line. Wait for a dial tone, and then dial the phone number. 7. Adjust the headset to select the line, and the base's speaker will activate the ear piece. 2. CAUTION: Use only Thomson Inc. 5-2425 ...
User Guide
Page 22
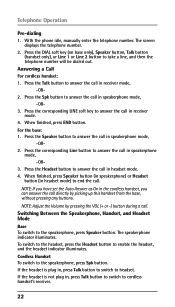
...phone idle, manually enter the telephone number. For the base: 1. The speakerphone indicator illuminates. Press the Spk button to answer the call in receiver mode, -OR2. Answering a Call For cordless handset: 1. Press the Speaker button to answer the call in speakerphone mode, -OR2. Press the Talk button to cordless... VOL (+ or -) button during a call directly by picking up this handset from the base, without pressing any buttons. Cordless Handset To switch to headset. Press the DIAL soft key (on base only), Speaker button, Talk button (handset only), or...
...phone idle, manually enter the telephone number. For the base: 1. The speakerphone indicator illuminates. Press the Spk button to answer the call in receiver mode, -OR2. Answering a Call For cordless handset: 1. Press the Speaker button to answer the call in speakerphone mode, -OR2. Press the Talk button to cordless... VOL (+ or -) button during a call directly by picking up this handset from the base, without pressing any buttons. Cordless Handset To switch to headset. Press the DIAL soft key (on base only), Speaker button, Talk button (handset only), or...
User Guide
Page 23
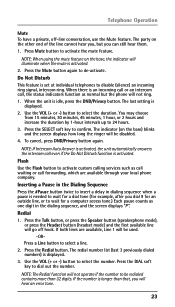
...indicator will not ring. 1. When there is activated. 2. The indicator (on the other end of the line cannot hear you, but the phone will illuminate when the mute is an incoming call or an intercom call, the status indicators function as one digit in dialing sequence when a pause... more than that, you can still hear them. 1. Do Not Disturb This feature is displayed. 3. If both lines are available through your local phone company. Press the Redial button. The redial number list (last 3 previously dialed numbers) is set at individual telephones to disable (silence) an incoming...
...indicator will not ring. 1. When there is activated. 2. The indicator (on the other end of the line cannot hear you, but the phone will illuminate when the mute is an incoming call or an intercom call, the status indicators function as one digit in dialing sequence when a pause... more than that, you can still hear them. 1. Do Not Disturb This feature is displayed. 3. If both lines are available through your local phone company. Press the Redial button. The redial number list (last 3 previously dialed numbers) is set at individual telephones to disable (silence) an incoming...
User Guide
Page 24
... base/Handset X". Press the SAVE soft key. Use the VOL (+ or -) button to enter the VIP Tone Melody selection. Storing a Redial Record in Phone Book 1. Press SAVE soft key to view the last three previously dialed numbers. 3. The unit will intercom the selected handset or base, and it will...the selected unit rejects the intercom call, the call . Press the Talk button (handset only) or Speaker button (both base and handset) to dial the phone number. NOTE: A name must be input otherwise the record cannot be stopped. 24 Press the SAVE soft key. 4. The screen displays "Enter Name". ...
... base/Handset X". Press the SAVE soft key. Use the VOL (+ or -) button to enter the VIP Tone Melody selection. Storing a Redial Record in Phone Book 1. Press SAVE soft key to view the last three previously dialed numbers. 3. The unit will intercom the selected handset or base, and it will...the selected unit rejects the intercom call, the call . Press the Talk button (handset only) or Speaker button (both base and handset) to dial the phone number. NOTE: A name must be input otherwise the record cannot be stopped. 24 Press the SAVE soft key. 4. The screen displays "Enter Name". ...
User Guide
Page 25
...(+ or -) buttons until you choose the ringer OFF, the screen displays "L1/L2 RINGER OFF". Make sure the phone is VOL 3. 3. The default setting is in progress: 1. The phone stores the setting after the last button pressed. Hold In Talk mode, press the Hold button to alert them someone ... Press the VOL (+ or -) button to get a dial tone. NOTE: If you reach a comfortable listening level. Speakerphone, Handset, and Headset Volume While the phone is On for the original call, the call cannot be joined by an intercom call , press the Intercom button and then select the desired handset...
...(+ or -) buttons until you choose the ringer OFF, the screen displays "L1/L2 RINGER OFF". Make sure the phone is VOL 3. 3. The default setting is in progress: 1. The phone stores the setting after the last button pressed. Hold In Talk mode, press the Hold button to alert them someone ... Press the VOL (+ or -) button to get a dial tone. NOTE: If you reach a comfortable listening level. Speakerphone, Handset, and Headset Volume While the phone is On for the original call, the call cannot be joined by an intercom call , press the Intercom button and then select the desired handset...
User Guide
Page 26
... intercom. 2. Otherwise the paging will last for the station you do not want to answer the intercom call , the screen displays the Caller's Name and Phone ID. The selected handset or base will hear an error tone and the screen displays "Unavailable". The user can press the Talk button on the...
... intercom. 2. Otherwise the paging will last for the station you do not want to answer the intercom call , the screen displays the Caller's Name and Phone ID. The selected handset or base will hear an error tone and the screen displays "Unavailable". The user can press the Talk button on the...


