User Guide
Page 5
... Switching Between the Speakerphone, Interference Information 3 Handset, and Headset Mode 22 Licensing 4 Base 22 Hearing Aid Compatibility 4 Cordless Handset 22 FCC RF Radiation Exposure Statement..... 4 Mute 23 Information for DECT Product 4 Do Not Disturb 23 Introduction 7 ... Sequence Telephone Jack Requirements 7 23 Installation 8 Redial 23 Digital Security System 8 Reviewing the Redial Numbers 24 Important Installation Guidelines 8 Storing a Redial Record in Phone Book24 Handset Layout 9 Transferring a Call to Another Extension Base Layout 10 24 ...
... Switching Between the Speakerphone, Interference Information 3 Handset, and Headset Mode 22 Licensing 4 Base 22 Hearing Aid Compatibility 4 Cordless Handset 22 FCC RF Radiation Exposure Statement..... 4 Mute 23 Information for DECT Product 4 Do Not Disturb 23 Introduction 7 ... Sequence Telephone Jack Requirements 7 23 Installation 8 Redial 23 Digital Security System 8 Reviewing the Redial Numbers 24 Important Installation Guidelines 8 Storing a Redial Record in Phone Book24 Handset Layout 9 Transferring a Call to Another Extension Base Layout 10 24 ...
User Guide
Page 6
... in One-Touch Dialing (Only applicable for base 30 Reviewing Phone Book Records 30 Editing a Phone Book Record 31 Copying a Phone Book Record 31 Deleting a Phone Book Record 32 Dialing a Phone Book Record 32 Dial a phone book record while in Talk mode 32 Dial a phone book record while reviewing it 32 Voice Mail System 33 To listen to your...
... in One-Touch Dialing (Only applicable for base 30 Reviewing Phone Book Records 30 Editing a Phone Book Record 31 Copying a Phone Book Record 31 Deleting a Phone Book Record 32 Dialing a Phone Book Record 32 Dial a phone book record while in Talk mode 32 Dial a phone book record while reviewing it 32 Voice Mail System 33 To listen to your...
User Guide
Page 24
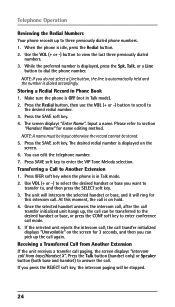
...screen displays "Intercom call . The desired redial number is displayed, press the Spk, Talk, or a Line button to three previously dialed phone numbers. 1. Transferring a Call to enter conference call is on the screen. 6. Once the selected handset answers the intercom call, after ... the last three previously dialed numbers. 3. Make sure the phone is idle, press the Redial button. 2. At this intercom call from base/Handset X". Telephone Operation Reviewing the Redial Numbers Your phone records up to dial the phone number. Use the VOL (+ or -) button to select ...
...screen displays "Intercom call . The desired redial number is displayed, press the Spk, Talk, or a Line button to three previously dialed phone numbers. 1. Transferring a Call to enter conference call is on the screen. 6. Once the selected handset answers the intercom call, after ... the last three previously dialed numbers. 3. Make sure the phone is idle, press the Redial button. 2. At this intercom call from base/Handset X". Telephone Operation Reviewing the Redial Numbers Your phone records up to dial the phone number. Use the VOL (+ or -) button to select ...
User Guide
Page 27
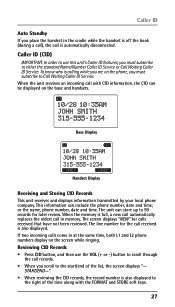
.... When the memory is full, a new call automatically replaces the oldest call in at the same time, both L1 and L2 phone numbers display on the screen while ringing. Reviewing CID Records • Press CID button, and then use this unit's Caller ID features, you must subscribe to 99 records for... unit receives an incoming call records. • When you scroll to the start/end of the list, the screen displays "-START/END--". • When reviewing the CID records, the record number is also displayed to the right of the time along with CID information, the CID can be displayed on...
.... When the memory is full, a new call automatically replaces the oldest call in at the same time, both L1 and L2 phone numbers display on the screen while ringing. Reviewing CID Records • Press CID button, and then use this unit's Caller ID features, you must subscribe to 99 records for... unit receives an incoming call records. • When you scroll to the start/end of the list, the screen displays "-START/END--". • When reviewing the CID records, the record number is also displayed to the right of the time along with CID information, the CID can be displayed on...
User Guide
Page 28
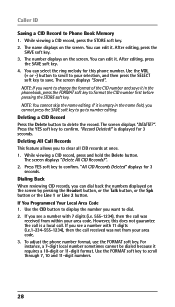
...delete the record. You can edit it. Press the YES soft key to confirm. Dialing Back When reviewing CID records, you cannot press the SAVE soft key to go to number editing. However, this phone number. For instance, a 7-digit local number sometimes cannot be dialed because it . Press YES ...the name field, you can edit it requires a 10-digit or 11-digit format. The screen displays "Delete All CID Records?". 2. To adjust the phone number format, use the FORMAT soft key. If you see a number with 11 digits (i.e.1-234-555-1234), then the call . Deleting All Call ...
...delete the record. You can edit it. Press the YES soft key to confirm. Dialing Back When reviewing CID records, you cannot press the SAVE soft key to go to number editing. However, this phone number. For instance, a 7-digit local number sometimes cannot be dialed because it . Press YES ...the name field, you can edit it requires a 10-digit or 11-digit format. The screen displays "Delete All CID Records?". 2. To adjust the phone number format, use the FORMAT soft key. If you see a number with 11 digits (i.e.1-234-555-1234), then the call . Deleting All Call ...

User Guide
Page 30
... 30 NOTE: If the screen displays "Memory full", you should delete one or more unnecessary records and repeat above steps to complete. Make sure the phone is OFF (not in a number if necessary. 7. Press the DIR button. 3. The screen displays "Enter Name". Use VOL (+ or -) button... to scroll to the selection and press SELECT soft key to continue the call record storage. Reviewing Phone Book Records 1. Press a One-Touch button (1-10) to insert a pause in Talk mode). 2. Press the VOL (+ or -) button to insert a pause...
... 30 NOTE: If the screen displays "Memory full", you should delete one or more unnecessary records and repeat above steps to complete. Make sure the phone is OFF (not in a number if necessary. 7. Press the DIR button. 3. The screen displays "Enter Name". Use VOL (+ or -) button... to scroll to the selection and press SELECT soft key to continue the call record storage. Reviewing Phone Book Records 1. Press a One-Touch button (1-10) to insert a pause in Talk mode). 2. Press the VOL (+ or -) button to insert a pause...
User Guide
Page 31
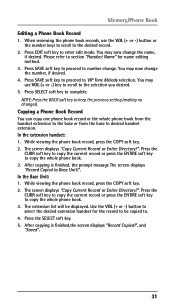
When reviewing the phone book records, use VOL (+ or -) key to scroll to . 4. The screen displays "Copy Current Record or Entire Directory?". After copying is finished,the screen displays "Record Copied!", and "Saved". 31 While viewing the phone book record, press the COPY soft key. 2. Press the CURR soft key to copy ... to the base or from the base to complete. Press SELECT soft key to desired handset extension. Press EDIT soft key to copy the whole phone book. 3. In the extension handset: 1. Press the CURR soft key to copy the current record or press the ENTIRE soft key to enter ...
When reviewing the phone book records, use VOL (+ or -) key to scroll to . 4. The screen displays "Copy Current Record or Entire Directory?". After copying is finished,the screen displays "Record Copied!", and "Saved". 31 While viewing the phone book record, press the COPY soft key. 2. Press the CURR soft key to copy ... to the base or from the base to complete. Press SELECT soft key to desired handset extension. Press EDIT soft key to copy the whole phone book. 3. In the extension handset: 1. Press the CURR soft key to copy the current record or press the ENTIRE soft key to enter ...

User Guide
Page 32
When reviewing the phone book records list, use the VOL (+ or -) button or the number keys to scroll to access the phone book. 3. Dialing a Phone Book Record Dial a phone book record while in Talk mode). 2. Make sure the phone is ON (in Talk mode) by pressing the Talk, Spk button, or selecting a Line. 2. Press the Phonebook button... the DIAL soft key to delete the record. 3. Press the Talk or Spk button on the handset or press the Speaker or Line 1/2 on the phone to dial the number. -ORDial a phone book record while reviewing it: 1.
When reviewing the phone book records list, use the VOL (+ or -) button or the number keys to scroll to access the phone book. 3. Dialing a Phone Book Record Dial a phone book record while in Talk mode). 2. Make sure the phone is ON (in Talk mode) by pressing the Talk, Spk button, or selecting a Line. 2. Press the Phonebook button... the DIAL soft key to delete the record. 3. Press the Talk or Spk button on the handset or press the Speaker or Line 1/2 on the phone to dial the number. -ORDial a phone book record while reviewing it: 1.
User Guide
Page 33
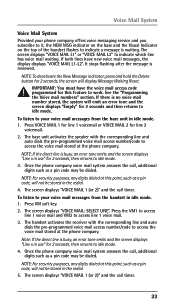
...Mail System Provided your voice mail messages from the base unit in idle mode. 1. To listen to access the voice mail stored at the phone company. The base unit activates the speaker with the corresponding line and auto dials the pre-programmed voice mail access number/code to idle ...top of the handset flashes to idle mode. NOTE: If the direct line is waiting. Press VM soft key. 2. Note: If the direct line is reviewed. The screen displays "VOICE MAIL: SELECT LINE". It stops flashing after the message is busy, an error tone emits and the screen displays "Line x...
...Mail System Provided your voice mail messages from the base unit in idle mode. 1. To listen to access the voice mail stored at the phone company. The base unit activates the speaker with the corresponding line and auto dials the pre-programmed voice mail access number/code to idle ...top of the handset flashes to idle mode. NOTE: If the direct line is waiting. Press VM soft key. 2. Note: If the direct line is reviewed. The screen displays "VOICE MAIL: SELECT LINE". It stops flashing after the message is busy, an error tone emits and the screen displays "Line x...
User Guide
Page 36
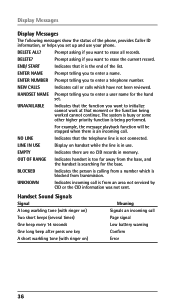
...list. Prompt asking if you want to erase all records. Prompt asking if you set . NEW CALLS Indicates call is the end of the phone, provides Caller ID information, or helps you want to erase the current record. UNAVAILABLE Indicates that it is from the base, and the .... END/ START Indicates that the function you to initialize cannot work at that the telephone line is blocked from a number which have not been reviewed. ENTER NAME Prompt telling you want to enter a name. HANDSET NAME Prompt telling you to enter a user name for the base. The system...
...list. Prompt asking if you want to erase all records. Prompt asking if you set . NEW CALLS Indicates call is the end of the phone, provides Caller ID information, or helps you want to erase the current record. UNAVAILABLE Indicates that it is from the base, and the .... END/ START Indicates that the function you to initialize cannot work at that the telephone line is blocked from a number which have not been reviewed. ENTER NAME Prompt telling you want to enter a name. HANDSET NAME Prompt telling you to enter a user name for the base. The system...
User Guide
Page 44
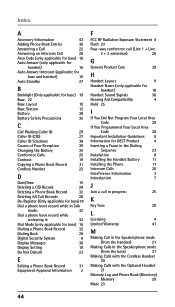
... Calls 25 Contrast 19 Copying a Phone Book Record 31 Cordless Handset 22 D Date/Time 15 Deleting a CID Record 28 Deleting a Phone Book Record 32 Deleting All Call Records 28 De-Register (Only applicable for base)18 Dial a phone book record while in Talk mode: 32 Dial a phone book record while reviewing it: 32 Dial Mode (only...
... Calls 25 Contrast 19 Copying a Phone Book Record 31 Cordless Handset 22 D Date/Time 15 Deleting a CID Record 28 Deleting a Phone Book Record 32 Deleting All Call Records 28 De-Register (Only applicable for base)18 Dial a phone book record while in Talk mode: 32 Dial a phone book record while reviewing it: 32 Dial Mode (only...
User Guide
Page 45
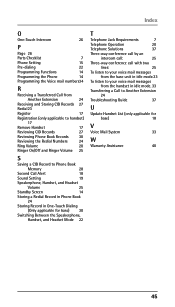
... a Transferred Call from Another Extension 24 Receiving and Storing CID Records 27 Redial 23 Register 17 Registration (only applicable to handset) 17 Remove Handset 17 Reviewing CID Records 27 Reviewing Phone Book Records 30 Reviewing the Redial Numbers 24 Ring Volume 20 Ringer On/Off and Ringer Volume 25 S Saving a CID Record to...
... a Transferred Call from Another Extension 24 Receiving and Storing CID Records 27 Redial 23 Register 17 Registration (only applicable to handset) 17 Remove Handset 17 Reviewing CID Records 27 Reviewing Phone Book Records 30 Reviewing the Redial Numbers 24 Ring Volume 20 Ringer On/Off and Ringer Volume 25 S Saving a CID Record to...