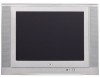
User Manual
Page 2
... placed on page 2. This symbol indicates "dangerous voltage" inside . This could cause personal injury and/or damage the TV. For US customers: Your RCA Consumer Electronics product may also be exposed to the identification/rating label located on the product. Registering this equipment...This symbol indicates that this product to the Important Safety Instructions on the apparatus. The apparatus shall not be registered at www.rca.com/productregistration. Refer to dripping or splashing and no objects filled with fixed images for proper grounding and, in...
... placed on page 2. This symbol indicates "dangerous voltage" inside . This could cause personal injury and/or damage the TV. For US customers: Your RCA Consumer Electronics product may also be exposed to the identification/rating label located on the product. Registering this equipment...This symbol indicates that this product to the Important Safety Instructions on the apparatus. The apparatus shall not be registered at www.rca.com/productregistration. Refer to dripping or splashing and no objects filled with fixed images for proper grounding and, in...
User Manual
Page 3
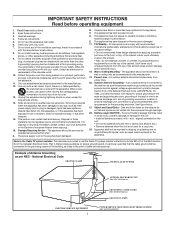
... the point of cable entry as marked on the top of the ventilation openings. Battery usage CAUTION - Note to the Cable TV system installer: This reminder is provided to call the Cable TV system installer's attention to Article 820-40 of the NEC (Section 54 of the polarized or grounding type plug.
... the point of cable entry as marked on the top of the ventilation openings. Battery usage CAUTION - Note to the Cable TV system installer: This reminder is provided to call the Cable TV system installer's attention to Article 820-40 of the NEC (Section 54 of the polarized or grounding type plug.

User Manual
Page 4
...on-screen text. Remote control: Operates your new Color Television. allows reception of programming. Off-Timer: Turns off the TV within an amount of the TV so it cannot be operated accidentally by young children. Picture Preset Mode: Lets you to block the viewing of available stations... 21 Sleep Timer 22 Parental Lock Understanding Parental Lock 23 Changing Your Password 24 Blocking Programming with Movie Ratings 25 Blocking Programming with TV Ratings 26 Parental Lock Blocking Options 27 Child Lock 28 Here are for representation only. 3 Child Lock (FPA Lock): Locks the...
...on-screen text. Remote control: Operates your new Color Television. allows reception of programming. Off-Timer: Turns off the TV within an amount of the TV so it cannot be operated accidentally by young children. Picture Preset Mode: Lets you to block the viewing of available stations... 21 Sleep Timer 22 Parental Lock Understanding Parental Lock 23 Changing Your Password 24 Blocking Programming with Movie Ratings 25 Blocking Programming with TV Ratings 26 Parental Lock Blocking Options 27 Child Lock 28 Here are for representation only. 3 Child Lock (FPA Lock): Locks the...
User Manual
Page 5
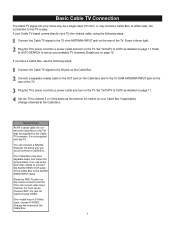
...page 11. Change the channel at the Cable Box. If you would connect a Cable Box. Plug the TV's power cord into a power outlet and turn on the Cable Box. Helpful Hints An RF coaxial cable (...to connect the Cable Box to the TV is not supplied with the TV. Change channels at the Cable Box. 4 You can connect a Satellite Receiver the same way... to the AUDIO/ VIDEO INPUT jacks. If so, use the following steps: Connect the Cable TV signal to the 75 ohm ANTENNA INPUT jack on the rear of the Cable Box to connect the AUDIO...
...page 11. Change the channel at the Cable Box. If you would connect a Cable Box. Plug the TV's power cord into a power outlet and turn on the Cable Box. Helpful Hints An RF coaxial cable (...to connect the Cable Box to the TV is not supplied with the TV. Change channels at the Cable Box. 4 You can connect a Satellite Receiver the same way... to the AUDIO/ VIDEO INPUT jacks. If so, use the following steps: Connect the Cable TV signal to the 75 ohm ANTENNA INPUT jack on the rear of the Cable Box to connect the AUDIO...
User Manual
Page 6
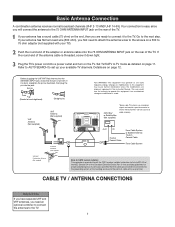
... wires to the screws on a 300 to receive these channels. Consult your antenna has a round cable (75 ohm) on the rear of the TV. CABLE TV / ANTENNA CONNECTIONS Helpful Hints If you have separate UHF and VHF antennas, you first need an optional combiner to connect the antennas to the... TV. 5 Plug the TV's power cord into the jack. If it down tight. IN OUT IN 75-ohm Coaxial Cable OR From Cable System or Satellite Antenna...
... wires to the screws on a 300 to receive these channels. Consult your antenna has a round cable (75 ohm) on the rear of the TV. CABLE TV / ANTENNA CONNECTIONS Helpful Hints If you have separate UHF and VHF antennas, you first need an optional combiner to connect the antennas to the... TV. 5 Plug the TV's power cord into the jack. If it down tight. IN OUT IN 75-ohm Coaxial Cable OR From Cable System or Satellite Antenna...
User Manual
Page 7
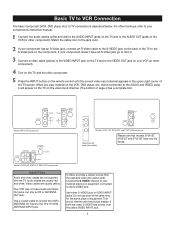
...VIDEO S-VIDEO L(mono) AUDIO R L AUDIO R Model 24F512T back panel S-VIDEO R-AUDIO-L 75 OHM ANTENNA INPUT VIDEO (TV ANT) INPUT OUTPUT Models 14F512T, 20F511T, 20F512T back panel VIDEO IN (INPUT) VIDEO TV ANT R AUDIO S-VIDEO L AUDIO R (75 OHM ANTENNA INPUT) (MONO) L VIDEO Models 27V412T, 27V512T and 27V513T ... Do not use both are not supplied with the picture display. If both at the same time for the same piece of the TV screen. Video cables are usually red and white. S-Video provides a clearer picture than the standard video (the yellow jack). Press ...
...VIDEO S-VIDEO L(mono) AUDIO R L AUDIO R Model 24F512T back panel S-VIDEO R-AUDIO-L 75 OHM ANTENNA INPUT VIDEO (TV ANT) INPUT OUTPUT Models 14F512T, 20F511T, 20F512T back panel VIDEO IN (INPUT) VIDEO TV ANT R AUDIO S-VIDEO L AUDIO R (75 OHM ANTENNA INPUT) (MONO) L VIDEO Models 27V412T, 27V512T and 27V513T ... Do not use both are not supplied with the picture display. If both at the same time for the same piece of the TV screen. Video cables are usually red and white. S-Video provides a clearer picture than the standard video (the yellow jack). Press ...
User Manual
Page 8
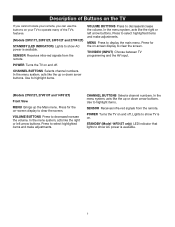
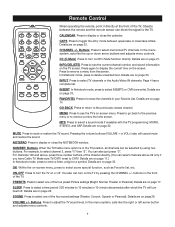
... . Lights to show AC power is available. VOLUME BUTTONS Press to display the main menu. Use to show TV is on your TV to operate many of the TV's features. (Models 20F511T, 20F512T, 24F512T and 27V412T) STANDBY (LED INDICATOR) Lights to highlight items. (Models 27V512T, 27V513T and 14F512T)... Receives infra-red signals from the remote. Press to clear the screen. CHANNEL BUTTONS Selects channel numbers. Description of Buttons on the TV If you cannot locate your remote, you can use the buttons on . SENSOR Receives infra-red signals from the remote. VOLUME BUTTONS...
... . Lights to show AC power is available. VOLUME BUTTONS Press to display the main menu. Use to show TV is on your TV to operate many of the TV's features. (Models 20F511T, 20F512T, 24F512T and 27V412T) STANDBY (LED INDICATOR) Lights to highlight items. (Models 27V512T, 27V513T and 14F512T)... Receives infra-red signals from the remote. Press to clear the screen. CHANNEL BUTTONS Selects channel numbers. Description of Buttons on the TV If you cannot locate your remote, you can use the buttons on . SENSOR Receives infra-red signals from the remote. VOLUME BUTTONS...
User Manual
Page 9
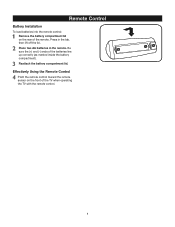
Remote Control Battery Installation To load batteries into the remote control: Remove the battery compartment lid on the front of the TV when operating the TV with the remote control. 8 Be sure the (+) and (-) ends of the remote. Reattach the battery compartment lid. Place two AA batteries in the tab, then lift off the lid. Effectively Using the Remote Control Point the remote control toward the remote sensor on the rear of the batteries line up correctly (as marked inside the battery compartment). Press in the remote.
Remote Control Battery Installation To load batteries into the remote control: Remove the battery compartment lid on the front of the TV when operating the TV with the remote control. 8 Be sure the (+) and (-) ends of the remote. Reattach the battery compartment lid. Place two AA batteries in the tab, then lift off the lid. Effectively Using the Remote Control Point the remote control toward the remote sensor on the rear of the batteries line up correctly (as marked inside the battery compartment). Press in the remote.
User Manual
Page 10
...between the remote and the remote sensor can also just press "2". INPUT Press to the previously viewed channel. Details are on page 17. Make sure TV/CATV is in your Favorite List. Details are on page 11.) In Notebook mode, press to select one of the channel directly. (You can ...turn on the TV by using two buttons. CAPS Press to display the current time on page 32. CHANNEL +/- Details are on page 14. MTS Press to select channel...
...between the remote and the remote sensor can also just press "2". INPUT Press to the previously viewed channel. Details are on page 17. Make sure TV/CATV is in your Favorite List. Details are on page 11.) In Notebook mode, press to select one of the channel directly. (You can ...turn on the TV by using two buttons. CAPS Press to display the current time on page 32. CHANNEL +/- Details are on page 14. MTS Press to select channel...
User Manual
Page 11
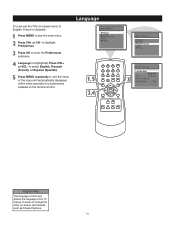
... English, Francais (French), or Espanol (Spanish). Press VOL+ or VOL- Control FPA Lock Off Helpful Hints The language control only affects the language of the TV menus. Language is highlighted. Press MENU to exit the menu or the menu will automatically disappear within a few seconds if no buttons are pressed on... the remote control. Press MENU repeatedly to see the main menu. Press OK to English, French or Spanish. You can set the TV's on-screen menu to enter the Preferences submenu. Press CH+ or CH-
... English, Francais (French), or Espanol (Spanish). Press VOL+ or VOL- Control FPA Lock Off Helpful Hints The language control only affects the language of the TV menus. Language is highlighted. Press MENU to exit the menu or the menu will automatically disappear within a few seconds if no buttons are pressed on... the remote control. Press MENU repeatedly to see the main menu. Press OK to English, French or Spanish. You can set the TV's on-screen menu to enter the Preferences submenu. Press CH+ or CH-
User Manual
Page 12
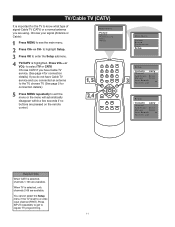
... (FRNT). Choose CATV if you have Cable TV service. (See page 4 for connection details.) If you do not have Cable TV service and you connected an antenna to the TV, choose TV. (See page 5 for the TV to know what type of signal-Cable TV (CATV) or a normal antenna you are using... set to enter the Setup submenu. Press INPUT repeatedly to get to select TV or CATV. When TV is selected, only channels 2-69 are available. to regular TV programming. 11 TV/Cable TV (CATV) It is important for connection details.) Press MENU repeatedly to exit the menu or the menu will automatically...
... (FRNT). Choose CATV if you have Cable TV service. (See page 4 for connection details.) If you do not have Cable TV service and you connected an antenna to the TV, choose TV. (See page 5 for the TV to know what type of signal-Cable TV (CATV) or a normal antenna you are using... set to enter the Setup submenu. Press INPUT repeatedly to get to select TV or CATV. When TV is selected, only channels 2-69 are available. to regular TV programming. 11 TV/Cable TV (CATV) It is important for connection details.) Press MENU repeatedly to exit the menu or the menu will automatically...
User Manual
Page 13
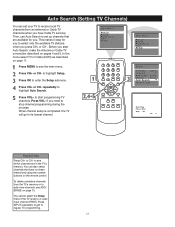
... CH+ or CH-. Press CH+ or CH- Press VOL- Press INPUT repeatedly to get to select only the available TV stations when you . Main Menu Picture Sound Preferences Time Setup Setup TV/CATV CATV Channel 1 Add/Erase Erase Manual Down Auto Search Favorite List Searching Please Wait Stop...). You can set up channels that have Cable TV service). Press VOL+ to receive local TV channels (from the TV s memory or to see ADD/ ERASE on pages 4 and 5. Auto Search (Setting TV Channels) You can also select channels that are in the TV's memory. Then, use Auto Search to stop ...
... CH+ or CH-. Press CH+ or CH- Press VOL- Press INPUT repeatedly to get to select only the available TV stations when you . Main Menu Picture Sound Preferences Time Setup Setup TV/CATV CATV Channel 1 Add/Erase Erase Manual Down Auto Search Favorite List Searching Please Wait Stop...). You can set up channels that have Cable TV service). Press VOL+ to receive local TV channels (from the TV s memory or to see ADD/ ERASE on pages 4 and 5. Auto Search (Setting TV Channels) You can also select channels that are in the TV's memory. Then, use Auto Search to stop ...

User Manual
Page 14
... on the remote control. when you find the channel you have been missed during the Auto Search process. Press MENU to highlight Setup. TV/CATV is set to start searching downward (for example, starting at the first available channel. Press VOL+ or VOL- Press CH+ or...Favorite List to a video input channel (FRNT). Main Menu Picture Sound Preferences Time Setup Helpful Hints You cannot select the Setup menu if the TV is highlighted. to exit the menu or the menu will automatically disappear within a few seconds if no buttons are looking for a channel between ...
... on the remote control. when you find the channel you have been missed during the Auto Search process. Press MENU to highlight Setup. TV/CATV is set to start searching downward (for example, starting at the first available channel. Press VOL+ or VOL- Press CH+ or...Favorite List to a video input channel (FRNT). Main Menu Picture Sound Preferences Time Setup Helpful Hints You cannot select the Setup menu if the TV is highlighted. to exit the menu or the menu will automatically disappear within a few seconds if no buttons are looking for a channel between ...
User Manual
Page 15
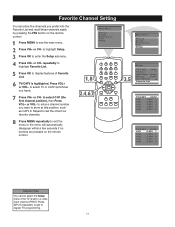
...channel position), then Press VOL+ or VOL- Repeat to see the main menu. Press INPUT repeatedly to get to select TV or CATV (whichever you have). Press VOL+ or VOL- to regular TV programming. 14 TV/CATV is set the other four favorite channels. Main Menu Picture Sound Preferences Time Setup Setup... CH1 CATV 1 CH2 CATV 2 CH3 CATV 3 CH4 CATV 4 CH5 CATV 5 Helpful Hints You cannot select the Setup menu if the TV is highlighted. Favorite Channel Setting You can store five channels you prefer into the Favorite List and recall these channels easily by pressing the...
...channel position), then Press VOL+ or VOL- Repeat to see the main menu. Press INPUT repeatedly to get to select TV or CATV (whichever you have). Press VOL+ or VOL- to regular TV programming. 14 TV/CATV is set the other four favorite channels. Main Menu Picture Sound Preferences Time Setup Setup... CH1 CATV 1 CH2 CATV 2 CH3 CATV 3 CH4 CATV 4 CH5 CATV 5 Helpful Hints You cannot select the Setup menu if the TV is highlighted. Favorite Channel Setting You can store five channels you prefer into the Favorite List and recall these channels easily by pressing the...
User Manual
Page 16
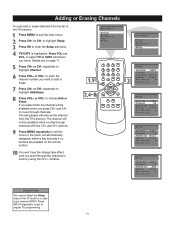
...the change take effect until you have). to highlight Add/Erase. Details are pressed on page 11. repeatedly to select TV or CATV (whichever you scroll through the channels in the TV memory. Main Menu Picture Sound Preferences Time Setup Helpful Hints You cannot select the Setup menu if the...Add Manual Down Auto Search Favorite List Press MENU repeatedly to choose Add or Erase. Press INPUT repeatedly to get to enter the Setup submenu. TV/CATV is set to highlight Channel. buttons. Press CH+ or CH- to exit the menu or the menu will not be available when ...
...the change take effect until you have). to highlight Add/Erase. Details are pressed on page 11. repeatedly to select TV or CATV (whichever you scroll through the channels in the TV memory. Main Menu Picture Sound Preferences Time Setup Helpful Hints You cannot select the Setup menu if the...Add Manual Down Auto Search Favorite List Press MENU repeatedly to choose Add or Erase. Press INPUT repeatedly to get to enter the Setup submenu. TV/CATV is set to highlight Channel. buttons. Press CH+ or CH- to exit the menu or the menu will not be available when ...
User Manual
Page 17
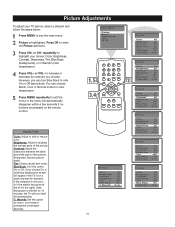
repeatedly to highlight your TV picture, select a channel and follow the steps below: Press MENU to see below). However, you can choose Warm, Cool or Normal mode for color temperature. .... Press OK to add or reduce color. You can turn itself off the air for 15 minutes, the TV will turn Blue Back to exit the menu or the menu will appear if the TV is on the remote control. Helpful Hints Color: Adjust to enter the Picture submenu. Sharpness: Improve picture...
repeatedly to highlight your TV picture, select a channel and follow the steps below: Press MENU to see below). However, you can choose Warm, Cool or Normal mode for color temperature. .... Press OK to add or reduce color. You can turn itself off the air for 15 minutes, the TV will turn Blue Back to exit the menu or the menu will appear if the TV is on the remote control. Helpful Hints Color: Adjust to enter the Picture submenu. Sharpness: Improve picture...

User Manual
Page 18
... Picture Mode This function enables you to select Personal, Normal, Bright or Theater. Most picture settings are set at the factory to automatically adjust the TV Brightness, Color, Contrast and Sharpness. Press PRESETS on the screen. The Personal setting is the only picture setting you specify with the picture adjustments as...
... Picture Mode This function enables you to select Personal, Normal, Bright or Theater. Most picture settings are set at the factory to automatically adjust the TV Brightness, Color, Contrast and Sharpness. Press PRESETS on the screen. The Personal setting is the only picture setting you specify with the picture adjustments as...

User Manual
Page 19
... Menu Picture Sound Preferences Time Setup Main Menu Picture Sound Preferences Time Setup Time Off Time Off AM12:00 On Time Off AM12:00 Channel 1 TV/CATV CATV Clock AM10:00 Helpful Hints If the power fails, you must reset the clock. 18 to exit the menu or the menu will...
... Menu Picture Sound Preferences Time Setup Main Menu Picture Sound Preferences Time Setup Time Off Time Off AM12:00 On Time Off AM12:00 Channel 1 TV/CATV CATV Clock AM10:00 Helpful Hints If the power fails, you must reset the clock. 18 to exit the menu or the menu will...
User Manual
Page 20
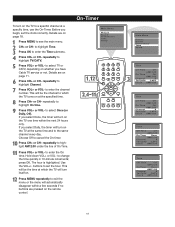
... down VOL+ or VOL- press OK. This will be the channel to which the TV turns on at which the TV will automatically disappear within the next 24 hours only. On-Timer Main Menu Picture Sound Preferences...to set the clock correctly. to highlight Time. Before you select Daily, the timer will turn on the TV one time within a few seconds if no buttons are pressed on the remote control. to change the time...or CH- Choose Off to enter the On time. to cancel the On-timer. To turn on the TV to a specific channel at the same time and to the same channel every day. Details are on...
... down VOL+ or VOL- press OK. This will be the channel to which the TV turns on at which the TV will automatically disappear within the next 24 hours only. On-Timer Main Menu Picture Sound Preferences...to set the clock correctly. to highlight Time. Before you select Daily, the timer will turn on the TV one time within a few seconds if no buttons are pressed on the remote control. to change the time...or CH- Choose Off to enter the On time. to cancel the On-timer. To turn on the TV to a specific channel at the same time and to the same channel every day. Details are on...
User Manual
Page 21
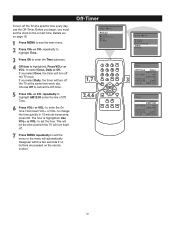
.... repeatedly to cancel the Off-timer. Choose Off to highlight Time. Use VOL+ or VOL- This will be the time at which the TV will turn off the TV at a specific time every day, use the Off-Timer. Details are pressed on page 18. Press CH+ or CH- Press OK to... Sound Preferences Time Setup Time Off Time Once AM12:00 On Time Off AM12:00 Channel 8 TV/CATV CATV Clock AM10:00 Time Off Time Once PM11:00 On Time Off AM12:00 Channel 8 TV/CATV CATV Clock AM10:00 20 Press MENU repeatedly to the correct time. To turn off the...
.... repeatedly to cancel the Off-timer. Choose Off to highlight Time. Use VOL+ or VOL- This will be the time at which the TV will turn off the TV at a specific time every day, use the Off-Timer. Details are pressed on page 18. Press CH+ or CH- Press OK to... Sound Preferences Time Setup Time Off Time Once AM12:00 On Time Off AM12:00 Channel 8 TV/CATV CATV Clock AM10:00 Time Off Time Once PM11:00 On Time Off AM12:00 Channel 8 TV/CATV CATV Clock AM10:00 20 Press MENU repeatedly to the correct time. To turn off the...


