User Manual
Page 2
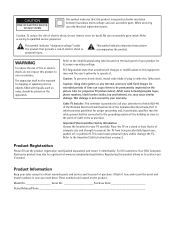
... proper operating voltage. Caution: Using video games or any external accessory with liquids, such as practical. FCC Regulations state that this product incorporates double insulation between hazardous mains voltage and user accessible parts. Cable TV Installer: This reminder is not covered by your attention to Article 820-40 of the National Electrical Code (Section 54 of time can cause them . Important Stand and Base...
... proper operating voltage. Caution: Using video games or any external accessory with liquids, such as practical. FCC Regulations state that this product incorporates double insulation between hazardous mains voltage and user accessible parts. Cable TV Installer: This reminder is not covered by your attention to Article 820-40 of the National Electrical Code (Section 54 of time can cause them . Important Stand and Base...
User Manual
Page 3
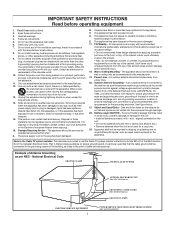
... mercury. aligned as practical. Example of time. 14. Keep these instructions. 2. Follow all servicing to the Cable TV system installer: This reminder is used for the grounding electrode. A polarized plug has two blades with + and - This product may result in accordance with liquids, such as if the power-supply cord or plug is not used , use attachments/accessories specified by the...
... mercury. aligned as practical. Example of time. 14. Keep these instructions. 2. Follow all servicing to the Cable TV system installer: This reminder is used for the grounding electrode. A polarized plug has two blades with + and - This product may result in accordance with liquids, such as if the power-supply cord or plug is not used , use attachments/accessories specified by the...

User Manual
Page 4
... Lock (FPA Lock): Locks the buttons on the TV 7 Remote Control 8 Setup Menus Language 10 TV/Cable TV (CATV 11 Auto Search (Setting TV Channels 12 Manual Channel Tuning 13 Favorite Channel Setting 14 Adding or Erasing Channels 15 On-screen Menus Picture Adjustments 16 Preset Picture Mode 17 Clock 18 On-Timer 19 Off-Timer 20 Closed Caption 21 Sleep Timer 22 Parental Lock Understanding Parental Lock 23 Changing Your Password 24 Blocking Programming with Movie Ratings 25 Blocking Programming with TV Ratings 26 Parental Lock...
... Lock (FPA Lock): Locks the buttons on the TV 7 Remote Control 8 Setup Menus Language 10 TV/Cable TV (CATV 11 Auto Search (Setting TV Channels 12 Manual Channel Tuning 13 Favorite Channel Setting 14 Adding or Erasing Channels 15 On-screen Menus Picture Adjustments 16 Preset Picture Mode 17 Clock 18 On-Timer 19 Off-Timer 20 Closed Caption 21 Sleep Timer 22 Parental Lock Understanding Parental Lock 23 Changing Your Password 24 Blocking Programming with Movie Ratings 25 Blocking Programming with TV Ratings 26 Parental Lock...
User Manual
Page 5
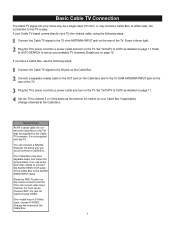
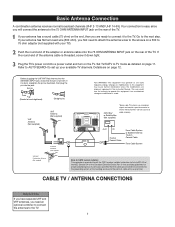
... video input channel. Refer to AUTO SEARCH to set the TV to CATV as the channel 3/4 switch on page 12. Plug the TV's power cord into a power outlet and turn on the remote control to channel 3 or 4 (the same as detailed on the TV. It is easy. You can connect a Satellite Receiver the same way you have separate Audio and Video Out jacks instead. Your Cable Box may include a Cable Box. Press the INPUT button...
... video input channel. Refer to AUTO SEARCH to set the TV to CATV as the channel 3/4 switch on page 12. Plug the TV's power cord into a power outlet and turn on the remote control to channel 3 or 4 (the same as detailed on the TV. It is easy. You can connect a Satellite Receiver the same way you have separate Audio and Video Out jacks instead. Your Cable Box may include a Cable Box. Press the INPUT button...
User Manual
Page 6
... connect the antenna to receive these channels. Plug the TV's power cord into the jack. Bent pin Cable Plug (Needs to this equipment if an unauthorized change or modification is bent, straighten the pin as close to the next step. Changes or modifications to be connected to the grounding system of cable entry as detailed on the rear of the antenna cable is threaded, screw...
... connect the antenna to receive these channels. Plug the TV's power cord into the jack. Bent pin Cable Plug (Needs to this equipment if an unauthorized change or modification is bent, straighten the pin as close to the next step. Changes or modifications to be connected to the grounding system of cable entry as detailed on the rear of the antenna cable is threaded, screw...
User Manual
Page 7
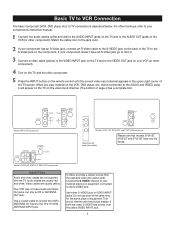
... jack. Helpful Hints Audio and video cables are usually red and white. Your VCR may not have only AV inputs. Use a coaxial cable to connect the VCR's ANTENNA OUT jack to the jack color. Turn on the TV and the other hookups, refer to the S-Video jack on your component's instruction manual. Video cables are used, S-VIDEO has priority over the yellow VIDEO INPUT jack. 6 Choose the S-VIDEO channel to view material playing on equipment connected to TV connection is connected to the VIDEO OUT jack on the component...
... jack. Helpful Hints Audio and video cables are usually red and white. Your VCR may not have only AV inputs. Use a coaxial cable to connect the VCR's ANTENNA OUT jack to the jack color. Turn on the TV and the other hookups, refer to the S-Video jack on your component's instruction manual. Video cables are used, S-VIDEO has priority over the yellow VIDEO INPUT jack. 6 Choose the S-VIDEO channel to view material playing on equipment connected to TV connection is connected to the VIDEO OUT jack on the component...
User Manual
Page 8
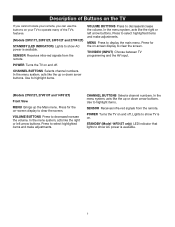
... arrow buttons. MENU Press to highlight items. SENSOR Receives infra-red signals from the remote. Use to display the main menu. POWER Turns the TV on -screen display to select highlighted items and make adjustments. Press to show TV is available. VOLUME BUTTONS Press to highlight items. (Models 27V512T, 27V513T and 14F512T) Front View MENU Brings up the Main menu. Use to decrease/increase the volume. VOLUME BUTTONS Press to clear the screen. CHANNEL BUTTONS Selects channel numbers. Lights to select highlighted...
... arrow buttons. MENU Press to highlight items. SENSOR Receives infra-red signals from the remote. Use to display the main menu. POWER Turns the TV on -screen display to select highlighted items and make adjustments. Press to show TV is available. VOLUME BUTTONS Press to highlight items. (Models 27V512T, 27V513T and 14F512T) Front View MENU Brings up the Main menu. Use to decrease/increase the volume. VOLUME BUTTONS Press to clear the screen. CHANNEL BUTTONS Selects channel numbers. Lights to select highlighted...
User Manual
Page 10
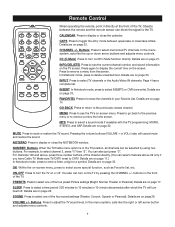
... to display or close the NOTEBOOK window. SLEEP Press to select a time period (120 minutes to select some special function, such as Favorite list, etc. Details are on page 11.) In Notebook mode, press to see the current channel number, and sound information on page 17. Details are on page 14. NUMBER Buttons When the TV/Cable menu option is set to remove a menu from the screen. You can select channels...
... to display or close the NOTEBOOK window. SLEEP Press to select a time period (120 minutes to select some special function, such as Favorite list, etc. Details are on page 11.) In Notebook mode, press to see the current channel number, and sound information on page 17. Details are on page 14. NUMBER Buttons When the TV/Cable menu option is set to remove a menu from the screen. You can select channels...
User Manual
Page 12
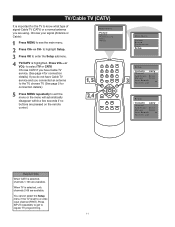
...- You cannot select the Setup menu if the TV is set to regular TV programming. 11 Main Menu Picture Sound Preferences Time Setup Setup TV/CATV CATV Channel 1 Add/Erase Erase Manual Down Auto Search Favorite List Setup TV/CATV CATV Channel 7 Add/Erase Erase Manual Down Auto Search Favorite List Helpful Hints When CATV is selected, channels 1-125 are available. Press INPUT repeatedly to get to a video input channel (FRNT). Choose your signal (Antenna or Cable): Press MENU to enter...
...- You cannot select the Setup menu if the TV is set to regular TV programming. 11 Main Menu Picture Sound Preferences Time Setup Setup TV/CATV CATV Channel 1 Add/Erase Erase Manual Down Auto Search Favorite List Setup TV/CATV CATV Channel 7 Add/Erase Erase Manual Down Auto Search Favorite List Helpful Hints When CATV is selected, channels 1-125 are available. Press INPUT repeatedly to get to a video input channel (FRNT). Choose your signal (Antenna or Cable): Press MENU to enter...
User Manual
Page 13
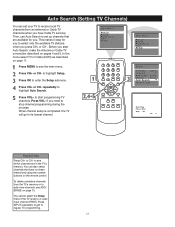
... the remote control. Press OK to regular TV programming. 12 Press VOL- Main Menu Picture Sound Preferences Time Setup Setup TV/CATV CATV Channel 1 Add/Erase Erase Manual Down Auto Search Favorite List Searching Please Wait Stop TV 2 Helpful Hints Press CH+ or CH- Press INPUT repeatedly to get to enter the Setup submenu. This makes it easy for you. When channel setup is set up channels that have Cable TV service...
... the remote control. Press OK to regular TV programming. 12 Press VOL- Main Menu Picture Sound Preferences Time Setup Setup TV/CATV CATV Channel 1 Add/Erase Erase Manual Down Auto Search Favorite List Searching Please Wait Stop TV 2 Helpful Hints Press CH+ or CH- Press INPUT repeatedly to get to enter the Setup submenu. This makes it easy for you. When channel setup is set up channels that have Cable TV service...

User Manual
Page 14
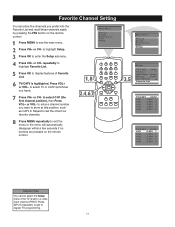
... INPUT repeatedly to get to highlight Manual. Press CH+ or CH- Press VOL+ or VOL- to enter the channel number at channel 60 and going down to 59, 58, 57, etc.). repeatedly to regular TV programming. 13 Main Menu Picture Sound Preferences Time Setup Setup TV/CATV CATV Channel 60 Add/Erase Erase Manual Down Auto Search Favorite List Setup TV/CATV CATV Channel 60 Add/Erase Erase Manual...
... INPUT repeatedly to get to highlight Manual. Press CH+ or CH- Press VOL+ or VOL- to enter the channel number at channel 60 and going down to 59, 58, 57, etc.). repeatedly to regular TV programming. 13 Main Menu Picture Sound Preferences Time Setup Setup TV/CATV CATV Channel 60 Add/Erase Erase Manual Down Auto Search Favorite List Setup TV/CATV CATV Channel 60 Add/Erase Erase Manual...
User Manual
Page 15
... You cannot select the Setup menu if the TV is highlighted. Main Menu Picture Sound Preferences Time Setup Press CH+ or CH- to a video input channel (FRNT). to display features of Favorite List. Press OK to highlight Setup. Press MENU repeatedly to see the main menu. Press MENU to exit the menu or the menu will automatically disappear within a few seconds if no buttons are pressed on the remote control. Press OK...
... You cannot select the Setup menu if the TV is highlighted. Main Menu Picture Sound Preferences Time Setup Press CH+ or CH- to a video input channel (FRNT). to display features of Favorite List. Press OK to highlight Setup. Press MENU repeatedly to see the main menu. Press MENU to exit the menu or the menu will automatically disappear within a few seconds if no buttons are pressed on the remote control. Press OK...
User Manual
Page 16
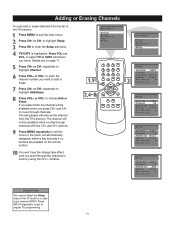
... Auto Search Favorite List Setup TV/CATV CATV Channel 55 Add/Erase Add Manual Down Auto Search Favorite List Press CH+ or CH- buttons. Press OK to highlight Add/Erase. repeatedly to enter the Setup submenu. Main Menu Picture Sound Preferences Time Setup Helpful Hints You cannot select the Setup menu if the TV is highlighted. to choose Add or Erase. You won't see the main menu. Press MENU to a video input channel...
... Auto Search Favorite List Setup TV/CATV CATV Channel 55 Add/Erase Add Manual Down Auto Search Favorite List Press CH+ or CH- buttons. Press OK to highlight Add/Erase. repeatedly to enter the Setup submenu. Main Menu Picture Sound Preferences Time Setup Helpful Hints You cannot select the Setup menu if the TV is highlighted. to choose Add or Erase. You won't see the main menu. Press MENU to a video input channel...
User Manual
Page 17
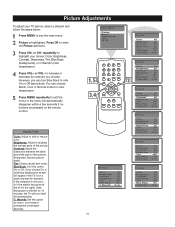
... TV picture, select a channel and follow the steps below: Press MENU to brighten the darkest parts of the picture. However, you choose. Helpful Hints Color: Adjust to enter the Picture submenu. Sharpness: Improve picture detail. Picture Adjustments To adjust your choice: Color, Brightness, Contrast, Sharpness, Tint, Blue Back (background), or C.Warmth (color temperature.) Press VOL+ or VOL- Blue Back: Turn this option for the night). Main Menu Picture Sound Preferences Time Setup...
... TV picture, select a channel and follow the steps below: Press MENU to brighten the darkest parts of the picture. However, you choose. Helpful Hints Color: Adjust to enter the Picture submenu. Sharpness: Improve picture detail. Picture Adjustments To adjust your choice: Color, Brightness, Contrast, Sharpness, Tint, Blue Back (background), or C.Warmth (color temperature.) Press VOL+ or VOL- Blue Back: Turn this option for the night). Main Menu Picture Sound Preferences Time Setup...
User Manual
Page 22
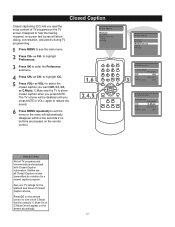
... highlight Preferences. to select the closed caption when you want (Off, C1, C2, or C.Mute). C.Mute sets the TV to show dialog, conversation, and activity during TV programming. The TV volume will show closed caption you press MUTE. Control FPA Lock Off Helpful Hints Not all Closed Caption modes transmitted by a station for the stations and times of TV programs on the remote control. Control FPA Lock Off Preferences Language...
... highlight Preferences. to select the closed caption when you want (Off, C1, C2, or C.Mute). C.Mute sets the TV to show dialog, conversation, and activity during TV programming. The TV volume will show closed caption you press MUTE. Control FPA Lock Off Helpful Hints Not all Closed Caption modes transmitted by a station for the stations and times of TV programs on the remote control. Control FPA Lock Off Preferences Language...
User Manual
Page 26
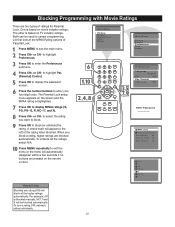
... enter your four-digit code. Main Menu Picture Sound Preferences Time Setup Main Menu Picture Sound Preferences Time Setup Preferences Language English CC Off Par. Control FPA Lock Off Enter Password: MPAA rating TV parental guidelines Block unrated off Block No Rating off Master Enable off N/A G PG PG-13 R NC-17 X Helpful Hints Blocking any rating (ON) will appear to exit the menu or the menu will be used to highlight...
... enter your four-digit code. Main Menu Picture Sound Preferences Time Setup Main Menu Picture Sound Preferences Time Setup Preferences Language English CC Off Par. Control FPA Lock Off Enter Password: MPAA rating TV parental guidelines Block unrated off Block No Rating off Master Enable off N/A G PG PG-13 R NC-17 X Helpful Hints Blocking any rating (ON) will appear to exit the menu or the menu will be used to highlight...
User Manual
Page 28
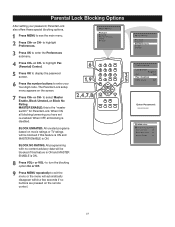
... feature is ON and MASTER ENABLE is ON. Main Menu Picture Sound Preferences Time Setup Main Menu Picture Sound Preferences Time Setup Preferences Language English CC Off Par. Press MENU to select Master Enable, Block Unrated, or Block No Rating. to enter your password, Parental Lock also offers these special blocking options. BLOCK UNRATED: All unrated programs based on movie ratings or TV ratings will automatically disappear within...
... feature is ON and MASTER ENABLE is ON. Main Menu Picture Sound Preferences Time Setup Main Menu Picture Sound Preferences Time Setup Preferences Language English CC Off Par. Press MENU to select Master Enable, Block Unrated, or Block No Rating. to enter your password, Parental Lock also offers these special blocking options. BLOCK UNRATED: All unrated programs based on movie ratings or TV ratings will automatically disappear within...
User Manual
Page 36
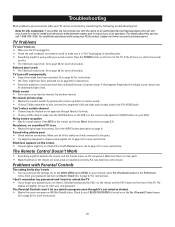
... in the Par. (Parental) Control menu. Try pressing the volume up button to restore sound. • If using S-Video remember to also connect the component's left and right audio output jacks to page 16 for instructions. • Off-Timer might have been activated. Go to the TV's AUDIO jacks. The Remote Control Doesn't Work • Something might have been activated because of a power surge. Enter your password and turn on • Make sure...
... in the Par. (Parental) Control menu. Try pressing the volume up button to restore sound. • If using S-Video remember to also connect the component's left and right audio output jacks to page 16 for instructions. • Off-Timer might have been activated. Go to the TV's AUDIO jacks. The Remote Control Doesn't Work • Something might have been activated because of a power surge. Enter your password and turn on • Make sure...

User Manual
Page 37
... your dealer). • Installation and related adjustments. • Signal reception problems not caused by your television. • Damage from any Authorized RCA Television Service Center for the picture tubes. ALSO, some network/program logos, phone numbers, etc. How you may cause similar damage. If necessary, you get service: • For screen sizes of cleaners will do not spray liquid directly on the picture tube (or projection TV...
... your dealer). • Installation and related adjustments. • Signal reception problems not caused by your television. • Damage from any Authorized RCA Television Service Center for the picture tubes. ALSO, some network/program logos, phone numbers, etc. How you may cause similar damage. If necessary, you get service: • For screen sizes of cleaners will do not spray liquid directly on the picture tube (or projection TV...
Brochure
Page 2
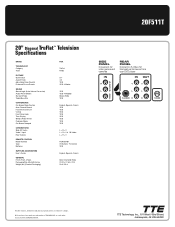
... Category Tuner PICTURE Screen Size Aspect Ratio Adjustable Color Warmth Preferred Picture Presets SOUND Sound Logic (Auto Volume Correction) Audio Preset Modes Surround Type Treble/Bass/Bal CONVENIENCE On-Screen Menu System Auto Channel Search Favorite Channel List V-Chip Front Panel Lock Time Display Sleep & Wake Timers Calendar Mode On-Screen Notepad CONNECTIONS Side A/V Jacks Video 1 Input Rear Outputs REMOTE CONTROL Model Number Type Batteries SUPPLIED ACCESSORIES User's Guide GENERAL Finish (Front & Rear) Packaging Size (WxHxD) Inches Weight (lbs) (Product/Packaging) RCA TruFlat...
... Category Tuner PICTURE Screen Size Aspect Ratio Adjustable Color Warmth Preferred Picture Presets SOUND Sound Logic (Auto Volume Correction) Audio Preset Modes Surround Type Treble/Bass/Bal CONVENIENCE On-Screen Menu System Auto Channel Search Favorite Channel List V-Chip Front Panel Lock Time Display Sleep & Wake Timers Calendar Mode On-Screen Notepad CONNECTIONS Side A/V Jacks Video 1 Input Rear Outputs REMOTE CONTROL Model Number Type Batteries SUPPLIED ACCESSORIES User's Guide GENERAL Finish (Front & Rear) Packaging Size (WxHxD) Inches Weight (lbs) (Product/Packaging) RCA TruFlat...


