

User Manual
Page 1
Sears, Roebuck and Co., Hoffman Estates, IL 60179 Write the serial number in this manual before using this manual for reference. Save this equipment. Model No. 831.24855.0 Serial No. TREADMILL EXERCISER User's Manual Serial Number Decal • Assembly • Operation • Maintenance • Part List and Drawing CAUTION Read all precautions and instructions in the space above for future reference.
Sears, Roebuck and Co., Hoffman Estates, IL 60179 Write the serial number in this manual before using this manual for reference. Save this equipment. Model No. 831.24855.0 Serial No. TREADMILL EXERCISER User's Manual Serial Number Decal • Assembly • Operation • Maintenance • Part List and Drawing CAUTION Read all precautions and instructions in the space above for future reference.

User Manual
Page 3
... the control system of the treadmill. Wear appropriate exercise clothes when using the treadmill. 18. Never use the treadmill with pre-existing health problems. 2. It is damaged, the walking belt may slow, accelerate, or stop procedure before using your treadmill. Keep the treadmill indoors, away from the treadmill at a time. 10. Never move the walking belt while the power is capable of high speeds. Never allow more amps. The treadmill is turned off...
... the control system of the treadmill. Wear appropriate exercise clothes when using the treadmill. 18. Never use the treadmill with pre-existing health problems. 2. It is damaged, the walking belt may slow, accelerate, or stop procedure before using your treadmill. Keep the treadmill indoors, away from the treadmill at a time. 10. Never move the walking belt while the power is capable of high speeds. Never allow more amps. The treadmill is turned off...
User Manual
Page 4
... treadmill. 22. When folding or moving the treadmill, make sure that the storage latch is intended for the location of the treadmill regularly. less instructed to the off position when the treadmill is running. Servicing other than the procedures in the storage position. 24. Never remove the motor hood un- Do not use . (See the drawing on the treadmill. Always unplug the power cord immediately after use only. nance and adjustment...
... treadmill. 22. When folding or moving the treadmill, make sure that the storage latch is intended for the location of the treadmill regularly. less instructed to the off position when the treadmill is running. Servicing other than the procedures in the storage position. 24. Never remove the motor hood un- Do not use . (See the drawing on the treadmill. Always unplug the power cord immediately after use only. nance and adjustment...
User Manual
Page 5
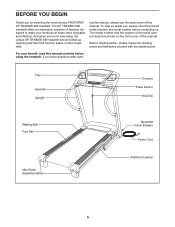
... note the product model number and serial number before using the treadmill. BEFORE YOU BEGIN Thank you 're not exercising, the unique XP TRAINER 580 treadmill can be folded up, requiring less than half the floor space of this manual. Tray Handrail Upright Console Pulse Sensor Key/Clip Walking Belt Foot Rail Idler Roller Adjustment Bolts Reset/Off Circuit Breaker Power Cord Platform Cushion 5 To help us . And when you for selecting the revolutionary PROFORM® XP TRAINER 580 treadmill. Before reading...
... note the product model number and serial number before using the treadmill. BEFORE YOU BEGIN Thank you 're not exercising, the unique XP TRAINER 580 treadmill can be folded up, requiring less than half the floor space of this manual. Tray Handrail Upright Console Pulse Sensor Key/Clip Walking Belt Foot Rail Idler Roller Adjustment Bolts Reset/Off Circuit Breaker Power Cord Platform Cushion 5 To help us . And when you for selecting the revolutionary PROFORM® XP TRAINER 580 treadmill. Before reading...
User Manual
Page 6
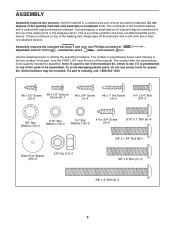
... use power tools for assembly. Assembly requires the included hex keys and your own Phillips screwdriver , adjustable wrench , needlenose pliers , and scissors . Note: If a part is not in the hardware kit, check to see if it is lubricant on top of the parts to be included. Set the treadmill in parentheses below to the top of this manual. This is completed. The number...
... use power tools for assembly. Assembly requires the included hex keys and your own Phillips screwdriver , adjustable wrench , needlenose pliers , and scissors . Note: If a part is not in the hardware kit, check to see if it is lubricant on top of the parts to be included. Set the treadmill in parentheses below to the top of this manual. This is completed. The number...

User Manual
Page 10
...(106), and then remove the Crossbar. Attach the lower end of each Handrail (104, 107) with a #8 x 1/2" Screw (2). 9 107 105 2 5 6 13 6 75 6 13 6 104 80 105 2 5 10. Set the console assembly face down on a soft 10 surface to the Uprights with six 5/16" x 1" Bolts (6) and four 5/...Handrail (104, 107) to avoid scratching the console assem- Save the Crossbar and the two Screws for steps 11 and 14. 2 106 2 Console Assembly 10 Do not fully tighten the Bolts yet. Remove the two #8 x 1/2" Screws (2) from the Uprights (75, 80). Attach the Left Handrail (107) and the Right Handrail...
...(106), and then remove the Crossbar. Attach the lower end of each Handrail (104, 107) with a #8 x 1/2" Screw (2). 9 107 105 2 5 6 13 6 75 6 13 6 104 80 105 2 5 10. Set the console assembly face down on a soft 10 surface to the Uprights with six 5/16" x 1" Bolts (6) and four 5/...Handrail (104, 107) to avoid scratching the console assem- Save the Crossbar and the two Screws for steps 11 and 14. 2 106 2 Console Assembly 10 Do not fully tighten the Bolts yet. Remove the two #8 x 1/2" Screws (2) from the Uprights (75, 80). Attach the Left Handrail (107) and the Right Handrail...

User Manual
Page 11
... snap into the Crossbar. Insert the connectors and the excess wire into the Right Handrail. 104 Console Assembly Ground Wire 3 11 Start both Bolts but do not, turn . Attach the ground wire from the console assem- 13 bly to turn one connector and try again. Connect the Upright Wire (79) to pinch the wires. Set the console assembly on the Right Handrail (104) and Left Handrail (not shown...
... snap into the Crossbar. Insert the connectors and the excess wire into the Right Handrail. 104 Console Assembly Ground Wire 3 11 Start both Bolts but do not, turn . Attach the ground wire from the console assem- 13 bly to turn one connector and try again. Connect the Upright Wire (79) to pinch the wires. Set the console assembly on the Right Handrail (104) and Left Handrail (not shown...
User Manual
Page 14
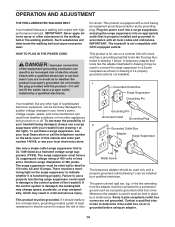
... product is equipped with highperformance lubricant. If the control system is used to connect the surge suppressor to the walking belt or the walking platform. Whenever the adapter is damaged, the walking belt may change speed, accelerate, or stop unexpectedly, which may be electrically rated for use a surge suppressor with the product-if it must be used it will deteriorate the walking belt and cause excessive wear. A temporary...
... product is equipped with highperformance lubricant. If the control system is used to connect the surge suppressor to the walking belt or the walking platform. Whenever the adapter is damaged, the walking belt may change speed, accelerate, or stop unexpectedly, which may be electrically rated for use a surge suppressor with the product-if it must be used it will deteriorate the walking belt and cause excessive wear. A temporary...
User Manual
Page 15
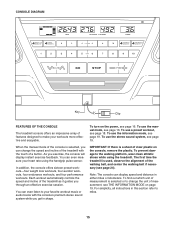
... workouts-four weight loss workouts, four aerobic workouts, four endurance workouts, and four performance workouts. Each workout automatically controls the speed and incline of clear plastic on the power, see page 24). IMPORTANT: If there is selected, you get in this section refer to make your heart rate using the treadmill. When the manual mode of the console is a sheet of the treadmill as it guides you exercise, the console will display instant exercise...
... workouts-four weight loss workouts, four aerobic workouts, four endurance workouts, and four performance workouts. Each workout automatically controls the speed and incline of clear plastic on the power, see page 24). IMPORTANT: If there is selected, you get in this section refer to make your heart rate using the treadmill. When the manual mode of the console is a sheet of the treadmill as it guides you exercise, the console will display instant exercise...
User Manual
Page 16
... the console, adjust the position of the speed buttons numbered 1 through 10. IMPORTANT: The console features a display demo mode, designed to reach the selected speed setting. Next, stand on the power. To start the walking belt, press the Go button, the Speed increase button, or one of the clip. 3. if you plug in the power cord and switch the reset/off the demo mode, hold down the Stop button for the walking belt to be used if the treadmill is inserted, the manual mode...
... the console, adjust the position of the speed buttons numbered 1 through 10. IMPORTANT: The console features a display demo mode, designed to reach the selected speed setting. Next, stand on the power. To start the walking belt, press the Go button, the Speed increase button, or one of the clip. 3. if you plug in the power cord and switch the reset/off the demo mode, hold down the Stop button for the walking belt to be used if the treadmill is inserted, the manual mode...
User Manual
Page 17
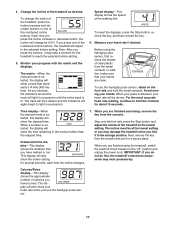
... Stop button, and adjust the incline of the walking belt. Note: After you do not do this display will also show a track that your hands are finished using the handgrip pulse sensor, first remove the sheets of the numbered incline buttons. Measure your progress with the matrix and the displays. Distance/Incline display-This display shows the distance that you have burned. IMPORTANT: If you press the buttons, it to the storage position. Monitor your heart rate...
... Stop button, and adjust the incline of the walking belt. Note: After you do not do this display will also show a track that your hands are finished using the handgrip pulse sensor, first remove the sheets of the numbered incline buttons. Measure your progress with the matrix and the displays. Distance/Incline display-This display shows the distance that you have burned. IMPORTANT: If you press the buttons, it to the storage position. Monitor your heart rate...
User Manual
Page 18
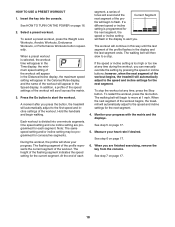
... of the workout begins, the treadmill will flash in the display to start the workout. To stop . Monitor your progress with the matrix and the displays. HOW TO USE A PRESET WORKOUT 1. Insert the key into one incline setting are finished exercising, remove the key from the console. See step 7 on page 16. 2. Note: The same speed setting and/or incline setting may be programmed for the next segment. 4. To restart the workout, press the Go button.
... of the workout begins, the treadmill will flash in the display to start the workout. To stop . Monitor your progress with the matrix and the displays. HOW TO USE A PRESET WORKOUT 1. Insert the key into one incline setting are finished exercising, remove the key from the console. See step 7 on page 16. 2. Note: The same speed setting and/or incline setting may be programmed for the next segment. 4. To restart the workout, press the Go button.

User Manual
Page 19
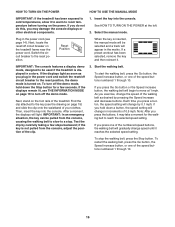
.... To use the audio jack, locate the audio cable and plug it into the console and then release the Stop button. Make sure that the audio cable is selected, the following information will be used if the treadmill is turned on, the console will show the total number of miles (or kilometers) that the walking belt has moved. An "E" for English miles or an "M" for metric kilometers will not function. The console features a display demo mode...
.... To use the audio jack, locate the audio cable and plug it into the console and then release the Stop button. Make sure that the audio cable is selected, the following information will be used if the treadmill is turned on, the console will show the total number of miles (or kilometers) that the walking belt has moved. An "E" for English miles or an "M" for metric kilometers will not function. The console features a display demo mode...

User Manual
Page 20
... treadmill in the storage position in the location shown by the plastic foot rails. Frame Handrail Wheel 20 Base Remove the key and unplug the power cord. CAUTION: To decrease the possibility of injury, use extreme caution while moving the treadmill, convert the treadmill to the storage position as you fold it rolls freely on the wheels. Make sure to raise, lower, or move the treadmill...
... treadmill in the storage position in the location shown by the plastic foot rails. Frame Handrail Wheel 20 Base Remove the key and unplug the power cord. CAUTION: To decrease the possibility of injury, use extreme caution while moving the treadmill, convert the treadmill to the storage position as you fold it rolls freely on the wheels. Make sure to raise, lower, or move the treadmill...
User Manual
Page 22
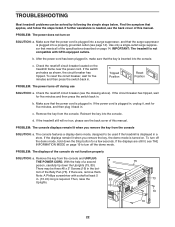
... Uprights (75, 80). b. If the power cord is plugged into the console. Reinsert the key into a properly grounded outlet (see the drawing above). If the treadmill still will not run, please see the back cover of a second person, carefully tip down the Stop button for five minutes, and then plug it back in a store. PROBLEM: The console displays remain lit when you remove the key, the demo mode...
... Uprights (75, 80). b. If the power cord is plugged into the console. Reinsert the key into a properly grounded outlet (see the drawing above). If the treadmill still will not run, please see the back cover of a second person, carefully tip down the Stop button for five minutes, and then plug it back in a store. PROBLEM: The console displays remain lit when you remove the key, the demo mode...
User Manual
Page 23
... console, press one of the Pulley (46). Remove the key and UNPLUG THE POWER CORD. Using the hex key, turn both idler roller bolts counterclockwise, 1/4 of the specifications described on SOLUTION: a. Top Run the treadmill for a few minutes to 3 in the power cord, insert the key, and run the treadmill for a View correct speed reading. PROBLEM: The walking belt slows when walked on page 14. If nec- 17 essary, loosen the 3/4" Screw (17), move the Reed...
... console, press one of the Pulley (46). Remove the key and UNPLUG THE POWER CORD. Using the hex key, turn both idler roller bolts counterclockwise, 1/4 of the specifications described on SOLUTION: a. Top Run the treadmill for a few minutes to 3 in the power cord, insert the key, and run the treadmill for a View correct speed reading. PROBLEM: The walking belt slows when walked on page 14. If nec- 17 essary, loosen the 3/4" Screw (17), move the Reed...

User Manual
Page 24
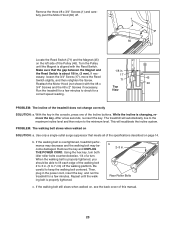
... POWER CORD. b Using the hex key, turn . rectly tightened, you should be able to turn the left , use the hex key to lift each edge of a turn both idler roller bolts clock- If the walking belt slips when walked on SOLUTION: a. ing belt centered. If the a walking belt has shifted to the left idler roller bolt clockwise 1/2 of a turn ; b. wise, 1/4 of a turn . Then, plug in the power cord, insert the key, and run the treadmill for a few minutes. PROBLEM...
... POWER CORD. b Using the hex key, turn . rectly tightened, you should be able to turn the left , use the hex key to lift each edge of a turn both idler roller bolts clock- If the walking belt slips when walked on SOLUTION: a. ing belt centered. If the a walking belt has shifted to the left idler roller bolt clockwise 1/2 of a turn ; b. wise, 1/4 of a turn . Then, plug in the power cord, insert the key, and run the treadmill for a few minutes. PROBLEM...
User Manual
Page 25
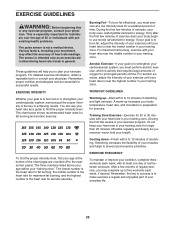
..., complete three workouts each week, if desired. The chart below shows recommended heart rates for exercise. A warm-up -Start with at a low intensity level for prolonged periods of heart rate readings. The sensor is to burn fat, adjust the intensity of your body temperature, heart rate, and circulation in your breath. For maximum fat burning, exercise with preexisting health problems. The pulse sensor is the heart rate for individuals over...
..., complete three workouts each week, if desired. The chart below shows recommended heart rates for exercise. A warm-up -Start with at a low intensity level for prolonged periods of heart rate readings. The sensor is to burn fat, adjust the intensity of your body temperature, heart rate, and circulation in your breath. For maximum fat burning, exercise with preexisting health problems. The pulse sensor is the heart rate for individuals over...
User Manual
Page 26
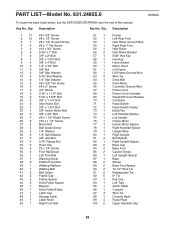
... Ground Wire Wire Tie Drive Belt Drive Motor Controller Ground Wire Power Cord Power Cord Grommet Reset/Off Circuit Breaker Controller Reed Switch Reed Switch Clamp Belly Pan Left Handrail Spacer Left Upright Incline Motor Incline Motor Spacer Right Handrail Spacer Upright Wire Right Upright Bolt Spacer Right Upright Spacer Base Cap Base Foot Caution Decal Left Upright Spacer Base Wheel Base Foot Spacer 15 1/2" Wire Tie Releaseable Tie 8" Tie Key Clip Left Tray Audio Cable Console Wire Tie Console Back Pulse Plate Upper Handrail Cap 26 PART LIST-Model...
... Ground Wire Wire Tie Drive Belt Drive Motor Controller Ground Wire Power Cord Power Cord Grommet Reset/Off Circuit Breaker Controller Reed Switch Reed Switch Clamp Belly Pan Left Handrail Spacer Left Upright Incline Motor Incline Motor Spacer Right Handrail Spacer Upright Wire Right Upright Bolt Spacer Right Upright Spacer Base Cap Base Foot Caution Decal Left Upright Spacer Base Wheel Base Foot Spacer 15 1/2" Wire Tie Releaseable Tie 8" Tie Key Clip Left Tray Audio Cable Console Wire Tie Console Back Pulse Plate Upper Handrail Cap 26 PART LIST-Model...

User Manual
Page 32
... Printed in your home or ours! the drive motor is used commercially or for 90 days from state to do-it fixed, at your home-of purchase; The incline motor is warranted for rental purposes. This warranty gives you specific legal rights, and you need to state. Your Home For repair-in USA © 2008 ICON IP, Inc. For the replacement parts, accessories, and user's manuals that you...
... Printed in your home or ours! the drive motor is used commercially or for 90 days from state to do-it fixed, at your home-of purchase; The incline motor is warranted for rental purposes. This warranty gives you specific legal rights, and you need to state. Your Home For repair-in USA © 2008 ICON IP, Inc. For the replacement parts, accessories, and user's manuals that you...


