

Instruction Manual
Page 1
... E-mail: [email protected] Write: ICON Health & Fitness, Ltd. Keep this equipment. c/o HI Group PLC Express Way Whitwood, West Yorkshire WF10 5QJ UK CAUTION Read all precautions and instructions in the space above for future reference. USERʼS MANUAL Visit our website www.iconsupport.eu Model No. : PFIVEL74413.0 Serial No ___________ Serial number decal Write the serial number in this manual before using this manual for reference.
... E-mail: [email protected] Write: ICON Health & Fitness, Ltd. Keep this equipment. c/o HI Group PLC Express Way Whitwood, West Yorkshire WF10 5QJ UK CAUTION Read all precautions and instructions in the space above for future reference. USERʼS MANUAL Visit our website www.iconsupport.eu Model No. : PFIVEL74413.0 Serial No ___________ Serial number decal Write the serial number in this manual before using this manual for reference.

Instruction Manual
Page 2
TABLE OF CONTENTS IMPORTANT PRECAUTIONS 3 BEFORE YOU BEGIN 4 WARNING DECAL PLACEMENT 4 ASSEMBLY 5 HOW TO PLUG THE POWER ADAPTER 9 HOW TO OPERATE THE elliptiCAL 10 FEATURES OF THE CONSOLE 11 MAINTENANCE AND TROUBLESHOOTING 14 EXERCISE GUIDELINES 15 EXPLODED DRAWINGS 16 PART LIST 18 NOTES 19 ORDERING REPLACEMENT PARTS Last Page 2
TABLE OF CONTENTS IMPORTANT PRECAUTIONS 3 BEFORE YOU BEGIN 4 WARNING DECAL PLACEMENT 4 ASSEMBLY 5 HOW TO PLUG THE POWER ADAPTER 9 HOW TO OPERATE THE elliptiCAL 10 FEATURES OF THE CONSOLE 11 MAINTENANCE AND TROUBLESHOOTING 14 EXERCISE GUIDELINES 15 EXPLODED DRAWINGS 16 PART LIST 18 NOTES 19 ORDERING REPLACEMENT PARTS Last Page 2

Instruction Manual
Page 3
... 2 ft. (0.6 m) on each side. 13. liptical; Replace any exercise program, con- Keep children under age 12 and pets away pain while exercising, stop immediately and from mois- 12. for home use only. Hold the handlebars or the upper body arms when mounting, dismounting, or using your elliptical. rate trends in a con- pedals will continue to move until the flywheel face, with pre- It is...
... 2 ft. (0.6 m) on each side. 13. liptical; Replace any exercise program, con- Keep children under age 12 and pets away pain while exercising, stop immediately and from mois- 12. for home use only. Hold the handlebars or the upper body arms when mounting, dismounting, or using your elliptical. rate trends in a con- pedals will continue to move until the flywheel face, with pre- It is...

Instruction Manual
Page 4
... the telephone number on the front cover of this manual. Note: The decal(s) may not be shown at home more effective and enjoyable. If you , note the product model number and serial number before you for purchasing the ProForm® Space Saver 700. Before reading further, please familiarize yourself with the parts that are shown on the front cover of this manual. The elliptical provides an...
... the telephone number on the front cover of this manual. Note: The decal(s) may not be shown at home more effective and enjoyable. If you , note the product model number and serial number before you for purchasing the ProForm® Space Saver 700. Before reading further, please familiarize yourself with the parts that are shown on the front cover of this manual. The elliptical provides an...

Instruction Manual
Page 5
...*2T(49)*2 exercise cycle in assembly. The number following the parentheses is not in parenthe- ses below to the 5mm(115)*2 M6(59)*4 key number of 116)*1 the part, from the PART LIST near the end of this manual. M8*70(30)...尼帽 M10(50)*2 8*Φ19*1.5T(13)*10 袋帽 M8(40)*2 Use the part drawings below each drawing refers to identify the small parts used in a cleared area and remove M6*55(52)*4 the packing materials.
...*2T(49)*2 exercise cycle in assembly. The number following the parentheses is not in parenthe- ses below to the 5mm(115)*2 M6(59)*4 key number of 116)*1 the part, from the PART LIST near the end of this manual. M8*70(30)...尼帽 M10(50)*2 8*Φ19*1.5T(13)*10 袋帽 M8(40)*2 Use the part drawings below each drawing refers to identify the small parts used in a cleared area and remove M6*55(52)*4 the packing materials.

Instruction Manual
Page 6
... Before insert the bolt,Pls to adjust the Knob under the bottom tube to keep the main frame assemble tightly. Secure with 2 allen bolts (100). Remove the loosely fitted Allen bolts (15),spring (14) and curved washers (13) from the underside of stabilizer. Loosely re-fit the 2x M8 Allen Bolt (15), 2 ...then tighten the Allen bolts fully. 26 31 32 22 14 30 15 13 6 Fasten Rear stabilizer (101) with 2 curved washers (13), 2 cap nuts (40). Remove the Front main frame welding(33),keep the entire main frame horizontally. STEP 1 Fasten front stabilizer (35) with 2 carriage bolts ...
... Before insert the bolt,Pls to adjust the Knob under the bottom tube to keep the main frame assemble tightly. Secure with 2 allen bolts (100). Remove the loosely fitted Allen bolts (15),spring (14) and curved washers (13) from the underside of stabilizer. Loosely re-fit the 2x M8 Allen Bolt (15), 2 ...then tighten the Allen bolts fully. 26 31 32 22 14 30 15 13 6 Fasten Rear stabilizer (101) with 2 curved washers (13), 2 cap nuts (40). Remove the Front main frame welding(33),keep the entire main frame horizontally. STEP 1 Fasten front stabilizer (35) with 2 carriage bolts ...
Instruction Manual
Page 7
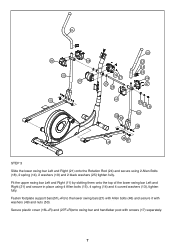
... slotting them onto the top of the lower swing bar Left and Right (21) and secure in place using 2 Allen Bolts (18), 2 spring (14), 2 washers (19) and 2 black washers (25) tighten fully. Fasten footplate support bars(51L+R) to the lower swing bars(21) with Allen bolts (46) and secure it with screws (17) separately. 7 Secure plastic cover (16L+R) and (27F+R)onto swing...
... slotting them onto the top of the lower swing bar Left and Right (21) and secure in place using 2 Allen Bolts (18), 2 spring (14), 2 washers (19) and 2 black washers (25) tighten fully. Fasten footplate support bars(51L+R) to the lower swing bars(21) with Allen bolts (46) and secure it with screws (17) separately. 7 Secure plastic cover (16L+R) and (27F+R)onto swing...
Instruction Manual
Page 8
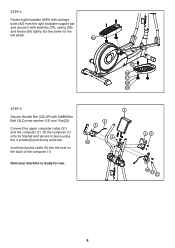
... bracket and secure in place using the 4 screws(2) previously removed. Inset hand pulse cable (9) into the hole on the back of the computer (1) Now your machine is ready for the left pedal. 60L 52 60R 57 58 59 STEP 5 Secure Handle Bar (23L+R) with washers (57), spring (58) and knobs (59) tightly. Connect the upper computer cable (31) and the computer (1). Do...
... bracket and secure in place using the 4 screws(2) previously removed. Inset hand pulse cable (9) into the hole on the back of the computer (1) Now your machine is ready for the left pedal. 60L 52 60R 57 58 59 STEP 5 Secure Handle Bar (23L+R) with washers (57), spring (58) and knobs (59) tightly. Connect the upper computer cable (31) and the computer (1). Do...
Instruction Manual
Page 9
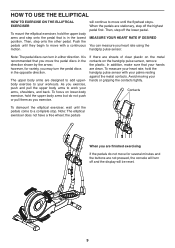
... upper body arms to your heart rate if desired You can turn off and the display will continue to move for variety, you heart rate using the handgrip pulse sensor. however, for several minutes and the buttons are stationary, step off the lower pedal. Note: The elliptical exerciser does not have a free wheel; Then, step onto the other pedal. Avoid moving your palms resting against the metal contacts. Measure your workouts. Push the pedals...
... upper body arms to your heart rate if desired You can turn off and the display will continue to move for variety, you heart rate using the handgrip pulse sensor. however, for several minutes and the buttons are stationary, step off the lower pedal. Note: The elliptical exerciser does not have a free wheel; Then, step onto the other pedal. Avoid moving your palms resting against the metal contacts. Measure your workouts. Push the pedals...

Instruction Manual
Page 10
... Latch button Magnet Plug the power adapter into the receptacle on the upper body arms. Then, lift the latches under each pedal arm, and lift HOW TO MOVE THE ELLIPTICAL Crank arm Pedal arm To move the elliptical to the desired position, and then lower it locks in a vertical position Now, put back the safety pin in its location. IMPORTANT: The adapter is useless for the UK market. You may damage the console displays...
... Latch button Magnet Plug the power adapter into the receptacle on the upper body arms. Then, lift the latches under each pedal arm, and lift HOW TO MOVE THE ELLIPTICAL Crank arm Pedal arm To move the elliptical to the desired position, and then lower it locks in a vertical position Now, put back the safety pin in its location. IMPORTANT: The adapter is useless for the UK market. You may damage the console displays...

Instruction Manual
Page 11
... 0.1. stop exercising. Follow your finger on the up and down button, then validate by pressing "TEST(RECOVERY) " key and then stop status. Distance-This mode shows the distance you can start : you have burnt. In TO PLUG THE POWER ADAPTER page 10). If the pedals do not move for 1 minute and the result will display the selected mode. 6. At the end of the console, remove it right after START/STOP : For...
... 0.1. stop exercising. Follow your finger on the up and down button, then validate by pressing "TEST(RECOVERY) " key and then stop status. Distance-This mode shows the distance you can start : you have burnt. In TO PLUG THE POWER ADAPTER page 10). If the pedals do not move for 1 minute and the result will display the selected mode. 6. At the end of the console, remove it right after START/STOP : For...
Instruction Manual
Page 12
... START/STOP button 4. USER SETTING PROGRAMS : As you turn off. or simply begin pedaling. Select a preset program : 2. As soon as you pedal, change the resistance of your exercice. Change the resistance of the The console displays the elapsed time and the distance computer. 2. There are : 7. You will FAT%: The total body fat in the program 3. The entire display will light for a moment, the console will automatically turn on the console HOW TO USE THE MANUAL MODE...
... START/STOP button 4. USER SETTING PROGRAMS : As you turn off. or simply begin pedaling. Select a preset program : 2. As soon as you pedal, change the resistance of your exercice. Change the resistance of the The console displays the elapsed time and the distance computer. 2. There are : 7. You will FAT%: The total body fat in the program 3. The entire display will light for a moment, the console will automatically turn on the console HOW TO USE THE MANUAL MODE...

Instruction Manual
Page 13
.... HEART RATE CONTROL PROGRAMS : 1. The entire display will then be ready for use . 2. Entering your Max HR % is properly calculated. Do as follow : 220- your data : 13 to validate the value. Select a heart rate program : Select a heart rate program using the up and down button to select your program, then press M to begin pedaling. The word DISTANCE will change automatically according to select the value then press the M button. To turn on the console...
.... HEART RATE CONTROL PROGRAMS : 1. The entire display will then be ready for use . 2. Entering your Max HR % is properly calculated. Do as follow : 220- your data : 13 to validate the value. Select a heart rate program : Select a heart rate program using the up and down button to select your program, then press M to begin pedaling. The word DISTANCE will change automatically according to select the value then press the M button. To turn on the console...
Instruction Manual
Page 14
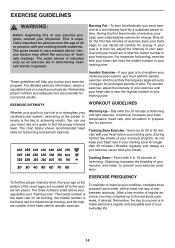
...-Start with 5 to make exercise a regular and enjoyable part of your body temperature, heart rate, and circulation in your training zone. (During he first few minutes of stretching. For aerobic exercise, adjust the intensity of your exercise until your heart rate is to 10 minutes of exercise does your body begin to achieving results. A warm-up to five workouts each week, with pre-existing health problems. The pulse sensor...
...-Start with 5 to make exercise a regular and enjoyable part of your body temperature, heart rate, and circulation in your training zone. (During he first few minutes of stretching. For aerobic exercise, adjust the intensity of your exercise until your heart rate is to 10 minutes of exercise does your body begin to achieving results. A warm-up to five workouts each week, with pre-existing health problems. The pulse sensor...

Instruction Manual
Page 15
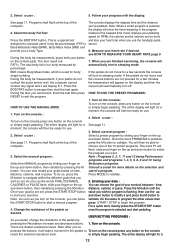
...counts, then relax. Repeat 3 times. Stretches: Hamstrings, back of your groin area as far as possible. Reach toward your extended leg. Hold for 15 counts, then relax. Repeat 3 times for balance, reach back and grasp one foot with the soles of ...for each leg. Repeat 3 times for 15 counts, then relax. Stretches: Quadriceps and hip muscles. 3 5 1 2 4 15 Bend your front leg, lean forward and move your knees outward. Stretches: Calves, achilles tendons, and ankles. 4. SUGGESTED STRETCHES The correct form for each leg. Move slowly as well. Stretches: Hamstrings, lower back, and...
...counts, then relax. Repeat 3 times. Stretches: Hamstrings, back of your groin area as far as possible. Reach toward your extended leg. Hold for 15 counts, then relax. Repeat 3 times for balance, reach back and grasp one foot with the soles of ...for each leg. Repeat 3 times for 15 counts, then relax. Stretches: Quadriceps and hip muscles. 3 5 1 2 4 15 Bend your front leg, lean forward and move your knees outward. Stretches: Calves, achilles tendons, and ankles. 4. SUGGESTED STRETCHES The correct form for each leg. Move slowly as well. Stretches: Hamstrings, lower back, and...

Instruction Manual
Page 16
EXPLODED DRAWING-Model No. PFIVEL74413.0 16 106 114 68L Item.115*2 Item.116 1 11L 2 3 4 5 6 7 8 9 10 11R 12 102 101 38 100 99 23L 16F 16R 21L 60L 27F 26 28 29 30 31 111 51L 110 106 18 14 108 107 109 13 27R 17 23R 22 20 25 24 22 16F 14 15 13 32 118 117 33 34 35 13 14 15 16R 17 21R 20 19 14 18 113 112 106 22 105 96 103 104 87 85 69 84 83 82 81 98 97 39 40 38 86 13 36 41 37 96 88 95 89 94 93 92 91 90 50 80 79 78 77 76 75 74 42 119 43 51R 44 45 53 54 55 56 57 58 59 60R 46 47 48 49 50 52 73 72 71 70 25 69 68R 67 66 65 64 63 62 14 61
EXPLODED DRAWING-Model No. PFIVEL74413.0 16 106 114 68L Item.115*2 Item.116 1 11L 2 3 4 5 6 7 8 9 10 11R 12 102 101 38 100 99 23L 16F 16R 21L 60L 27F 26 28 29 30 31 111 51L 110 106 18 14 108 107 109 13 27R 17 23R 22 20 25 24 22 16F 14 15 13 32 118 117 33 34 35 13 14 15 16R 17 21R 20 19 14 18 113 112 106 22 105 96 103 104 87 85 69 84 83 82 81 98 97 39 40 38 86 13 36 41 37 96 88 95 89 94 93 92 91 90 50 80 79 78 77 76 75 74 42 119 43 51R 44 45 53 54 55 56 57 58 59 60R 46 47 48 49 50 52 73 72 71 70 25 69 68R 67 66 65 64 63 62 14 61

Instruction Manual
Page 17
... Flange Screw 3/8 2 103 Rear Handle 1 45 Axle Cap 2 104 Main Frame 1 46 Allen Bolt M10*90 2 105 Motor 1 47 Bush 14*32 4 106 Drill Screw M5*20 7 48 Tube Φ14*72.2 2 107 Lower Computer Cable 450mm 1 49 Washer Φ10*Φ19*2T 2 108 Washer Φ8*Φ24*0.5T 2 50 Nut M10 3 109 Wire 1 51 Footplate Support Bar (L+R) 1 110...
... Flange Screw 3/8 2 103 Rear Handle 1 45 Axle Cap 2 104 Main Frame 1 46 Allen Bolt M10*90 2 105 Motor 1 47 Bush 14*32 4 106 Drill Screw M5*20 7 48 Tube Φ14*72.2 2 107 Lower Computer Cable 450mm 1 49 Washer Φ10*Φ19*2T 2 108 Washer Φ8*Φ24*0.5T 2 50 Nut M10 3 109 Wire 1 51 Footplate Support Bar (L+R) 1 110...

Instruction Manual
Page 18
To clean the exercise cycle, use a damp cloth and a small amount of direct sunlight. 18 Important: To avoid damaging the console, keep liquids away from the console and keep the console out of mild detergent. Replace any worn parts immediately. MAINTENANCE AND TROUBLESHOOTING IInspect and tighten all parts of the exercise cycle regularly.
To clean the exercise cycle, use a damp cloth and a small amount of direct sunlight. 18 Important: To avoid damaging the console, keep liquids away from the console and keep the console out of mild detergent. Replace any worn parts immediately. MAINTENANCE AND TROUBLESHOOTING IInspect and tighten all parts of the exercise cycle regularly.

Instruction Manual
Page 20
... us : • the model number and serial number of the product (see the front cover of this manual) • the name of the product (see the front cover of this manual) • the key number and description of the replacement part(s) (see the front cover of this type of in China © 2013 Icon Health & Fitness, Inc. Product dimensions : (L x l x h) : 143 x 68 x 153 cm Product weight: 51 Kg Printed...
... us : • the model number and serial number of the product (see the front cover of this manual) • the name of the product (see the front cover of this manual) • the key number and description of the replacement part(s) (see the front cover of this type of in China © 2013 Icon Health & Fitness, Inc. Product dimensions : (L x l x h) : 143 x 68 x 153 cm Product weight: 51 Kg Printed...


