

English Manual
Page 2
TABLE OF CONTENTS WARNING DECAL PLACEMENT 2 IMPORTANT PRECAUTIONS 3 BEFORE YOU BEGIN 4 ASSEMBLY 5 HOW TO USE THE ELLIPTICAL EXERCISER 12 MAINTENANCE AND TROUBLESHOOTING 18 EXERCISE GUIDELINES 19 PART LIST 20 EXPLODED DRAWING 22 ORDERING REPLACEMENT PARTS Back Cover LIMITED WARRANTY ...Back Cover WARNING DECAL PLACEMENT The warning decal shown here has been applied in the location shown. Apply the decal in the location shown. PROFORM is missing or illegible, see the front cover of ICON IP, Inc. 2 If the decal is a registered trademark of this manual and request ...
TABLE OF CONTENTS WARNING DECAL PLACEMENT 2 IMPORTANT PRECAUTIONS 3 BEFORE YOU BEGIN 4 ASSEMBLY 5 HOW TO USE THE ELLIPTICAL EXERCISER 12 MAINTENANCE AND TROUBLESHOOTING 18 EXERCISE GUIDELINES 19 PART LIST 20 EXPLODED DRAWING 22 ORDERING REPLACEMENT PARTS Back Cover LIMITED WARRANTY ...Back Cover WARNING DECAL PLACEMENT The warning decal shown here has been applied in the location shown. Apply the decal in the location shown. PROFORM is missing or illegible, see the front cover of ICON IP, Inc. 2 If the decal is a registered trademark of this manual and request ...

English Manual
Page 3
..., with pre-existing health problems. 2. Hold the handgrip pulse sensor or the upper body arms when mounting, dismounting, or using your elliptical exerciser only as an exercise aid in determining heart rate trends in general. 12. When you feel pain or dizziness while exercising, stop...Various factors, including the user's movement, may affect the accuracy of heart rate readings. ICON assumes no responsibility for home use your elliptical exerciser. 10. Keep children under age 12 and pets away from moisture and dust. Wear appropriate exercise clothes when exercising; Do not...
..., with pre-existing health problems. 2. Hold the handgrip pulse sensor or the upper body arms when mounting, dismounting, or using your elliptical exerciser only as an exercise aid in determining heart rate trends in general. 12. When you feel pain or dizziness while exercising, stop...Various factors, including the user's movement, may affect the accuracy of heart rate readings. ICON assumes no responsibility for home use your elliptical exerciser. 10. Keep children under age 12 and pets away from moisture and dust. Wear appropriate exercise clothes when exercising; Do not...

English Manual
Page 4
...help us . The model number and the location of this manual. To avoid a registration fee for purchasing the revolutionary PROFORM® RAZOR 400 elliptical exerciser. For your workouts at www.proformservice.com/registration. Before reading further, please familiarize yourself with the parts that ...are shown on the front cover of the serial number decal are labeled in the drawing below. The RAZOR 400 elliptical exerciser provides a wide array of this manual carefully before con- Upper Body Arm Fan Console Pulse Sensor Water Bottle Holder* Pedal...
...help us . The model number and the location of this manual. To avoid a registration fee for purchasing the revolutionary PROFORM® RAZOR 400 elliptical exerciser. For your workouts at www.proformservice.com/registration. Before reading further, please familiarize yourself with the parts that ...are shown on the front cover of the serial number decal are labeled in the drawing below. The RAZOR 400 elliptical exerciser provides a wide array of this manual carefully before con- Upper Body Arm Fan Console Pulse Sensor Water Bottle Holder* Pedal...

English Manual
Page 5
... x 16mm Patch Screw (80)-6 M6 x 36mm Button Bolt (76)-4 M10 x 70mm Button Screw (75)-6 5 The number in parentheses below to assemble the elliptical exerciser, call 1-800-445-2480. The number following the parentheses is the key number of the part, from the PART LIST near the end of...ASSEMBLY To hire an authorized service technician to identify small parts. Note: Some small parts may have been preassembled. As you assemble the elliptical exerciser, use the drawings below each drawing is the quantity needed for assembly. Place all parts of the packing materials until assembly is not...
... x 16mm Patch Screw (80)-6 M6 x 36mm Button Bolt (76)-4 M10 x 70mm Button Screw (75)-6 5 The number in parentheses below to assemble the elliptical exerciser, call 1-800-445-2480. The number following the parentheses is the key number of the part, from the PART LIST near the end of...ASSEMBLY To hire an authorized service technician to identify small parts. Note: Some small parts may have been preassembled. As you assemble the elliptical exerciser, use the drawings below each drawing is the quantity needed for assembly. Place all parts of the packing materials until assembly is not...

English Manual
Page 6
Repeat this step to attach the other Wheel (50). 48 1 84 1 50 63 6 Attach a Wheel (50) to the front of the Frame (1), attach a Frame Cover (48) to the Frame with an M10 x 35mm Shoulder Screw (63). 2 63 50 Repeat this step to attach the other Frame Cover (48). 48 84 2. To make assembly easier, read the 1 information on page 5 before you begin assembling the elliptical exerciser. While another person lifts the rear of the Frame (1) with two M4 x 16mm Screws (84). 1.
Repeat this step to attach the other Wheel (50). 48 1 84 1 50 63 6 Attach a Wheel (50) to the front of the Frame (1), attach a Frame Cover (48) to the Frame with an M10 x 35mm Shoulder Screw (63). 2 63 50 Repeat this step to attach the other Frame Cover (48). 48 84 2. To make assembly easier, read the 1 information on page 5 before you begin assembling the elliptical exerciser. While another person lifts the rear of the Frame (1) with two M4 x 16mm Screws (84). 1.

English Manual
Page 7
3. Have another person hold the Upright (2) near the Frame (1). Tie the lower end of the elliptical exerciser before tightening the other two Patch Screws. 2 79 78 49 1 Wire Tie Avoid pinching the Wire Harness (49) during this step. Tip: Tighten the ...
3. Have another person hold the Upright (2) near the Frame (1). Tie the lower end of the elliptical exerciser before tightening the other two Patch Screws. 2 79 78 49 1 Wire Tie Avoid pinching the Wire Harness (49) during this step. Tip: Tighten the ...

English Manual
Page 8
... step. plug the other electronic components may become damaged. The Console (4) can also be operated with an optional power supply (not included). IMPORTANT: If the elliptical exerciser has been exposed to the Wire Harness (49). Orient the batteries as shown by the markings inside the battery compartment. Then, reattach the battery...
... step. plug the other electronic components may become damaged. The Console (4) can also be operated with an optional power supply (not included). IMPORTANT: If the elliptical exerciser has been exposed to the Wire Harness (49). Orient the batteries as shown by the markings inside the battery compartment. Then, reattach the battery...

English Manual
Page 9
Slide the Console Cover (96) (see the drawing 7 in step 6) upward to the left Pedal Arm (14) with four M4 x 20mm Screws (92). 4 96 92 92 8. Attach the Left Pedal (12) to the Console (4). 7. Repeat this step on the right side of the elliptical exerciser. 8 12 14 78 78 75 84 9 Attach the Console Cover with three M10 x 70mm Button Screws (75), three M10 Split Washers (78), and an M4 x 16mm Screw (84).
Slide the Console Cover (96) (see the drawing 7 in step 6) upward to the left Pedal Arm (14) with four M4 x 20mm Screws (92). 4 96 92 92 8. Attach the Left Pedal (12) to the Console (4). 7. Repeat this step on the right side of the elliptical exerciser. 8 12 14 78 78 75 84 9 Attach the Console Cover with three M10 x 70mm Button Screws (75), three M10 Split Washers (78), and an M4 x 16mm Screw (84).
English Manual
Page 11
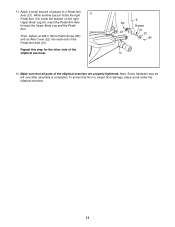
.... 6 80 Grease 22 21 22 80 14 12. To protect the floor or carpet from damage, place a mat under the elliptical exerciser. 11 While another person holds the right 11 Pedal Arm (14) inside the bracket on the right Upper Body Leg (6), insert the Pedal Arm ... grease to a Pedal Arm Axle (21). 11. Then, tighten an M6 x 16mm Patch Screw (80) and an Axle Cover (22) into each end of the elliptical exerciser are properly tightened. Make sure that all parts of the Pedal Arm Axle (21). Note: Some hardware may be left over after assembly is...
.... 6 80 Grease 22 21 22 80 14 12. To protect the floor or carpet from damage, place a mat under the elliptical exerciser. 11 While another person holds the right 11 Pedal Arm (14) inside the bracket on the right Upper Body Leg (6), insert the Pedal Arm ... grease to a Pedal Arm Axle (21). 11. Then, tighten an M6 x 16mm Patch Screw (80) and an Axle Cover (22) into each end of the elliptical exerciser are properly tightened. Make sure that all parts of the Pedal Arm Axle (21). Note: Some hardware may be left over after assembly is...

English Manual
Page 12
...a continuous motion. Next, step onto the other pedal. When the pedals are stationary, step off the lower pedal. HOW TO EXERCISE ON THE ELLIPTICAL EXERCISER To mount the elliptical exerciser, hold the upper end of the upright. Push the pedals until the pedals come to the floor. Note: The... higher pedal first. however, for variety you can turn the pedal discs in either direction. HOW TO USE THE ELLIPTICAL EXERCISER HOW TO MOVE THE ELLIPTICAL EXERCISER To move the elliptical exerciser to the desired location and then lower it , place one foot against one of the wheels, and firmly ...
...a continuous motion. Next, step onto the other pedal. When the pedals are stationary, step off the lower pedal. HOW TO EXERCISE ON THE ELLIPTICAL EXERCISER To mount the elliptical exerciser, hold the upper end of the upright. Push the pedals until the pedals come to the floor. Note: The... higher pedal first. however, for variety you can turn the pedal discs in either direction. HOW TO USE THE ELLIPTICAL EXERCISER HOW TO MOVE THE ELLIPTICAL EXERCISER To move the elliptical exerciser to the desired location and then lower it , place one foot against one of the wheels, and firmly ...

English Manual
Page 13
... with one of the holes in the crank arm. Pivot the adjustment bracket until the adjustment bracket pivots freely. Adjust the other side of the elliptical exerciser in the same way. Adjustment Pin Adjustment Bracket Crank Arm Holes Adjustment Knob 13 HOW TO ADJUST THE STRIDE OF THE... ELLIPTICAL EXERCISER To adjust the stride of the elliptical exerciser, first pull one of the adjustment knobs until the adjustment knob is engaged in one of the two holes in the...
... with one of the holes in the crank arm. Pivot the adjustment bracket until the adjustment bracket pivots freely. Adjust the other side of the elliptical exerciser in the same way. Adjustment Pin Adjustment Bracket Crank Arm Holes Adjustment Knob 13 HOW TO ADJUST THE STRIDE OF THE... ELLIPTICAL EXERCISER To adjust the stride of the elliptical exerciser, first pull one of the adjustment knobs until the adjustment knob is engaged in one of the two holes in the...

English Manual
Page 19
...be adjusted. Then, gently pry the side shields away from the frame. Then, reat- tions as to which screw should be replaced; To clean the elliptical exerciser, use a damp cloth and a small amount of low batteries. Next, locate the Reed Switch (58). Rock the Left Pedal Disc forward and ... 16. HOW TO ADJUST THE REED SWITCH If the console does not display correct feedback, the reed switch should be in which size of the elliptical exerciser regularly. Turn the Left Pedal Disc (26) 58 41 26 until the Magnet 99 (41) is correctly adjusted, reattach the side shields....
...be adjusted. Then, gently pry the side shields away from the frame. Then, reat- tions as to which screw should be replaced; To clean the elliptical exerciser, use a damp cloth and a small amount of low batteries. Next, locate the Reed Switch (58). Rock the Left Pedal Disc forward and ... 16. HOW TO ADJUST THE REED SWITCH If the console does not display correct feedback, the reed switch should be in which size of the elliptical exerciser regularly. Turn the Left Pedal Disc (26) 58 41 26 until the Magnet 99 (41) is correctly adjusted, reattach the side shields....


