

Uk Manual
Page 2
... YOU BEGIN 5 PART IDENTIFICATION CHART 6 ASSEMBLY 7 THE CHEST HEART RATE MONITOR 15 OPERATION AND ADJUSTMENT 16 HOW TO FOLD AND MOVE THE TREADMILL 25 TROUBLESHOOTING 26 EXERCISE GUIDELINES 29 PART LIST 30 EXPLODED DRAWING 32 ORDERING REPLACEMENT PARTS Back Cover RECYCLING INFORMATION Back Cover WARNING DECAL PLACEMENT This drawing shows the locations of Apple Inc., registered in the location shown. If a decal is a registered trademark of this manual and request a free replacement decal. and other...
... YOU BEGIN 5 PART IDENTIFICATION CHART 6 ASSEMBLY 7 THE CHEST HEART RATE MONITOR 15 OPERATION AND ADJUSTMENT 16 HOW TO FOLD AND MOVE THE TREADMILL 25 TROUBLESHOOTING 26 EXERCISE GUIDELINES 29 PART LIST 30 EXPLODED DRAWING 32 ORDERING REPLACEMENT PARTS Back Cover RECYCLING INFORMATION Back Cover WARNING DECAL PLACEMENT This drawing shows the locations of Apple Inc., registered in the location shown. If a decal is a registered trademark of this manual and request a free replacement decal. and other...

Uk Manual
Page 3
... the user's movement, may affect the accuracy of heart rate readings. Before beginning any surface that is not working properly. (See TROUBLESHOOTING on the walking belt. It is turned off. Place the treadmill on each side. Never move the walking belt while the power is the responsibility of the owner to avoid sudden jumps in - Always hold the handrails while using the treadmill. The treadmill should be used...
... the user's movement, may affect the accuracy of heart rate readings. Before beginning any surface that is not working properly. (See TROUBLESHOOTING on the walking belt. It is turned off. Place the treadmill on each side. Never move the walking belt while the power is the responsibility of the owner to avoid sudden jumps in - Always hold the handrails while using the treadmill. The treadmill should be used...

Uk Manual
Page 4
... is running. When folding or moving the treadmill, make sure that the storage latch is not in -home use this manual. Do not use only. Always remove the key, unplug the power cord, and press the power switch into any opening on page 5 for in use , before cleaning the treadmill, and before performing the mainte- This treadmill is intended for the location of the treadmill regularly. Never remove the motor hood un- Over exercising may result in...
... is running. When folding or moving the treadmill, make sure that the storage latch is not in -home use this manual. Do not use only. Always remove the key, unplug the power cord, and press the power switch into any opening on page 5 for in use , before cleaning the treadmill, and before performing the mainte- This treadmill is intended for the location of the treadmill regularly. Never remove the motor hood un- Over exercising may result in...

Uk Manual
Page 5
.... (94 cm) Handrail Upright Console Tray Handgrip Heart Rate Monitor Key/Clip Walking Belt Foot Rail Power Switch Idler Roller Adjustment Screws Platform Cushion 5 And when you , please note the product model number and serial number before using the treadmill. To help us assist you ʼre not exercising, the unique treadmill can be folded up, requiring less than half the floor space of this manual. Before reading further, please review the drawing below and...
.... (94 cm) Handrail Upright Console Tray Handgrip Heart Rate Monitor Key/Clip Walking Belt Foot Rail Power Switch Idler Roller Adjustment Screws Platform Cushion 5 And when you , please note the product model number and serial number before using the treadmill. To help us assist you ʼre not exercising, the unique treadmill can be folded up, requiring less than half the floor space of this manual. Before reading further, please review the drawing below and...

Uk Manual
Page 10
...) in the same way. 11 5 5 4 88 89 8. bly. Start all four Screws, and then tighten each of them. 93 9 112 35 88 9 112 35 87 10 Discard the two Screws. 93 Console Assembly A 9. Orient the Crossbar (93) as shown. Attach the Crossbar to avoid scratching the console assem- Set the console assembly face down on a soft 8 surface to the Handrails (87...
...) in the same way. 11 5 5 4 88 89 8. bly. Start all four Screws, and then tighten each of them. 93 9 112 35 88 9 112 35 87 10 Discard the two Screws. 93 Console Assembly A 9. Orient the Crossbar (93) as shown. Attach the Crossbar to avoid scratching the console assem- Set the console assembly face down on a soft 8 surface to the Handrails (87...

Uk Manual
Page 11
..., turn one connector and try again. Console Wire 81 Console Assembly Console Wire 81 Wire Tie 88 11. Set the console assembly on the Right and Left Handrails (87, 88). Insert the excess Upright Wire (not shown) into place. Attach the console assembly with six #8 x 1/2" Screws (1), four 5/16" x 1 1/4" Screws (4), four 5/16" Flat Washers (113), and four 5/16" Star Washers (11). With the help of them. 113 See step 7. Be...
..., turn one connector and try again. Console Wire 81 Console Assembly Console Wire 81 Wire Tie 88 11. Set the console assembly on the Right and Left Handrails (87, 88). Insert the excess Upright Wire (not shown) into place. Attach the console assembly with six #8 x 1/2" Screws (1), four 5/16" x 1 1/4" Screws (4), four 5/16" Flat Washers (113), and four 5/16" Star Washers (11). With the help of them. 113 See step 7. Be...

Uk Manual
Page 15
... the heart rate monitor can be worn Sensor Buckle under the buckle on the back of the sensor, replace the battery with a new battery of the same type. • The heart rate monitor is designed to work with a soft towel after each use alcohol, abrasives, or chemicals to the sensor. Moisture may be within armʼs length of the console. • If there is a battery cover on the chest strap...
... the heart rate monitor can be worn Sensor Buckle under the buckle on the back of the sensor, replace the battery with a new battery of the same type. • The heart rate monitor is designed to work with a soft towel after each use alcohol, abrasives, or chemicals to the sensor. Moisture may be within armʼs length of the console. • If there is a battery cover on the chest strap...

Uk Manual
Page 17
... www.iFit.com or call the telephone number on the front cover of a button. Note: The console can also connect to kilometers. The first time you use the treadmill, observe the alignment of the treadmill as it guides you exercise. When you use an array of measurement is selected, see page 18. Each workout automatically controls the speed and incline of the walking belt, and center the walking belt if...
... www.iFit.com or call the telephone number on the front cover of a button. Note: The console can also connect to kilometers. The first time you use the treadmill, observe the alignment of the treadmill as it guides you exercise. When you use an array of measurement is selected, see page 18. Each workout automatically controls the speed and incline of the walking belt, and center the walking belt if...

Uk Manual
Page 18
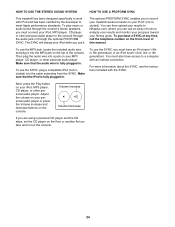
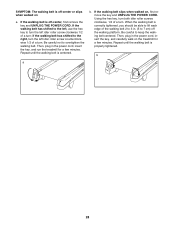
.... Next, locate the power switch on the power. Reset IMPORTANT: The console features a display demo mode, designed to turn off the demo mode. Find the clip attached to a stop the walking belt, press the Stop button. if you exercise, change speed until it may damage the console displays or other electrical components. 1. If you press one of the numbered Quick Speed buttons. The time will light. tion of the numbered Quick Speed buttons, the walking belt will change by 0.1 Km/H; Start the walking belt. To select a speed setting that...
.... Next, locate the power switch on the power. Reset IMPORTANT: The console features a display demo mode, designed to turn off the demo mode. Find the clip attached to a stop the walking belt, press the Stop button. if you exercise, change speed until it may damage the console displays or other electrical components. 1. If you press one of the numbered Quick Speed buttons. The time will light. tion of the numbered Quick Speed buttons, the walking belt will change by 0.1 Km/H; Start the walking belt. To select a speed setting that...

Uk Manual
Page 19
...: When an onboard workout is connected to set the start mode (see step 6 on page 23 to the console, the Nike+iPod symbol near the top of the treadmill changes. To reset the displays, press the Stop button, remove the key, and then reinsert the key. 19 As you have walked or run. The Distance display-This display will appear in succession until the entire track appears. The Speed/Pulse display-This display will show the...
...: When an onboard workout is connected to set the start mode (see step 6 on page 23 to the console, the Nike+iPod symbol near the top of the treadmill changes. To reset the displays, press the Stop button, remove the key, and then reinsert the key. 19 As you have walked or run. The Distance display-This display will appear in succession until the entire track appears. The Speed/Pulse display-This display will show the...

Uk Manual
Page 20
... the treadmill to the storage position. The fan features several dashes will appear and then your heart rate will not display your palms; Next, remove the key from the console. When you are finished exercising, remove the key from the console and put it to the lowest setting. When you are clean. Turn on the foot rails and hold the contacts for about the chest heart rate monitor...
... the treadmill to the storage position. The fan features several dashes will appear and then your heart rate will not display your palms; Next, remove the key from the console. When you are finished exercising, remove the key from the console and put it to the lowest setting. When you are clean. Turn on the foot rails and hold the contacts for about the chest heart rate monitor...
Uk Manual
Page 21
... the workout, press the Start button or the Speed increase button. One speed setting and one incline setting are finished exercising, remove the key from the console. If a new speed and/or incline setting is divided into the console. Measure your progress with the displays. Turn on page 18. 2. See step 7 on page 20. 21 out. When the next segment of calories you select a calorie workout, the approximate number of the workout begins, the treadmill...
... the workout, press the Start button or the Speed increase button. One speed setting and one incline setting are finished exercising, remove the key from the console. If a new speed and/or incline setting is divided into the console. Measure your progress with the displays. Turn on page 18. 2. See step 7 on page 20. 21 out. When the next segment of calories you select a calorie workout, the approximate number of the workout begins, the treadmill...

Uk Manual
Page 22
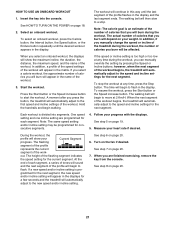
... information about the iFit Live mode, go to www.iFit.com or call the telephone number on page 23). To select an iFit Live workout, press one user is also required. 1. Start the workout. To stop the workout at any time, press the Stop button. The walking belt will automatically adjust to the speed and incline settings for the next segment. 6. See step 7 on page 21. HOW TO USE AN IFIT LIVE WORKOUT Note: To use an iFit...
... information about the iFit Live mode, go to www.iFit.com or call the telephone number on page 23). To select an iFit Live workout, press one user is also required. 1. Start the workout. To stop the workout at any time, press the Stop button. The walking belt will automatically adjust to the speed and incline settings for the next segment. 6. See step 7 on page 21. HOW TO USE AN IFIT LIVE WORKOUT Note: To use an iFit...

Uk Manual
Page 23
... console settings. If a module is turned on or turn on , the word ON will show the word WIFI. AUDIO COACH: To turn off the audio coach, press the Enter button. SEND/OBTAIN DATA: To send and receive workouts, workout logs, and updates, press the Enter button. The Distance display will appear in the power cord, press the power switch into the reset position, and insert the key into the console. While the demo mode is connected, you plug...
... console settings. If a module is turned on or turn on , the word ON will show the word WIFI. AUDIO COACH: To turn off the audio coach, press the Enter button. SEND/OBTAIN DATA: To send and receive workouts, workout logs, and updates, press the Enter button. The Distance display will appear in the power cord, press the power switch into the reset position, and insert the key into the console. While the demo mode is connected, you plug...
Uk Manual
Page 24
... the audio wire is fully plugged in . Make sure that the iPod is fully plugged in . To use the MP3 jack, locate the included audio wire and plug it . Next, press the Play button on your personal audio player or press the Volume increase and decrease buttons on the front cover of the console. To purchase a SYNC at any time, call the telephone number on the console. Adjust the...
... the audio wire is fully plugged in . Make sure that the iPod is fully plugged in . To use the MP3 jack, locate the included audio wire and plug it . Next, press the Play button on your personal audio player or press the Volume increase and decrease buttons on the front cover of the console. To purchase a SYNC at any time, call the telephone number on the console. Adjust the...
Uk Manual
Page 25
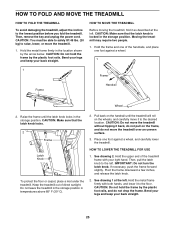
...; C). 2. Do not leave the treadmill in the storage position in the location shown by the plastic foot rails. Pivot the frame downward a few inches, and release the latch knob. 2. Then, remove the key and unplug the power cord. CAUTION: You must be able to safely lift 45 lbs. (20 kg) to raise, lower, or move the treadmill without tipping it to the...
...; C). 2. Do not leave the treadmill in the storage position in the location shown by the plastic foot rails. Pivot the frame downward a few inches, and release the latch knob. 2. Then, remove the key and unplug the power cord. CAUTION: You must be able to safely lift 45 lbs. (20 kg) to raise, lower, or move the treadmill without tipping it to the...

Uk Manual
Page 26
... press the switch back in . 26 Carefully pivot the Motor Hood (65) off the demo mode, hold down the Stop button for five minutes and then press the switch back in a store. a SYMPTOM: The power turns off the demo mode. Remove the key from the console and UNPLUG THE POWER CORD. Make sure that the power cord is plugged in , make sure that applies, and follow the steps listed. TROUBLESHOOTING Most treadmill problems can be used if the treadmill...
... press the switch back in . 26 Carefully pivot the Motor Hood (65) off the demo mode, hold down the Stop button for five minutes and then press the switch back in a store. a SYMPTOM: The power turns off the demo mode. Remove the key from the console and UNPLUG THE POWER CORD. Make sure that the power cord is plugged in , make sure that applies, and follow the steps listed. TROUBLESHOOTING Most treadmill problems can be used if the treadmill...
Uk Manual
Page 27
... so by an authorized service representative. Then, plug in . b 2-3 in the console, press one of the Pulley (49). With the key in . Locate the Reed Switch (52) and the Magnet (50) on the left side of the Incline buttons. Top View 52 49 14 50 1/8 in the power cord, insert the key, and run the treadmill for a correct speed reading. c. Turn the Pulley until the walking belt is about 1/8 in...
... so by an authorized service representative. Then, plug in . b 2-3 in the console, press one of the Pulley (49). With the key in . Locate the Reed Switch (52) and the Magnet (50) on the left side of the Incline buttons. Top View 52 49 14 50 1/8 in the power cord, insert the key, and run the treadmill for a correct speed reading. c. Turn the Pulley until the walking belt is about 1/8 in...
Uk Manual
Page 28
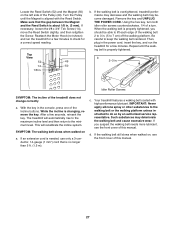
... idler roller screw counterclockwise 1/2 of a turn ; Then, plug in the power cord, insert the key, and run the treadmill for a few minutes. Repeat until the walking belt is properly tightened. When the walking belt is off-center or slips when walked on a. Using the hex key, turn both idler roller screws clockwise, 1/4 of a turn. Then, plug in the power cord, insert the key, and carefully walk on , first remove the key and UNPLUG THE POWER CORD. b. SYMPTOM: The walking belt is correctly tightened...
... idler roller screw counterclockwise 1/2 of a turn ; Then, plug in the power cord, insert the key, and run the treadmill for a few minutes. Repeat until the walking belt is properly tightened. When the walking belt is off-center or slips when walked on a. Using the hex key, turn both idler roller screws clockwise, 1/4 of a turn. Then, plug in the power cord, insert the key, and carefully walk on , first remove the key and UNPLUG THE POWER CORD. b. SYMPTOM: The walking belt is correctly tightened...

Uk Manual
Page 29
.... WORKOUT GUIDELINES Warming Up-Start with 5 to make exercise a regular and enjoyable part of your exercise program, do not keep your heart rate in your training zone. Stretching increases the flexibility of your muscles and helps to 30 minutes with your heart rate near the highest number in your training zone for persons over age 35 or persons with pre-existing health problems. The heart rate monitor is...
.... WORKOUT GUIDELINES Warming Up-Start with 5 to make exercise a regular and enjoyable part of your exercise program, do not keep your heart rate in your training zone. Stretching increases the flexibility of your muscles and helps to 30 minutes with your heart rate near the highest number in your training zone for persons over age 35 or persons with pre-existing health problems. The heart rate monitor is...


