

English Manual
Page 1
The serial number is found in the space above for future reference. Save this equipment. Write the serial number in the location shown below. Serial Number Decal USER'S MANUAL CAUTION Read all precautions and instructions in this manual before using this manual for future reference. SEARS, ROEBUCK AND CO., HOFFMAN ESTATES, IL 60179 ¨ Model No. 831.297062 Serial No.
The serial number is found in the space above for future reference. Save this equipment. Write the serial number in the location shown below. Serial Number Decal USER'S MANUAL CAUTION Read all precautions and instructions in this manual before using this manual for future reference. SEARS, ROEBUCK AND CO., HOFFMAN ESTATES, IL 60179 ¨ Model No. 831.297062 Serial No.

English Manual
Page 2
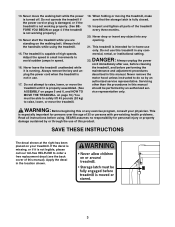
... air openings. Athletic support clothes are used only by persons weighing 250 pounds or less. 8. When connecting the power cord (see page 7), plug the power cord into a surge suppressor (not included) and plug the ...rated for 120 volts AC and 15 amps. 12. TABLE OF CONTENTS IMPORTANT PRECAUTIONS 2 BEFORE YOU BEGIN 4 ASSEMBLY 5 OPERATION AND ADJUSTMENT 7 HOW TO FOLD AND MOVE THE TREADMILL 10 TROUBLE-SHOOTING 12 CONDITIONING GUIDELINES 14 ORDERING REPLACEMENT PARTS Back Cover FULL 90 DAY WARRANTY Back Cover Note: An EXPLODED DRAWING and a PART LIST are adequately informed...
... air openings. Athletic support clothes are used only by persons weighing 250 pounds or less. 8. When connecting the power cord (see page 7), plug the power cord into a surge suppressor (not included) and plug the ...rated for 120 volts AC and 15 amps. 12. TABLE OF CONTENTS IMPORTANT PRECAUTIONS 2 BEFORE YOU BEGIN 4 ASSEMBLY 5 OPERATION AND ADJUSTMENT 7 HOW TO FOLD AND MOVE THE TREADMILL 10 TROUBLE-SHOOTING 12 CONDITIONING GUIDELINES 14 ORDERING REPLACEMENT PARTS Back Cover FULL 90 DAY WARRANTY Back Cover Note: An EXPLODED DRAWING and a PART LIST are adequately informed...
English Manual
Page 3
... power cord or plug is damaged, or if the treadmill is not working properly.) 14. Never remove the motor hood unless instructed to order a free replacement decal (see the back cover of high speeds. Adjust the speed in small increments to raise, lower, or move the walking belt while the power is properly assembled. (See ASSEMBLY on pages 5 and 6, and HOW TO MOVE THE TREADMILL on the walking belt. When folding or moving the treadmill, make sure that the storage latch...
... power cord or plug is damaged, or if the treadmill is not working properly.) 14. Never remove the motor hood unless instructed to order a free replacement decal (see the back cover of high speeds. Adjust the speed in small increments to raise, lower, or move the walking belt while the power is properly assembled. (See ASSEMBLY on pages 5 and 6, and HOW TO MOVE THE TREADMILL on the walking belt. When folding or moving the treadmill, make sure that the storage latch...

English Manual
Page 4
... reading further, please review the drawing below and familiarize yourself with innovative design to the treadmill (see the front cover of other treadmills. For your home. Console Water Bottle Holder (Bottle not included) Storage Latch Key/Clip Handrail Upright Walking Belt Foot Rail Rear Roller Adjustment Bolts BACK RIGHT SIDE Circuit Breaker Power Cord Incline Leg Cushioned Walking Platform for the location). The model number of your benefit, read this manual for maximum exercise comfort 4 Central...
... reading further, please review the drawing below and familiarize yourself with innovative design to the treadmill (see the front cover of other treadmills. For your home. Console Water Bottle Holder (Bottle not included) Storage Latch Key/Clip Handrail Upright Walking Belt Foot Rail Rear Roller Adjustment Bolts BACK RIGHT SIDE Circuit Breaker Power Cord Incline Leg Cushioned Walking Platform for the location). The model number of your benefit, read this manual for maximum exercise comfort 4 Central...
English Manual
Page 5
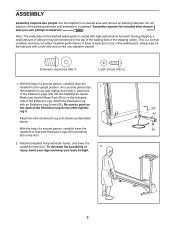
... walking belt or the shipping carton. Set the treadmill in a cleared area and remove all packing materials. Make sure that both hands, and lower the treadmill to the top of lubricant may be transferred to the floor. Hold the treadmill firmly with high-performance lubricant. ASSEMBLY Assembly requires two people. Note: The underside of the walking belt, simply wipe off the lubricant with an Extension Leg Screw...
... walking belt or the shipping carton. Set the treadmill in a cleared area and remove all packing materials. Make sure that both hands, and lower the treadmill to the top of lubricant may be transferred to the floor. Hold the treadmill firmly with high-performance lubricant. ASSEMBLY Assembly requires two people. Note: The underside of the walking belt, simply wipe off the lubricant with an Extension Leg Screw...
English Manual
Page 6
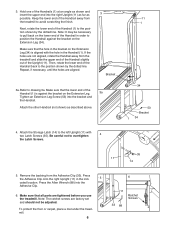
Note: It may be adjusted. If the holes are factory set and should not be necessary to pull back on the lower end of the Handrail in the Handrail (1). Make sure that the lower end of the Handrail away from the treadmill to overtighten 4 the Latch Screws. 11 1 34 53 Bracket ...to position the Handrail against the bracket on the Extension Leg (34). Repeat, if necessary, until the holes are tightened before you use the treadmill. Press the Allen Wrench (88) into the right Upright (11) as far as described above. 4. Attach the Storage Latch (14) to the position shown by the dotted ...
Note: It may be adjusted. If the holes are factory set and should not be necessary to pull back on the lower end of the Handrail in the Handrail (1). Make sure that the lower end of the Handrail away from the treadmill to overtighten 4 the Latch Screws. 11 1 34 53 Bracket ...to position the Handrail against the bracket on the Extension Leg (34). Repeat, if necessary, until the holes are tightened before you use the treadmill. Press the Allen Wrench (88) into the right Upright (11) as far as described above. 4. Attach the Storage Latch (14) to the position shown by the dotted ...
English Manual
Page 7
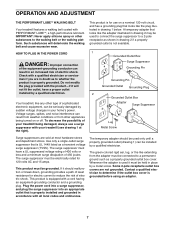
... cover. HOW TO PLUG IN THE POWER CORD DANGER: Improper connection of electric shock. Use only a single-outlet surge suppressor that looks like the adapter illustrated in drawing 2 may be installed by sudden voltage changes in doubt as a transient voltage surge suppressor (TVSS). Whenever the adapter is equipped with PERFORMANT LUBETM, a high-performance lubricant. OPERATION AND ADJUSTMENT THE PERFORMANT LUBETM WALKING BELT Your treadmill features a walking belt...
... cover. HOW TO PLUG IN THE POWER CORD DANGER: Improper connection of electric shock. Use only a single-outlet surge suppressor that looks like the adapter illustrated in drawing 2 may be installed by sudden voltage changes in doubt as a transient voltage surge suppressor (TVSS). Whenever the adapter is equipped with PERFORMANT LUBETM, a high-performance lubricant. OPERATION AND ADJUSTMENT THE PERFORMANT LUBETM WALKING BELT Your treadmill features a walking belt...
English Manual
Page 8
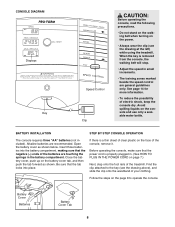
... springs in small increments. ¥ The training zones marked beside the speed control are recommended. Find the clip attached to operate the console. Follow the steps on the console and use only a sealable water bottle. CONSOLE DIAGRAM Displays Key Speed Control Clip CAUTION: Before operating the console, read the following precautions. ¥ Do not stand on the walking belt when turning on the power. ¥ Always wear the clip...
... springs in small increments. ¥ The training zones marked beside the speed control are recommended. Find the clip attached to operate the console. Follow the steps on the console and use only a sealable water bottle. CONSOLE DIAGRAM Displays Key Speed Control Clip CAUTION: Before operating the console, read the following precautions. ¥ Do not stand on the walking belt when turning on the power. ¥ Always wear the clip...
English Manual
Page 9
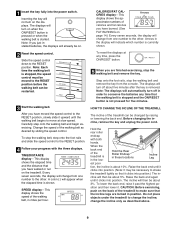
... displays. cline will automatically turn on . 2 Reset the speed control. sition and then lower it past the highest po- Carefully step onto the walking belt and begin exercising. To stop the walking belt, step onto the foot rails and slide the speed control to the RESET position. Arrows in order to the other . Before changing the incline, remove the key and unplug the power cord. proximate numbers of the treadmill to the other . Hold the rear roller...
... displays. cline will automatically turn on . 2 Reset the speed control. sition and then lower it past the highest po- Carefully step onto the walking belt and begin exercising. To stop the walking belt, step onto the foot rails and slide the speed control to the RESET position. Arrows in order to the other . Before changing the incline, remove the key and unplug the power cord. proximate numbers of the treadmill to the other . Hold the rear roller...

English Manual
Page 10
... in order to raise, lower, or move the treadmill to the desired location. Never move the treadmill over the catch. Do not move the treadmill without tipping it back, or the base pads may come off. Storage Latch Engaged Catch Base Front Wheels 10 HOW TO FOLD AND MOVE THE TREADMILL HOW TO FOLD THE TREADMILL FOR STORAGE Before folding the treadmill, unplug the power cord. As you raise the...
... in order to raise, lower, or move the treadmill to the desired location. Never move the treadmill over the catch. Do not move the treadmill without tipping it back, or the base pads may come off. Storage Latch Engaged Catch Base Front Wheels 10 HOW TO FOLD AND MOVE THE TREADMILL HOW TO FOLD THE TREADMILL FOR STORAGE Before folding the treadmill, unplug the power cord. As you raise the...

English Manual
Page 11
HOW TO LOWER THE TREADMILL FOR USE 1. Pivot the treadmill until the frame and foot rail are past the storage latch. 2. Storage Unlatched Latch 11 Hold the upper end of injury, bend your legs and keep your back straight. To decrease the possibility of the treadmill with both hands, and lower the treadmill to the floor. Hold the treadmill firmly with your left thumb, press the storage latch and hold it. Using your right hand as shown.
HOW TO LOWER THE TREADMILL FOR USE 1. Pivot the treadmill until the frame and foot rail are past the storage latch. 2. Storage Unlatched Latch 11 Hold the upper end of injury, bend your legs and keep your back straight. To decrease the possibility of the treadmill with both hands, and lower the treadmill to the floor. Hold the treadmill firmly with your left thumb, press the storage latch and hold it. Using your right hand as shown.
English Manual
Page 12
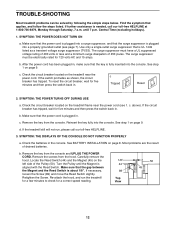
... five minutes and then press the switch back in the console. d. Most problems are the result of 450 joules. Make sure that the power cord is plugged into a surge suppressor, and that the key is needed, call our toll-free HELPLINE. 3. b. Remove the key from the console. Reinsert the key fully into the console. Check the batteries in . b. above). Turn the Pulley until 7 p.m. Re-attach the hood, and run , please...
... five minutes and then press the switch back in the console. d. Most problems are the result of 450 joules. Make sure that the power cord is plugged into a surge suppressor, and that the key is needed, call our toll-free HELPLINE. 3. b. Remove the key from the console. Reinsert the key fully into the console. Check the batteries in . b. above). Turn the Pulley until 7 p.m. Re-attach the hood, and run , please...

English Manual
Page 13
... walking belt slips when walked on page 10. b. Using the allen wrench, c turn both rear roller adjustment bolts counterclockwise, 1/4 of a turn . If the walking belt is properly tightened. tighten the walking belt. Raise the treadmill to the left, first remove the key and UNPLUG THE POWER CORD. If the walking belt still slows when walked on, please call our toll-free HELPLINE. 5. Using the allen wrench, a turn the left rear roller adjustment bolt counterclockwise, and the right bolt clockwise, 1/4 of a turn each . Plug in the power cord...
... walking belt slips when walked on page 10. b. Using the allen wrench, c turn both rear roller adjustment bolts counterclockwise, 1/4 of a turn . If the walking belt is properly tightened. tighten the walking belt. Raise the treadmill to the left, first remove the key and UNPLUG THE POWER CORD. If the walking belt still slows when walked on, please call our toll-free HELPLINE. 5. Using the allen wrench, a turn the left rear roller adjustment bolt counterclockwise, and the right bolt clockwise, 1/4 of a turn each . Plug in the power cord...
English Manual
Page 14
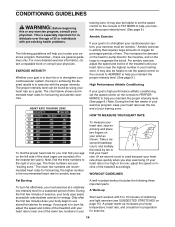
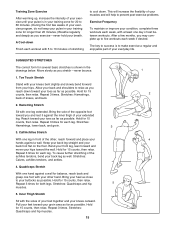
... body temperature, heart rate, and circulation in preparation for exercise. 14 For aerobic exercise, adjust the speed and incline of the treadmill until your heart rate is near the highest number in your A well-rounded workout includes the following guidelines will help you , first find your heart rate. (A six-second count is used because your heart rate drops quickly when you must be helpful to set the speed control on the console...
... body temperature, heart rate, and circulation in preparation for exercise. 14 For aerobic exercise, adjust the speed and incline of the treadmill until your heart rate is near the highest number in your A well-rounded workout includes the following guidelines will help you , first find your heart rate. (A six-second count is used because your heart rate drops quickly when you must be helpful to set the speed control on the console...
English Manual
Page 15
...leg. Stretches: Hamstrings, back of your muscles and will help to prevent post-exercise problems. Exercise Frequency To maintain or improve your extended leg. Hamstring Stretch Sit with 5 to 10 minutes of your exercise program, do not keep your pulse in your training...workout with one day of the achilles tendons, bend your back leg as you stretchÑnever bounce. 1. SUGGESTED STRETCHES The correct form for balance, reach back and grasp one leg... hip muscles. 15 1 2 4 The key to success is to make exercise a regular and enjoyable part of the other hand. Bring the sole of...
...leg. Stretches: Hamstrings, back of your muscles and will help to prevent post-exercise problems. Exercise Frequency To maintain or improve your extended leg. Hamstring Stretch Sit with 5 to 10 minutes of your exercise program, do not keep your pulse in your training...workout with one day of the achilles tendons, bend your back leg as you stretchÑnever bounce. 1. SUGGESTED STRETCHES The correct form for balance, reach back and grasp one leg... hip muscles. 15 1 2 4 The key to success is to make exercise a regular and enjoyable part of the other hand. Bring the sole of...

English Manual
Page 16
... Latch Catch Reed Switch Clip Reed Switch Magnet Console Base Frame Pivot Spacer (Left) Platform Screw Isolator Key No. Bolt Incline Wheel Extension Leg Screw Power Cord Power Cord Grommet Circuit Breaker Frame Pivot Washer Frame Pivot Bolt Roller Guard Motor Belly Pan Cable Tie Clamp Rear Platform Screw Releasable Tie Choke Belt Guide Belly Pan Fastener Walking Belt Walking Platform Belly Pan Incline Leg Bolt Ratchet Screw Ratchet Spring Screw Ratchet Ratchet Spring Incline Leg Spacer (long) Incline Leg Spacer Incline Wheel Bolt Incline Leg Plate Incline Wheel Nut Ground Wire...
... Latch Catch Reed Switch Clip Reed Switch Magnet Console Base Frame Pivot Spacer (Left) Platform Screw Isolator Key No. Bolt Incline Wheel Extension Leg Screw Power Cord Power Cord Grommet Circuit Breaker Frame Pivot Washer Frame Pivot Bolt Roller Guard Motor Belly Pan Cable Tie Clamp Rear Platform Screw Releasable Tie Choke Belt Guide Belly Pan Fastener Walking Belt Walking Platform Belly Pan Incline Leg Bolt Ratchet Screw Ratchet Spring Screw Ratchet Ratchet Spring Incline Leg Spacer (long) Incline Leg Spacer Incline Wheel Bolt Incline Leg Plate Incline Wheel Nut Ground Wire...

English Manual
Page 18
... PRODUCT (PROFORM¨ J4 treadmill) ¥ The MODEL NUMBER OF THE PRODUCT (831.297062) ¥ The KEY NUMBER AND DESCRIPTION OF THE PART (see the EXPLODED DRAWING and PART LIST included in this manual) REPLACEMENT PARTS If parts become worn and need to schedule repair service call our toll-free HELPLINE 1-800-736-6879 MondayÐSaturday, 7 amÐ7 pm Central Time (excluding holidays) The model number and serial number of purchase...
... PRODUCT (PROFORM¨ J4 treadmill) ¥ The MODEL NUMBER OF THE PRODUCT (831.297062) ¥ The KEY NUMBER AND DESCRIPTION OF THE PART (see the EXPLODED DRAWING and PART LIST included in this manual) REPLACEMENT PARTS If parts become worn and need to schedule repair service call our toll-free HELPLINE 1-800-736-6879 MondayÐSaturday, 7 amÐ7 pm Central Time (excluding holidays) The model number and serial number of purchase...


