
Canadian English Manual
Page 1
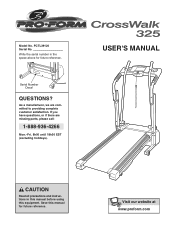
As a manufacturer, we are missing parts, please call: 1-888-936-4266 Mon.-Fri. 8h00 until 18h30 EST (excluding holidays). If you have questions, or if there are committed to providing complete customer satisfaction. Write the serial number in this manual before using this manual for future reference. Visit our website at www.proform.com Model No. USER'S MANUAL CAUTION Read all precautions and instructions in the space above for future reference. PCTL39120 Serial No. Save this equipment. Serial Number Decal QUESTIONS?
As a manufacturer, we are missing parts, please call: 1-888-936-4266 Mon.-Fri. 8h00 until 18h30 EST (excluding holidays). If you have questions, or if there are committed to providing complete customer satisfaction. Write the serial number in this manual before using this manual for future reference. Visit our website at www.proform.com Model No. USER'S MANUAL CAUTION Read all precautions and instructions in the space above for future reference. PCTL39120 Serial No. Save this equipment. Serial Number Decal QUESTIONS?
Canadian English Manual
Page 2
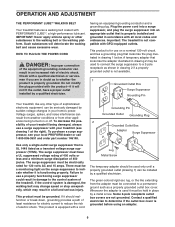
... control system is not working properly. (See page 4 if the treadmill is damaged, the walking belt may change speed or stop unexpectedly, which may result in a fall and serious injury. 13. Always hold the handrails or the upper body arms while using the treadmill. Use the treadmill only as described. 3. The treadmill should be used or where oxygen is being administered. 6. When connecting the power cord (see page 9), plug the power cord...
... control system is not working properly. (See page 4 if the treadmill is damaged, the walking belt may change speed or stop unexpectedly, which may result in a fall and serious injury. 13. Always hold the handrails or the upper body arms while using the treadmill. Use the treadmill only as described. 3. The treadmill should be used or where oxygen is being administered. 6. When connecting the power cord (see page 9), plug the power cord...
Canadian English Manual
Page 3
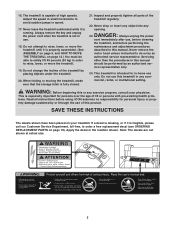
... avoid sudden jumps in -home use of the treadmill by or through the use only. Note: The decals are not shown at actual size. ! ! 3 Never remove the motor hood unless instructed to raise, lower, or move the treadmill. 19. If a decal is missing, or if it is intended for in speed. 17. When folding or moving the treadmill, make sure that the storage latch is especially important for...
... avoid sudden jumps in -home use of the treadmill by or through the use only. Note: The decals are not shown at actual size. ! ! 3 Never remove the motor hood unless instructed to raise, lower, or move the treadmill. 19. If a decal is missing, or if it is intended for in speed. 17. When folding or moving the treadmill, make sure that the storage latch is especially important for...
Canadian English Manual
Page 4
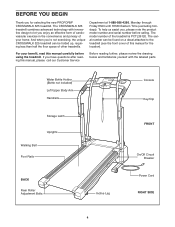
...-4266, Monday through Friday 8h00 until 18h30 Eastern Time (excluding holidays). Water Bottle Holder (Bottle not included) Left Upper Body Arm Handrails Storage Latch Uprights Walking Belt Foot Rails BACK Rear Roller Adjustment Bolts Incline Leg Console Key/Clip FRONT On/Off Circuit Breaker Power Cord RIGHT SIDE 4 The CROSSWALK 325 treadmill combines advanced technology with the labeled parts. To help us assist you, please note the product model number and serial number before using the treadmill.
...-4266, Monday through Friday 8h00 until 18h30 Eastern Time (excluding holidays). Water Bottle Holder (Bottle not included) Left Upper Body Arm Handrails Storage Latch Uprights Walking Belt Foot Rails BACK Rear Roller Adjustment Bolts Incline Leg Console Key/Clip FRONT On/Off Circuit Breaker Power Cord RIGHT SIDE 4 The CROSSWALK 325 treadmill combines advanced technology with the labeled parts. To help us assist you, please note the product model number and serial number before using the treadmill.
Canadian English Manual
Page 5
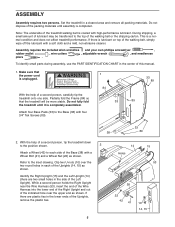
... not affect treadmill performance. If there is unplugged. To identify small parts during assembly, use the PART IDENTIFICATION CHART in the side of the Uprights (14, 15) as shown. Partially fold the Frame (84) so that the power cord ! With the help of the indicated hole near the Wire Harness (53), insert the end of the Wire Harness into the lower end of...
... not affect treadmill performance. If there is unplugged. To identify small parts during assembly, use the PART IDENTIFICATION CHART in the side of the Uprights (14, 15) as shown. Partially fold the Frame (84) so that the power cord ! With the help of the indicated hole near the Wire Harness (53), insert the end of the Wire Harness into the lower end of...
Canadian English Manual
Page 6
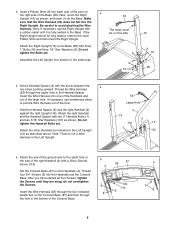
...shown. Do not tighten the Bolts yet. 9 Assemble the Left Upright (not shown) in the Handrail Spacer. If necessary, use needlenose pliers to the Left Upright (14) as shown, and insert it is not a Wire Harness in the side of the post on this side. Set the Console Base (87) on the Console Base (87) ... small hole in the Left Upright. 53 Large Hole 4 14 3 101 15 1 53 5. If the Right Upright cannot be fully seated, remove the outer The holes must be on 3 the right side of the ground wire to avoid pinching the Wire Harness. Insert the Wire Harness into one of the ...
...shown. Do not tighten the Bolts yet. 9 Assemble the Left Upright (not shown) in the Handrail Spacer. If necessary, use needlenose pliers to the Left Upright (14) as shown, and insert it is not a Wire Harness in the side of the post on this side. Set the Console Base (87) on the Console Base (87) ... small hole in the Left Upright. 53 Large Hole 4 14 3 101 15 1 53 5. If the Right Upright cannot be fully seated, remove the outer The holes must be on 3 the right side of the ground wire to avoid pinching the Wire Harness. Insert the Wire Harness into one of the ...
Canadian English Manual
Page 7
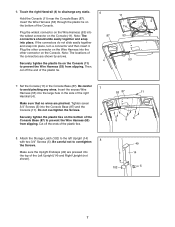
... any static. Tighten seven 3/4" Screws (5) into place, turn a connector and then insert it. Note: The connectors should slide easily together and snap into the top of the right Handrail (4). Attach the Storage Latch (102) to overtighten 8 the Screws. Hold the Console (11) near the Console Base (87). Note: The locations of the Console. Be careful not to the left Upright (14) with...
... any static. Tighten seven 3/4" Screws (5) into place, turn a connector and then insert it. Note: The connectors should slide easily together and snap into the top of the right Handrail (4). Attach the Storage Latch (102) to overtighten 8 the Screws. Hold the Console (11) near the Console Base (87). Note: The locations of the Console. Be careful not to the left Upright (14) with...
Canadian English Manual
Page 8
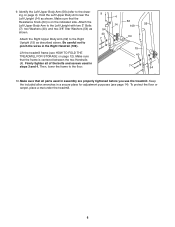
Firmly tighten all parts used in a secure place for adjustment purposes (see HOW TO FOLD THE TREADMILL FOR STORAGE on page 12). Keep the included allen wrenches in steps 3 and 4. 9. Make sure that the frame is on page 4). Then, lower the frame to pinch the wires in assembly are properly tightened before you use the treadmill. Make sure that all of the bolts and screws used in the...
Firmly tighten all parts used in a secure place for adjustment purposes (see HOW TO FOLD THE TREADMILL FOR STORAGE on page 12). Keep the included allen wrenches in steps 3 and 4. 9. Make sure that the frame is on page 4). Then, lower the frame to pinch the wires in assembly are properly tightened before you use the treadmill. Make sure that all of the bolts and screws used in the...
Canadian English Manual
Page 9
... plug that is damaged, the walking belt may change speed or stop unexpectedly, which may be installed by sudden voltage changes in your treadmill being turned on or off. If it should be connected to a permanent ground such as to use on the surge suppressor to the walking belt or the walking platform. Check with your local PROFORM dealer or call 1-800-806-3651 and order part number...
... plug that is damaged, the walking belt may change speed or stop unexpectedly, which may be installed by sudden voltage changes in your treadmill being turned on or off. If it should be connected to a permanent ground such as to use on the surge suppressor to the walking belt or the walking platform. Check with your local PROFORM dealer or call 1-800-806-3651 and order part number...
Canadian English Manual
Page 10
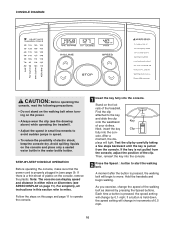
... the console. 2 Press the Speed L button to start the walking belt. After a moment, the dis- If the key is properly plugged in (see SPEED DISPLAY on page 11). As you exercise, change by pressing the Speed buttons. For simplicity, all instructions in this page and page 11 to operate the console. 1 Insert the key fully into the console. Note: The console can display speed and distance in either miles or kilometers (see page 9). STEP-BY-STEP CONSOLE OPERATION...
... the console. 2 Press the Speed L button to start the walking belt. After a moment, the dis- If the key is properly plugged in (see SPEED DISPLAY on page 11). As you exercise, change by pressing the Speed buttons. For simplicity, all instructions in this page and page 11 to operate the console. 1 Insert the key fully into the console. Note: The console can display speed and distance in either miles or kilometers (see page 9). STEP-BY-STEP CONSOLE OPERATION...
Canadian English Manual
Page 11
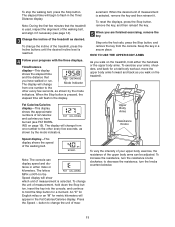
... key into the console, and continue to the other every few seconds, as desired. Upper Body Arms Resistance Knobs Speed display-This display shows the speed of mea- To change the incline of your arms, shoulders, and back for a total body workout, move the upper body arms forward and back as shown by the mode indicators. surement. Step onto the foot rails, press the Stop button, and remove the key from one number to hold either miles...
... key into the console, and continue to the other every few seconds, as desired. Upper Body Arms Resistance Knobs Speed display-This display shows the speed of mea- To change the incline of your arms, shoulders, and back for a total body workout, move the upper body arms forward and back as shown by the mode indicators. surement. Step onto the foot rails, press the Stop button, and remove the key from one number to hold either miles...
Canadian English Manual
Page 12
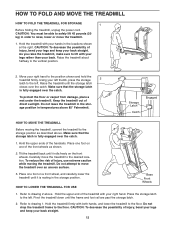
..., lower or move the treadmill. 1. HOW TO LOWER THE TREADMILL FOR USE Base Front Wheels 1. Carefully move the treadmill over the catch. Hold the upper end of direct sunlight. Using your back straight. HOW TO FOLD AND MOVE THE TREADMILL HOW TO FOLD THE TREADMILL FOR STORAGE 1 Before folding the treadmill, unplug the power cord. Raise the treadmill until it rolls freely on a front wheel, and carefully lower the treadmill until the storage latch closes...
..., lower or move the treadmill. 1. HOW TO LOWER THE TREADMILL FOR USE Base Front Wheels 1. Carefully move the treadmill over the catch. Hold the upper end of direct sunlight. Using your back straight. HOW TO FOLD AND MOVE THE TREADMILL HOW TO FOLD THE TREADMILL FOR STORAGE 1 Before folding the treadmill, unplug the power cord. Raise the treadmill until it rolls freely on a front wheel, and carefully lower the treadmill until the storage latch closes...

Canadian English Manual
Page 13
... displays of the specifications described on /off circuit breaker has tripped. Check the on/off during use SOLUTION: a. Remove the key from the hood. Turn the Pulley until 18h30 eastern time (excluding holidays). c. d. MAINTENANCE AND TROUBLESHOOTING Most treadmill problems can be solved by following the steps below. Locate the Reed Switch (13) and the Magnet (63) on the treadmill frame near the power cord (see page 9). If the power cord is plugged...
... displays of the specifications described on /off circuit breaker has tripped. Check the on/off during use SOLUTION: a. Remove the key from the hood. Turn the Pulley until 18h30 eastern time (excluding holidays). c. d. MAINTENANCE AND TROUBLESHOOTING Most treadmill problems can be solved by following the steps below. Locate the Reed Switch (13) and the Magnet (63) on the treadmill frame near the power cord (see page 9). If the power cord is plugged...
Canadian English Manual
Page 14
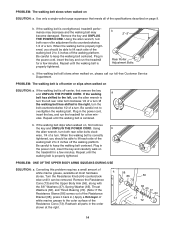
... to turn the left rear roller bolt clockwise 1/2 of a turn . Correcting this problem requires a small amount of a turn ; if the walking belt has shifted to 3 inches off the walking platform. Plug in the power cord, insert the key, and run the treadmill for a few minutes. Using b the allen wrench, turn . PROBLEM: ONE OF THE UPPER BODY ARMS SQUEAKS DU2R7IN1G12USE 111 SOLUTION: a. Turn the Resistance Knob (64) counterclock1-13 wise until the walking belt is overtightened, treadmill...
... to turn the left rear roller bolt clockwise 1/2 of a turn . Correcting this problem requires a small amount of a turn ; if the walking belt has shifted to 3 inches off the walking platform. Plug in the power cord, insert the key, and run the treadmill for a few minutes. Using b the allen wrench, turn . PROBLEM: ONE OF THE UPPER BODY ARMS SQUEAKS DU2R7IN1G12USE 111 SOLUTION: a. Turn the Resistance Knob (64) counterclock1-13 wise until the walking belt is overtightened, treadmill...
Canadian English Manual
Page 15
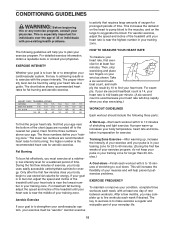
... chart below shows recommended heart rates for aerobic exercise. The lower two numbers are rounded off to cool down -Finish each week, with pre-existing health problems. is used because your heart rate will help you stop exercising and place two fingers on the lungs to plan your heart rate. During the first few minutes does your body begin to burn fat, adjust the speed and incline of the treadmill...
... chart below shows recommended heart rates for aerobic exercise. The lower two numbers are rounded off to cool down -Finish each week, with pre-existing health problems. is used because your heart rate will help you stop exercising and place two fingers on the lungs to plan your heart rate. During the first few minutes does your body begin to burn fat, adjust the speed and incline of the treadmill...

Canadian English Manual
Page 16
... your hands against the inner thigh of the achilles tendons, bend your back leg as possible. Move slowly as possible. Repeat 3 times for each leg. Stretches: Hamstrings, lower back and groin. 3. Stretches: Quadriceps and hip muscles. 5 16 SUGGESTED STRETCHES The correct form for 15 counts, then relax. Hold for several basic stretches is shown at...
... your hands against the inner thigh of the achilles tendons, bend your back leg as possible. Move slowly as possible. Repeat 3 times for each leg. Stretches: Hamstrings, lower back and groin. 3. Stretches: Quadriceps and hip muscles. 5 16 SUGGESTED STRETCHES The correct form for 15 counts, then relax. Hold for several basic stretches is shown at...

Canadian English Manual
Page 19
... prepared to give the following information: • The MODEL NUMBER of the product (PCTL39120) • The NAME of the product (PROFORM® CROSSWALK 325 treadmill) • The SERIAL NUMBER of the product (see the front cover of this manual) • The KEY NUMBER and DESCRIPTION of the desired part(s) (see the PART LIST and the EXPLODED DRAWING in the center of this manual) ICON OF/DU CANADA, INC...
... prepared to give the following information: • The MODEL NUMBER of the product (PCTL39120) • The NAME of the product (PROFORM® CROSSWALK 325 treadmill) • The SERIAL NUMBER of the product (see the front cover of this manual) • The KEY NUMBER and DESCRIPTION of the desired part(s) (see the PART LIST and the EXPLODED DRAWING in the center of this manual) ICON OF/DU CANADA, INC...
Canadian English Manual
Page 20
... of ICON Health & Fitness, Inc. ™ ® of Canada, Inc., 900 de l'Industrie, St. J Bicycle J Exercise Cycle J Treadmill J Home Gym J Weight Bench J Stepper J Cardio Glide J Other 11) Which type of what other warranty beyond that specifically set forth herein. Accordingly, the above limitation may not apply to you own? J Yes J No THANK YOU FOR YOUR TIME © 2003 ICON of purchase. LIMITED WARRANTY ICON OF CANADA, INC., (ICON), warrants...
... of ICON Health & Fitness, Inc. ™ ® of Canada, Inc., 900 de l'Industrie, St. J Bicycle J Exercise Cycle J Treadmill J Home Gym J Weight Bench J Stepper J Cardio Glide J Other 11) Which type of what other warranty beyond that specifically set forth herein. Accordingly, the above limitation may not apply to you own? J Yes J No THANK YOU FOR YOUR TIME © 2003 ICON of purchase. LIMITED WARRANTY ICON OF CANADA, INC., (ICON), warrants...

Canadian English Manual
Page 21
PART IDENTIFICATION CHART Remove this chart and the EXPLODED DRAWING/PART LIST for future reference. 3/8" Star Washer (54)-4 U-Nut (10)-4 1" Bolt (16)-6 5/16" Star Washer (101)-4 1/4" Star Washer (2)-6 (May be an internal Star Washer) Silver Ground Screw (113)-1 3/4" Screw (5)-13 3/4" Tek Screw (89)-4 3" Bolt (7)-4 Wheel Bolt (41)-2 Washer (40)-4 Wheel Nut (22)-2 3" Handrail Bolt (1)-4 Save this chart and use it to identify small parts during assembly.
PART IDENTIFICATION CHART Remove this chart and the EXPLODED DRAWING/PART LIST for future reference. 3/8" Star Washer (54)-4 U-Nut (10)-4 1" Bolt (16)-6 5/16" Star Washer (101)-4 1/4" Star Washer (2)-6 (May be an internal Star Washer) Silver Ground Screw (113)-1 3/4" Screw (5)-13 3/4" Tek Screw (89)-4 3" Bolt (7)-4 Wheel Bolt (41)-2 Washer (40)-4 Wheel Nut (22)-2 3" Handrail Bolt (1)-4 Save this chart and use it to identify small parts during assembly.
Canadian English Manual
Page 22
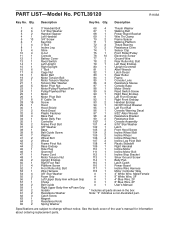
... replacement parts. Description 1 4 3" Handrail Bolt 66 4 Thrush Washer 2 6 1/4" Star Washer 67 1 Walking Belt 3 2 Handrail Spacer 68 1 Power Board Bracket 4 1 Left Handrail 69 1 Wire Tie Clamp 5 13 3/4" Screw 70 2 Frame Spacer 6 1 Key/Clip 71 1 Walking Platform 7 4 3" Bolt 72 2 Thrust Bearing 8 1 Incline Leg 73 2 Resistance Cone 9 4 Shim 74 1 Sensor Clip 10 4 U-nut 75 1 Front Roller/Pulley 11 1 Console 76 10 Electronic Screw 12 1 Battery Cover 77 1 Ground Wire 13 1 Reed Switch 78 2 Rear Roller Adj. PART LIST-Model...
... replacement parts. Description 1 4 3" Handrail Bolt 66 4 Thrush Washer 2 6 1/4" Star Washer 67 1 Walking Belt 3 2 Handrail Spacer 68 1 Power Board Bracket 4 1 Left Handrail 69 1 Wire Tie Clamp 5 13 3/4" Screw 70 2 Frame Spacer 6 1 Key/Clip 71 1 Walking Platform 7 4 3" Bolt 72 2 Thrust Bearing 8 1 Incline Leg 73 2 Resistance Cone 9 4 Shim 74 1 Sensor Clip 10 4 U-nut 75 1 Front Roller/Pulley 11 1 Console 76 10 Electronic Screw 12 1 Battery Cover 77 1 Ground Wire 13 1 Reed Switch 78 2 Rear Roller Adj. PART LIST-Model...


