
User Manual
Page 1
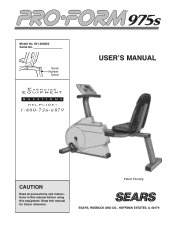
Keep this equipment. Model No. 831.288282 Serial No. Patent Pending SEARS, ROEBUCK AND CO., HOFFMAN ESTATES, IL 60179 Serial Number Decal ¨ USERÕS MANUAL CAUTION Read all precautions and instructions in this manual before using this manual for future reference.
Keep this equipment. Model No. 831.288282 Serial No. Patent Pending SEARS, ROEBUCK AND CO., HOFFMAN ESTATES, IL 60179 Serial Number Decal ¨ USERÕS MANUAL CAUTION Read all precautions and instructions in this manual before using this manual for future reference.
User Manual
Page 2
... 3 ASSEMBLY 4 HOW TO USE THE PROFORM¨ 975S 8 HOW TO USE THE PULSE SENSOR 11 MAINTENANCE AND STORAGE 12 CONDITIONING GUIDELINES 13 PART LIST 14 EXPLODED DRAWING 15 ORDERING REPLACEMENT PARTS Back Cover LIMITED WARRANTY Back Cover IMPORTANT PRECAUTIONS WARNING: To reduce the risk of this product. 2 Place a mat under the age of 35 or persons with pre-existing health problems. Read all users of the 975s are adequately informed of the owner...
... 3 ASSEMBLY 4 HOW TO USE THE PROFORM¨ 975S 8 HOW TO USE THE PULSE SENSOR 11 MAINTENANCE AND STORAGE 12 CONDITIONING GUIDELINES 13 PART LIST 14 EXPLODED DRAWING 15 ORDERING REPLACEMENT PARTS Back Cover LIMITED WARRANTY Back Cover IMPORTANT PRECAUTIONS WARNING: To reduce the risk of this product. 2 Place a mat under the age of 35 or persons with pre-existing health problems. Read all users of the 975s are adequately informed of the owner...
User Manual
Page 3
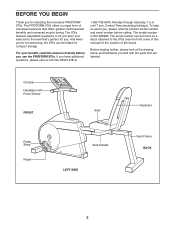
... compact storage. Console Handlebar with the parts that are labeled. BEFORE YOU BEGIN Thank you , please note the product model number and serial number before you have additional questions, please call our toll-free HELPLINE at the drawing below and familiarize yourself with Pulse Sensor FRONT Seat Backrest Pedal Strap Pedal Seat Handle PFEX9757 LEFT SIDE Seat Frame BACK 3 until 7 p.m. Central Time (excluding holidays). The model number is...
... compact storage. Console Handlebar with the parts that are labeled. BEFORE YOU BEGIN Thank you , please note the product model number and serial number before you have additional questions, please call our toll-free HELPLINE at the drawing below and familiarize yourself with Pulse Sensor FRONT Seat Backrest Pedal Strap Pedal Seat Handle PFEX9757 LEFT SIDE Seat Frame BACK 3 until 7 p.m. Central Time (excluding holidays). The model number is...
User Manual
Page 4
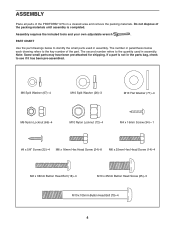
...)Ñ1 #8 x 5/8Ó Screw (22)Ð4 M6 x 16mm Hex Head Screw (24)Ð8 M6 x 25mm Hex Head Screw (14)Ð4 M6 x 38mm Button Head Bolt (18)Ð4 M10 x 25mm Button Head Screw (25)Ð3 M10 x 105mm Button Head Bolt (70)Ð4 4 Note: Some small parts may have been pre-attached for shipping. PART CHART Use the part drawings below each drawing refers to the quantity used in assembly.
...)Ñ1 #8 x 5/8Ó Screw (22)Ð4 M6 x 16mm Hex Head Screw (24)Ð8 M6 x 25mm Hex Head Screw (14)Ð4 M6 x 38mm Button Head Bolt (18)Ð4 M10 x 25mm Button Head Screw (25)Ð3 M10 x 105mm Button Head Bolt (70)Ð4 4 Note: Some small parts may have been pre-attached for shipping. PART CHART Use the part drawings below each drawing refers to the quantity used in assembly.

User Manual
Page 5
... Screws will be attached in step 5. 3 67 14 2 2 26 25 10 25 26 25 13 1 14 67 41 4 4. Press the Resistance Knob (9) onto the Resistance Control (10). Make sure that the mark on the Knob is correctly aligned. 4 8 9 Console Wires 41 13 22 Ground Wire 34 10 2 22 5 Connect the Reed Switch Wire (13) and the two Extension Wires (41) to the Upright (2) with an M4 x 16mm Screw (34). Tighten...
... Screws will be attached in step 5. 3 67 14 2 2 26 25 10 25 26 25 13 1 14 67 41 4 4. Press the Resistance Knob (9) onto the Resistance Control (10). Make sure that the mark on the Knob is correctly aligned. 4 8 9 Console Wires 41 13 22 Ground Wire 34 10 2 22 5 Connect the Reed Switch Wire (13) and the two Extension Wires (41) to the Upright (2) with an M4 x 16mm Screw (34). Tighten...

User Manual
Page 6
...four M6 x 16mm Hex Head Screws (24). 71 72 69 3 71 16 8. Attach a Seat Handle (17) to the Seat Bracket (69) with two M6 x 38mm Button Head Bolts (18) and two M6 Nylon Locknuts (66). Tighten all four Hex Head Screws. 67 14 6. Attach the other Seat Handle (17) to the Seat Frame (3) 6 with two ...M6 x 25mm Hex Head Screws (14) and two more M6 Split Washers (67). Attach the Seat Bracket (69) to the Seat Bracket (69) in the same manner. 24 66 69 17 69 17 18 6 Finish attaching the Handlebar (4) to the Upright (2) 5 with four M10 x 105mm Button Head Bolts (70), four M10 ...
...four M6 x 16mm Hex Head Screws (24). 71 72 69 3 71 16 8. Attach a Seat Handle (17) to the Seat Bracket (69) with two M6 x 38mm Button Head Bolts (18) and two M6 Nylon Locknuts (66). Tighten all four Hex Head Screws. 67 14 6. Attach the other Seat Handle (17) to the Seat Frame (3) 6 with two ...M6 x 25mm Hex Head Screws (14) and two more M6 Split Washers (67). Attach the Seat Bracket (69) to the Seat Bracket (69) in the same manner. 24 66 69 17 69 17 18 6 Finish attaching the Handlebar (4) to the Upright (2) 5 with four M10 x 105mm Button Head Bolts (70), four M10 ...
User Manual
Page 7
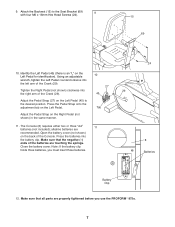
... Console. Note: If the battery clip holds three batteries, you use the PROFORM ¨ 975s. 7 Tab Adjust the Pedal Strap on the Left Pedal. alkaline batteries are properly tightened before you must insert three batteries. 24 8 Batteries Battery Clip 12. Close the battery cover. Using an adjustable wrench, tighten the Left Pedal counterclockwise into the left arm of the Crank (29). 27 Tighten the Right Pedal (not shown) clockwise into the battery clip. Press the Pedal Strap onto the adjustment...
... Console. Note: If the battery clip holds three batteries, you use the PROFORM ¨ 975s. 7 Tab Adjust the Pedal Strap on the Left Pedal. alkaline batteries are properly tightened before you must insert three batteries. 24 8 Batteries Battery Clip 12. Close the battery cover. Using an adjustable wrench, tighten the Left Pedal counterclockwise into the left arm of the Crank (29). 27 Tighten the Right Pedal (not shown) clockwise into the battery clip. Press the Pedal Strap onto the adjustment...
User Manual
Page 8
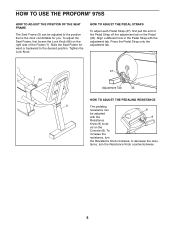
HOW TO USE THE PROFORM¨ 975S HOW TO ADJUST THE POSITION OF THE SEAT FRAME The Seat Frame (3) can 8 be adjusted to the position that is the most comfortable for you. Tighten the Lock Knob. Press the Pedal Strap onto the adjustment tab. 1 68 27 Adjustment Tab 45 HOW TO ADJUST THE PEDALING RESISTANCE 3 The pedaling resistance can be adjusted with the adjustment tab. tance, turn the Resistance Knob clockwise; Slide the Seat Frame forward...
HOW TO USE THE PROFORM¨ 975S HOW TO ADJUST THE POSITION OF THE SEAT FRAME The Seat Frame (3) can 8 be adjusted to the position that is the most comfortable for you. Tighten the Lock Knob. Press the Pedal Strap onto the adjustment tab. 1 68 27 Adjustment Tab 45 HOW TO ADJUST THE PEDALING RESISTANCE 3 The pedaling resistance can be adjusted with the adjustment tab. tance, turn the Resistance Knob clockwise; Slide the Seat Frame forward...
User Manual
Page 9
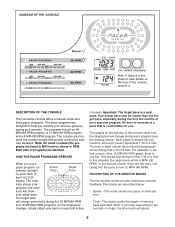
... the target pace changes, simply adjust your exercise. Be sure to exercise at a pace that 1/10 of the 12 MPH/60 RPM graph, there is one bar. DESCRIPTION OF THE CONSOLE The innovative console offers a manual mode and three pacer programs. The pacer programs are two bars, indicating that provide continuous exercise feedback. The outer track shows a tar- The console also features five monitor modes that the...
... the target pace changes, simply adjust your exercise. Be sure to exercise at a pace that 1/10 of the 12 MPH/60 RPM graph, there is one bar. DESCRIPTION OF THE CONSOLE The innovative console offers a manual mode and three pacer programs. The pacer programs are two bars, indicating that provide continuous exercise feedback. The outer track shows a tar- The console also features five monitor modes that the...
User Manual
Page 10
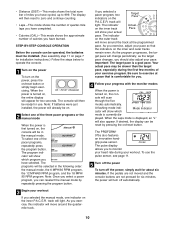
... turned on /reset button or simply begin exercising. As you exercise, this indicator will then be selected in the manual mode. as the target pace changes, you should also adjust your exercise program. Be sure to monitor your heart rate during the first few months of your pace. The pulse display allows you to exercise at the programmed pace. To use . ¥ Distance (DIST)ÑThis mode shows the total number of miles...
... turned on /reset button or simply begin exercising. As you exercise, this indicator will then be selected in the manual mode. as the target pace changes, you should also adjust your exercise program. Be sure to monitor your heart rate during the first few months of your pace. The pulse display allows you to exercise at the programmed pace. To use . ¥ Distance (DIST)ÑThis mode shows the total number of miles...
User Manual
Page 11
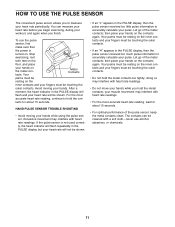
... your heart rate before you begin exercising, during your workout, and again when you finish. Your Metal Contacts palms must be cleaned with heart rate readings. Excessive movement may interfere with a soft clothÑnever use the pulse sensor, first make sure that the power is not used correctly, the heart indicator will flash repeatedly in the PULSE display, then the pulse sensor received too much pulse information...
... your heart rate before you begin exercising, during your workout, and again when you finish. Your Metal Contacts palms must be cleaned with heart rate readings. Excessive movement may interfere with a soft clothÑnever use the pulse sensor, first make sure that the power is not used correctly, the heart indicator will flash repeatedly in the PULSE display, then the pulse sensor received too much pulse information...
User Manual
Page 12
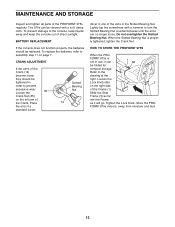
... replaced. BATTERY REPLACEMENT If the console does not function properly, the batteries should be cleaned with a hammer to the console, keep liquids away and keep the console out of the Crank. Loosen the 35 Crank Nut (35) on the right side of a standard screw- MAINTENANCE AND STORAGE Inspect and tighten all parts of the Crank (14) become loose, they should be folded for compact storage. Store the PRO...
... replaced. BATTERY REPLACEMENT If the console does not function properly, the batteries should be cleaned with a hammer to the console, keep liquids away and keep the console out of the Crank. Loosen the 35 Crank Nut (35) on the right side of a standard screw- MAINTENANCE AND STORAGE Inspect and tighten all parts of the Crank (14) become loose, they should be folded for compact storage. Store the PRO...
User Manual
Page 13
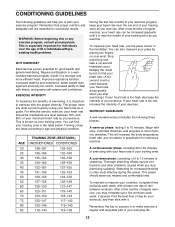
... make exercise a regular and enjoyable part of your training zone as you to more efficient heart, improved respiratory function, increased stamina and endurance, better weight management and body fat control, increased ability to deal with slow, controlled stretches, and progress to plan your heart rate as you stop exercising.) If your heart rate is to age and physical condition. Regular participation in a wellrounded exercise program results...
... make exercise a regular and enjoyable part of your training zone as you to more efficient heart, improved respiratory function, increased stamina and endurance, better weight management and body fat control, increased ability to deal with slow, controlled stretches, and progress to plan your heart rate as you stop exercising.) If your heart rate is to age and physical condition. Regular participation in a wellrounded exercise program results...
User Manual
Page 14
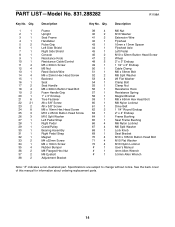
... 2 Description Frame Upright Seat Frame Handlebar Pulse Grip Left Side Shield Right Side Shield Console Resistance Knob Resistance Cable/Control M5 x 30mm Screw M5 Nut Reed Switch/Wire M6 x 25mm Hex Head Screw Backrest Seat Seat Handle M6 x 38mm Button Head Bolt Foam Handle Grip 1Ó x 3Ó Endcap Tree Fastener #8 x 5/8Ó Screw #8 x 3/8Ó Screw M6 x 16mm Hex Head Screw M10 x 25mm Button Head Screw M10 Split Washer Left Pedal Strap Right Pedal Crank/Pulley Bearing Assembly Right Pedal Strap Magnet M4...
... 2 Description Frame Upright Seat Frame Handlebar Pulse Grip Left Side Shield Right Side Shield Console Resistance Knob Resistance Cable/Control M5 x 30mm Screw M5 Nut Reed Switch/Wire M6 x 25mm Hex Head Screw Backrest Seat Seat Handle M6 x 38mm Button Head Bolt Foam Handle Grip 1Ó x 3Ó Endcap Tree Fastener #8 x 5/8Ó Screw #8 x 3/8Ó Screw M6 x 16mm Hex Head Screw M10 x 25mm Button Head Screw M10 Split Washer Left Pedal Strap Right Pedal Crank/Pulley Bearing Assembly Right Pedal Strap Magnet M4...
User Manual
Page 16
... SEARS Service Center. This warranty does not apply when the BIKE EXERCISER is missing ¥ or you need to be prepared to order parts by telephone, call the following information: ¥ The MODEL NUMBER of the product (831.288282). ¥ The NAME of the product (PROFORM¨ 975s). ¥ The KEY NUMBER and DESCRIPTION of purchase, if failure occurs due to state. All replacement parts are listed...
... SEARS Service Center. This warranty does not apply when the BIKE EXERCISER is missing ¥ or you need to be prepared to order parts by telephone, call the following information: ¥ The MODEL NUMBER of the product (831.288282). ¥ The NAME of the product (PROFORM¨ 975s). ¥ The KEY NUMBER and DESCRIPTION of purchase, if failure occurs due to state. All replacement parts are listed...

