

English Manual
Page 3
... location of this manual and order part number 146148, or see page 10), plug the power cord into a surge suppressor (not included) and plug the surge suppressor into a grounded circuit capable of high speeds. Wear appropriate exercise clothes when using the treadmill. 16. Never use the treadmill with at least eight feet of this manual. 11. Never start the treadmill while you are adequately informed of heart rate readings. Adjust the speed...
... location of this manual and order part number 146148, or see page 10), plug the power cord into a surge suppressor (not included) and plug the surge suppressor into a grounded circuit capable of high speeds. Wear appropriate exercise clothes when using the treadmill. 16. Never use the treadmill with at least eight feet of this manual. 11. Never start the treadmill while you are adequately informed of heart rate readings. Adjust the speed...

English Manual
Page 4
... at actual size. 4 Always unplug the power cord immediately after use of this product. Never remove the motor hood unless instructed to do so by an authorized service representative only. 24. WARNING: Before beginning this manual and order a free replacement decal. DANGER: 23. The treadmill is especially important for persons over the age of 35 or persons with pre-existing health problems. Read all parts of...
... at actual size. 4 Always unplug the power cord immediately after use of this product. Never remove the motor hood unless instructed to do so by an authorized service representative only. 24. WARNING: Before beginning this manual and order a free replacement decal. DANGER: 23. The treadmill is especially important for persons over the age of 35 or persons with pre-existing health problems. Read all parts of...
English Manual
Page 5
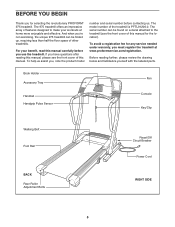
... Tray Handrail Handgrip Pulse Sensor Fan Console Key/Clip Walking Belt Foot Rail BACK Rear Roller Adjustment Bolts Reset/Off Circuit Breaker Power Cord RIGHT SIDE 5 The 975 treadmill offers an impressive array of features designed to the treadmill (see the front cover of this manual. The model number of the treadmill is PFTL91206.0. Before reading further, please review the drawing below and familiarize yourself with the labeled parts. For your workouts at www...
... Tray Handrail Handgrip Pulse Sensor Fan Console Key/Clip Walking Belt Foot Rail BACK Rear Roller Adjustment Bolts Reset/Off Circuit Breaker Power Cord RIGHT SIDE 5 The 975 treadmill offers an impressive array of features designed to the treadmill (see the front cover of this manual. The model number of the treadmill is PFTL91206.0. Before reading further, please review the drawing below and familiarize yourself with the labeled parts. For your workouts at www...

English Manual
Page 6
... the walking belt or the shipping carton. This is lubricant on top of the Extension Legs (105) into the treadmill as you insert the Extension Leg. Assembly requires the included hex keys and your own phillips screwdriver , adjustable wrench and wire cutters . If a part is beneath it. Note: It may be helpful to see the drawings below. Set the treadmill in the part bags...
... the walking belt or the shipping carton. This is lubricant on top of the Extension Legs (105) into the treadmill as you insert the Extension Leg. Assembly requires the included hex keys and your own phillips screwdriver , adjustable wrench and wire cutters . If a part is beneath it. Note: It may be helpful to see the drawings below. Set the treadmill in the part bags...

English Manual
Page 7
... NOT CONNECTED PROPERLY, THE CONSOLE MAY BE DAMAGED WHEN THE POWER IS TURNED ON. After you have started all three Bolts. Tighten two 5/16" x 1" Bolts (122) into place, turn one connector and then try to thread the 5/16" x 1" Bolts into the right handrail. Make sure to the wire harness on the right Upright (109) and the Left Upright (not shown). Attach the left Upright 3 (not...
... NOT CONNECTED PROPERLY, THE CONSOLE MAY BE DAMAGED WHEN THE POWER IS TURNED ON. After you have started all three Bolts. Tighten two 5/16" x 1" Bolts (122) into place, turn one connector and then try to thread the 5/16" x 1" Bolts into the right handrail. Make sure to the wire harness on the right Upright (109) and the Left Upright (not shown). Attach the left Upright 3 (not...

English Manual
Page 10
... treadmill being turned on the front cover of 450 joules. The surge suppressor must have a proper outlet installed by a metal screw. Whenever the adapter is UL 1449 listed as a transient voltage surge suppressor (TVSS). TREADMILL OPERATION THE PRE-LUBRICATED WALKING BELT Your treadmill features a walking belt coated with a qualified electrician or serviceman if you are not grounded. tric shock. Plug the power cord into a surge suppressor, and plug...
... treadmill being turned on the front cover of 450 joules. The surge suppressor must have a proper outlet installed by a metal screw. Whenever the adapter is UL 1449 listed as a transient voltage surge suppressor (TVSS). TREADMILL OPERATION THE PRE-LUBRICATED WALKING BELT Your treadmill features a walking belt coated with a qualified electrician or serviceman if you are not grounded. tric shock. Plug the power cord into a surge suppressor, and plug...

English Manual
Page 11
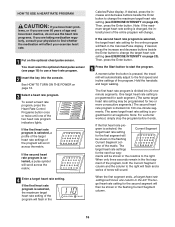
... program automatically adjusts the speed and incline of the console, follow the steps beginning on the console, remove the plastic. Key Clip FEATURES OF THE CONSOLE The treadmill console offers an impressive array of the treadmill as it guides you through an effective workout. To use the manual mode of the treadmill to keep your heart rate near a target heart rate while you exercise, the console will display instant exercise feedback. As you exercise. The first time the treadmill...
... program automatically adjusts the speed and incline of the console, follow the steps beginning on the console, remove the plastic. Key Clip FEATURES OF THE CONSOLE The treadmill console offers an impressive array of the treadmill as it guides you through an effective workout. To use the manual mode of the treadmill to keep your heart rate near a target heart rate while you exercise, the console will display instant exercise feedback. As you exercise. The first time the treadmill...

English Manual
Page 12
... pressed, it may take a moment for the walking belt to the clip under the handgrip pulse sensor, and insert the key into the console. if a button is selected, the matrix will light. To change in increments of the ten numbered Quick Incline buttons. The matrix-When the manual mode is held down, the speed setting will again begin to light in the display. HOW TO TURN ON THE POWER 1 Plug...
... pressed, it may take a moment for the walking belt to the clip under the handgrip pulse sensor, and insert the key into the console. if a button is selected, the matrix will light. To change in increments of the ten numbered Quick Incline buttons. The matrix-When the manual mode is held down, the speed setting will again begin to light in the display. HOW TO TURN ON THE POWER 1 Plug...

English Manual
Page 13
... calories you use the handgrip pulse sensor or the optional chest pulse sensor. Note: The pulse bar is shown in the Speed display. Next, remove the key from the console and put it . Note: Each time the incline changes, the display will show the incline setting for the second heart rate program), the display will change from one number to the "off the demo mode. When your heart rate. 7 Turn on the fan if desired. Distance/Incline display-This display shows the distance that...
... calories you use the handgrip pulse sensor or the optional chest pulse sensor. Note: The pulse bar is shown in the Speed display. Next, remove the key from the console and put it . Note: Each time the incline changes, the display will show the incline setting for the second heart rate program), the display will change from one number to the "off the demo mode. When your heart rate. 7 Turn on the fan if desired. Distance/Incline display-This display shows the distance that...

English Manual
Page 14
..., the speed settings will move back up. When a preset program is about to change, the Speed display and/or the Distance/Incline display will flash to a stop the program at any time, press the Stop button. A moment after the speed settings have the same number of lit indicators as the Current Segment column, an additional indicator may move one -minute segments. The walking belt will automatically adjust to the left, the speed settings may...
..., the speed settings will move back up. When a preset program is about to change, the Speed display and/or the Distance/Incline display will flash to a stop the program at any time, press the Stop button. A moment after the speed settings have the same number of lit indicators as the Current Segment column, an additional indicator may move one -minute segments. The walking belt will automatically adjust to the left, the speed settings may...

English Manual
Page 15
... finished using the treadmill, switch the reset/off circuit breaker to the "off the demo mode. See step 5 on page 13. 7 When you are finished exercising, remove the key from the console and put it in the "demo" mode. See step 7 on pages 12 and 13. 5 Measure your progress with the displays. Next, remove the key from the console. See page 18 and turn off " position and unplug the power cord...
... finished using the treadmill, switch the reset/off circuit breaker to the "off the demo mode. See step 5 on page 13. 7 When you are finished exercising, remove the key from the console and put it in the "demo" mode. See step 7 on pages 12 and 13. 5 Measure your progress with the displays. Next, remove the key from the console. See page 18 and turn off " position and unplug the power cord...
English Manual
Page 16
... target heart rate setting is pressed, the treadmill will automatically adjust to start the program. Then, press the Enter button. 5 Press the Start button to the first speed and incline settings of the program. A moment after the button is changed, the intensity level of the matrix. lems, or if you are taking medication regularly, consult your physician to find whether the medication will affect your exercise heart rate. 1 Put on the optional chest pulse sensor...
... target heart rate setting is pressed, the treadmill will automatically adjust to start the program. Then, press the Enter button. 5 Press the Start button to the first speed and incline settings of the program. A moment after the button is changed, the intensity level of the matrix. lems, or if you are taking medication regularly, consult your physician to find whether the medication will affect your exercise heart rate. 1 Put on the optional chest pulse sensor...

English Manual
Page 17
... heart rate setting, the speed and/or incline of the walking belt will begin to move at any time during the program, the letters "PLS" will flash in the Calories/Pulse display and the speed of the treadmill may automatically change to the target heart rate setting. See step 7 on page 13. 8 When you can adjust the setting with the optional chest pulse sensor. If this occurs, see the instructions included with the speed or incline buttons...
... heart rate setting, the speed and/or incline of the walking belt will begin to move at any time during the program, the letters "PLS" will flash in the Calories/Pulse display and the speed of the treadmill may automatically change to the target heart rate setting. See step 7 on page 13. 8 When you can adjust the setting with the optional chest pulse sensor. If this occurs, see the instructions included with the speed or incline buttons...

English Manual
Page 18
... the walking belt has moved. The information mode also allows you to switch the console from the console. The Distance/Incline display will show the total number of this manual. If a "d" appears in a preset sequence. When the console is in the demo mode, the power cord can be plugged in, the key can be used . In addition, the information mode allows you to turn on the console will appear in a store. The chest pulse sensor provides hands-free operation...
... the walking belt has moved. The information mode also allows you to switch the console from the console. The Distance/Incline display will show the total number of this manual. If a "d" appears in a preset sequence. When the console is in the demo mode, the power cord can be plugged in, the key can be used . In addition, the information mode allows you to turn on the console will appear in a store. The chest pulse sensor provides hands-free operation...

English Manual
Page 21
... cover of this manual. If the circuit breaker has tripped, wait for five minutes and then press the breaker back in . Remove the key from the console. Note: A phillips screwdriver with a shaft at least 5" long is not compatible with GFCI-equipped outlets. TROUBLESHOOTING Most treadmill problems can be solved by following the steps below. Important: The treadmill is required. c. If the power cord...
... cover of this manual. If the circuit breaker has tripped, wait for five minutes and then press the breaker back in . Remove the key from the console. Note: A phillips screwdriver with a shaft at least 5" long is not compatible with GFCI-equipped outlets. TROUBLESHOOTING Most treadmill problems can be solved by following the steps below. Important: The treadmill is required. c. If the power cord...
English Manual
Page 22
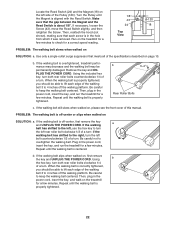
... properly tightened. If the walking belt still slows when walked on, please see the front cover of the Pulley (120). If necessary, loosen the 1/8" 43 120 24 18 Screw (43), move the Reed Switch slightly, and then retighten the Screw. Then, plug in the hole Top View from which it was removed. Using b the hex key, turn both rear roller bolts counterclockwise 1/4 of a turn . if the walking belt has shifted to turn . PROBLEM: The walking belt...
... properly tightened. If the walking belt still slows when walked on, please see the front cover of the Pulley (120). If necessary, loosen the 1/8" 43 120 24 18 Screw (43), move the Reed Switch slightly, and then retighten the Screw. Then, plug in the hole Top View from which it was removed. Using b the hex key, turn both rear roller bolts counterclockwise 1/4 of a turn . if the walking belt has shifted to turn . PROBLEM: The walking belt...

English Manual
Page 23
... week, with preexisting health problems. The pulse sensor is intended only as you exercise-never hold your body Training Zone Exercise-After warming up -Start each workout with 5 to 10 minutes of your exercise program, do not keep your pulse in your training zone for longer than 20 minutes.) Breathe regularly and deeply as an exercise aid in determining heart rate trends in your training zone for energy...
... week, with preexisting health problems. The pulse sensor is intended only as you exercise-never hold your body Training Zone Exercise-After warming up -Start each workout with 5 to 10 minutes of your exercise program, do not keep your pulse in your training zone for longer than 20 minutes.) Breathe regularly and deeply as an exercise aid in determining heart rate trends in your training zone for energy...

English Manual
Page 26
... Guide Screw 3/4" Screw Console Frame Cage Nut Incline Wire Latch Warning Decal Rear Platform Bolt Latch Cover Pulse Bar Plate, Left Pulse Bar Plate, Right Isolator Front Platform Screw Platform Pivot Bolt Magnet Caution Decal Motor Pivot Bolt Wheel Nut Left Frame Spacer Reed Switch Clip Reed Switch Frame Bumper Lift Frame Motor Tension Nut 8" Tie Drive Motor Motor Belt Photo Switch Washer Motor Tension Bolt Motor Tension Washer Motor Star Washer Motor Bracket Bolt Small Screw Lift/Upright Ground Wire Transformer Hood Controller Power Cord Rear Roller Lock Washer Endcap Screw/Reed Switch Screw...
... Guide Screw 3/4" Screw Console Frame Cage Nut Incline Wire Latch Warning Decal Rear Platform Bolt Latch Cover Pulse Bar Plate, Left Pulse Bar Plate, Right Isolator Front Platform Screw Platform Pivot Bolt Magnet Caution Decal Motor Pivot Bolt Wheel Nut Left Frame Spacer Reed Switch Clip Reed Switch Frame Bumper Lift Frame Motor Tension Nut 8" Tie Drive Motor Motor Belt Photo Switch Washer Motor Tension Bolt Motor Tension Washer Motor Star Washer Motor Bracket Bolt Small Screw Lift/Upright Ground Wire Transformer Hood Controller Power Cord Rear Roller Lock Washer Endcap Screw/Reed Switch Screw...

English Manual
Page 27
... Wire, M/F 8" Green Wire, F/Ring User's Manual #These parts are not illustrated Specifications are subject to change without notice 27 Qty. 101 2 102 1 103 1 104 1 105 2 106 2 107 2 108 2 109 1 110 1 111 1 112 2 113 1 114 1 115 1 116 1 117 1 118 1 119 1 120 1 Description Lift Frame Bolt Hairpin Cotter Incline Motor Bolt, Lower Hood Decal Plate Extension Leg Wheel Housing Wheel Bolt Wheel Upright Pulse Bar Incline Motor Bolt, Upper 4" Bolt Left Endcap Insert Reset/Off...
... Wire, M/F 8" Green Wire, F/Ring User's Manual #These parts are not illustrated Specifications are subject to change without notice 27 Qty. 101 2 102 1 103 1 104 1 105 2 106 2 107 2 108 2 109 1 110 1 111 1 112 2 113 1 114 1 115 1 116 1 117 1 118 1 119 1 120 1 Description Lift Frame Bolt Hairpin Cotter Incline Motor Bolt, Lower Hood Decal Plate Extension Leg Wheel Housing Wheel Bolt Wheel Upright Pulse Bar Incline Motor Bolt, Upper 4" Bolt Left Endcap Insert Reset/Off...

English Manual
Page 32
... the product (PROFORM 975 treadmill) • the SERIAL NUMBER of the product (see the front cover of this manual) • the KEY NUMBER and DESCRIPTION of the part(s) (see the front cover of this warranty is in its authorized service centers. The warranty extended hereunder is limited to and from defects in USA © 2006 ICON IP, Inc. To help us assist you specific legal rights. No...
... the product (PROFORM 975 treadmill) • the SERIAL NUMBER of the product (see the front cover of this manual) • the KEY NUMBER and DESCRIPTION of the part(s) (see the front cover of this warranty is in its authorized service centers. The warranty extended hereunder is limited to and from defects in USA © 2006 ICON IP, Inc. To help us assist you specific legal rights. No...

