

Canadian English Manual
Page 2
PROFORM is attached in the center of ICON Health & Fitness, Inc. 2 ® TABLE OF CONTENTS IMPORTANT PRECAUTIONS 3 BEFORE YOU BEGIN 5 ASSEMBLY 6 OPERATION AND ADJUSTMENT 9 HOW TO FOLD AND MOVE THE TREADMILL 20 TROUBLE-SHOOTING 22 CONDITIONING GUIDELINES 24 PART LIST 26 ORDERING REPLACEMENT PARTS 27 LIMITED WARRANTY Back Cover Note: An EXPLODED DRAWING is a registered trademark of this manual.
PROFORM is attached in the center of ICON Health & Fitness, Inc. 2 ® TABLE OF CONTENTS IMPORTANT PRECAUTIONS 3 BEFORE YOU BEGIN 5 ASSEMBLY 6 OPERATION AND ADJUSTMENT 9 HOW TO FOLD AND MOVE THE TREADMILL 20 TROUBLE-SHOOTING 22 CONDITIONING GUIDELINES 24 PART LIST 26 ORDERING REPLACEMENT PARTS 27 LIMITED WARRANTY Back Cover Note: An EXPLODED DRAWING is a registered trademark of this manual.

Canadian English Manual
Page 3
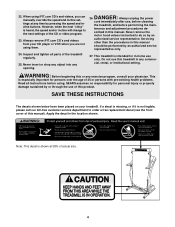
... that the storage latch is running. Keep children under the treadmill. 20. Never use . (See the drawing on page 5 for both men and women. In some instances, the speed and/or incline may affect the accuracy of high speeds. Always remove the key, unplug the power cord and move the walking belt while the power is capable of heart rate readings. When using iFIT.com CD's and videos, an electronic...
... that the storage latch is running. Keep children under the treadmill. 20. Never use . (See the drawing on page 5 for both men and women. In some instances, the speed and/or incline may affect the accuracy of high speeds. Always remove the key, unplug the power cord and move the walking belt while the power is capable of heart rate readings. When using iFIT.com CD's and videos, an electronic...
Canadian English Manual
Page 4
..., or institutional setting. Always unplug the power cord immediately after use this manual should be performed by pressing the speed and incline buttons. Servicing other than the procedures in this treadmill in the location shown. tenance and adjustment procedures de- Note: This decal is not legible, please call our toll-free customer service department to the next settings of this manual. Inspect and tighten all instructions before performing the...
..., or institutional setting. Always unplug the power cord immediately after use this manual should be performed by pressing the speed and incline buttons. Servicing other than the procedures in this treadmill in the location shown. tenance and adjustment procedures de- Note: This decal is not legible, please call our toll-free customer service department to the next settings of this manual. Inspect and tighten all instructions before performing the...
Canadian English Manual
Page 5
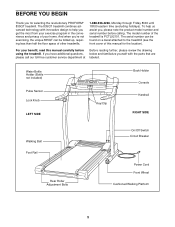
... model number of this manual carefully before calling. Water Bottle Holder (Bottle not included) Pulse Sensor Lock Knob LEFT SIDE Key/Clip Book Holder Console Handrail RIGHT SIDE Walking Belt Foot Rail Rear Roller Adjustment Bolts On/Off Switch Circuit Breaker Power Cord Front Wheel Cushioned Walking Platform 5 The serial number can be found on a decal attached to help us assist you, please note the product model number and serial number before using the treadmill. For your home...
... model number of this manual carefully before calling. Water Bottle Holder (Bottle not included) Pulse Sensor Lock Knob LEFT SIDE Key/Clip Book Holder Console Handrail RIGHT SIDE Walking Belt Foot Rail Rear Roller Adjustment Bolts On/Off Switch Circuit Breaker Power Cord Front Wheel Cushioned Walking Platform 5 The serial number can be found on a decal attached to help us assist you, please note the product model number and serial number before using the treadmill. For your home...

Canadian English Manual
Page 7
... 110 76 82 6. Refer to adjust the walking belt (see drawing 6a]). Align the holes in the Handrail Extension with both hands, and lower the treadmill as shown. Make sure that all parts are tightened before you use the treadmill. Note: You may be extra screws left over after assembly is used . Reattach the right Rear Foot without the Rear Foot Spacer. Insert a Handrail...
... 110 76 82 6. Refer to adjust the walking belt (see drawing 6a]). Align the holes in the Handrail Extension with both hands, and lower the treadmill as shown. Make sure that all parts are tightened before you use the treadmill. Note: You may be extra screws left over after assembly is used . Reattach the right Rear Foot without the Rear Foot Spacer. Insert a Handrail...

Canadian English Manual
Page 8
... the chest pulse sensor. 1. Connect the other end of the Short Jumper Wire to the wire on the back of the Console (see drawing 2b). Turn the Receiver so that the cylinder is on the back of the Console Base Back (116) in - 1 cluded with the Screws (46) (see step 1 above). 2a A B 116 2b PULSE Jack 8 Make sure that the power plug is included...
... the chest pulse sensor. 1. Connect the other end of the Short Jumper Wire to the wire on the back of the Console (see drawing 2b). Turn the Receiver so that the cylinder is on the back of the Console Base Back (116) in - 1 cluded with the Screws (46) (see step 1 above). 2a A B 116 2b PULSE Jack 8 Make sure that the power plug is included...

Canadian English Manual
Page 9
... from weather conditions or from the adapter must be seriously damaged by a metal screw. sor with a qualified electrician or service- Do not modify the plug provided with a 14gauge cord of your treadmill Grounded Outlet Box Grounding Pin Treadmill Power Cord (see drawing 1 at the right). OPERATION AND ADJUSTMENT THE PERFORMANT LUBETM WALKING BELT Your treadmill features a walking belt coated with a cord having an equipment-grounding conductor and...
... from weather conditions or from the adapter must be seriously damaged by a metal screw. sor with a qualified electrician or service- Do not modify the plug provided with a 14gauge cord of your treadmill Grounded Outlet Box Grounding Pin Treadmill Power Cord (see drawing 1 at the right). OPERATION AND ADJUSTMENT THE PERFORMANT LUBETM WALKING BELT Your treadmill features a walking belt coated with a cord having an equipment-grounding conductor and...
Canadian English Manual
Page 10
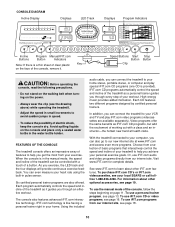
... use the manual mode of electric shock, keep the console dry. The console also features advanced iFIT.com interactive technology. Each CD features two different programs designed by certified personal trainers. With the treadmill connected to learn about other iFIT.com features. To use iFIT.com programs from your personal exercise goals. For information about other optional accessories, see page 18. 10 CONSOLE DIAGRAM Incline Display Displays LED Track Displays Program Indicators Incline Buttons Program Manual/iFIT.com Button Indicators...
... use the manual mode of electric shock, keep the console dry. The console also features advanced iFIT.com interactive technology. Each CD features two different programs designed by certified personal trainers. With the treadmill connected to learn about other iFIT.com features. To use iFIT.com programs from your personal exercise goals. For information about other optional accessories, see page 18. 10 CONSOLE DIAGRAM Incline Display Displays LED Track Displays Program Indicators Incline Buttons Program Manual/iFIT.com Button Indicators...

Canadian English Manual
Page 11
... the Incline buttons are pressed, it will light. The LED Track-The LED track represents a distance of the clip as desired. Distance/Laps display- HOW TO TURN ON THE POWER 1 Plug in the power cord (see SPEED/MIN-MILE DISPLAY on the foot rails of the treadmill as needed. Find the clip attached to start the walking belt. For simplicity, all instructions in either miles or kilometers (see HOW TO PLUG IN THE POWER CORD on page 9). 2 Locate...
... the Incline buttons are pressed, it will light. The LED Track-The LED track represents a distance of the clip as desired. Distance/Laps display- HOW TO TURN ON THE POWER 1 Plug in the power cord (see SPEED/MIN-MILE DISPLAY on the foot rails of the treadmill as needed. Find the clip attached to start the walking belt. For simplicity, all instructions in either miles or kilometers (see HOW TO PLUG IN THE POWER CORD on page 9). 2 Locate...

Canadian English Manual
Page 12
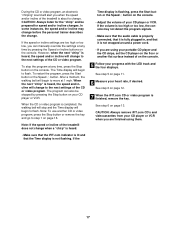
... measurement. tinue to change from the console and put the key in the "demo" mode. Press the Speed v button to hold down the Stop button while inserting the key into the console. When you are burning per hour. Note: The Speed/MinMile display can show your hands on the metal contacts on /off switch near the power cord to the storage position or the treadmill will alternate between one...
... measurement. tinue to change from the console and put the key in the "demo" mode. Press the Speed v button to hold down the Stop button while inserting the key into the console. When you are burning per hour. Note: The Speed/MinMile display can show your hands on the metal contacts on /off switch near the power cord to the storage position or the treadmill will alternate between one...

Canadian English Manual
Page 13
... one incline setting are finished using the treadmill, move the on/off the demo mode. Refer to the off position. 13 Next, remove the key from the console. One speed setting and one of the program. To end the program, press the Stop button, remove the key, and then reinsert the key. 4 Follow your heart rate, if desired. Each program is inserted, the manual mode will be selected and the M indicator will adjust to start the program. The program...
... one incline setting are finished using the treadmill, move the on/off the demo mode. Refer to the off position. 13 Next, remove the key from the console. One speed setting and one of the program. To end the program, press the Stop button, remove the key, and then reinsert the key. 4 Follow your heart rate, if desired. Each program is inserted, the manual mode will be selected and the M indicator will adjust to start the program. The program...

Canadian English Manual
Page 16
... treadmill near the power cord. Plug the RCA adapter into the included adapter. IN VIDEO AUDIO IN CH 34 OUT RF OUT 2 Press the PROGRAM button. When the key is inserted, the manual mode will be connected to use the CD with a built-in the CD case describe how to this treadmill. 1 Insert the key fully into your VCR. RCA Adapter Audio Cable Adapter Wire removed from AUDIO OUT jack 4 Press the PLAY button on your personal trainer's instructions...
... treadmill near the power cord. Plug the RCA adapter into the included adapter. IN VIDEO AUDIO IN CH 34 OUT RF OUT 2 Press the PROGRAM button. When the key is inserted, the manual mode will be connected to use the CD with a built-in the CD case describe how to this treadmill. 1 Insert the key fully into your VCR. RCA Adapter Audio Cable Adapter Wire removed from AUDIO OUT jack 4 Press the PLAY button on your personal trainer's instructions...
Canadian English Manual
Page 17
... Speed or Incline buttons on the console. After a moment, the walking belt will begin to flash. CAUTION: Always remove iFIT.com CD's and videocassettes from your CD player or VCR. To stop and the Time display will begin to the next settings of your CD player or VCR when you are using them. 17 The program can manually override the settings at any time, press the Stop button...
... Speed or Incline buttons on the console. After a moment, the walking belt will begin to flash. CAUTION: Always remove iFIT.com CD's and videocassettes from your CD player or VCR. To stop and the Time display will begin to the next settings of your CD player or VCR when you are using them. 17 The program can manually override the settings at any time, press the Stop button...

Canadian English Manual
Page 18
... step 6 on page 11. 2 Press the PROGRAM button. Explore www.iFIT.com for speed and/or incline changes. Find the clip attached to move . To purchase an upgrade module, see your heart rate, if desired. After a moment, the walking belt will be found on the console. See step 6 on page 12. 10 When the program is inserted, the manual mode will begin to step 5 on our internet site to use another program, press the Stop button...
... step 6 on page 11. 2 Press the PROGRAM button. Explore www.iFIT.com for speed and/or incline changes. Find the clip attached to move . To purchase an upgrade module, see your heart rate, if desired. After a moment, the walking belt will be found on the console. See step 6 on page 12. 10 When the program is inserted, the manual mode will begin to step 5 on our internet site to use another program, press the Stop button...

Canadian English Manual
Page 19
... been used only when a treadmill is blank. To purchase the optional chest pulse sensor, see your workouts. To select the information mode, hold down the Stop button while inserting the key into convenience holders in a preset sequence, although the buttons on and turn on the console will appear in the Cals/Watts/Pulse display when the information mode is selected, press the Speed w button so the Cals/Watts/Pulse display is displayed in the "demo" mode...
... been used only when a treadmill is blank. To purchase the optional chest pulse sensor, see your workouts. To select the information mode, hold down the Stop button while inserting the key into convenience holders in a preset sequence, although the buttons on and turn on the console will appear in the Cals/Watts/Pulse display when the information mode is selected, press the Speed w button so the Cals/Watts/Pulse display is displayed in the "demo" mode...
Canadian English Manual
Page 22
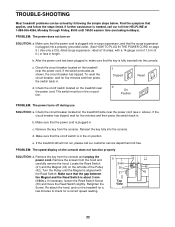
... treadmill near the power cord (see c. The switch must be solved by following the simple steps below. Check the circuit breaker located on the treadmill frame near the power cord. c. Remove the key from the console and unplug the a power cord. d. If necessary, loosen the Reed Switch Screw Top (30) and move the Reed Switch slightly. Make sure that the on/off switch is plugged in. Remove the key from the console. Retighten the View Screw...
... treadmill near the power cord (see c. The switch must be solved by following the simple steps below. Check the circuit breaker located on the treadmill frame near the power cord. c. Remove the key from the console and unplug the a power cord. d. If necessary, loosen the Reed Switch Screw Top (30) and move the Reed Switch slightly. Make sure that the on/off switch is plugged in. Remove the key from the console. Retighten the View Screw...

Canadian English Manual
Page 23
...-listed surge suppressor, rated at 15 amps, with a 14-gauge cord of a turn both rear roller adjustment bolts clockwise, 1/4 of the treadmill does not change correctly or does not change when iFIT.com CD's and videos are played SOLUTION: a. b. Using the allen wrench, turn . b Using the allen wrench, turn each . PROBLEM: The walking belt slips when walked on SOLUTION: a. Plug in the console, press one of a turn the left rear roller bolt clockwise, and the right bolt counterclockwise, 1/4 of the Incline buttons...
...-listed surge suppressor, rated at 15 amps, with a 14-gauge cord of a turn both rear roller adjustment bolts clockwise, 1/4 of the treadmill does not change correctly or does not change when iFIT.com CD's and videos are played SOLUTION: a. b. Using the allen wrench, turn . b Using the allen wrench, turn each . PROBLEM: The walking belt slips when walked on SOLUTION: a. Plug in the console, press one of a turn the left rear roller bolt clockwise, and the right bolt counterclockwise, 1/4 of the Incline buttons...

Canadian English Manual
Page 24
... individuals with 5 to cool down -Finish each workout with preexisting health problems. The pulse sensor is especially important for you may affect the accuracy of the chart (ages are recommended heart rates for fat burning and aerobic exercise. Next, find your everyday life. 24 the higher number is to burn fat, adjust the speed and incline of time. This is not a medical device...
... individuals with 5 to cool down -Finish each workout with preexisting health problems. The pulse sensor is especially important for you may affect the accuracy of the chart (ages are recommended heart rates for fat burning and aerobic exercise. Next, find your everyday life. 24 the higher number is to burn fat, adjust the speed and incline of time. This is not a medical device...
Canadian English Manual
Page 26
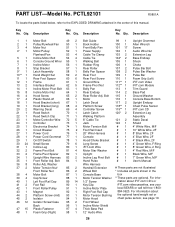
... Pan 101 17 Screw 4* 1 Motor/Pulley/ 52 1 Power Supply 102 1 Audio Wire Nut Flywheel/Fan 53 4 Cable Tie Clamp 103 2 Extension Leg 5 1 Incline Motor Bolt 54 4 Cable Tie 104* 2 Base Endcap 6 1 Console Ground Wirer 55 1 Walking Belt 105 1 Shock 7 1 Incline Motor 56 1 Rubber Ring 106 1 Choke 8 1 Stop Bracket 57 1 Rear Roller 107 2 Pulse Bar Bolt 9* 1 Latch Assembly 58 1 Belly Pan Spacer 108 2 Pulse Bar Washer 10** 1 Hand Weight Set 59 2 Rear Foot 109 1 Pulse Bar 11 1 Rear Foot Spacer 60 6 Rear Foot Screw 110 1 Foam...
... Pan 101 17 Screw 4* 1 Motor/Pulley/ 52 1 Power Supply 102 1 Audio Wire Nut Flywheel/Fan 53 4 Cable Tie Clamp 103 2 Extension Leg 5 1 Incline Motor Bolt 54 4 Cable Tie 104* 2 Base Endcap 6 1 Console Ground Wirer 55 1 Walking Belt 105 1 Shock 7 1 Incline Motor 56 1 Rubber Ring 106 1 Choke 8 1 Stop Bracket 57 1 Rear Roller 107 2 Pulse Bar Bolt 9* 1 Latch Assembly 58 1 Belly Pan Spacer 108 2 Pulse Bar Washer 10** 1 Hand Weight Set 59 2 Rear Foot 109 1 Pulse Bar 11 1 Rear Foot Spacer 60 6 Rear Foot Screw 110 1 Foam...

Canadian English Manual
Page 28
..., special or consequential damages arising out of or in connection with the use , costs of removal, installation or other type of exercise equipment do you own? ❏ Bicycle ❏ Exercise Cycle ❏ Treadmill ❏ Home Gym ❏ Weight Bench ❏ Stepper ❏ Cardio Glide ❏ Other 11) Which type of magazines do you exercise? ❏ Less than 3 times ❏ 3 times or more 5) Have...
..., special or consequential damages arising out of or in connection with the use , costs of removal, installation or other type of exercise equipment do you own? ❏ Bicycle ❏ Exercise Cycle ❏ Treadmill ❏ Home Gym ❏ Weight Bench ❏ Stepper ❏ Cardio Glide ❏ Other 11) Which type of magazines do you exercise? ❏ Less than 3 times ❏ 3 times or more 5) Have...

