

English Manual
Page 1
Save this equipment. Write the serial number in this manual before using this manual for future reference. Serial Number Decal CAUTION Read all precautions and instructions in the space above for future reference. DO NOT ALTER Model No. 831.297940 Serial No. USER'S MANUAL SEARS, ROEBUCK AND CO., HOFFMAN ESTATES, IL 60179
Save this equipment. Write the serial number in this manual before using this manual for future reference. Serial Number Decal CAUTION Read all precautions and instructions in the space above for future reference. DO NOT ALTER Model No. 831.297940 Serial No. USER'S MANUAL SEARS, ROEBUCK AND CO., HOFFMAN ESTATES, IL 60179
English Manual
Page 2
... SEARS will repair or replace the TREADMILL EXERCISER, free of charge. This warranty gives you specific legal rights, and you may also have other rights which vary from the date of purchase, if failure occurs due to state. TABLE OF CONTENTS FULL 90 DAY WARRANTY 2 IMPORTANT PRECAUTIONS 3 BEFORE YOU BEGIN 5 SET-UP 6 OPERATION AND ADJUSTMENT 7 HOW TO FOLD AND MOVE THE TREADMILL 10 MAINTENANCE AND TROUBLE...
... SEARS will repair or replace the TREADMILL EXERCISER, free of charge. This warranty gives you specific legal rights, and you may also have other rights which vary from the date of purchase, if failure occurs due to state. TABLE OF CONTENTS FULL 90 DAY WARRANTY 2 IMPORTANT PRECAUTIONS 3 BEFORE YOU BEGIN 5 SET-UP 6 OPERATION AND ADJUSTMENT 7 HOW TO FOLD AND MOVE THE TREADMILL 10 MAINTENANCE AND TROUBLE...
English Manual
Page 3
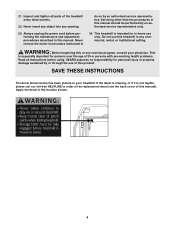
... manual. 3. Always remove the key when the treadmill is not in speed. 7. The surge 20. It is the responsibility of the owner to avoid sudden jumps in use an extension cord. 16. Do not place the treadmill on the walking belt. Do not operate the treadmill if the power cord or plug is damaged, or if the treadmill is not working properly.) 14. The treadmill should be electrically rated...
... manual. 3. Always remove the key when the treadmill is not in speed. 7. The surge 20. It is the responsibility of the owner to avoid sudden jumps in use an extension cord. 16. Do not place the treadmill on the walking belt. Do not operate the treadmill if the power cord or plug is damaged, or if the treadmill is not working properly.) 14. The treadmill should be electrically rated...
English Manual
Page 4
... power cord before using. Never remove the motor hood unless instructed to order a free replacement decal (see the back cover of the treadmill every three months. 22. do so by an authorized service representative only. 23. Inspect and tighten all instructions before performing the maintenance and adjustment procedures described in any commercial, rental, or institutional setting. Apply the decal in this manual. Servicing other than the procedures in the location...
... power cord before using. Never remove the motor hood unless instructed to order a free replacement decal (see the back cover of the treadmill every three months. 22. do so by an authorized service representative only. 23. Inspect and tighten all instructions before performing the maintenance and adjustment procedures described in any commercial, rental, or institutional setting. Apply the decal in this manual. Servicing other than the procedures in the location...
English Manual
Page 5
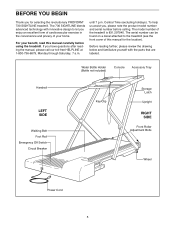
... using the treadmill. Water Bottle Holder (Bottle not included) Console Accessory Tray Handrail LEFT SIDE Walking Belt Foot Rail Emergency Off Switch Circuit Breaker Key/Clip Storage Latch Upright RIGHT SIDE Front Roller Adjustment Bolts Wheel Power Cord 5 The 730 SIGHTLINE blends advanced technology with the parts that are labeled. Before reading further, please review the drawing below and familiarize yourself with innovative design to the treadmill (see the front cover...
... using the treadmill. Water Bottle Holder (Bottle not included) Console Accessory Tray Handrail LEFT SIDE Walking Belt Foot Rail Emergency Off Switch Circuit Breaker Key/Clip Storage Latch Upright RIGHT SIDE Front Roller Adjustment Bolts Wheel Power Cord 5 The 730 SIGHTLINE blends advanced technology with the parts that are labeled. Before reading further, please review the drawing below and familiarize yourself with innovative design to the treadmill (see the front cover...
English Manual
Page 6
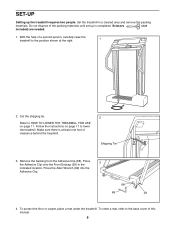
... 29 4. Press 3 the Adhesive Clip onto the Front Endcap (29) in a cleared area and remove the packing materials. Set the treadmill in the indicated location. Follow the instructions on page 11 to HOW TO LOWER THE TREADMILL FOR USE on page 11. SET-UP Setting up is at the right. 2. Cut the shipping tie. Refer to lower the treadmill. Scissors (not included) are needed. 1.
... 29 4. Press 3 the Adhesive Clip onto the Front Endcap (29) in a cleared area and remove the packing materials. Set the treadmill in the indicated location. Follow the instructions on page 11 to HOW TO LOWER THE TREADMILL FOR USE on page 11. SET-UP Setting up is at the right. 2. Cut the shipping tie. Refer to lower the treadmill. Scissors (not included) are needed. 1.
English Manual
Page 7
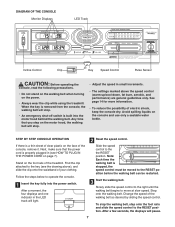
... PLUG IN THE POWER CORD on the motor hood, the walking belt will stop. ¥ Adjust the speed in small increments. ¥ The settings marked above ), and slide the clip onto the waistband of the walking belt as desired by sliding the speed control. After a few seconds, the displays will light. 2 Reset the speed control. STEP BY STEP CONSOLE OPERATION If there is stopped, the speed control must be restarted. 3 Start the walking belt. DIAGRAM OF THE CONSOLE Monitor Displays LED Track Incline Control Clip Key Speed Control Pulse Sensor...
... PLUG IN THE POWER CORD on the motor hood, the walking belt will stop. ¥ Adjust the speed in small increments. ¥ The settings marked above ), and slide the clip onto the waistband of the walking belt as desired by sliding the speed control. After a few seconds, the displays will light. 2 Reset the speed control. STEP BY STEP CONSOLE OPERATION If there is stopped, the speed control must be restarted. 3 Start the walking belt. DIAGRAM OF THE CONSOLE Monitor Displays LED Track Incline Control Clip Key Speed Control Pulse Sensor...

English Manual
Page 8
... sensor several CALS/FAT CALS/ times until the heart-shaped Indicator every seven seconds. proximate numbers of calories and fat calo- 6 Change the incline of 1/4 mile. Note: If the walking belt is lit, the PULSE display distance will appear in kilometers; sure to reset. Note: If the CALS/FAT CALS/ KPH indicator beside the SPEED display is stopped and no console buttons are finished exercising, stop the walking belt, and remove the key...
... sensor several CALS/FAT CALS/ times until the heart-shaped Indicator every seven seconds. proximate numbers of calories and fat calo- 6 Change the incline of 1/4 mile. Note: If the walking belt is lit, the PULSE display distance will appear in kilometers; sure to reset. Note: If the CALS/FAT CALS/ KPH indicator beside the SPEED display is stopped and no console buttons are finished exercising, stop the walking belt, and remove the key...
English Manual
Page 9
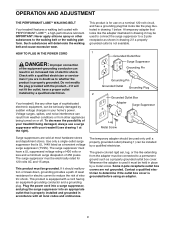
...-performance lubricant. The temporary adapter should malfunction or break down, grounding provides a path of electric shock. The surge suppressor must be grounded. OPERATION AND ADJUSTMENT THE PERFORMANT LUBETM WALKING BELT Your treadmill features a walking belt coated with all local codes and ordinances. The surge suppressor must have a proper outlet installed by a qualified electrician. HOW TO PLUG IN THE POWER CORD DANGER: Improper connection of...
...-performance lubricant. The temporary adapter should malfunction or break down, grounding provides a path of electric shock. The surge suppressor must be grounded. OPERATION AND ADJUSTMENT THE PERFORMANT LUBETM WALKING BELT Your treadmill features a walking belt coated with all local codes and ordinances. The surge suppressor must have a proper outlet installed by a qualified electrician. HOW TO PLUG IN THE POWER CORD DANGER: Improper connection of...
English Manual
Page 10
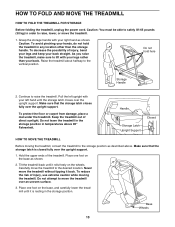
... TREADMILL FOR STORAGE Before folding the treadmill, unplug the power cord. Grasp the storage handle with your back. To decrease the possibility of injury, use extreme caution while moving the treadmill, convert the treadmill to raise the treadmill. Pull the left upright with your back straight. Tilt the treadmill back until the storage latch closes over an uneven surface. 3. Handle Storage Latch Upright Support Closed HOW TO MOVE THE TREADMILL Before moving the treadmill...
... TREADMILL FOR STORAGE Before folding the treadmill, unplug the power cord. Grasp the storage handle with your back. To decrease the possibility of injury, use extreme caution while moving the treadmill, convert the treadmill to raise the treadmill. Pull the left upright with your back straight. Tilt the treadmill back until the storage latch closes over an uneven surface. 3. Handle Storage Latch Upright Support Closed HOW TO MOVE THE TREADMILL Before moving the treadmill...
English Manual
Page 11
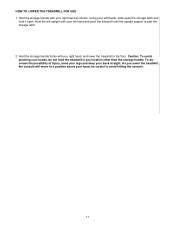
..., bend your legs and keep your right hand as shown. be careful to the floor. Caution: To avoid pinching your left thumb, slide open . Using your head; Hold the storage handle with you lower the treadmill, the console will move to a position above your left hand and pivot the treadmill until the upright support is past the storage latch. 2. Hold the storage handle firmly...
..., bend your legs and keep your right hand as shown. be careful to the floor. Caution: To avoid pinching your left thumb, slide open . Using your head; Hold the storage handle with you lower the treadmill, the console will move to a position above your left hand and pivot the treadmill until the upright support is past the storage latch. 2. Hold the storage handle firmly...
English Manual
Page 12
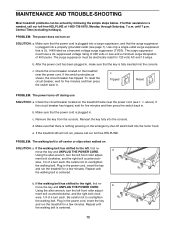
... re- MAINTENANCE AND TROUBLE-SHOOTING Most treadmill problems can be electrically rated for 120 volts AC and 15 amps. ment bolt clockwise, and the right bolt counterclock- Central Time (excluding holidays). Make sure that the power cord is needed, call our toll-free HELPLINE. To reset the circuit breaker, wait for five minutes and then press the switch back in the power cord, insert the key and...
... re- MAINTENANCE AND TROUBLE-SHOOTING Most treadmill problems can be electrically rated for 120 volts AC and 15 amps. ment bolt clockwise, and the right bolt counterclock- Central Time (excluding holidays). Make sure that the power cord is needed, call our toll-free HELPLINE. To reset the circuit breaker, wait for five minutes and then press the switch back in the power cord, insert the key and...
English Manual
Page 13
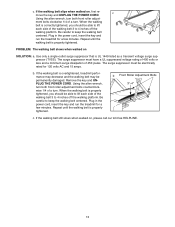
.... Plug in the power cord, insert the key and run the treadmill for a few minutes. c move the key and UNPLUG THE POWER CORD. When the walking belt is properly tightened. Plug in the power cord, insert the key and run the treadmill for a few minutes. Using the allen wrench, turn . The surge suppressor must be permanently damaged. Remove the key and UNPLUG THE POWER CORD. b Front Roller Adjustment Bolts 3ÓÐ4Ó c. c. When the walking belt is properly tightened. b. Use...
.... Plug in the power cord, insert the key and run the treadmill for a few minutes. c move the key and UNPLUG THE POWER CORD. When the walking belt is properly tightened. Plug in the power cord, insert the key and run the treadmill for a few minutes. Using the allen wrench, turn . The surge suppressor must be permanently damaged. Remove the key and UNPLUG THE POWER CORD. b Front Roller Adjustment Bolts 3ÓÐ4Ó c. c. When the walking belt is properly tightened. b. Use...
English Manual
Page 14
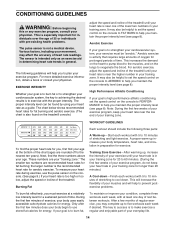
... your training zone for 20 to 60 minutes. (During the first few minutes does your body uses easily accessible carbohydrate calories for individuals over the age of 35 or individuals with 5 to plan your heart rate as an exercise aid in determining heart rate trends in your goal is high performance athletic conditioning, set the speed control on the treadmill console.) adjust the speed and incline...
... your training zone for 20 to 60 minutes. (During the first few minutes does your body uses easily accessible carbohydrate calories for individuals over the age of 35 or individuals with 5 to plan your heart rate as an exercise aid in determining heart rate trends in your goal is high performance athletic conditioning, set the speed control on the treadmill console.) adjust the speed and incline...
English Manual
Page 15
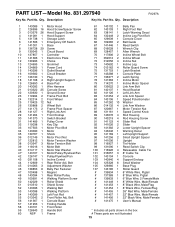
... 132449 2 Incline Leg Pivot Bolt 65 129639 1 Console Cover 66 109265 2 Belt Guide 67 141446 1 Reed Switch 68 016028 1 Wrench Clip 69 128457 1 Allen Wrench 70 117806 2 Incline Wheel Bolt 71 052012 2 Incline Wheel 72 012056 4 Incline Nut 73 140692 1 Incline Leg 74 013162 4 Roller Guard Screw 75 131753 1 Latch Bracket 76 143288 1 Console Plate 77 136377 2 Latch Spring 78 141363 1 Incline Motor 79 114270 1 Incline Motor Spacer 80 135622 2 Link Arm Bolt 81 140137 1 Hood Bracket...
... 132449 2 Incline Leg Pivot Bolt 65 129639 1 Console Cover 66 109265 2 Belt Guide 67 141446 1 Reed Switch 68 016028 1 Wrench Clip 69 128457 1 Allen Wrench 70 117806 2 Incline Wheel Bolt 71 052012 2 Incline Wheel 72 012056 4 Incline Nut 73 140692 1 Incline Leg 74 013162 4 Roller Guard Screw 75 131753 1 Latch Bracket 76 143288 1 Console Plate 77 136377 2 Latch Spring 78 141363 1 Incline Motor 79 114270 1 Incline Motor Spacer 80 135622 2 Link Arm Bolt 81 140137 1 Hood Bracket...
English Manual
Page 18
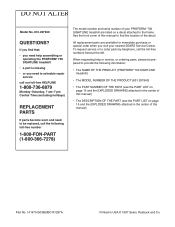
... need to schedule repair service call our toll-free HELPLINE 1-800-736-6879 MondayÐSaturday, 7 amÐ7 pm Central Time (excluding holidays) REPLACEMENT PARTS If parts become worn and need to order parts by telephone, call the following information: ¥ The NAME OF THE PRODUCT (PROFORM¨ 730 SIGHTLINE treadmill) ¥ The MODEL NUMBER OF THE PRODUCT (831.297940) ¥ The PART NUMBER OF THE PART (see the PART LIST...
... need to schedule repair service call our toll-free HELPLINE 1-800-736-6879 MondayÐSaturday, 7 amÐ7 pm Central Time (excluding holidays) REPLACEMENT PARTS If parts become worn and need to order parts by telephone, call the following information: ¥ The NAME OF THE PRODUCT (PROFORM¨ 730 SIGHTLINE treadmill) ¥ The MODEL NUMBER OF THE PRODUCT (831.297940) ¥ The PART NUMBER OF THE PART (see the PART LIST...

