
English Manual
Page 1
Model No. 831.285420 Serial No. Keep this equipment. Sears, Roebuck and Co., Hoffman Estates, IL 60179 Serial Number Decal • Assembly • Operation • Maintenance • Part List and Drawing ELLIPTICAL EXERCISER User's Manual CAUTION Read all precautions and instructions in this manual before using this manual for future reference.
Model No. 831.285420 Serial No. Keep this equipment. Sears, Roebuck and Co., Hoffman Estates, IL 60179 Serial Number Decal • Assembly • Operation • Maintenance • Part List and Drawing ELLIPTICAL EXERCISER User's Manual CAUTION Read all precautions and instructions in this manual before using this manual for future reference.

English Manual
Page 2
TABLE OF CONTENTS IMPORTANT PRECAUTIONS 3 BEFORE YOU BEGIN 4 ASSEMBLY 5 HOW TO USE THE ELLIPTICAL CROSSTRAINER 9 MAINTENANCE AND TROUBLESHOOTING 12 CONDITIONING GUIDELINES 13 PART LIST 14 EXPLODED DRAWING 15 HOW TO ORDER REPLACEMENT PARTS Back Cover FULL 90 DAY WARRANTY Back Cover 2
TABLE OF CONTENTS IMPORTANT PRECAUTIONS 3 BEFORE YOU BEGIN 4 ASSEMBLY 5 HOW TO USE THE ELLIPTICAL CROSSTRAINER 9 MAINTENANCE AND TROUBLESHOOTING 12 CONDITIONING GUIDELINES 13 PART LIST 14 EXPLODED DRAWING 15 HOW TO ORDER REPLACEMENT PARTS Back Cover FULL 90 DAY WARRANTY Back Cover 2

English Manual
Page 3
... instructions in a commercial, rental, or institutional setting. 7. Inspect and properly tighten all precautions. 9. If you stop exercising, allow the pedals to slowly come to ensure that all users of the elliptical crosstrainer are adequately informed of the owner to a stop immediately and cool down. 12. The elliptical crosstrainer is the responsibility of all parts regularly. Do not use only. Sears assumes no responsibility for home use the elliptical crosstrainer in this manual...
... instructions in a commercial, rental, or institutional setting. 7. Inspect and properly tighten all precautions. 9. If you stop exercising, allow the pedals to slowly come to ensure that all users of the elliptical crosstrainer are adequately informed of the owner to a stop immediately and cool down. 12. The elliptical crosstrainer is the responsibility of all parts regularly. Do not use only. Sears assumes no responsibility for home use the elliptical crosstrainer in this manual...
English Manual
Page 4
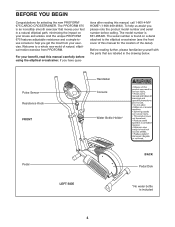
... PROFORM® 675 CARDIO CROSSTRAINER. Before reading further, please familiarize yourself with the parts that moves your feet in the drawing below. Pulse Sensor Resistance Knob FRONT Handlebar Console Water Bottle Holder* Pedal LEFT SIDE 4 BACK Pedal Disk *No water bottle is 831.285420. For your exercise. If you , please note the product model number and serial number before using the elliptical crosstrainer. BEFORE YOU BEGIN Congratulations for the location of natural, elliptical...
... PROFORM® 675 CARDIO CROSSTRAINER. Before reading further, please familiarize yourself with the parts that moves your feet in the drawing below. Pulse Sensor Resistance Knob FRONT Handlebar Console Water Bottle Holder* Pedal LEFT SIDE 4 BACK Pedal Disk *No water bottle is 831.285420. For your exercise. If you , please note the product model number and serial number before using the elliptical crosstrainer. BEFORE YOU BEGIN Congratulations for the location of natural, elliptical...
English Manual
Page 5
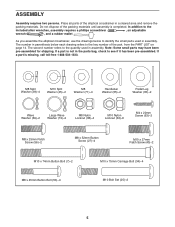
... assemble the elliptical crosstrainer, use the drawings below each drawing refers to see if it has been pre-assembled. If a part is missing, call toll-free 1-888-533-1333. If a part is not in assembly. The number in parenthesis below to the included allen wrenches, assembly requires a phillips screwdriver , an adjustable wrench , and a rubber mallet . Do not dispose of the part, from the PART LIST...
... assemble the elliptical crosstrainer, use the drawings below each drawing refers to see if it has been pre-assembled. If a part is missing, call toll-free 1-888-533-1333. If a part is not in assembly. The number in parenthesis below to the included allen wrenches, assembly requires a phillips screwdriver , an adjustable wrench , and a rubber mallet . Do not dispose of the part, from the PART LIST...

English Manual
Page 6
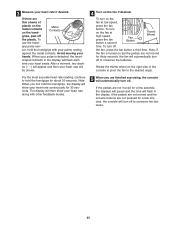
... installed correctly, the fan will turn on its ends. Attach the Console (23) to the Upright (2) with the Console. Attach the Water Bottle Holder (29) to the Upright (2) with the four Console Screws (59) included with two M4 x 22mm Screws (63). alkaline batteries are recommended. 1. Remove the indicated screw from the battery drawer, and pull the battery drawer open. Be careful to the lowest setting before continuing. Turn the Resistance Control...
... installed correctly, the fan will turn on its ends. Attach the Console (23) to the Upright (2) with the Console. Attach the Water Bottle Holder (29) to the Upright (2) with the four Console Screws (59) included with two M4 x 22mm Screws (63). alkaline batteries are recommended. 1. Remove the indicated screw from the battery drawer, and pull the battery drawer open. Be careful to the lowest setting before continuing. Turn the Resistance Control...

English Manual
Page 7
... the wires or cables. Attach the Upright to the Lower Resistance Cable (43) in the following way: • See drawing A. Do not fully tighten the Button Bolts yet. Insert the Pivot Axle (26) into the Frame (1). Assemble the Right Handlebar (8) and the other Handlebar Leg (5) in the position shown, connect the Extension Wire (68) to both ends of the hexagonal holes. Next, connect the Resistance Cable (42...
... the wires or cables. Attach the Upright to the Lower Resistance Cable (43) in the following way: • See drawing A. Do not fully tighten the Button Bolts yet. Insert the Pivot Axle (26) into the Frame (1). Assemble the Right Handlebar (8) and the other Handlebar Leg (5) in the position shown, connect the Extension Wire (68) to both ends of the hexagonal holes. Next, connect the Resistance Cable (42...

English Manual
Page 8
... under the elliptical crosstrainer. 8 Slide a Pedal Leg Washer (35) onto an M10 x 27mm Patch Screw (40), and tighten the Patch Screw into the axle. 16 Next, hold the lower end of the left Handlebar Leg (5) inside of grease to an M10 Bolt Set (25). Attach the Right Pedal (not shown) in the same way. Attach the Left Pedal (13) to a Large Grease Wave Washer (72) and press it...
... under the elliptical crosstrainer. 8 Slide a Pedal Leg Washer (35) onto an M10 x 27mm Patch Screw (40), and tighten the Patch Screw into the axle. 16 Next, hold the lower end of the left Handlebar Leg (5) inside of grease to an M10 Bolt Set (25). Attach the Right Pedal (not shown) in the same way. Attach the Left Pedal (13) to a Large Grease Wave Washer (72) and press it...
English Manual
Page 9
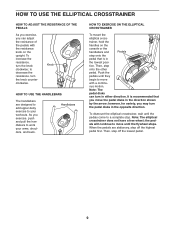
... add upper-body exercise to work your workouts. Note: The pedal disks can adjust the resistance of the pedals with a continu- Then, step onto the other pedal. It is recommended that is in the opposite direction. To dismount the elliptical crosstrainer, wait until the pedals come to move with the resistance knob on the console or the handlebars and Pedals step onto the pedal that you may turn the knob clockwise; the pedals will...
... add upper-body exercise to work your workouts. Note: The pedal disks can adjust the resistance of the pedals with a continu- Then, step onto the other pedal. It is recommended that is in the opposite direction. To dismount the elliptical crosstrainer, wait until the pedals come to move with the resistance knob on the console or the handlebars and Pedals step onto the pedal that you may turn the knob clockwise; the pedals will...

English Manual
Page 10
...). 10 The lower section of the console, remove the plastic. Note: The console requires four 1.5V "D" batteries (see step 3 on page 11). To turn on the console, press the On/Reset button or begin pedaling. (See the drawing above to the next every few seconds. If you use the handgrip pulse sensor, the display will change from one number to identify the On/Reset button.) 2 Follow your heart rate (see assembly step 3 on the...
...). 10 The lower section of the console, remove the plastic. Note: The console requires four 1.5V "D" batteries (see step 3 on page 11). To turn on the console, press the On/Reset button or begin pedaling. (See the drawing above to the next every few seconds. If you use the handgrip pulse sensor, the display will change from one number to identify the On/Reset button.) 2 Follow your heart rate (see assembly step 3 on the...
English Manual
Page 11
..., the heart- The display will turn on but the pedals are not moved for a few minutes, the console will then show your heart rate continuously for a few seconds, the displays will pause and the time will show your heart rate along with your pulse is turned on the fan at low speed, press the fan button. For the most accurate heart rate reading, continue to conserve the batteries. 11...
..., the heart- The display will turn on but the pedals are not moved for a few minutes, the console will then show your heart rate continuously for a few seconds, the displays will pause and the time will show your heart rate along with your pulse is turned on the fan at low speed, press the fan button. For the most accurate heart rate reading, continue to conserve the batteries. 11...
English Manual
Page 12
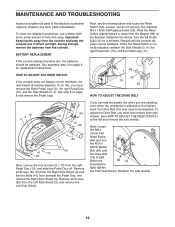
... 62 19 Drive Belt is adjusted to the highest level, the Drive Belt (19) may need to be adjusted. Next, loosen the M8 x 22mm Flat Head Screw (65) and turn the M10 x 60mm Button 65 Bolt (62) until the console displays correct feedback. To clean the elliptical crosstrainer, use a damp cloth and a small amount of the elliptical crosstrainer regularly. Replace any worn parts immediately. See assembly step 3 on page 8 and remove the Pedal Legs. 15...
... 62 19 Drive Belt is adjusted to the highest level, the Drive Belt (19) may need to be adjusted. Next, loosen the M8 x 22mm Flat Head Screw (65) and turn the M10 x 60mm Button 65 Bolt (62) until the console displays correct feedback. To clean the elliptical crosstrainer, use a damp cloth and a small amount of the elliptical crosstrainer regularly. Replace any worn parts immediately. See assembly step 3 on page 8 and remove the Pedal Legs. 15...
English Manual
Page 13
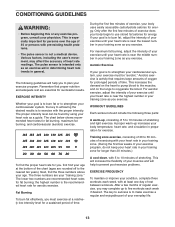
... of exercise does your exercise program. The following three parts: A warm-up to use stored fat calories for successful results. the highest number is near the highest number in preparation for aerobic exercise. CONDITIONING GUIDELINES WARNING: • Before beginning this or any exercise program, consult your age. Training zone exercise, consisting of 20 to 30 minutes of exercising with pre-existing health problems. • The pulse sensor...
... of exercise does your exercise program. The following three parts: A warm-up to use stored fat calories for successful results. the highest number is near the highest number in preparation for aerobic exercise. CONDITIONING GUIDELINES WARNING: • Before beginning this or any exercise program, consult your age. Training zone exercise, consisting of 20 to 30 minutes of exercising with pre-existing health problems. • The pulse sensor...
English Manual
Page 14
... 4 Pedal Arm Bushing 38 5 M8 Nylon Locknut 39 2 M10 Washer 40 2 M10 x 27mm Patch Screw 41 2 M6 x 18mm Bolt 42 1 Resistance Control/Cable 43 1 Lower Resistance Cable 44 2 Handlebar Endcap 45 2 M10 Split Washer 46 2 Handlebar Cap 47 2 Handlebar Spacer 48 2 Frame Spacer 49 6 Small Handlebar Bushing 50 4 M8 x 45mm Button Bolt 51 4 M6 x 25mm Screw 52 10 M4 x 16mm Self-tapping Screw 53 1 Reed Switch/Wire...
... 4 Pedal Arm Bushing 38 5 M8 Nylon Locknut 39 2 M10 Washer 40 2 M10 x 27mm Patch Screw 41 2 M6 x 18mm Bolt 42 1 Resistance Control/Cable 43 1 Lower Resistance Cable 44 2 Handlebar Endcap 45 2 M10 Split Washer 46 2 Handlebar Cap 47 2 Handlebar Spacer 48 2 Frame Spacer 49 6 Small Handlebar Bushing 50 4 M8 x 45mm Button Bolt 51 4 M6 x 25mm Screw 52 10 M4 x 16mm Self-tapping Screw 53 1 Reed Switch/Wire...
English Manual
Page 15
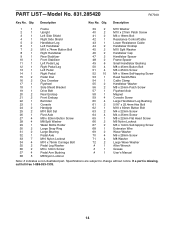
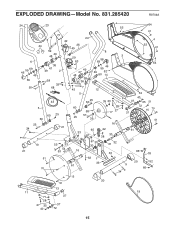
EXPLODED DRAWING-Model No. 831.285420 R0704A 24 23 64 52 41 24 42 44 59 49 48 6 26 52 49 29 63 8 3 56 69 55 69 46 49 36 47 49 2 49 47 48 46 55 49 52 50 14 56 38 38 45 36 33 50 68 7 45 12 5 43 5 60 60 25 34 25 21 25 60 60 58 57 25 39 65 33 67 39 33 71 28 17 27 16 22 30 38 37 37 61 4 52 41 64 52 40 35 51 72 15 70 51 10 21 52 33 54 53 16 67 31 30 31 32 33 66 18 51 62 1 33 61 20 52 9 70 66 34 15 20 51 13 11 19 71 37 28 27 35 40 37 72 15
EXPLODED DRAWING-Model No. 831.285420 R0704A 24 23 64 52 41 24 42 44 59 49 48 6 26 52 49 29 63 8 3 56 69 55 69 46 49 36 47 49 2 49 47 48 46 55 49 52 50 14 56 38 38 45 36 33 50 68 7 45 12 5 43 5 60 60 25 34 25 21 25 60 60 58 57 25 39 65 33 67 39 33 71 28 17 27 16 22 30 38 37 37 61 4 52 41 64 52 40 35 51 72 15 70 51 10 21 52 33 54 53 16 67 31 30 31 32 33 66 18 51 62 1 33 61 20 52 9 70 66 34 15 20 51 13 11 19 71 37 28 27 35 40 37 72 15
English Manual
Page 16
.... FULL 90 DAY WARRANTY For 90 days from state to defect in material or workmanship in China © 2004 Sears, Roebuck and Co. Sears, Roebuck and Co., Dept. 817WA, Hoffman Estates, IL 60179 Part No. 213843 R0704A Printed in this Sears Elliptical Exerciser, contact the nearest Sears Service Center throughout the United States and Sears will repair or replace the Elliptical Exerciser, free of purchase...
.... FULL 90 DAY WARRANTY For 90 days from state to defect in material or workmanship in China © 2004 Sears, Roebuck and Co. Sears, Roebuck and Co., Dept. 817WA, Hoffman Estates, IL 60179 Part No. 213843 R0704A Printed in this Sears Elliptical Exerciser, contact the nearest Sears Service Center throughout the United States and Sears will repair or replace the Elliptical Exerciser, free of purchase...

