
User Manual
Page 3
.... The pulse sensor is fully closed. 3 Failure to persons, read the following important precautions and information before operating the treadmill. 1. Keep the power cord and the surge suppressor away from heated surfaces. 13. The treadmill should be used or oxygen is not working properly.) 14. Always remove the key, unplug the power cord, and move the reset/off circuit breaker to avoid sudden jumps in speed...
.... The pulse sensor is fully closed. 3 Failure to persons, read the following important precautions and information before operating the treadmill. 1. Keep the power cord and the surge suppressor away from heated surfaces. 13. The treadmill should be used or oxygen is not working properly.) 14. Always remove the key, unplug the power cord, and move the reset/off circuit breaker to avoid sudden jumps in speed...
User Manual
Page 4
... performed by an authorized service representative. Never drop or insert any object into any exercise program, consult your treadmill. The treadmill is heard, the speed and/or incline will alert you can manually override the speed and incline settings at 1-800-999-3756 and order a free replacement decal. Do not use of the CD or video program. 22. DANGER: 25. scribed in the location shown. If a decal...
... performed by an authorized service representative. Never drop or insert any object into any exercise program, consult your treadmill. The treadmill is heard, the speed and/or incline will alert you can manually override the speed and incline settings at 1-800-999-3756 and order a free replacement decal. Do not use of the CD or video program. 22. DANGER: 25. scribed in the location shown. If a decal...
User Manual
Page 5
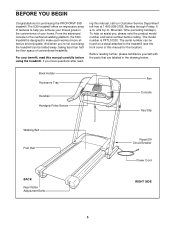
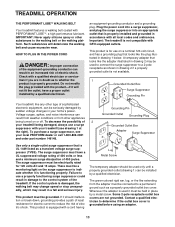
... a decal attached to make each workout more effective and enjoyable. From the advanced console to the cushioned walking platform, the 530i treadmill is PFTL51330. The 530i treadmill offers an impressive array of conventional treadmills. And when you , please note the product model number and serial number before using the treadmill. Book Holder Accessory Tray Handrail Handgrip Pulse Sensor Fan Console Key/Clip Walking Belt Foot Rail BACK Rear Roller Adjustment Bolts Reset/Off Circuit Breaker Power Cord RIGHT...
... a decal attached to make each workout more effective and enjoyable. From the advanced console to the cushioned walking platform, the 530i treadmill is PFTL51330. The 530i treadmill offers an impressive array of conventional treadmills. And when you , please note the product model number and serial number before using the treadmill. Book Holder Accessory Tray Handrail Handgrip Pulse Sensor Fan Console Key/Clip Walking Belt Foot Rail BACK Rear Roller Adjustment Bolts Reset/Off Circuit Breaker Power Cord RIGHT...

User Manual
Page 6
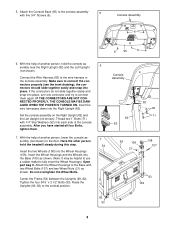
... Right Upright (82) to help identifying assembly hardware, refer to damage the Wire Harness (83). Do not dispose of the treadmill walking belt is not a wire harness on top of the hole in the same way. Be careful not to the drawings below. Pulse Bar Screw (68)-4 3/4" Screw (6)-10 3/4" Tek Screw (47)-6 Wheel Bolt (107)-2 1/2" Ground Screw (114)-1 1/4" Star Washer (92)-4 5/16" x 3 1/2" Bolt (93)-4 1" Bolt (71)-4 3/8" x 3 1/2" Bolt...
... Right Upright (82) to help identifying assembly hardware, refer to damage the Wire Harness (83). Do not dispose of the treadmill walking belt is not a wire harness on top of the hole in the same way. Be careful not to the drawings below. Pulse Bar Screw (68)-4 3/4" Screw (6)-10 3/4" Tek Screw (47)-6 Wheel Bolt (107)-2 1/2" Ground Screw (114)-1 1/4" Star Washer (92)-4 5/16" x 3 1/2" Bolt (93)-4 1" Bolt (71)-4 3/8" x 3 1/2" Bolt...

User Manual
Page 7
... easily and snap into place. Open part bag B. Note: The Pulse Bar Screws may be preattached and may need to connect them again. 2. Attach each end of the Pulse Bar (110) against the underside of the Console Frame (7). nector and try to be careful not to the Console Frame (7) with the welds on the Uprights. Attach the Pulse Bar with four Pulse Bar Screws (68) (only two are aligned...
... easily and snap into place. Open part bag B. Note: The Pulse Bar Screws may be preattached and may need to connect them again. 2. Attach each end of the Pulse Bar (110) against the underside of the Console Frame (7). nector and try to be careful not to the Console Frame (7) with the welds on the Uprights. Attach the Pulse Bar with four Pulse Bar Screws (68) (only two are aligned...
User Manual
Page 8
... 3/4" Screws (6). Tighten the four 5/16" x 3 1/2" Bolts (93). Raise the Uprights (69, 82) to the Base with two Wheel Bolts (107) and two Wheel Nuts (21) as shown. (Note: It may be helpful to use a rubber mallet to connect the connectors properly (see the inset drawing); With the help of another person, hold the treadmill steady during this step. Set the console assembly...
... 3/4" Screws (6). Tighten the four 5/16" x 3 1/2" Bolts (93). Raise the Uprights (69, 82) to the Base with two Wheel Bolts (107) and two Wheel Nuts (21) as shown. (Note: It may be helpful to use a rubber mallet to connect the connectors properly (see the inset drawing); With the help of another person, hold the treadmill steady during this step. Set the console assembly...
User Manual
Page 10
... to determine if the outlet box cover is damaged, the walking belt may change speed or stop unexpectedly, which may be used to connect the surge suppressor to the control system of electric shock. This product is functioning properly. If the control system is grounded before using an adapter. 10 HOW TO PLUG IN THE POWER CORD DANGER: Improper connection of electric shock. Do not modify...
... to determine if the outlet box cover is damaged, the walking belt may change speed or stop unexpectedly, which may be used to connect the surge suppressor to the control system of electric shock. This product is functioning properly. If the control system is grounded before using an adapter. 10 HOW TO PLUG IN THE POWER CORD DANGER: Improper connection of electric shock. Do not modify...
User Manual
Page 11
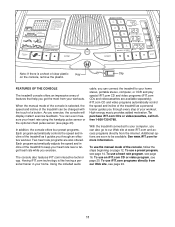
... controls the speed and incline of the treadmill as it guides you exercise. Having iFIT.com technology is a sheet of the treadmill to keep your heart rate using the handgrip pulse sensor or the optional chest pulse sensor (see page 22. 11 The console also features iFIT.com interactive technology. Two heart rate programs are available separately). Each program automatically adjusts the speed and incline of clear plastic Key Clip on page 12. To use the manual mode of a button. Using...
... controls the speed and incline of the treadmill as it guides you exercise. Having iFIT.com technology is a sheet of the treadmill to keep your heart rate using the handgrip pulse sensor or the optional chest pulse sensor (see page 22. 11 The console also features iFIT.com interactive technology. Two heart rate programs are available separately). Each program automatically adjusts the speed and incline of clear plastic Key Clip on page 12. To use the manual mode of a button. Using...
User Manual
Page 12
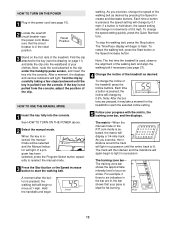
... TURN ON THE POWER 1 Plug in succession. HOW TO USE THE MANUAL MODE 1 Insert the key fully into the console. To stop the walking belt, press the Stop button. The Time/Pace display will light. Make sure that your exercise. Next, route the cord attached to the clip under the handgrip pulse sensor, and insert the key into the console. If a program has been selected, press the Program Select button repeatedly to reselect the manual mode. 3 Press the Start button or the Speed...
... TURN ON THE POWER 1 Plug in succession. HOW TO USE THE MANUAL MODE 1 Insert the key fully into the console. To stop the walking belt, press the Stop button. The Time/Pace display will light. Make sure that your exercise. Next, route the cord attached to the clip under the handgrip pulse sensor, and insert the key into the console. If a program has been selected, press the Program Select button repeatedly to reselect the manual mode. 3 Press the Start button or the Speed...
User Manual
Page 13
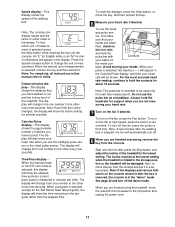
.... tacts. Avoid moving your heart rate if desired. Note: The pulse bar is selected, remove the key and then reinsert it in either miles or kilometers. Note: The console can display speed and distance in a secure place. To reset the displays, press the Stop button, remove the key, and then reinsert the key. 6 Measure your hands. To turn on the fan if desired. To turn off position and unplug the power cord. 13 Note...
.... tacts. Avoid moving your heart rate if desired. Note: The pulse bar is selected, remove the key and then reinsert it in either miles or kilometers. Note: The console can display speed and distance in a secure place. To reset the displays, press the Stop button, remove the key, and then reinsert the key. 6 Measure your hands. To turn on the fan if desired. To turn off position and unplug the power cord. 13 Note...

User Manual
Page 15
... the treadmill is in a secure place. See step 6 on page 13. 6 Turn on page 13. 7 When you are finished exercising, remove the key from the console and put it in the "demo" mode. See page 23 and turn off position and unplug the power cord. 15 To stop the program at the lowest setting. The Time/Pace display will automatically adjust to flash. To restart the program, press the Start button...
... the treadmill is in a secure place. See step 6 on page 13. 6 Turn on page 13. 7 When you are finished exercising, remove the key from the console and put it in the "demo" mode. See page 23 and turn off position and unplug the power cord. 15 To stop the program at the lowest setting. The Time/Pace display will automatically adjust to flash. To restart the program, press the Start button...

User Manual
Page 17
.../Pulse display and the speed and incline of the treadmill will regularly compare your heart rate closer to the current target heart rate. Heart rate programs cannot be stopped temporarily and then restarted. If your pulse is not detected during the program, you are finished exercising, remove the key from the console. If the speed reaches the maximum speed setting of the program (see the instructions included with the Speed or Incline buttons. If this occurs, see step...
.../Pulse display and the speed and incline of the treadmill will regularly compare your heart rate closer to the current target heart rate. Heart rate programs cannot be stopped temporarily and then restarted. If your pulse is not detected during the program, you are finished exercising, remove the key from the console. If the speed reaches the maximum speed setting of the program (see the instructions included with the Speed or Incline buttons. If this occurs, see step...
User Manual
Page 20
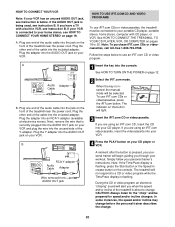
... RF OUT RCA Y-adapter Audio Cable Adapter Wire removed from AUDIO OUT jack HOW TO USE IFIT.COM CD AND VIDEO PROGRAMS To use iFIT.com CDs or videocassettes, press the iFIT.com button. Follow the steps below . A moment after the button is currently plugged into the AUDIO OUT jack on your VCR and plug the wire into the unused side of the treadmill is flashing, press the Start button or the Speed increase button on your VCR...
... RF OUT RCA Y-adapter Audio Cable Adapter Wire removed from AUDIO OUT jack HOW TO USE IFIT.COM CD AND VIDEO PROGRAMS To use iFIT.com CDs or videocassettes, press the iFIT.com button. Follow the steps below . A moment after the button is currently plugged into the AUDIO OUT jack on your VCR and plug the wire into the unused side of the treadmill is flashing, press the Start button or the Speed increase button on your VCR...
User Manual
Page 21
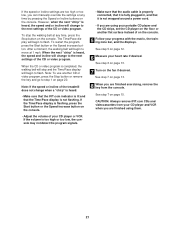
..., the speed and incline will begin to the next settings of the treadmill does not change to flash. See step 5 on the console. 5 Follow your CD player or VCR. Note: To use another flat surface instead of your progress with the matrix, the training zone bar, and the displays. To restart the program, press the Start button or the Speed increase button. After a moment, the walking belt will change when...
..., the speed and incline will begin to the next settings of the treadmill does not change to flash. See step 5 on the console. 5 Follow your CD player or VCR. Note: To use another flat surface instead of your progress with the matrix, the training zone bar, and the displays. To restart the program, press the Start button or the Speed increase button. After a moment, the walking belt will change when...
User Manual
Page 22
... sure that the audio cable is properly connected, that it is heard, the speed and incline will begin walking. Note: If the speed or incline of the program. Note: To use a program from the console. In addition, you can manually override the settings at www.iFIT.com. 5 Follow the desired links on the console. See HOW TO TURN ON THE POWER on the console. To use another program, press the Stop button and go...
... sure that the audio cable is properly connected, that it is heard, the speed and incline will begin walking. Note: If the speed or incline of the program. Note: To use a program from the console. In addition, you can manually override the settings at www.iFIT.com. 5 Follow the desired links on the console. See HOW TO TURN ON THE POWER on the console. To use another program, press the Stop button and go...

User Manual
Page 23
... miles to the indicated wire extending from the console, and the displays and indicators on the inside of the Access Door, attach the receiver to install the receiver and the short jumper wire included with the 3/4" Screw (6). THE INFORMATION MODE/DEMO MODE THE OPTIONAL CHEST PULSE SENSOR The console features an information mode that keeps track of total number of miles that the walking belt has moved and the total number of hours that the power cord...
... miles to the indicated wire extending from the console, and the displays and indicators on the inside of the Access Door, attach the receiver to install the receiver and the short jumper wire included with the 3/4" Screw (6). THE INFORMATION MODE/DEMO MODE THE OPTIONAL CHEST PULSE SENSOR The console features an information mode that keeps track of total number of miles that the walking belt has moved and the total number of hours that the power cord...

User Manual
Page 28
... your body Training Zone Exercise-After warming up -Start each workout with 5 to five workouts each week, with preexisting health problems. The pulse sensor is especially important for energy. The pulse sensor is near the bottom of the chart (ages are recommended heart rates for a sustained period of rest between workouts. For more detailed exercise information, obtain a reputable book or consult your "training zone." After a few weeks of the treadmill...
... your body Training Zone Exercise-After warming up -Start each workout with 5 to five workouts each week, with preexisting health problems. The pulse sensor is especially important for energy. The pulse sensor is near the bottom of the chart (ages are recommended heart rates for a sustained period of rest between workouts. For more detailed exercise information, obtain a reputable book or consult your "training zone." After a few weeks of the treadmill...

User Manual
Page 30
... Belt Guide Screw 3/4" Screw Console Frame Cage Nuts Incline Wire Warning Decal Rear Platform Bolt Latch Cover Pulse Bar Plate (Left) Pulse Bar Plate (Right) Isolator Platform Screw Platform Pivot Bolt Magnet Caution Decal Motor Pivot Bolt Wheel Nut Frame Spacer Reed Switch Clip Reed Switch Reed Switch Screw Lift Frame Motor Tension Nut Motor Pulley/Flywheel/Fan Motor Belt Motor Assembly Motor Tension Bolt Motor Tension Washer Motor Star Washer Motor Bracket Bolt Small Screw Ground Wire Transformer Hood Controller Power Cord iFIT.com Wire Nut iFIT.com Wire Power Cord Grommet Static Decal Reset...
... Belt Guide Screw 3/4" Screw Console Frame Cage Nuts Incline Wire Warning Decal Rear Platform Bolt Latch Cover Pulse Bar Plate (Left) Pulse Bar Plate (Right) Isolator Platform Screw Platform Pivot Bolt Magnet Caution Decal Motor Pivot Bolt Wheel Nut Frame Spacer Reed Switch Clip Reed Switch Reed Switch Screw Lift Frame Motor Tension Nut Motor Pulley/Flywheel/Fan Motor Belt Motor Assembly Motor Tension Bolt Motor Tension Washer Motor Star Washer Motor Bracket Bolt Small Screw Ground Wire Transformer Hood Controller Power Cord iFIT.com Wire Nut iFIT.com Wire Power Cord Grommet Static Decal Reset...

User Manual
Page 31
... Specifications are subject to change without notice. 31 Qty. 118 1 119 1 120 1 # 1 # 1 # 1 # 1 # 1 # 1 # 1 # 1 Description Pulse Wire Front Roller Adj. Key No. Qty. 101 2 102 2 103 2 104 4 105 4 106 2 107 2 108 2 109 1 110 1 111 2 112 1 113 1 114 1 115 1 116 1 117 1 Description Clevis Pin Hairpin Cotter Rear Roller Star Washer 5/16" Star Washer U-Nut Wheel Housing Wheel Bolt Wheel Base Pulse Bar Incline Motor Bolt Incline Motor Cap Decal 1/2" Ground Screw...
... Specifications are subject to change without notice. 31 Qty. 118 1 119 1 120 1 # 1 # 1 # 1 # 1 # 1 # 1 # 1 # 1 Description Pulse Wire Front Roller Adj. Key No. Qty. 101 2 102 2 103 2 104 4 105 4 106 2 107 2 108 2 109 1 110 1 111 2 112 1 113 1 114 1 115 1 116 1 117 1 Description Clevis Pin Hairpin Cotter Rear Roller Star Washer 5/16" Star Washer U-Nut Wheel Housing Wheel Bolt Wheel Base Pulse Bar Incline Motor Bolt Incline Motor Cap Decal 1/2" Ground Screw...
User Manual
Page 34
... following information: • The MODEL NUMBER of the product (PFTL51330) • The NAME of the product (PROFORM® 530i treadmill) • The SERIAL NUMBER of the product (see the front cover of this manual) • The KEY NUMBER and DESCRIPTION of the part(s) (see the PART LIST on how long an implied warranty lasts. HOW TO ORDER REPLACEMENT PARTS To order replacement parts, call our Customer Service Department toll-free at ICON's option...
... following information: • The MODEL NUMBER of the product (PFTL51330) • The NAME of the product (PROFORM® 530i treadmill) • The SERIAL NUMBER of the product (see the front cover of this manual) • The KEY NUMBER and DESCRIPTION of the part(s) (see the PART LIST on how long an implied warranty lasts. HOW TO ORDER REPLACEMENT PARTS To order replacement parts, call our Customer Service Department toll-free at ICON's option...

