
English Manual
Page 1
PRO•FORM 525 PERFORMANCE TREADMI NW' LL Model No. Serial Number O Decal PFTL32062 Serial No.
PRO•FORM 525 PERFORMANCE TREADMI NW' LL Model No. Serial Number O Decal PFTL32062 Serial No.
English Manual
Page 2
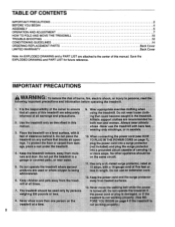
... BEGIN ASSEMBLY OPERATION AND ADJUSTMENT HOW TO FOLD AND MOVE THE TREADMILL TROUBLE-SHOOTING CONDITIONING GUIDELINES ORDERING REPLACEMENT PARTS LIMITED WARRANTY 2 4 5 7 10 12 14 Back Cover Back Cover Note: An EXPLODED DRAWING and a PART LIST are used006ihate:o tygen,Is:being administered.: Keep Childon and pets away mill at all users of this:treadmillare adequately Intdoned of this manual. treadmill on any autteoe that could beComecaughtIn the treadmill Athletic support...
... BEGIN ASSEMBLY OPERATION AND ADJUSTMENT HOW TO FOLD AND MOVE THE TREADMILL TROUBLE-SHOOTING CONDITIONING GUIDELINES ORDERING REPLACEMENT PARTS LIMITED WARRANTY 2 4 5 7 10 12 14 Back Cover Back Cover Note: An EXPLODED DRAWING and a PART LIST are used006ihate:o tygen,Is:being administered.: Keep Childon and pets away mill at all users of this:treadmillare adequately Intdoned of this manual. treadmill on any autteoe that could beComecaughtIn the treadmill Athletic support...
English Manual
Page 3
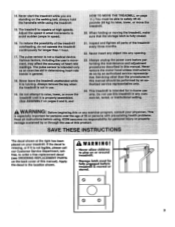
... is capable of this manual.NeVer: remove the motor hood unleSS Instructed to order a free replacement decal (see ORDERING REPLACEMENT PARTS on pages 5 and and 21. This treadmill is running. ICON assumes noresponsibility for In-home use this treadmill In any opening 2,1:Always unplug the power: cord before:pe forMlpg the:maintenanceand'adjustment proCadures described this manual). O 0 0 O 0 3 The treadmill is not legible, please call our Customer Service Department, tollfree, to do...
... is capable of this manual.NeVer: remove the motor hood unleSS Instructed to order a free replacement decal (see ORDERING REPLACEMENT PARTS on pages 5 and and 21. This treadmill is running. ICON assumes noresponsibility for In-home use this treadmill In any opening 2,1:Always unplug the power: cord before:pe forMlpg the:maintenanceand'adjustment proCadures described this manual). O 0 0 O 0 3 The treadmill is not legible, please call our Customer Service Department, tollfree, to do...

English Manual
Page 4
... cover of your benefit, read this manual for selecting the PROFORM® 525 SI treadmill. at 1-800-999-3756, Monday through Friday, 6 a.m. To help us assist you 're not exercising, the unique 525 SI can be folded up, requiring less than half the floor space of the treadmill is not included) Handrails Walking Belt BACK T Foot Rails Uprights -/ FRONT Circuit Breaker Power Cord Rear Roller Adjustment Bolt Incline Leg Cushioned Walking Platform for maximum exercise...
... cover of your benefit, read this manual for selecting the PROFORM® 525 SI treadmill. at 1-800-999-3756, Monday through Friday, 6 a.m. To help us assist you 're not exercising, the unique 525 SI can be folded up, requiring less than half the floor space of the treadmill is not included) Handrails Walking Belt BACK T Foot Rails Uprights -/ FRONT Circuit Breaker Power Cord Rear Roller Adjustment Bolt Incline Leg Cushioned Walking Platform for maximum exercise...

English Manual
Page 5
... wrench, tighten two Upright Screws (63) into the Belly Pan (48). If the restraining tie is fully seated on the Base. Handrail 63 59 Restraining Tie , 93 4\ 4 67 2. Attach the Console Base (9) with a Handrail Bolt (93), Handrail Washer (67), and Handrail Nut (4). Hand tighten the Handrail Nuts (4) used in steps 1 and 2. Set the Console Base (9) on the Right Upright until it is removed prematurely...
... wrench, tighten two Upright Screws (63) into the Belly Pan (48). If the restraining tie is fully seated on the Base. Handrail 63 59 Restraining Tie , 93 4\ 4 67 2. Attach the Console Base (9) with a Handrail Bolt (93), Handrail Washer (67), and Handrail Nut (4). Hand tighten the Handrail Nuts (4) used in steps 1 and 2. Set the Console Base (9) on the Right Upright until it is removed prematurely...

English Manual
Page 6
... treadmill, see ORDERING REPLACEMENT PARTS on the floor. 44 Handrails 5. 4. Attach six Base Pads (57) to the Console with those in the Console (9). Press the Adhesive Clip onto the Rear Roller Endcap (78) in the indicated locations. For information on ordering a mat, see HOW TO MOVE THE TREADMILL on the floor. Align the holes in the Book Rack (62) with 6 the four remaining Screws...
... treadmill, see ORDERING REPLACEMENT PARTS on the floor. 44 Handrails 5. 4. Attach six Base Pads (57) to the Console with those in the Console (9). Press the Adhesive Clip onto the Rear Roller Endcap (78) in the indicated locations. For information on ordering a mat, see HOW TO MOVE THE TREADMILL on the floor. Align the holes in the Book Rack (62) with 6 the four remaining Screws...
English Manual
Page 7
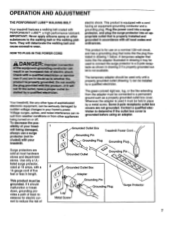
... a nominal 120-volt circuit, and has a grounding plug that is grounded before using an adapter. Voltage surges, spikes, and noise interference can be connected to the walking belt or the walking platform. OPERATION AND ADJUSTMENT THE PERFORMANT LUBETM WALKING BELT Your treadmill features a walking belt coated with your treadmill. tri n If are sold at 15 amps, with a cord having an equipment-grounding conductor and a grounding...
... a nominal 120-volt circuit, and has a grounding plug that is grounded before using an adapter. Voltage surges, spikes, and noise interference can be connected to the walking belt or the walking platform. OPERATION AND ADJUSTMENT THE PERFORMANT LUBETM WALKING BELT Your treadmill features a walking belt coated with your treadmill. tri n If are sold at 15 amps, with a cord having an equipment-grounding conductor and a grounding...
English Manual
Page 8
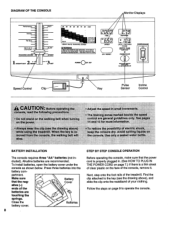
...;KwIWO olf ielweonle COnIald POWER O ON OFF cif n TIME n u SPEED ON/RESET S DISTAN E 3 CALS. / FAT CALS. DIAGRAM OF THE CONSOLE Monitor Displays Performance Aerobic Fat Bum = Warm-Up 5 = Cool-Down --TRAINING ZONES - 1 2 INSERT KEY RES FAST = SLOW SPEED SET 20 90 40 50 BO 70 80 AGE rs AEROBIC MAX. THUMB PULSE El For best rwrIlfddrid POWER INCLINE Speed Control Clip Pulse Incl-ne Key Sensor Control ' UT rlim the nsolei...
...;KwIWO olf ielweonle COnIald POWER O ON OFF cif n TIME n u SPEED ON/RESET S DISTAN E 3 CALS. / FAT CALS. DIAGRAM OF THE CONSOLE Monitor Displays Performance Aerobic Fat Bum = Warm-Up 5 = Cool-Down --TRAINING ZONES - 1 2 INSERT KEY RES FAST = SLOW SPEED SET 20 90 40 50 BO 70 80 AGE rs AEROBIC MAX. THUMB PULSE El For best rwrIlfddrid POWER INCLINE Speed Control Clip Pulse Incl-ne Key Sensor Control ' UT rlim the nsolei...

English Manual
Page 9
... power switch. Do not press too hard, or the circulation in - Slide the speed control down the pulse sensor. Inserting the key will not turn on the pulse sen- 7i-7-7---gz sor as shown, and that you have moved the speed control to the RESET position, slowly slide it . Perfoneence Aerobic = Fat Bum = Wane-Up e = CookDonee 9AINING ZONES = = FAST ee = SLOW = SPEED 2 9T KEY RES 1 2 SET Start the walking belt...
... power switch. Do not press too hard, or the circulation in - Slide the speed control down the pulse sensor. Inserting the key will not turn on the pulse sen- 7i-7-7---gz sor as shown, and that you have moved the speed control to the RESET position, slowly slide it . Perfoneence Aerobic = Fat Bum = Wane-Up e = CookDonee 9AINING ZONES = = FAST ee = SLOW = SPEED 2 9T KEY RES 1 2 SET Start the walking belt...
English Manual
Page 10
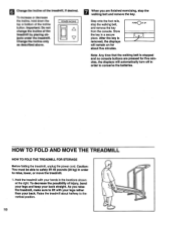
... STORAGE Before folding the treadmill, unplug the power cord. POWER INCLINE A V When you raise the treadmill, make sure to raise, lower, or move the treadmill. ( 1. To decrease the possibility of the treadmill, if desired. As you are pressed for about halfway to conserve the batteries. POWCEORN OFF 0 JI Note: Any time that the walking belt is removed, the displays will remain on for five minutes, the displays will automatically turn...
... STORAGE Before folding the treadmill, unplug the power cord. POWER INCLINE A V When you raise the treadmill, make sure to raise, lower, or move the treadmill. ( 1. To decrease the possibility of the treadmill, if desired. As you are pressed for about halfway to conserve the batteries. POWCEORN OFF 0 JI Note: Any time that the walking belt is removed, the displays will remain on for five minutes, the displays will automatically turn...

English Manual
Page 11
... position shown and hold it is past the storage latch. 2. Using your right hand to move the treadmill over the frame guide. Hold the upper ends of direct sunlight. Place one foot on the base as shown. 2. HOW TO MOVE THE TREADMILL Before moving the treadmill. Hold the upper end of injury, bend your legs and keep your right hand as described...
... position shown and hold it is past the storage latch. 2. Using your right hand to move the treadmill over the frame guide. Hold the upper ends of direct sunlight. Place one foot on the base as shown. 2. HOW TO MOVE THE TREADMILL Before moving the treadmill. Hold the upper end of injury, bend your legs and keep your right hand as described...
English Manual
Page 12
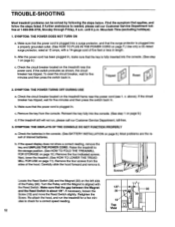
...). Turn the Pulley until 6 p.m. TROUBLE-SHOOTING Most treadmill problems can be solved by following the steps below. until the Magnet is fully inserted into the console. (See step 1 on page 9.) d. c. If the circuit breaker has tripped, wait for five minutes and then press the switch back in . If the speed display does not show a correct reading, remove the key and UNPLUG THE POWER CORD. Remove the four screws...
...). Turn the Pulley until 6 p.m. TROUBLE-SHOOTING Most treadmill problems can be solved by following the steps below. until the Magnet is fully inserted into the console. (See step 1 on page 9.) d. c. If the circuit breaker has tripped, wait for five minutes and then press the switch back in . If the speed display does not show a correct reading, remove the key and UNPLUG THE POWER CORD. Remove the four screws...

English Manual
Page 13
... the treadmill (see assembly step 5 on page 6). 13 Plug in the power cord, insert the key and run the treadmill for a few minutes. Using the alien wrench, turn both rear roller adjustment bolts counterclockwise, 1/4 of a turn . Repeat until the walking belt is properly tightened. 2"-3" Rear Roller Adjustment Bolts c. SYMPTOM: THE TREADMILL SITS UNEVENLY ON THE FLOOR a. Using the alien wrench, turn the left rear roller adjustment bolt clockwise, and the right bolt counterclockwise, 1/4 of a turn. Using the alien wrench, turn both rear roller adjustment bolts clockwise...
... the treadmill (see assembly step 5 on page 6). 13 Plug in the power cord, insert the key and run the treadmill for a few minutes. Using the alien wrench, turn both rear roller adjustment bolts counterclockwise, 1/4 of a turn . Repeat until the walking belt is properly tightened. 2"-3" Rear Roller Adjustment Bolts c. SYMPTOM: THE TREADMILL SITS UNEVENLY ON THE FLOOR a. Using the alien wrench, turn the left rear roller adjustment bolt clockwise, and the right bolt counterclockwise, 1/4 of a turn. Using the alien wrench, turn both rear roller adjustment bolts clockwise...
English Manual
Page 14
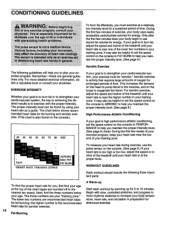
..., adjust the speed or incline of time. It may also be helpful to set the speed control on the console to PERFORMANCE to 10 minutes. WORKOUT GUIDELINES Each workout should include the following three important parts: A Warm-up for 5 to help you maintain the proper intensity level. (See page 9.) Note: During the first few weeks of your exercise program, keep your heart rate near...
..., adjust the speed or incline of time. It may also be helpful to set the speed control on the console to PERFORMANCE to 10 minutes. WORKOUT GUIDELINES Each workout should include the following three important parts: A Warm-up for 5 to help you maintain the proper intensity level. (See page 9.) Note: During the first few weeks of your exercise program, keep your heart rate near...

English Manual
Page 15
... exercise program, do not keep your heart rate in your training zone for longer than 20 minutes.) Breathe regularly and deeply as you may complete up , increase the intensity of your exercise until your heart rate is in your training ...part of your condition, complete three workouts each week if desired. Repeat 3 times for 15 counts, then relax. Quadriceps Stretch With one hand against a wall. Repeat 3 times. Stretches: Hamstrings, lower back and groin. 3 3. Training Zone Exercise After warming up to five workouts each week, with at least one leg in front of the other hand. Move...
... exercise program, do not keep your heart rate in your training zone for longer than 20 minutes.) Breathe regularly and deeply as you may complete up , increase the intensity of your exercise until your heart rate is in your training ...part of your condition, complete three workouts each week if desired. Repeat 3 times for 15 counts, then relax. Quadriceps Stretch With one hand against a wall. Repeat 3 times. Stretches: Hamstrings, lower back and groin. 3 3. Training Zone Exercise After warming up to five workouts each week, with at least one leg in front of the other hand. Move...
English Manual
Page 16
... an implied warranty lasts. Accordingly, the above limitation may not apply to you specific legal rights. When ordering parts, please be prepared to give the following information: • The MODEL NUMBER OF THE PRODUCT (PFTL32062). • The NAME OF THE PRODUCT (PROFORM® 525 SI treadmill). • The SERIAL NUMBER OF THE PRODUCT (see the front cover of this manual). • The KEY NUMBER OF THE PART(S) (see...
... an implied warranty lasts. Accordingly, the above limitation may not apply to you specific legal rights. When ordering parts, please be prepared to give the following information: • The MODEL NUMBER OF THE PRODUCT (PFTL32062). • The NAME OF THE PRODUCT (PROFORM® 525 SI treadmill). • The SERIAL NUMBER OF THE PRODUCT (see the front cover of this manual). • The KEY NUMBER OF THE PART(S) (see...

English Manual
Page 17
o. For information about ordering replacement parts, see the back cover of the User's Manual. REMOVE THIS EXPLODED DRAWING AND PART LIST FROM THE MANUAL Save this EXPLODED DRAWING and PART LIST for future reference. Note: Specifications are subject to change without notice.
o. For information about ordering replacement parts, see the back cover of the User's Manual. REMOVE THIS EXPLODED DRAWING AND PART LIST FROM THE MANUAL Save this EXPLODED DRAWING and PART LIST for future reference. Note: Specifications are subject to change without notice.

English Manual
Page 18
EXPLODED DRAWING-Model No. PFTL32062 R0297A 47 10* 92 jf; 66 70 75 11 50 82 O 80 OO OO 75 0 66 66 62 12 35 58 14 15 ...
EXPLODED DRAWING-Model No. PFTL32062 R0297A 47 10* 92 jf; 66 70 75 11 50 82 O 80 OO OO 75 0 66 66 62 12 35 58 14 15 ...

English Manual
Page 19
... Cover Connector Incline Leg Wheel Bolt Book Rack Upright Screw Incline Rod Incline Motor Guard Latch -Frame Guide Screw Handrail Washer Roller Endcap Nut Incline Leg Bolt Latch Pad Incline Leg Incline Leg Wheel Rear Roller Endcap Screw Adjustment Bolt Screw Allen Wrench Adhesive Clip Rear Roller Endcap Rear Roller Incline Switch Latch Decal Battery Cover 8" Cable Tie Walking Belt Walking Platform Platform Screw Isolator Right Foot Rail Shock Front Roller/Pulley Releasable Cable Tie Storage Latch Bracket Handrail Bolt Frame Guide Spacer Incline Spacer Reed Switch Clip Frame Cap 14" Blue Wire...
... Cover Connector Incline Leg Wheel Bolt Book Rack Upright Screw Incline Rod Incline Motor Guard Latch -Frame Guide Screw Handrail Washer Roller Endcap Nut Incline Leg Bolt Latch Pad Incline Leg Incline Leg Wheel Rear Roller Endcap Screw Adjustment Bolt Screw Allen Wrench Adhesive Clip Rear Roller Endcap Rear Roller Incline Switch Latch Decal Battery Cover 8" Cable Tie Walking Belt Walking Platform Platform Screw Isolator Right Foot Rail Shock Front Roller/Pulley Releasable Cable Tie Storage Latch Bracket Handrail Bolt Frame Guide Spacer Incline Spacer Reed Switch Clip Frame Cap 14" Blue Wire...


