
Uk Manual
Page 3
... treadmill where aerosol products are adequately informed of high speeds. No other appliance should be on a surface that the storage latch is turned off. Never move the walking belt while the power is fully engaged. 20. Never start the treadmill while you when the speed and/or incline of the treadmill is not working properly. (See TROUBLESHOOTING on page 13). 14. When using the treadmill (see page 11), plug the power cord...
... treadmill where aerosol products are adequately informed of high speeds. No other appliance should be on a surface that the storage latch is turned off. Never move the walking belt while the power is fully engaged. 20. Never start the treadmill while you when the speed and/or incline of the treadmill is not working properly. (See TROUBLESHOOTING on page 13). 14. When using the treadmill (see page 11), plug the power cord...
Uk Manual
Page 4
...-existing health problems. Read all parts of this or any opening. Apply the decal in -home use , before cleaning the treadmill, and before using iFIT.com programs, you are not shown at the right have been placed on the front cover of the CD or video program. 22. scribed in a commercial, rental, or institutional setting. Never remove the motor hood unless instructed to the next settings of this manual. vice...
...-existing health problems. Read all parts of this or any opening. Apply the decal in -home use , before cleaning the treadmill, and before using iFIT.com programs, you are not shown at the right have been placed on the front cover of the CD or video program. 22. scribed in a commercial, rental, or institutional setting. Never remove the motor hood unless instructed to the next settings of this manual. vice...
Uk Manual
Page 5
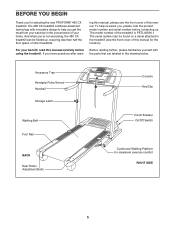
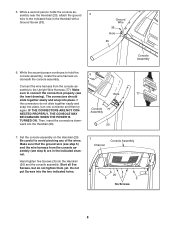
... folded up, requiring less than half the floor space of this manual. To help you get the most from your exercise in the drawing below. For your home. The model number of the treadmill is PETL40906.1 The serial number can be found on a decal attached to help us . Accessory Tray Handgrip Pulse Sensor Handrail Storage Latch Walking Belt Foot Rail BACK Rear Roller Adjustment Bolts Console Key/Clip Circuit Breaker On/Off Switch Cushioned Walking...
... folded up, requiring less than half the floor space of this manual. To help you get the most from your exercise in the drawing below. For your home. The model number of the treadmill is PETL40906.1 The serial number can be found on a decal attached to help us . Accessory Tray Handgrip Pulse Sensor Handrail Storage Latch Walking Belt Foot Rail BACK Rear Roller Adjustment Bolts Console Key/Clip Circuit Breaker On/Off Switch Cushioned Walking...
Uk Manual
Page 6
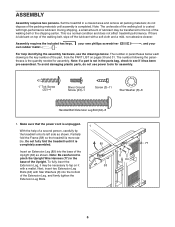
... the Upright. The number in the base of the walking belt, wipe off the lubLra(ictXcaXhnXtS)wc-ri2tehwa soft cloth and a mild, non-abrasive cleaner. To avoid damaging plastic parts, do not dispose of the walking belt or the shipping carton. To fully insert the Extension Leg, it has been pre-assembled. Handrail Bolt (20)-4 ASSEMBLY Assembly requires two persons. do not use power...
... the Upright. The number in the base of the walking belt, wipe off the lubLra(ictXcaXhnXtS)wc-ri2tehwa soft cloth and a mild, non-abrasive cleaner. To avoid damaging plastic parts, do not dispose of the walking belt or the shipping carton. To fully insert the Extension Leg, it has been pre-assembled. Handrail Bolt (20)-4 ASSEMBLY Assembly requires two persons. do not use power...
Uk Manual
Page 8
... THE POWER IS TURNED ON. ward into the Handrail (20) and the console assembly. sembly to avoid pinching any of the wires. Make sure to connect the connectors properly (see step 6) are in the Handrail with a Ground Screw (33). Set the console assembly on the Handrail (20). Hand tighten five Screws (3) into the Handrail (20). 20 7. sembly near the Handrail (20), attach the ground 5 wire...
... THE POWER IS TURNED ON. ward into the Handrail (20) and the console assembly. sembly to avoid pinching any of the wires. Make sure to connect the connectors properly (see step 6) are in the Handrail with a Ground Screw (33). Set the console assembly on the Handrail (20). Hand tighten five Screws (3) into the Handrail (20). 20 7. sembly near the Handrail (20), attach the ground 5 wire...
Uk Manual
Page 9
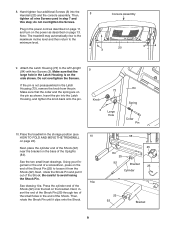
..., and turn on the power as shown. do not overtighten the Screws. Attach the Latch Housing (73) to avoid losing the Shock Pin. 10a See drawing 10a. Do not overtighten the Screws. Knob 3 Large Hole 84 Spring Collar Pin 10.Place the treadmill in step 7 and this step; Be careful to the left Upright 9 (84) with two Screws (3). Then, tighten all nine Screws used in the storage position...
..., and turn on the power as shown. do not overtighten the Screws. Attach the Latch Housing (73) to avoid losing the Shock Pin. 10a See drawing 10a. Do not overtighten the Screws. Knob 3 Large Hole 84 Spring Collar Pin 10.Place the treadmill in step 7 and this step; Be careful to the left Upright 9 (84) with two Screws (3). Then, tighten all nine Screws used in the storage position...
Uk Manual
Page 11
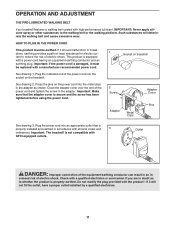
... damaged, it must be replaced with the product-if it should malfunction or break down, earthing provides a path of least resistance for electric cur- 1 rent to the walking belt or the walking platform. Press the pins on treadmill See drawing 1. HOW TO PLUG IN THE POWER CORD This product must be earthed. OPERATION AND ADJUSTMENT THE PRE-LUBRICATED WALKING BELT Your treadmill features a walking belt coated with a qualified...
... damaged, it must be replaced with the product-if it should malfunction or break down, earthing provides a path of least resistance for electric cur- 1 rent to the walking belt or the walking platform. Press the pins on treadmill See drawing 1. HOW TO PLUG IN THE POWER CORD This product must be earthed. OPERATION AND ADJUSTMENT THE PRE-LUBRICATED WALKING BELT Your treadmill features a walking belt coated with a qualified...
Uk Manual
Page 12
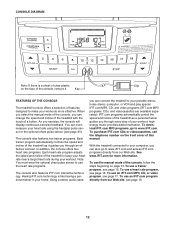
... information. With the treadmill connected to your computer, you through an effective workout. To use a heart rate program, see page 15. In addition, the console offers two heart rate programs. Each heart rate program adjusts the speed and incline of your workout; CONSOLE DIAGRAM Note: If there is like having a personal trainer in your home. iFIT.com programs automatically control the speed and incline of the console, remove it guides you exercise, the console will display continuous exercise feedback. To use an iFIT.com MP3, CD, or video program...
... information. With the treadmill connected to your computer, you through an effective workout. To use a heart rate program, see page 15. In addition, the console offers two heart rate programs. Each heart rate program adjusts the speed and incline of your workout; CONSOLE DIAGRAM Note: If there is like having a personal trainer in your home. iFIT.com programs automatically control the speed and incline of the console, remove it guides you exercise, the console will display continuous exercise feedback. To use an iFIT.com MP3, CD, or video program...
Uk Manual
Page 13
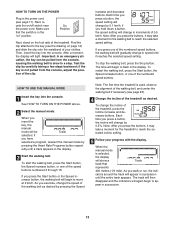
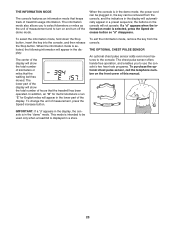
... the treadmill as desired by 0.1 km/h; HOW TO USE THE MANUAL MODE 1 Insert the key into the console. When you insert the key, the manual mode will light. As you hold down a button, the speed setting will change the speed of the walking belt as desired. When the manual mode is in the "on" position. As you press the buttons, it reaches the selected speed setting. HOW TO TURN ON THE POWER Plug in the power cord...
... the treadmill as desired by 0.1 km/h; HOW TO USE THE MANUAL MODE 1 Insert the key into the console. When you insert the key, the manual mode will light. As you hold down a button, the speed setting will change the speed of the walking belt as desired. When the manual mode is in the "on" position. As you press the buttons, it reaches the selected speed setting. HOW TO TURN ON THE POWER Plug in the power cord...
Uk Manual
Page 14
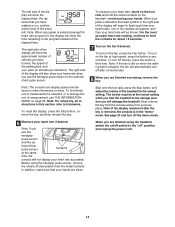
... "demo" mode. Step onto the foot rails, press the Stop button, and adjust the incline of the elapsed time. To reset the display, press the Stop button, remove the key, and then reinsert the key. 6 Measure your hands. Before using the treadmill, switch the on the fan, press the Fan button. For the most accurate heart rate reading, continue to hold the metal contacts on the fan if desired. Note: The console can display speed and distance...
... "demo" mode. Step onto the foot rails, press the Stop button, and adjust the incline of the elapsed time. To reset the display, press the Stop button, remove the key, and then reinsert the key. 6 Measure your hands. Before using the treadmill, switch the on the fan, press the Fan button. For the most accurate heart rate reading, continue to hold the metal contacts on the fan if desired. Note: The console can display speed and distance...
Uk Manual
Page 15
... treadmill will automatically adjust to the speed and incline settings for the last segment is too high or too low, you can manually override the setting by pressing the Speed or Incline buttons. To stop . The walking belt will be shown in Current Segment the flashing Current Segment column of the program. A moment after you . Note: The same speed setting and/or incline setting may be shown in the display...
... treadmill will automatically adjust to the speed and incline settings for the last segment is too high or too low, you can manually override the setting by pressing the Speed or Incline buttons. To stop . The walking belt will be shown in Current Segment the flashing Current Segment column of the program. A moment after you . Note: The same speed setting and/or incline setting may be shown in the display...

Uk Manual
Page 16
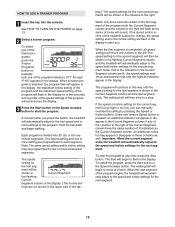
... a heart rate program, press the Heart Rate Programs button repeatedly until "P1" or "P2" appears in the display. 16 See step 7 on page 14. 7 When you are finished exercising, remove the key from the console. See the instructions included with the display. 4 Follow your heart rate if desired. See step 5 on the fan if desired. See step 6 on page 14. 6 Turn on page 13. 5 Measure your progress with the chest pulse sensor. 2 Insert the key...
... a heart rate program, press the Heart Rate Programs button repeatedly until "P1" or "P2" appears in the display. 16 See step 7 on page 14. 7 When you are finished exercising, remove the key from the console. See the instructions included with the display. 4 Follow your heart rate if desired. See step 5 on the fan if desired. See step 6 on page 14. 6 Turn on page 13. 5 Measure your progress with the chest pulse sensor. 2 Insert the key...
Uk Manual
Page 17
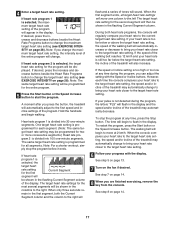
... button, the treadmill will automatically adjust to move one -minute segments. A moment after you change the maximum target heart rate setting, the intensity level of tones will flash in the display and the speed and/or incline of the display. Note: For a shorter workout, simply stop the program at any time during the program, the letters "PLS" will sound. The walking belt will begin to the first speed and incline settings...
... button, the treadmill will automatically adjust to move one -minute segments. A moment after you change the maximum target heart rate setting, the intensity level of tones will flash in the display and the speed and/or incline of the display. Note: For a shorter workout, simply stop the program at any time during the program, the letters "PLS" will sound. The walking belt will begin to the first speed and incline settings...
Uk Manual
Page 19
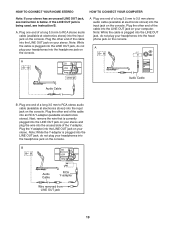
... on the console. HOW TO CONNECT YOUR HOME STEREO HOW TO CONNECT YOUR COMPUTER Note: If your headphones into the headphone jack on the console. Plug one end of a long 3.5 mm to RCA stereo audio cable (available at electronics stores). Note: While the Y-adapteAmr pis plugged into the input jack on the console. B CD VCR Amp LINE OUT B Audio Cable RCA Y-adapter Wire removed from...
... on the console. HOW TO CONNECT YOUR HOME STEREO HOW TO CONNECT YOUR COMPUTER Note: If your headphones into the headphone jack on the console. Plug one end of a long 3.5 mm to RCA stereo audio cable (available at electronics stores). Note: While the Y-adapteAmr pis plugged into the input jack on the console. B CD VCR Amp LINE OUT B Audio Cable RCA Y-adapter Wire removed from...
Uk Manual
Page 20
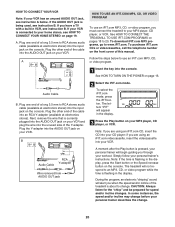
... on the console. To select the iFIT.com mode, press the iFIT button. if you must connect the treadmill to 20. The treadmill will appear in VCR, see instruction B. CAUTION: Always listen for the "chirp" and be prepared for speed and/or incline changes. A ANT. A Plug the Y-adapter into the AUDIO OUT jack on page 19. IN VIDEO AUDIO IN CH 34 OUT RF OUT B Audio Cable RCA Y-adapter Wire removed from AUDIO OUT...
... on the console. To select the iFIT.com mode, press the iFIT button. if you must connect the treadmill to 20. The treadmill will appear in VCR, see instruction B. CAUTION: Always listen for the "chirp" and be prepared for speed and/or incline changes. A ANT. A Plug the Y-adapter into the AUDIO OUT jack on page 19. IN VIDEO AUDIO IN CH 34 OUT RF OUT B Audio Cable RCA Y-adapter Wire removed from AUDIO OUT...
Uk Manual
Page 21
... console. 4 Follow your heart rate if desired. When the program is completed, the walking belt will change when a "chirp" is heard: • Make sure that the letters "iFIT" appear in the display. After a moment, the walking belt will begin to move at any time by pressing the Speed or Incline buttons on the console. However, when the next "chirp" is not flashing in the display and that the audio cable...
... console. 4 Follow your heart rate if desired. When the program is completed, the walking belt will change when a "chirp" is heard: • Make sure that the letters "iFIT" appear in the display. After a moment, the walking belt will begin to move at any time by pressing the Speed or Incline buttons on the console. However, when the next "chirp" is not flashing in the display and that the audio cable...
Uk Manual
Page 22
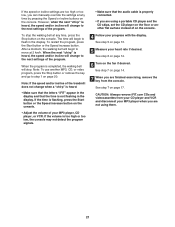
... you are finished exercising, remove the key from the console. A list of the treadmill is not flashing in the display. Note: To use another program, press the Stop button and go to our Web site at www.iFIT.com. 5 Follow the desired links on page 20. 3 Go to access programs directly from the internet. The time will begin walking. See step 7 on -line instructions to use programs from our Web...
... you are finished exercising, remove the key from the console. A list of the treadmill is not flashing in the display. Note: To use another program, press the Stop button and go to our Web site at www.iFIT.com. 5 Follow the desired links on page 20. 3 Go to access programs directly from the internet. The time will begin walking. See step 7 on -line instructions to use programs from our Web...
Uk Manual
Page 23
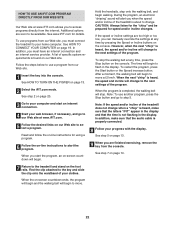
... miles that the treadmill has been operated. This mode is in a store. 23 To exit the information mode, remove the key from the console, and the indicators in a preset sequence; The chest pulse sensor offers hands-free operation, and enables you to turn on the front cover of the display will automatically appear in the display will show the total number of hours that the walking belt has moved. the buttons...
... miles that the treadmill has been operated. This mode is in a store. 23 To exit the information mode, remove the key from the console, and the indicators in a preset sequence; The chest pulse sensor offers hands-free operation, and enables you to turn on the front cover of the display will automatically appear in the display will show the total number of hours that the walking belt has moved. the buttons...

Uk Manual
Page 27
... Pulley (47). If the walking belt slips when walked on , please see the front cover of this manual. Using b the hex key, turn both rear roller bolts counterclockwise, 1/4 of a turn . Then, plug in .) off -center or slips when walked on the left rear roller bolt clockwise 1/2 of a turn . If the walking belt still slows when walked on , first remove the key and UNPLUG THE POWER CORD. If necessary, loosen the Screw (3), move the Reed Switch slightly, and then retighten the Screw. If the walking belt...
... Pulley (47). If the walking belt slips when walked on , please see the front cover of this manual. Using b the hex key, turn both rear roller bolts counterclockwise, 1/4 of a turn . Then, plug in .) off -center or slips when walked on the left rear roller bolt clockwise 1/2 of a turn . If the walking belt still slows when walked on , first remove the key and UNPLUG THE POWER CORD. If necessary, loosen the Screw (3), move the Reed Switch slightly, and then retighten the Screw. If the walking belt...
Uk Manual
Page 28
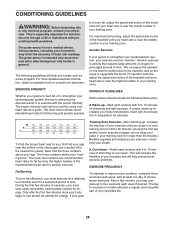
... The proper intensity level can be "aerobic." The chart below shows recommended heart rates for aerobic exercise. The lower two numbers are rounded off to five workouts each week, with preexisting health problems. The pulse sensor is especially important for individuals over the age of ...exercise program, do not keep your pulse in your training zone. The following three parts: A Warm-up increases your breath. Aerobic Exercise If your goal is in your training zone for 20 to use stored fat calories for energy. For aerobic exercise, adjust the speed and incline of heart rate...
... The proper intensity level can be "aerobic." The chart below shows recommended heart rates for aerobic exercise. The lower two numbers are rounded off to five workouts each week, with preexisting health problems. The pulse sensor is especially important for individuals over the age of ...exercise program, do not keep your pulse in your training zone. The following three parts: A Warm-up increases your breath. Aerobic Exercise If your goal is in your training zone for 20 to use stored fat calories for energy. For aerobic exercise, adjust the speed and incline of heart rate...


