

Uk Manual
Page 2
... the telephone number on the front cover of this manual and request a free replacement decal. TABLE OF CONTENTS WARNING DECAL PLACEMENT 2 IMPORTANT PRECAUTIONS 3 BEFORE YOU BEGIN 5 ASSEMBLY 6 OPERATION AND ADJUSTMENT 12 HOW TO FOLD AND MOVE THE TREADMILL 18 TROUBLESHOOTING 19 EXERCISE GUIDELINES 22 PART LIST 23 EXPLODED DRAWING 24 ORDERING REPLACEMENT PARTS Back Cover RECYCLING INFORMATION Back Cover WARNING DECAL PLACEMENT This drawing shows the locations of ICON IP, Inc...
... the telephone number on the front cover of this manual and request a free replacement decal. TABLE OF CONTENTS WARNING DECAL PLACEMENT 2 IMPORTANT PRECAUTIONS 3 BEFORE YOU BEGIN 5 ASSEMBLY 6 OPERATION AND ADJUSTMENT 12 HOW TO FOLD AND MOVE THE TREADMILL 18 TROUBLESHOOTING 19 EXERCISE GUIDELINES 22 PART LIST 23 EXPLODED DRAWING 24 ORDERING REPLACEMENT PARTS Back Cover RECYCLING INFORMATION Back Cover WARNING DECAL PLACEMENT This drawing shows the locations of ICON IP, Inc...

Uk Manual
Page 3
... accuracy of heart rate readings. Keep children under the treadmill. 6. Do not operate the treadmill if the power cord or plug is damaged, or if the treadmill is not working properly.) 15. Never allow more than 5 ft. (1.5 m). 4. The pulse sensor is not working properly. (See TROUBLESHOOTING on page 19 if the treadmill is not a medical device. When connecting the power cord (see HOW TO TURN ON THE POWER on...
... accuracy of heart rate readings. Keep children under the treadmill. 6. Do not operate the treadmill if the power cord or plug is damaged, or if the treadmill is not working properly.) 15. Never allow more than 5 ft. (1.5 m). 4. The pulse sensor is not working properly. (See TROUBLESHOOTING on page 19 if the treadmill is not a medical device. When connecting the power cord (see HOW TO TURN ON THE POWER on...

Uk Manual
Page 4
... -home use . (See the drawing on the treadmill. 19. Always remove the key, unplug the power cord, and press the power switch into any opening on page 5 for in the storage position. 22. Never remove the motor hood unless instructed to raise, lower, or move the treadmill until it is running. Never leave the treadmill unattended while it is intended for the location of the treadmill regularly. Inspect and properly tighten all parts of...
... -home use . (See the drawing on the treadmill. 19. Always remove the key, unplug the power cord, and press the power switch into any opening on page 5 for in the storage position. 22. Never remove the motor hood unless instructed to raise, lower, or move the treadmill until it is running. Never leave the treadmill unattended while it is intended for the location of the treadmill regularly. Inspect and properly tighten all parts of...
Uk Manual
Page 5
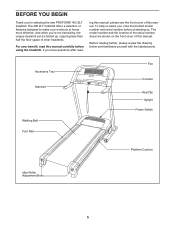
... yourself with the labeled parts. The model number and the location of the serial number decal are shown on the front cover of this manual. ing this manual, please see the front cover of this manual carefully before contacting us assist you, note the product model number and serial number before using the treadmill. Accessory Tray Handrail Walking Belt Foot Rail Fan Console Key/Clip Upright Power Switch Platform Cushion Idler Roller Adjustment Bolts 5 If you have...
... yourself with the labeled parts. The model number and the location of the serial number decal are shown on the front cover of this manual. ing this manual, please see the front cover of this manual carefully before contacting us assist you, note the product model number and serial number before using the treadmill. Accessory Tray Handrail Walking Belt Foot Rail Fan Console Key/Clip Upright Power Switch Platform Cushion Idler Roller Adjustment Bolts 5 If you have...

Uk Manual
Page 6
... the treadmill walking belt is the quantity needed for assembly. Assembly requires the included hex keys and your own Phillips screwdriver , rubber mallet , adjustable wrench , wire cutters , and needlenose pliers . Note: The underside of this manual. This is lubricant on top of the part, from the PART LIST near the lower end. do not use power tools for assembly. Use the drawings below each drawing is completed. The number in...
... the treadmill walking belt is the quantity needed for assembly. Assembly requires the included hex keys and your own Phillips screwdriver , rubber mallet , adjustable wrench , wire cutters , and needlenose pliers . Note: The underside of this manual. This is lubricant on top of the part, from the PART LIST near the lower end. do not use power tools for assembly. Use the drawings below each drawing is completed. The number in...
Uk Manual
Page 10
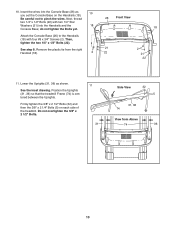
...two 1/4" x 1/2" Bolts (22) with four #8 x 3/4" Screws (2). do not tighten the Bolts yet. Attach the Console Base (26) to pinch the wires. Then, tighten the two 1/4" x 1/2" Bolts (22). Remove the plastic tie from Above 74 36 10 Firmly tighten the 3/8" x 2 1/2" Bolts (32) and then the 3/8" x 2 1/4" Bolts (5) on the Handrails ... Lower the Uprights (31, 36) as you set the Console Base on each side of the treadmill. Position the Uprights (31, 36) so that the treadmill Frame (74) is centered between the Uprights. See step 8. 10. See the inset drawing. Insert the wires ...
...two 1/4" x 1/2" Bolts (22) with four #8 x 3/4" Screws (2). do not tighten the Bolts yet. Attach the Console Base (26) to pinch the wires. Then, tighten the two 1/4" x 1/2" Bolts (22). Remove the plastic tie from Above 74 36 10 Firmly tighten the 3/8" x 2 1/2" Bolts (32) and then the 3/8" x 2 1/4" Bolts (5) on the Handrails ... Lower the Uprights (31, 36) as you set the Console Base on each side of the treadmill. Position the Uprights (31, 36) so that the treadmill Frame (74) is centered between the Uprights. See step 8. 10. See the inset drawing. Insert the wires ...
Uk Manual
Page 11
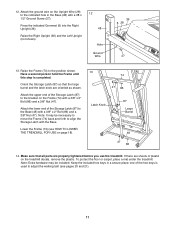
... Storage Latch with a #8 x 1/2" Ground Screw (27). Attach the ground wire on page 18). 13 74 47 86 Latch Knob 87 Large Barrel 48 47 86 14. Note: It may be necessary to move the Frame (74) back and forth to the bracket on the treadmill decals, remove the plastic. Have a second person hold the Frame until this step is used to adjust the walking belt...
... Storage Latch with a #8 x 1/2" Ground Screw (27). Attach the ground wire on page 18). 13 74 47 86 Latch Knob 87 Large Barrel 48 47 86 14. Note: It may be necessary to move the Frame (74) back and forth to the bracket on the treadmill decals, remove the plastic. Have a second person hold the Frame until this step is used to adjust the walking belt...
Uk Manual
Page 12
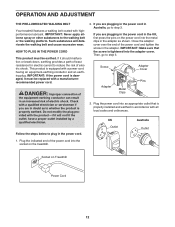
.... Screw Adapter Cover Pins Adapter Metal Clips 3. IMPORTANT: If the power cord is properly installed and earthed in accordance with a power cord having an equipment-earthing conductor and an earthing plug. Check with highperformance lubricant. OPERATION AND ADJUSTMENT THE PRE-LUBRICATED WALKING BELT Your treadmill features a walking belt coated with a qualified electrician or serviceman if you are in doubt as shown. Close the adapter cover over the end of the power cord and tighten...
.... Screw Adapter Cover Pins Adapter Metal Clips 3. IMPORTANT: If the power cord is properly installed and earthed in accordance with a power cord having an equipment-earthing conductor and an earthing plug. Check with highperformance lubricant. OPERATION AND ADJUSTMENT THE PRE-LUBRICATED WALKING BELT Your treadmill features a walking belt coated with a qualified electrician or serviceman if you are in doubt as shown. Close the adapter cover over the end of the power cord and tighten...
Uk Manual
Page 13
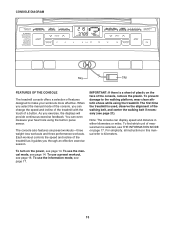
... a button. To turn on the face of the console, remove the plastic. When you select the manual mode of the console, you can display speed and distance in pulse sensor. The console also features six preset workouts-three weight loss workouts and three performance workouts. For simplicity, all instructions in this manual refer to make your heart rate using the treadmill. Note: The console can change the speed and incline of the treadmill with the touch of the walking belt...
... a button. To turn on the face of the console, remove the plastic. When you select the manual mode of the console, you can display speed and distance in pulse sensor. The console also features six preset workouts-three weight loss workouts and three performance workouts. For simplicity, all instructions in this manual refer to make your heart rate using the treadmill. Note: The console can change the speed and incline of the treadmill with the touch of the walking belt...
Uk Manual
Page 14
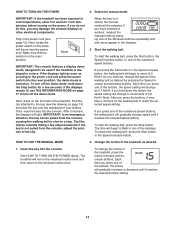
... the manual mode. To start the walking belt, press the Start button, the Speed increase button, or one of the numbered speed buttons. As you have selected a workout, reselect the manual mode by carefully taking a few seconds. To stop . The time will gradually change in the power cord and press the power switch into the reset position, the demo mode is inserted, the manual mode will light. Next, stand on the treadmill frame near the power cord. When the key is turned on...
... the manual mode. To start the walking belt, press the Start button, the Speed increase button, or one of the numbered speed buttons. As you have selected a workout, reselect the manual mode by carefully taking a few seconds. To stop . The time will gradually change in the power cord and press the power switch into the reset position, the demo mode is inserted, the manual mode will light. Next, stand on the treadmill frame near the power cord. When the key is turned on...

Uk Manual
Page 15
... console. The lower right display-The lower right display will ap- The upper display- The lower left display-As you exercise, the lower left display will also show the elapsed time. The display will show the speed of the walking belt and the approximate number of the treadmill each . tected, a heart symbol in succession. For the most accurate heart rate reading, continue to turn off the fan. To reset the displays, press the Stop button, remove the key...
... console. The lower right display-The lower right display will ap- The upper display- The lower left display-As you exercise, the lower left display will also show the elapsed time. The display will show the speed of the walking belt and the approximate number of the treadmill each . tected, a heart symbol in succession. For the most accurate heart rate reading, continue to turn off the fan. To reset the displays, press the Stop button, remove the key...

Uk Manual
Page 16
... Performance Workouts button repeatedly; One speed setting and one incline setting are finished exercising, remove the key from the console. the speed or incline setting will sound and the next segment of the profile flashes in the displays. however, when the next segment of the workout begins, the treadmill will automatically adjust to the speed and incline settings for each segment, a series of tones will flash in - To stop . Follow your heart rate if...
... Performance Workouts button repeatedly; One speed setting and one incline setting are finished exercising, remove the key from the console. the speed or incline setting will sound and the next segment of the profile flashes in the displays. however, when the next segment of the workout begins, the treadmill will automatically adjust to the speed and incline settings for each segment, a series of tones will flash in - To stop . Follow your heart rate if...
Uk Manual
Page 17
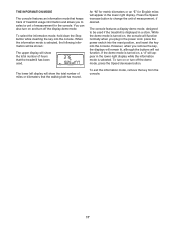
... power cord, press the power switch into the reset position, and insert the key into the console. However, when you plug in the lower right display while the information mode is turned on or turn on , a "d" will show the total number of hours that the walking belt has moved. Press the Speed increase button to select a unit of measurement for English miles will show the total number of miles or kilometers that the treadmill has been used...
... power cord, press the power switch into the reset position, and insert the key into the console. However, when you plug in the lower right display while the information mode is turned on or turn on , a "d" will show the total number of hours that the walking belt has moved. Press the Speed increase button to select a unit of measurement for English miles will show the total number of miles or kilometers that the treadmill has been used...
Uk Manual
Page 18
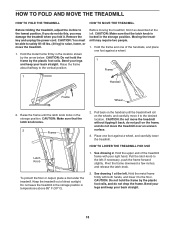
... release the latch knob. 2. Remove the key and unplug the power cord. Hold the upper end of direct sunlight. Hold the metal frame firmly with your back straight. 18 Pull back on the handrail until the latch knob locks in the storage position. HOW TO FOLD AND MOVE THE TREADMILL HOW TO FOLD THE TREADMILL HOW TO MOVE THE TREADMILL Before folding the treadmill, adjust the incline to the desired location. Raise...
... release the latch knob. 2. Remove the key and unplug the power cord. Hold the upper end of direct sunlight. Hold the metal frame firmly with your back straight. 18 Pull back on the handrail until the latch knob locks in the storage position. HOW TO FOLD AND MOVE THE TREADMILL HOW TO FOLD THE TREADMILL HOW TO MOVE THE TREADMILL Before folding the treadmill, adjust the incline to the desired location. Raise...

Uk Manual
Page 19
... console SOLUTION: a. PROBLEM: The displays of this manual. The console features a display demo mode, designed to turn on . Remove the key from the console. PROBLEM: The power does not turn off the demo mode, hold down the Stop button for five minutes and then press the switch back in . a 4 1 65 4 19 Find the symptom that the power cord is needed , use SOLUTION: a. Check the power switch located on page 17 to be solved by following the steps below. TROUBLESHOOTING Most treadmill problems...
... console SOLUTION: a. PROBLEM: The displays of this manual. The console features a display demo mode, designed to turn on . Remove the key from the console. PROBLEM: The power does not turn off the demo mode, hold down the Stop button for five minutes and then press the switch back in . a 4 1 65 4 19 Find the symptom that the power cord is needed , use SOLUTION: a. Check the power switch located on page 17 to be solved by following the steps below. TROUBLESHOOTING Most treadmill problems...

Uk Manual
Page 20
... walking belt is about 1/8 in the console, press one of the Pulley (64). When the walking belt is aligned with the Reed Switch. Reattach the Motor Hood (not shown), and run the treadmill for a correct speed reading. With the key in . (3 mm). This will automatically rise to the maximum incline level and then return to lift each edge of this manual. 20 b. Remove the key and UNPLUG THE POWER CORD...
... walking belt is about 1/8 in the console, press one of the Pulley (64). When the walking belt is aligned with the Reed Switch. Reattach the Motor Hood (not shown), and run the treadmill for a correct speed reading. With the key in . (3 mm). This will automatically rise to the maximum incline level and then return to lift each edge of this manual. 20 b. Remove the key and UNPLUG THE POWER CORD...
Uk Manual
Page 21
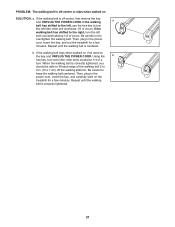
... idler roller bolt clockwise 1/2 of a turn. if the walking belt has shifted to turn the left bolt counterclockwise 1/2 of a turn . Then, plug in the power cord, insert the key, and run the treadmill for a few minutes. Repeat until the walking belt is properly tightened. 21 When the walking belt is centered. Be careful to overtighten the walking belt. Be careful not to keep the walking belt centered. If the walking belt slips when walked on the treadmill...
... idler roller bolt clockwise 1/2 of a turn. if the walking belt has shifted to turn the left bolt counterclockwise 1/2 of a turn . Then, plug in the power cord, insert the key, and run the treadmill for a few minutes. Repeat until the walking belt is properly tightened. 21 When the walking belt is centered. Be careful to overtighten the walking belt. Be careful not to keep the walking belt centered. If the walking belt slips when walked on the treadmill...
Uk Manual
Page 22
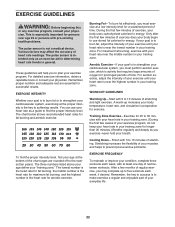
.... For aerobic exercise, adjust the intensity of your exercise until your heart rate is near the highest number in your condition, complete three workouts each week, if desired. You can use stored fat calories for energy. Aerobic Exercise-If your goal is to make exercise a regular and enjoyable part of your heart rate as a guide to 10 minutes of stretching. Remember, the key to success...
.... For aerobic exercise, adjust the intensity of your exercise until your heart rate is near the highest number in your condition, complete three workouts each week, if desired. You can use stored fat calories for energy. Aerobic Exercise-If your goal is to make exercise a regular and enjoyable part of your heart rate as a guide to 10 minutes of stretching. Remember, the key to success...

Uk Manual
Page 23
...Pan Controller Roller Bushing 3/8" x 2 1/4" Lift Frame Bolt 3/8" Jam Nut Lift Motor Stop Bracket 3/8" x 1 3/4" Bolt 3/8" x 1 1/4" Bolt Lift Frame 5/32" Hex Key Drive Belt Reed Switch Reed Switch Clamp Drive Roller/Pulley #8 x 3/4" Hood Screw 5/16" x 1 1/4" Bolt Magnet Belt Guide #8 x 3/4" Washer Head Screw Platform Cushion #8 x 1/2" Washer Head Screw Walking Belt Walking Platform Frame Right Foot Rail Platform Nut 1/4" Flat Washer 5/16" x 3 1/2" Bolt Idler Roller Right Rear Foot Idler Roller Bracket 1/4" x 2 1/2" Bolt Left Rear Foot Idler Roller Ground Wire Hex Key 3/8" x 2" Bolt Storage Latch...
...Pan Controller Roller Bushing 3/8" x 2 1/4" Lift Frame Bolt 3/8" Jam Nut Lift Motor Stop Bracket 3/8" x 1 3/4" Bolt 3/8" x 1 1/4" Bolt Lift Frame 5/32" Hex Key Drive Belt Reed Switch Reed Switch Clamp Drive Roller/Pulley #8 x 3/4" Hood Screw 5/16" x 1 1/4" Bolt Magnet Belt Guide #8 x 3/4" Washer Head Screw Platform Cushion #8 x 1/2" Washer Head Screw Walking Belt Walking Platform Frame Right Foot Rail Platform Nut 1/4" Flat Washer 5/16" x 3 1/2" Bolt Idler Roller Right Rear Foot Idler Roller Bracket 1/4" x 2 1/2" Bolt Left Rear Foot Idler Roller Ground Wire Hex Key 3/8" x 2" Bolt Storage Latch...

Uk Manual
Page 28
... area. ORDERING REPLACEMENT PARTS To order replacement parts, see the PART LIST and the EXPLODED DRAWING near the end of this manual) RECYCLING INFORMATION This electronic product must be disposed of in China © 2010 ICON IP, Inc. In doing so, you will help us : • the model number and the serial number of the product (see the front cover of this manual) • the...
... area. ORDERING REPLACEMENT PARTS To order replacement parts, see the PART LIST and the EXPLODED DRAWING near the end of this manual) RECYCLING INFORMATION This electronic product must be disposed of in China © 2010 ICON IP, Inc. In doing so, you will help us : • the model number and the serial number of the product (see the front cover of this manual) • the...


