
Canadian English Manual
Page 1
If you have questions, or if parts are damaged or missing, PLEASE CONTACT OUR CUSTOMER SERVICE DEPARTMENT DIRECTLY. USERʼS MANUAL www.proform.com Model No. 30331.1 Serial No. Write the serial number in this manual before using this manual for reference. Keep this equipment. Serial Number Decal QUESTIONS? CALL TOLL-FREE: 1-888-936-4266 Mon.-Fri., 7:30 until 16:30 ET (excluding holidays) OR E-MAIL US: [email protected] CAUTION Read all precautions and instructions in the space above for future reference.
If you have questions, or if parts are damaged or missing, PLEASE CONTACT OUR CUSTOMER SERVICE DEPARTMENT DIRECTLY. USERʼS MANUAL www.proform.com Model No. 30331.1 Serial No. Write the serial number in this manual before using this manual for reference. Keep this equipment. Serial Number Decal QUESTIONS? CALL TOLL-FREE: 1-888-936-4266 Mon.-Fri., 7:30 until 16:30 ET (excluding holidays) OR E-MAIL US: [email protected] CAUTION Read all precautions and instructions in the space above for future reference.
Canadian English Manual
Page 2
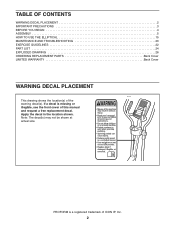
...PRECAUTIONS 3 BEFORE YOU BEGIN 4 ASSEMBLY 5 HOW TO USE THE ELLIPTICAL 15 MAINTENANCE AND TROUBLESHOOTING 20 EXERCISE GUIDELINES 22 PART LIST 24 EXPLODED DRAWING 26 ORDERING REPLACEMENT PARTS Back Cover LIMITED WARRANTY Back Cover WARNING DECAL PLACEMENT This drawing ...shows the location(s) of this manual and request a free replacement decal. If a decal is a registered trademark of ICON IP, Inc. 2 Note: The decal(s) may not be shown at actual size. Apply the decal in the location shown. PROFORM...
...PRECAUTIONS 3 BEFORE YOU BEGIN 4 ASSEMBLY 5 HOW TO USE THE ELLIPTICAL 15 MAINTENANCE AND TROUBLESHOOTING 20 EXERCISE GUIDELINES 22 PART LIST 24 EXPLODED DRAWING 26 ORDERING REPLACEMENT PARTS Back Cover LIMITED WARRANTY Back Cover WARNING DECAL PLACEMENT This drawing ...shows the location(s) of this manual and request a free replacement decal. If a decal is a registered trademark of ICON IP, Inc. 2 Note: The decal(s) may not be shown at actual size. Apply the decal in the location shown. PROFORM...

Canadian English Manual
Page 3
...described in a garage or covered patio, or near water. 6. Inspect and properly tighten all warnings on the elliptical. Before beginning any worn parts immediately. 8. The elliptical does not have a freewheel; Various factors may result in serious injury or death. IMPORTANT PRECAUTIONS WARNING: To reduce... read all important precautions and instructions in this manual and all parts regularly. This is intended for foot protection while exercising. 3. do not wear loose clothes that all users of the elliptical are adequately informed of all times. 15. ICON assumes no ...
...described in a garage or covered patio, or near water. 6. Inspect and properly tighten all warnings on the elliptical. Before beginning any worn parts immediately. 8. The elliptical does not have a freewheel; Various factors may result in serious injury or death. IMPORTANT PRECAUTIONS WARNING: To reduce... read all important precautions and instructions in this manual and all parts regularly. This is intended for foot protection while exercising. 3. do not wear loose clothes that all users of the elliptical are adequately informed of all times. 15. ICON assumes no ...
Canadian English Manual
Page 4
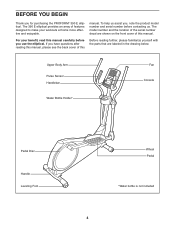
...array of the serial number decal are labeled in the drawing below. To help us assist you use the elliptical. If you for purchasing the PROFORM® 390 E elliptical. For your workouts at home more effective and enjoyable. manual. BEFORE YOU BEGIN Thank you have questions after... reading this manual, please see the back cover of this Before reading further, please familiarize yourself with the parts that are ...
...array of the serial number decal are labeled in the drawing below. To help us assist you use the elliptical. If you for purchasing the PROFORM® 390 E elliptical. For your workouts at home more effective and enjoyable. manual. BEFORE YOU BEGIN Thank you have questions after... reading this manual, please see the back cover of this Before reading further, please familiarize yourself with the parts that are ...
Canadian English Manual
Page 5
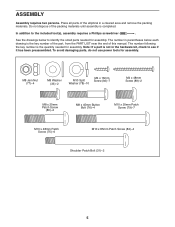
... the quantity needed for assembly. To avoid damaging parts, do not use power tools for assembly. The number following the key number is not in a cleared area and remove the packing materials. M8 Jam ... for assembly. Do not dispose of the packing materials until assembly is the key number of the part, from the PART LIST near the end of the elliptical in the hardware kit, check to see if it has been preassembled. The number in parentheses below to the included tool(s), assembly requires a Phillips screwdriver...
... the quantity needed for assembly. To avoid damaging parts, do not use power tools for assembly. The number following the key number is not in a cleared area and remove the packing materials. M8 Jam ... for assembly. Do not dispose of the packing materials until assembly is the key number of the part, from the PART LIST near the end of the elliptical in the hardware kit, check to see if it has been preassembled. The number in parentheses below to the included tool(s), assembly requires a Phillips screwdriver...
Canadian English Manual
Page 14
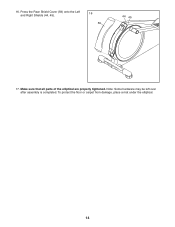
To protect the floor or carpet from damage, place a mat under the elliptical. 14 Press the Rear Shield Cover (59) onto the Left and Right Shields (44, 45). 16 59 44 45 17. Make sure that all parts of the elliptical are properly tightened. Note: Some hardware may be left over after assembly is completed. 16.
To protect the floor or carpet from damage, place a mat under the elliptical. 14 Press the Rear Shield Cover (59) onto the Left and Right Shields (44, 45). 16 59 44 45 17. Make sure that all parts of the elliptical are properly tightened. Note: Some hardware may be left over after assembly is completed. 16.
Canadian English Manual
Page 20
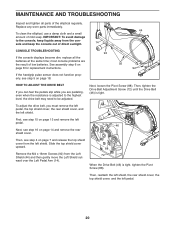
Replace any worn parts immediately. 44 To clean the elliptical, use a damp cloth and a small amount of the elliptical regularly. MAINTENANCE AND TROUBLESHOOTING Inspect and tighten all the batteries at the same time; First, see step 15 on page 14 and remove the rear ... left shield. To adjust the drive belt, you are the result of direct sunlight. 14 CONSOLE TROUBLESHOOTING If the console displays become dim, replace all parts of mild soap. Then, see step 4 on page 18. Next, loosen the Pivot Screw (88). HOW TO ADJUST THE DRIVE BELT If you can feel...
Replace any worn parts immediately. 44 To clean the elliptical, use a damp cloth and a small amount of the elliptical regularly. MAINTENANCE AND TROUBLESHOOTING Inspect and tighten all the batteries at the same time; First, see step 15 on page 14 and remove the rear ... left shield. To adjust the drive belt, you are the result of direct sunlight. 14 CONSOLE TROUBLESHOOTING If the console displays become dim, replace all parts of mild soap. Then, see step 4 on page 18. Next, loosen the Pivot Screw (88). HOW TO ADJUST THE DRIVE BELT If you can feel...
Canadian English Manual
Page 22
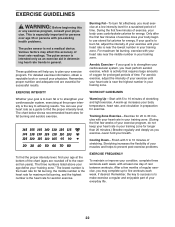
... or to five workouts each week, with your heart rate near the lowest number in your muscles and helps to make exercise a regular and enjoyable part of heart rate readings. For maximum fat burning, exercise with at the bottom of your training zone. EXERCISE INTENSITY WORKOUT GUIDELINES Whether your goal is...
... or to five workouts each week, with your heart rate near the lowest number in your muscles and helps to make exercise a regular and enjoyable part of heart rate readings. For maximum fat burning, exercise with at the bottom of your training zone. EXERCISE INTENSITY WORKOUT GUIDELINES Whether your goal is...
Canadian English Manual
Page 24
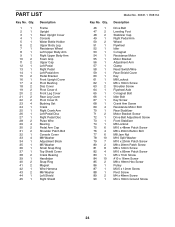
PART LIST Key No. Qty. 46 1 47 2 48 2 49 1 50 2 51 1 52 1 53 1 54 1 55 1 56 1 57 1 58 1 59 1 60 1 61 1 62 1 63 2 64 1 65 1 66 1 ...
PART LIST Key No. Qty. 46 1 47 2 48 2 49 1 50 2 51 1 52 1 53 1 54 1 55 1 56 1 57 1 58 1 59 1 60 1 61 1 62 1 63 2 64 1 65 1 66 1 ...

Canadian English Manual
Page 25
Key No. For information about ordering replacement parts, see the back cover of this manual. *These parts are subject to change without notice. Description Key No. Wire Tie Note: Specifications are not illustrated. 25 Userʼs Manual * - Grease Packet * - Description 91 2 Adjustment Nut 92 21 M4 x 16mm Screw 93 2 Pulse Sensor/Wire 94 1 Flywheel Bearing 95 1 Audio Cable 96 1 Left Crank Arm 97 1 Crank Arm Spacer 98 4 M8 x 10mm Screw 99 4 M8 x 15mm Screw * - Qty. Qty. Assembly Tool * -
Key No. For information about ordering replacement parts, see the back cover of this manual. *These parts are subject to change without notice. Description Key No. Wire Tie Note: Specifications are not illustrated. 25 Userʼs Manual * - Grease Packet * - Description 91 2 Adjustment Nut 92 21 M4 x 16mm Screw 93 2 Pulse Sensor/Wire 94 1 Flywheel Bearing 95 1 Audio Cable 96 1 Left Crank Arm 97 1 Crank Arm Spacer 98 4 M8 x 10mm Screw 99 4 M8 x 15mm Screw * - Qty. Qty. Assembly Tool * -

Canadian English Manual
Page 28
...this manual) • the name of the product (see the front cover of this manual) • the key number and description of the replacement part(s) (see the front cover of this product to repairing or replacing, at ICONʼs option, the product through one of its authorized service centers. ... from the date of purchase. Some provinces do not allow limitations on how long an implied warranty lasts. Jérôme, QC J7Y 4B8 Part No. 306377 R0811A Printed in connection with respect to you , please be free from the date of purchase. This warranty does not extend to ...
...this manual) • the name of the product (see the front cover of this manual) • the key number and description of the replacement part(s) (see the front cover of this product to repairing or replacing, at ICONʼs option, the product through one of its authorized service centers. ... from the date of purchase. Some provinces do not allow limitations on how long an implied warranty lasts. Jérôme, QC J7Y 4B8 Part No. 306377 R0811A Printed in connection with respect to you , please be free from the date of purchase. This warranty does not extend to ...


