

English Manual
Page 2
...cord of clearance behind it. No other appliance should be on the treadmill at all users of 12 and pets away from damage, place a mat under the age of this manual. Never move the walking belt while the power is being administered. 6. TABLE OF CONTENTS IMPORTANT ...PRECAUTIONS 2 BEFORE YOU BEGIN 4 ASSEMBLY 5 OPERATION AND ADJUSTMENT 7 HOW TO FOLD AND MOVE THE TREADMILL 10 TROUBLE-SHOOTING 12 CONDITIONING GUIDELINES 14 ORDERING REPLACEMENT PARTS...
...cord of clearance behind it. No other appliance should be on the treadmill at all users of 12 and pets away from damage, place a mat under the age of this manual. Never move the walking belt while the power is being administered. 6. TABLE OF CONTENTS IMPORTANT ...PRECAUTIONS 2 BEFORE YOU BEGIN 4 ASSEMBLY 5 OPERATION AND ADJUSTMENT 7 HOW TO FOLD AND MOVE THE TREADMILL 10 TROUBLE-SHOOTING 12 CONDITIONING GUIDELINES 14 ORDERING REPLACEMENT PARTS...

English Manual
Page 3
... the maintenance and adjustment procedures described in speed. 16. Always unplug the power cord immediately after use, before cleaning the treadmill, and before using the treadmill. 15. Servicing other than the procedures in this manual should be able to safely lift 45 pounds (20 kg) to...or property damage sustained by or through the use . 17. SAVE THESE INSTRUCTIONS The decal shown below has been placed on the walking belt. Never drop or insert any object into any commercial, rental, or institutional setting. Always hold the handrails while using . Always remove ...
... the maintenance and adjustment procedures described in speed. 16. Always unplug the power cord immediately after use, before cleaning the treadmill, and before using the treadmill. 15. Servicing other than the procedures in this manual should be able to safely lift 45 pounds (20 kg) to...or property damage sustained by or through the use . 17. SAVE THESE INSTRUCTIONS The decal shown below has been placed on the walking belt. Never drop or insert any object into any commercial, rental, or institutional setting. Always hold the handrails while using . Always remove ...

English Manual
Page 4
... convenience and privacy of the treadmill is not included) RIGHT SIDE Walking Belt Foot Rail BACK Rear Roller Adjustment Bolts Upright Circuit Breaker Power Cord Cushioned Walking Platform for maximum exercise comfort Incline Leg 4 The model number of your benefit, read this manual for selecting the new PROFORM® 385C treadmill. at 1-800-999-3756...
... convenience and privacy of the treadmill is not included) RIGHT SIDE Walking Belt Foot Rail BACK Rear Roller Adjustment Bolts Upright Circuit Breaker Power Cord Cushioned Walking Platform for maximum exercise comfort Incline Leg 4 The model number of your benefit, read this manual for selecting the new PROFORM® 385C treadmill. at 1-800-999-3756...

English Manual
Page 5
...lubricant. If there is lubricant on the head of the Extension Legs (34) into the treadmill as you insert the Extension Leg.) Make sure that the Base Pad (40) is on the indicated side of the treadmill walking belt is in the position shown. 1 11 2. Insert one of the Extension Leg Screw ...as shown. (Note: It may be helpful to push on top of the packing materials until the treadmill is coated with an Extension Leg Screw (53). This is completed. With the help of the walking belt or the shipping carton. Attach the other Extension Leg (34) in a cleared area and remove ...
...lubricant. If there is lubricant on the head of the Extension Legs (34) into the treadmill as you insert the Extension Leg.) Make sure that the Base Pad (40) is on the indicated side of the treadmill walking belt is in the position shown. 1 11 2. Insert one of the Extension Leg Screw ...as shown. (Note: It may be helpful to push on top of the packing materials until the treadmill is coated with an Extension Leg Screw (53). This is completed. With the help of the walking belt or the shipping carton. Attach the other Extension Leg (34) in a cleared area and remove ...

English Manual
Page 6
...). The allen wrench is toward the thickest part of the Handrail with the indicated hole in a secure place. Cover the floor beneath the treadmill to adjust the walking belt (see the inset drawing). Tighten a Handrail Screw (89) into the Handrail and the Upright. 11 89 89 Attach the other Handrail (1) ... (11) with a Handrail Washer (90) into the Handrail. Locate the two Rubber Rings (91) that all parts are tight before you use the treadmill. Make sure that each Upright (11). Slide the upper end of one of the Handrails (1) onto the post on each Rubber Ring is turned so...
...). The allen wrench is toward the thickest part of the Handrail with the indicated hole in a secure place. Cover the floor beneath the treadmill to adjust the walking belt (see the inset drawing). Tighten a Handrail Screw (89) into the Handrail and the Upright. 11 89 89 Attach the other Handrail (1) ... (11) with a Handrail Washer (90) into the Handrail. Locate the two Rubber Rings (91) that all parts are tight before you use the treadmill. Make sure that each Upright (11). Slide the upper end of one of the Handrails (1) onto the post on each Rubber Ring is turned so...

English Manual
Page 7
... outlet (drawing 1) can result in - Grounded Outlet Box Grounding Pin Treadmill Power Cord cluded) with the product-if it should be used to connect the surge protector to the walking belt or the walking platform. Use only a ULlisted surge protector, rated at... Grounded Outlet Box Adapter Grounding Pin Grounding Plug Lug Metal Screw Surge Protector 7 OPERATION AND ADJUSTMENT THE PERFORMANT LUBETM WALKING BELT Your treadmill features a walking belt coated with a qualified electrician or service- They will not fit the outlet, have a proper outlet in drawing 1 below...
... outlet (drawing 1) can result in - Grounded Outlet Box Grounding Pin Treadmill Power Cord cluded) with the product-if it should be used to connect the surge protector to the walking belt or the walking platform. Use only a ULlisted surge protector, rated at... Grounded Outlet Box Adapter Grounding Pin Grounding Plug Lug Metal Screw Surge Protector 7 OPERATION AND ADJUSTMENT THE PERFORMANT LUBETM WALKING BELT Your treadmill features a walking belt coated with a qualified electrician or service- They will not fit the outlet, have a proper outlet in drawing 1 below...
English Manual
Page 8
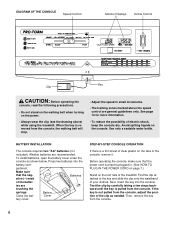
...carefully taking a few steps backward until the key is properly plugged in small increments. • The training zones marked above ) while using the treadmill. See page 14 for more information. • To reduce the possibility of the batter- Alkaline batteries are touching the springs. Avoid spilling liquids ... operating the console, read the following precautions. • Do not stand on the walking belt when turning on the console. Make sure that the power cord is pulled from the console, the walking belt will stop. • Adjust the speed in . (See HOW TO PLUG IN THE POWER...
...carefully taking a few steps backward until the key is properly plugged in small increments. • The training zones marked above ) while using the treadmill. See page 14 for more information. • To reduce the possibility of the batter- Alkaline batteries are touching the springs. Avoid spilling liquids ... operating the console, read the following precautions. • Do not stand on the walking belt when turning on the console. Make sure that the power cord is pulled from the console, the walking belt will stop. • Adjust the speed in . (See HOW TO PLUG IN THE POWER...

English Manual
Page 9
... to the RESET position, slowly slide it to the other . TIME/DISTANCE display-This display Indicator shows the elapsed time and distance that the walking belt is stopped and the ON/RESET button is reached. 5 Monitor your progress with the two displays. Every seven seconds, the display will already be restarted... moved to conserve the batteries. 9 CALS/FAT CALS/ SPEED display-This Indicator display shows the ap- Inserting the key will change the incline of the treadmill, press the top or bottom of the treadmill as desired by sliding the speed control.
... to the RESET position, slowly slide it to the other . TIME/DISTANCE display-This display Indicator shows the elapsed time and distance that the walking belt is stopped and the ON/RESET button is reached. 5 Monitor your progress with the two displays. Every seven seconds, the display will already be restarted... moved to conserve the batteries. 9 CALS/FAT CALS/ SPEED display-This Indicator display shows the ap- Inserting the key will change the incline of the treadmill, press the top or bottom of the treadmill as desired by sliding the speed control.

English Manual
Page 13
..., and the right bolt counterclockwise, 1/4 of a turn each side of the walking belt should be able to 3 inches off the walking platform. Plug in the power cord, insert the key and run the treadmill for a few minutes. Plug in the power cord, insert the key and run...tightened, you should just touch the walking platform. Plug in the power cord, insert the key and run the treadmill for a few minutes. Be careful not to over - 4. When the walking belt is properly tightened. 13 Using the allen wrench, a turn . Using the allen wrench, c turn both ...
..., and the right bolt counterclockwise, 1/4 of a turn each side of the walking belt should be able to 3 inches off the walking platform. Plug in the power cord, insert the key and run the treadmill for a few minutes. Plug in the power cord, insert the key and run...tightened, you should just touch the walking platform. Plug in the power cord, insert the key and run the treadmill for a few minutes. Be careful not to over - 4. When the walking belt is properly tightened. 13 Using the allen wrench, a turn . Using the allen wrench, c turn both ...

English Manual
Page 18
... 4 Description Handrail Key/Clip Screw Battery Cover Foot Rail Lift Motor Frame Guide Speed Potentiometer Speed Control Knob Console Assembly Upright/Base Motor Belt Small Screw Storage Latch 4" Cable Tie 8" Cable Tie Motor Swivel Nut Pulley/Flywheel/Fan Motor Motor/Pulley/Flywheel/Fan Wire Harness Hood... Frame Pivot Washer Frame Pivot Bolt Roller Guard Motor Belly Pan 1" Grommet Rear Platform Screw Releasable Tie Choke Belt Guide Belly Pan Fastener Walking Belt Walking Platform Belly Pan Electronics Screw Incline Wire Harness Wire Tie Holder Isolator Screw Allen Wrench Frame Left Front ...
... 4 Description Handrail Key/Clip Screw Battery Cover Foot Rail Lift Motor Frame Guide Speed Potentiometer Speed Control Knob Console Assembly Upright/Base Motor Belt Small Screw Storage Latch 4" Cable Tie 8" Cable Tie Motor Swivel Nut Pulley/Flywheel/Fan Motor Motor/Pulley/Flywheel/Fan Wire Harness Hood... Frame Pivot Washer Frame Pivot Bolt Roller Guard Motor Belly Pan 1" Grommet Rear Platform Screw Releasable Tie Choke Belt Guide Belly Pan Fastener Walking Belt Walking Platform Belly Pan Electronics Screw Incline Wire Harness Wire Tie Holder Isolator Screw Allen Wrench Frame Left Front ...


