
English Manual
Page 1
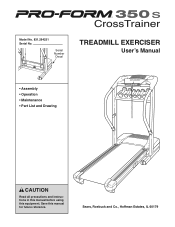
Model No. 831.294231 Serial No. Sears, Roebuck and Co., Hoffman Estates, IL 60179 Save this equipment. Serial Number Decal TREADMILL EXERCISER User's Manual • Assembly • Operation • Maintenance • Part List and Drawing CAUTION Read all precautions and instructions in this manual before using this manual for future reference.
Model No. 831.294231 Serial No. Sears, Roebuck and Co., Hoffman Estates, IL 60179 Save this equipment. Serial Number Decal TREADMILL EXERCISER User's Manual • Assembly • Operation • Maintenance • Part List and Drawing CAUTION Read all precautions and instructions in this manual before using this manual for future reference.
English Manual
Page 2
TABLE OF CONTENTS IMPORTANT PRECAUTIONS 3 BEFORE YOU BEGIN 5 ASSEMBLY 6 OPERATION AND ADJUSTMENT 10 HOW TO FOLD AND MOVE THE TREADMILL 14 TROUBLESHOOTING 16 CONDITIONING GUIDELINES 18 ORDERING REPLACEMENT PARTS Back Cover FULL 90 DAY WARRANTY Back Cover Note: An EXPLODED DRAWING and a PART LIST are attached in the center of this manual. 2
TABLE OF CONTENTS IMPORTANT PRECAUTIONS 3 BEFORE YOU BEGIN 5 ASSEMBLY 6 OPERATION AND ADJUSTMENT 10 HOW TO FOLD AND MOVE THE TREADMILL 14 TROUBLESHOOTING 16 CONDITIONING GUIDELINES 18 ORDERING REPLACEMENT PARTS Back Cover FULL 90 DAY WARRANTY Back Cover Note: An EXPLODED DRAWING and a PART LIST are attached in the center of this manual. 2
English Manual
Page 3
..., lower, or move the treadmill. 3 Never allow more amps. Athletic support clothes are standing on the same circuit. Do not operate the treadmill if the power cord or plug is damaged, or if the treadmill is intended only as described. 3. Adjust the speed in damage to maintain your local Sears or call 1-800-366-7278 and order part number 146148. 12. The sensor is not working...
..., lower, or move the treadmill. 3 Never allow more amps. Athletic support clothes are standing on the same circuit. Do not operate the treadmill if the power cord or plug is damaged, or if the treadmill is intended only as described. 3. Adjust the speed in damage to maintain your local Sears or call 1-800-366-7278 and order part number 146148. 12. The sensor is not working...
English Manual
Page 4
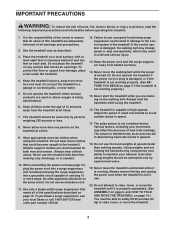
... the power cord immediately after use this manual. Do not use , before cleaning the treadmill, and before using. Note: The decals are not shown at actual size. 4 This treadmill is fully closed. 22. This is not legible, please call toll-free 1-888-533-1333 to do so by an authorized service representative only. 25. DANGER: 24. Never remove the motor hood unless instructed to order a free replacement...
... the power cord immediately after use this manual. Do not use , before cleaning the treadmill, and before using. Note: The decals are not shown at actual size. 4 This treadmill is fully closed. 22. This is not legible, please call toll-free 1-888-533-1333 to do so by an authorized service representative only. 25. DANGER: 24. Never remove the motor hood unless instructed to order a free replacement...
English Manual
Page 5
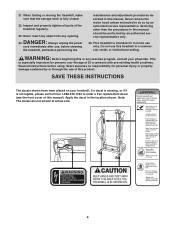
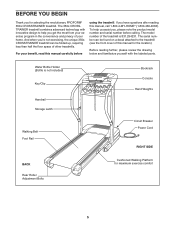
... included) Key/Clip Handrail Storage Latch Walking Belt Foot Rail Bookrack Console Hand Weights Circuit Breaker Power Cord RIGHT SIDE BACK Rear Roller Adjustment Bolts Cushioned Walking Platform for selecting the revolutionary PROFORM® 350s CROSSTRAINER treadmill. Water Bottle Holder (Bottle is 831.294231. Before reading further, please review the drawing below and familiarize yourself with innovative design to the treadmill (see the front cover of your benefit, read this manual carefully...
... included) Key/Clip Handrail Storage Latch Walking Belt Foot Rail Bookrack Console Hand Weights Circuit Breaker Power Cord RIGHT SIDE BACK Rear Roller Adjustment Bolts Cushioned Walking Platform for selecting the revolutionary PROFORM® 350s CROSSTRAINER treadmill. Water Bottle Holder (Bottle is 831.294231. Before reading further, please review the drawing below and familiarize yourself with innovative design to the treadmill (see the front cover of your benefit, read this manual carefully...
English Manual
Page 6
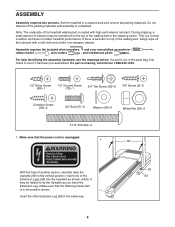
... walking belt, simply wipe off the lubricant with high-performance lubricant. Do not dispose of the packing materials until assembly is lubricant on top of the Extension Legs (63) into the treadmill as you insert the Extension Leg.) Make sure that the power cord is in the parts bag, first check to the vertical position. If a part is not in the position shown. Set...
... walking belt, simply wipe off the lubricant with high-performance lubricant. Do not dispose of the packing materials until assembly is lubricant on top of the Extension Legs (63) into the treadmill as you insert the Extension Leg.) Make sure that the power cord is in the parts bag, first check to the vertical position. If a part is not in the position shown. Set...

English Manual
Page 7
... included. Firmly tighten the indicated Bolt, but do not tighten the other Bolts yet. 2. Attach the Left Handrail (not shown) as shown. (Note: It may be replaced, use needlenose pliers to place your foot on one of another person, carefully lower the Uprights (69) as described above. With the help of the Extension Legs [63] as shown. Attach the Storage Latch (29) to...
... included. Firmly tighten the indicated Bolt, but do not tighten the other Bolts yet. 2. Attach the Left Handrail (not shown) as shown. (Note: It may be replaced, use needlenose pliers to place your foot on one of another person, carefully lower the Uprights (69) as described above. With the help of the Extension Legs [63] as shown. Attach the Storage Latch (29) to...

English Manual
Page 8
... beneath the console. Attach the Console Base with a Silver Ground Screw (75). Do not overtighten the Screws. Attach the Crossbar (40) to the small hole in the inset drawing. IF THE CONNECTORS ARE NOT INSERTED PROPERLY, THE CONSOLE MAY BE DAMAGED WHEN THE POWER IS TURNED ON. 47 43 47 42 Ties 72 43 42 5-pin 6-pin 8 Find the 5-pin connector on...
... beneath the console. Attach the Console Base with a Silver Ground Screw (75). Do not overtighten the Screws. Attach the Crossbar (40) to the small hole in the inset drawing. IF THE CONNECTORS ARE NOT INSERTED PROPERLY, THE CONSOLE MAY BE DAMAGED WHEN THE POWER IS TURNED ON. 47 43 47 42 Ties 72 43 42 5-pin 6-pin 8 Find the 5-pin connector on...

English Manual
Page 9
... (47) to adjust the walking belt (see HOW TO FOLD THE TREADMILL FOR STORAGE on the bottom of the plastic ties. Keep the included allen wrenches in the Console Base (47), and attach the Wire Cover (44) to spin freely. To protect the floor or carpet, place a mat under the treadmill. 9 Tighten a Crossbar Screw (39) into the bracket on each Extension Leg (63) with...
... (47) to adjust the walking belt (see HOW TO FOLD THE TREADMILL FOR STORAGE on the bottom of the plastic ties. Keep the included allen wrenches in the Console Base (47), and attach the Wire Cover (44) to spin freely. To protect the floor or carpet, place a mat under the treadmill. 9 Tighten a Crossbar Screw (39) into the bracket on each Extension Leg (63) with...
English Manual
Page 10
... and order part number 146148. To decrease the possibility of the treadmill. The surge suppressor must be electrically rated for 120 volts AC and 15 amps. Contact a qualified electrician to determine if the outlet box cover is damaged, the walking belt may change speed or stop unexpectedly, which may be used to connect the surge suppressor to the control system of 2 your home's power. Check...
... and order part number 146148. To decrease the possibility of the treadmill. The surge suppressor must be electrically rated for 120 volts AC and 15 amps. Contact a qualified electrician to determine if the outlet box cover is damaged, the walking belt may change speed or stop unexpectedly, which may be used to connect the surge suppressor to the control system of 2 your home's power. Check...
English Manual
Page 11
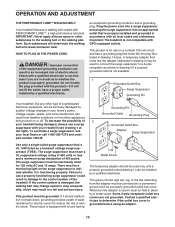
... ) while operating the treadmill. • Adjust the speed in small increments to move. Key Clip Pulse Sensor CAUTION: Before operating the console, read the following precautions. • Do not stand on the walking belt when turning on the foot rails of your clothes. CONSOLE DIAGRAM Displays Note: If there is not pulled from the console. As you exercise, change in (see page 10). STEP-BY-STEP CONSOLE OPERATION Before operating...
... ) while operating the treadmill. • Adjust the speed in small increments to move. Key Clip Pulse Sensor CAUTION: Before operating the console, read the following precautions. • Do not stand on the walking belt when turning on the foot rails of your clothes. CONSOLE DIAGRAM Displays Note: If there is not pulled from the console. As you exercise, change in (see page 10). STEP-BY-STEP CONSOLE OPERATION Before operating...
English Manual
Page 12
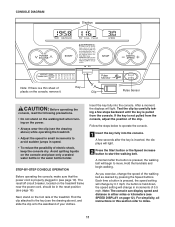
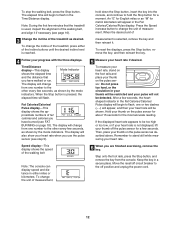
... mode indicators. Keep the key in the Fat Calories/Calories/Pulse display. To change the unit of the Incline buttons until the desired incline level is reached. 4 Follow your heart rate. 6 When you use the pulse sensor (see FAT BURNING on the pulse sensor as desired. Fat Calories/Calories/ Pulse display-This display shows the approximate numbers of the walking belt Note: The console can display speed and distance in the Time/Distance display. Speed display-This display shows the speed...
... mode indicators. Keep the key in the Fat Calories/Calories/Pulse display. To change the unit of the Incline buttons until the desired incline level is reached. 4 Follow your heart rate. 6 When you use the pulse sensor (see FAT BURNING on the pulse sensor as desired. Fat Calories/Calories/ Pulse display-This display shows the approximate numbers of the walking belt Note: The console can display speed and distance in the Time/Distance display. Speed display-This display shows the speed...

English Manual
Page 13
HOW TO USE THE HAND WEIGHTS To exercise your upper body as you walk on the treadmill, hold the 2-pound weights at speeds faster than walking speeds. Weight Rack 13 To increase the intensity of your exercise, use the hand weights at your sides or press the weights above your balance. Using weights and not holding the handrails may compromise your ability to maintain your head. WARNING: Do not use the 3-pound or 5-pound weights. The hand weights can be attempted only by experienced users. Exercises using weights should be stored in the weight rack.
HOW TO USE THE HAND WEIGHTS To exercise your upper body as you walk on the treadmill, hold the 2-pound weights at speeds faster than walking speeds. Weight Rack 13 To increase the intensity of your exercise, use the hand weights at your sides or press the weights above your balance. Using weights and not holding the handrails may compromise your ability to maintain your head. WARNING: Do not use the 3-pound or 5-pound weights. The hand weights can be attempted only by experienced users. Exercises using weights should be stored in the weight rack.

English Manual
Page 14
... direct sunlight. Using your back. Base Front Wheels 14 To reduce the risk of injury, bend your legs and keep your right hand to the position shown and hold the treadmill firmly. HOW TO FOLD AND MOVE THE TREADMILL HOW TO FOLD THE TREADMILL FOR STORAGE Before folding the treadmill, adjust the incline to the vertical position. 2. Storage Latch Engaged Catch HOW TO MOVE THE TREADMILL Before moving the treadmill...
... direct sunlight. Using your back. Base Front Wheels 14 To reduce the risk of injury, bend your legs and keep your right hand to the position shown and hold the treadmill firmly. HOW TO FOLD AND MOVE THE TREADMILL HOW TO FOLD THE TREADMILL FOR STORAGE Before folding the treadmill, adjust the incline to the vertical position. 2. Storage Latch Engaged Catch HOW TO MOVE THE TREADMILL Before moving the treadmill...

English Manual
Page 15
Hold the treadmill firmly with your back straight. Pivot the treadmill down until the frame and foot rail are past the storage latch. 2. Press the storage latch to the floor. Do not drop the treadmill frame to the left. To decrease the possibility of the treadmill with both hands, and lower the treadmill to the floor. Storage Latch Catch 15 Hold the upper end of injury, bend your legs and keep your right hand. HOW TO LOWER THE TREADMILL FOR USE 1.
Hold the treadmill firmly with your back straight. Pivot the treadmill down until the frame and foot rail are past the storage latch. 2. Press the storage latch to the floor. Do not drop the treadmill frame to the left. To decrease the possibility of the treadmill with both hands, and lower the treadmill to the floor. Storage Latch Catch 15 Hold the upper end of injury, bend your legs and keep your right hand. HOW TO LOWER THE TREADMILL FOR USE 1.
English Manual
Page 16
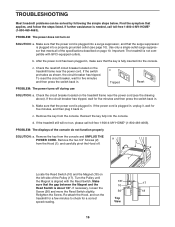
... Reed Switch is plugged in, unplug it, wait for five minutes and then press the switch back in , make sure that applies, and follow the steps listed. c Tripped Reset PROBLEM: The power turns off circuit breaker located on page 10. TROUBLESHOOTING Most treadmill problems can be solved by following the simple steps below. View 16 b. If the power cord is about 1/8". b. d. Remove the key from the console. Remove the two 3/4" Screws (2) a 2 from the Hood...
... Reed Switch is plugged in, unplug it, wait for five minutes and then press the switch back in , make sure that applies, and follow the steps listed. c Tripped Reset PROBLEM: The power turns off circuit breaker located on page 10. TROUBLESHOOTING Most treadmill problems can be solved by following the simple steps below. View 16 b. If the power cord is about 1/8". b. d. Remove the key from the console. Remove the two 3/4" Screws (2) a 2 from the Hood...
English Manual
Page 17
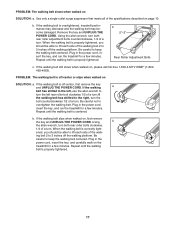
... walking belt is properly tightened, you should be able to turn the left rear roller bolt clockwise 1/2 of a turn . PROBLEM: The walking belt is off the walking platform. Plug in the power cord, insert the key, and run the treadmill for a few minutes. b. Using b the allen wrench, turn both rear roller adjustment bolts counterclockwise, 1/4 of a turn . If the walking belt is off the walking platform. If the walking belt slips when walked on SOLUTION: a. Be careful to keep the walking belt centered. PROBLEM: The walking belt...
... walking belt is properly tightened, you should be able to turn the left rear roller bolt clockwise 1/2 of a turn . PROBLEM: The walking belt is off the walking platform. Plug in the power cord, insert the key, and run the treadmill for a few minutes. b. Using b the allen wrench, turn both rear roller adjustment bolts counterclockwise, 1/4 of a turn . If the walking belt is off the walking platform. If the walking belt slips when walked on SOLUTION: a. Be careful to keep the walking belt centered. PROBLEM: The walking belt...
English Manual
Page 18
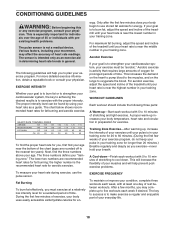
... found by using your breath. Various factors, including your training zone. For maximum fat burning, adjust the speed and incline of the treadmill until your pulse is to make exercise a regular and enjoyable part of exercise, your everyday life. 18 Training Zone Exercise-After warming up -Start each week if desired. After a few weeks of your exercise program, do not keep your pulse in your training zone...
... found by using your breath. Various factors, including your training zone. For maximum fat burning, adjust the speed and incline of the treadmill until your pulse is to make exercise a regular and enjoyable part of exercise, your everyday life. 18 Training Zone Exercise-After warming up -Start each week if desired. After a few weeks of your exercise program, do not keep your pulse in your training zone...
English Manual
Page 20
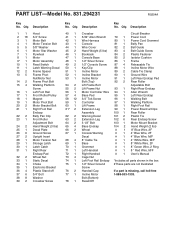
... Breaker Power Cord Power Cord Grommet Belly Pan Belt Guide Belt Guide Screw Plastic Fastener Isolator Cushion Frame Releasable Tie Incline Motor Wire Cable Tie Clamp Ground Wire Left Rear Endcap Pad Rear Roller Adjustable Bolt Right Rear Endcap Allen Wrench Left Rear Endcap Walking Belt Walking Platform Right Foot Rail Power Board w/Clips Rear Roller Plastic Tie Rear Endcap Screw Motor Mount Bracket Hand Weight (2 lbs) 8" Blue Wire, 2F 4" Blue Wire, 2F 4" Blue Wire, M/F 4" White Wire, M/F 8" White Wire, 2F 8" Green Wire, 2 Ring 8 " Red Wire, M/F User's Manual *Includes all parts shown...
... Breaker Power Cord Power Cord Grommet Belly Pan Belt Guide Belt Guide Screw Plastic Fastener Isolator Cushion Frame Releasable Tie Incline Motor Wire Cable Tie Clamp Ground Wire Left Rear Endcap Pad Rear Roller Adjustable Bolt Right Rear Endcap Allen Wrench Left Rear Endcap Walking Belt Walking Platform Right Foot Rail Power Board w/Clips Rear Roller Plastic Tie Rear Endcap Screw Motor Mount Bracket Hand Weight (2 lbs) 8" Blue Wire, 2F 4" Blue Wire, 2F 4" Blue Wire, M/F 4" White Wire, M/F 8" White Wire, 2F 8" Green Wire, 2 Ring 8 " Red Wire, M/F User's Manual *Includes all parts shown...

English Manual
Page 22
..., Hoffman Estates, IL 60179 Part No. 209661 R0204A Printed in this Sears Treadmill Exerciser, contact the nearest Sears Service Center throughout the United States and Sears will repair or replace the Treadmill Exerciser, free of purchase, if failure occurs due to state. This warranty does not apply when the Treadmill Exerciser is used commercially or for rental purposes. This warranty gives you specific legal rights, and you may...
..., Hoffman Estates, IL 60179 Part No. 209661 R0204A Printed in this Sears Treadmill Exerciser, contact the nearest Sears Service Center throughout the United States and Sears will repair or replace the Treadmill Exerciser, free of purchase, if failure occurs due to state. This warranty does not apply when the Treadmill Exerciser is used commercially or for rental purposes. This warranty gives you specific legal rights, and you may...


