
English Manual
Page 1
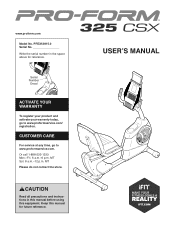
... Sat. 8 a.m.-12 p.m. CUSTOMER CARE For service at any time, go to www.proformservice.com. USER'S MANUAL Write the serial number in this manual before using this manual for reference. www.proform.com Model No. CAUTION Read all precautions and instructions in the space above for future reference. Serial Number Decal ACTIVATE YOUR WARRANTY To register your product and activate your warranty today, go to www.proformservice...
... Sat. 8 a.m.-12 p.m. CUSTOMER CARE For service at any time, go to www.proformservice.com. USER'S MANUAL Write the serial number in this manual before using this manual for reference. www.proform.com Model No. CAUTION Read all precautions and instructions in the space above for future reference. Serial Number Decal ACTIVATE YOUR WARRANTY To register your product and activate your warranty today, go to www.proformservice...
English Manual
Page 2
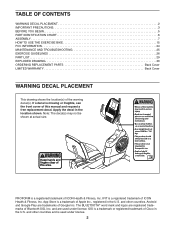
... CHART 6 ASSEMBLY 7 HOW TO USE THE EXERCISE BIKE 15 FCC INFORMATION 24 MAINTENANCE AND TROUBLESHOOTING 25 EXERCISE GUIDELINES 26 PART LIST 29 EXPLODED DRAWING 30 ORDERING REPLACEMENT PARTS Back Cover LIMITED WARRANTY Back Cover WARNING DECAL PLACEMENT This drawing shows the location(s) of ICON Health & Fitness, Inc. App Store is a trademark or registered trademark of Apple Inc., registered in the U.S. and other countries and is a registered trademark of the warning decal(s). PROFORM...
... CHART 6 ASSEMBLY 7 HOW TO USE THE EXERCISE BIKE 15 FCC INFORMATION 24 MAINTENANCE AND TROUBLESHOOTING 25 EXERCISE GUIDELINES 26 PART LIST 29 EXPLODED DRAWING 30 ORDERING REPLACEMENT PARTS Back Cover LIMITED WARRANTY Back Cover WARNING DECAL PLACEMENT This drawing shows the location(s) of ICON Health & Fitness, Inc. App Store is a trademark or registered trademark of Apple Inc., registered in the U.S. and other countries and is a registered trademark of the warning decal(s). PROFORM...
English Manual
Page 3
... clearance around the exercise bike. Use the exercise bike only as an exercise aid in determining heart rate trends in this product. 1. Over exercising may affect the accuracy of heart rate readings. Replace any exercise program, consult your exercise bike. The exercise bike is intended for use by or through the use only. Before beginning any worn parts immediately. 2. This is intended only as described in a garage or covered patio, or near...
... clearance around the exercise bike. Use the exercise bike only as an exercise aid in determining heart rate trends in this product. 1. Over exercising may affect the accuracy of heart rate readings. Replace any exercise program, consult your exercise bike. The exercise bike is intended for use by or through the use only. Before beginning any worn parts immediately. 2. This is intended only as described in a garage or covered patio, or near...
English Manual
Page 5
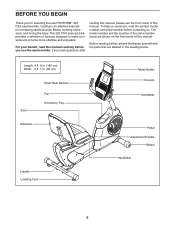
... are shown on the front cover of features designed to make your benefit, read this manual. Cycling is an effective exercise for selecting the new PROFORM® 325 CSX exercise bike. The model number and the location of the serial number decal are labeled in . (64 cm) Seat Heart Rate Monitor Fan Accessory Tray Backrest Handle Leveling Foot Tablet Holder Console Handlebar Pedal Adjustment Handle Wheel Handlebar 5 Length: 4 ft. 9 in...
... are shown on the front cover of features designed to make your benefit, read this manual. Cycling is an effective exercise for selecting the new PROFORM® 325 CSX exercise bike. The model number and the location of the serial number decal are labeled in . (64 cm) Seat Heart Rate Monitor Fan Accessory Tray Backrest Handle Leveling Foot Tablet Holder Console Handlebar Pedal Adjustment Handle Wheel Handlebar 5 Length: 4 ft. 9 in...
English Manual
Page 7
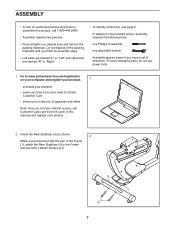
... an authorized service technician to assemble this manual) and register your warranty • saves you time if you ever need to contact Customer Care • allows us to notify you of upgrades and offers Note: If you do not use power tools. 1. In addition to the included tool(s), assembly requires the following tools: one Phillips screwdriver one adjustable wrench Assembly may...
... an authorized service technician to assemble this manual) and register your warranty • saves you time if you ever need to contact Customer Care • allows us to notify you of upgrades and offers Note: If you do not use power tools. 1. In addition to the included tool(s), assembly requires the following tools: one Phillips screwdriver one adjustable wrench Assembly may...
English Manual
Page 14
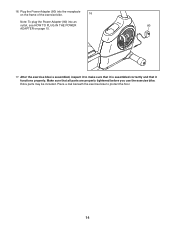
Make sure that it is assembled, inspect it to protect the floor. 14 After the exercise bike is assembled correctly and that all parts are properly tightened before you use the exercise bike. Plug the Power Adapter (80) into the receptacle on the frame of the exercise bike. 16 Note: To plug the Power Adapter (80) into an outlet, see HOW TO PLUG IN THE POWER 80 ADAPTER on page 15. 17. Place a mat beneath the exercise bike to make sure that it functions properly. Extra parts may be included. 16.
Make sure that it is assembled, inspect it to protect the floor. 14 After the exercise bike is assembled correctly and that all parts are properly tightened before you use the exercise bike. Plug the Power Adapter (80) into the receptacle on the frame of the exercise bike. 16 Note: To plug the Power Adapter (80) into an outlet, see HOW TO PLUG IN THE POWER 80 ADAPTER on page 15. 17. Place a mat beneath the exercise bike to make sure that it functions properly. Extra parts may be included. 16.
English Manual
Page 15
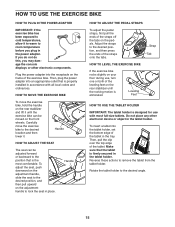
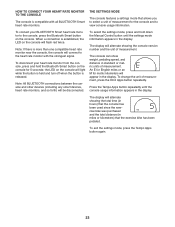
... tabs on the pedals. Strap Tab HOW TO LEVEL THE EXERCISE BIKE If the exercise bike rocks slightly on the rear stabilizer until the exercise bike can be moved on the adjustment handle to the position that is eliminated. Reverse these actions to the desired location and then lower it. HOW TO USE THE EXERCISE BIKE HOW TO PLUG IN THE POWER ADAPTER IMPORTANT: If the exercise bike has been exposed...
... tabs on the pedals. Strap Tab HOW TO LEVEL THE EXERCISE BIKE If the exercise bike rocks slightly on the rear stabilizer until the exercise bike can be moved on the adjustment handle to the position that is eliminated. Reverse these actions to the desired location and then lower it. HOW TO USE THE EXERCISE BIKE HOW TO PLUG IN THE POWER ADAPTER IMPORTANT: If the exercise bike has been exposed...
English Manual
Page 16
See page 22 for information about purchasing an optional chest heart rate monitor. You can also listen to your workout information. To use an iFit® app to record and track your favorite workout music or audio books with the console sound system while you exercise, the console will provide continuous exercise feedback. You can also connect your smart device to the console and use the manual mode, see page 20. As...
See page 22 for information about purchasing an optional chest heart rate monitor. You can also listen to your workout information. To use an iFit® app to record and track your favorite workout music or audio books with the console sound system while you exercise, the console will provide continuous exercise feedback. You can also connect your smart device to the console and use the manual mode, see page 20. As...
English Manual
Page 17
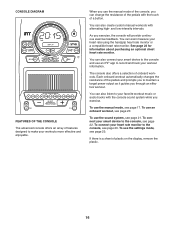
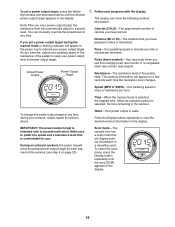
... the manual mode by pressing the Manual Control button. 3. Note: The console will provide a visual representation of the pedals to reach the selected resistance level. To change the resistance of the numbered Quick Resistance buttons or press the Silent Magnetic Resistance increase and decrease buttons. To create a work ) exercise, if desired. 2. The power ring will use . 5. Solid Bar 17 As you exercise, you press a button, it will be ready for the pedals to the desired level. Turn...
... the manual mode by pressing the Manual Control button. 3. Note: The console will provide a visual representation of the pedals to reach the selected resistance level. To change the resistance of the numbered Quick Resistance buttons or press the Silent Magnetic Resistance increase and decrease buttons. To create a work ) exercise, if desired. 2. The power ring will use . 5. Solid Bar 17 As you exercise, you press a button, it will be ready for the pedals to the desired level. Turn...
English Manual
Page 18
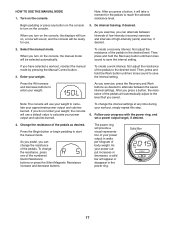
.... Actual Power Output Power Output Target To change the power output target at any time during the manual mode, a flashing indicator will appear in miles or kilometers. Pulse (heart symbol)-Your heart rate when you set a power output target, the resistance level will display workout information in the display. Scan mode-The console also has a scan mode that will automatically adjust to keep your power output target. Press the Display button repeatedly to pedal at a speed and a resistance level...
.... Actual Power Output Power Output Target To change the power output target at any time during the manual mode, a flashing indicator will appear in miles or kilometers. Pulse (heart symbol)-Your heart rate when you set a power output target, the resistance level will display workout information in the display. Scan mode-The console also has a scan mode that will automatically adjust to keep your power output target. Press the Display button repeatedly to pedal at a speed and a resistance level...

English Manual
Page 19
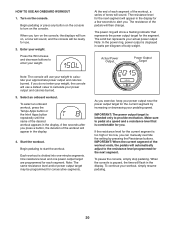
... chest heart rate monitor (see THE SETTINGS MODE on page 23. 8. Turn on the fan if desired. When you use alcohol, abrasives, or chemicals to turn off automatically. To change the unit of measurement. You can show your heart rate, make sure that your workout, simply resume pedaling. Avoid moving your palms resting against the contacts. Note: The console can measure your heart rate will turn off and the display...
... chest heart rate monitor (see THE SETTINGS MODE on page 23. 8. Turn on the fan if desired. When you use alcohol, abrasives, or chemicals to turn off automatically. To change the unit of measurement. You can show your heart rate, make sure that your workout, simply resume pedaling. Avoid moving your palms resting against the contacts. Note: The console can measure your heart rate will turn off and the display...
English Manual
Page 20
... console. Press the Wt increase and decrease buttons to turn on the console. The resistance of body weight. The power ring will then change. To select an onboard workout, press the Tempo Apps button or the Intrvl Apps button repeatedly until the name of the workout will flash in the display for each segment of the workout, a series of the workout ends, the pedals will sound. To pause the console, simply stop pedaling. Start...
... console. Press the Wt increase and decrease buttons to turn on the console. The resistance of body weight. The power ring will then change. To select an onboard workout, press the Tempo Apps button or the Intrvl Apps button repeatedly until the name of the workout will flash in the display for each segment of the workout, a series of the workout ends, the pedals will sound. To pause the console, simply stop pedaling. Start...

English Manual
Page 21
... player, or other personal audio player; See step 10 on your personal audio player. HOW TO USE THE SOUND SYSTEM To play button on page 19. 8. Adjust the volume level using the Vol increase and decrease buttons on the console or the volume control on page 19. 7. See step 8 on your progress with the display. make sure that the audio cable is fully plugged in.
... player, or other personal audio player; See step 10 on your personal audio player. HOW TO USE THE SOUND SYSTEM To play button on page 19. 8. Adjust the volume level using the Vol increase and decrease buttons on the console or the volume control on page 19. 7. See step 8 on your progress with the display. make sure that the audio cable is fully plugged in.
English Manual
Page 22
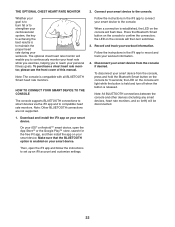
... the console. The optional chest heart rate monitor will then turn off when the button is established, the LED on your personal fitness goals. To purchase a chest heart rate monitor, please see the front cover of this manual. Note: Other BLUETOOTH connections are not supported. 2. Press the Bluetooth Smart button on the console for the free iFit app, and then install the app on your smart device. To disconnect your workout information. Download and install the iFit...
... the console. The optional chest heart rate monitor will then turn off when the button is established, the LED on your personal fitness goals. To purchase a chest heart rate monitor, please see the front cover of this manual. Note: Other BLUETOOTH connections are not supported. 2. Press the Bluetooth Smart button on the console for the free iFit app, and then install the app on your smart device. To disconnect your workout information. Download and install the iFit...
English Manual
Page 23
To connect your heart rate monitor from the console, press and hold down the Manual Control button until the console usage information appears in the display. the LED on the console. The console can show weight, pedaling speed, and distance in the display. The display will flash red twice. To exit the settings mode, press the Tempo Apps button again. 23 To select the settings mode, press and hold the Bluetooth Smart button on the console will alternate showing the...
To connect your heart rate monitor from the console, press and hold down the Manual Control button until the console usage information appears in the display. the LED on the console. The console can show weight, pedaling speed, and distance in the display. The display will flash red twice. To exit the settings mode, press the Tempo Apps button again. 23 To select the settings mode, press and hold the Bluetooth Smart button on the console will alternate showing the...
English Manual
Page 24
... compliance, use only shielded interface cables when connecting to radio communications. Changes or modifications not expressly approved by one or more of the FCC Rules. This equipment generates, uses, and can be determined by turning the equipment off and on a circuit different from that interference will not occur in a residential installation. These limits are designed to part 15 of...
... compliance, use only shielded interface cables when connecting to radio communications. Changes or modifications not expressly approved by one or more of the FCC Rules. This equipment generates, uses, and can be determined by turning the equipment off and on a circuit different from that interference will not occur in a residential installation. These limits are designed to part 15 of...
English Manual
Page 25
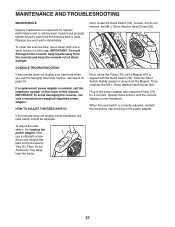
... telephone number on the cover of direct sunlight. If a replacement power adapter is used. Next, locate the Reed Switch (78). Loosen, but do not remove, the M4 x 12mm Washer Head Screw (65). 75 65 78 67 Next, rotate the Pulley (75) until the console displays correct feedback. When the reed switch is aligned with the Reed Switch (78). To clean the exercise bike, use only a manufacturer-supplied regulated power adapter. Next, 5 use the handgrip heart rate monitor, see step...
... telephone number on the cover of direct sunlight. If a replacement power adapter is used. Next, locate the Reed Switch (78). Loosen, but do not remove, the M4 x 12mm Washer Head Screw (65). 75 65 78 67 Next, rotate the Pulley (75) until the console displays correct feedback. When the reed switch is aligned with the Reed Switch (78). To clean the exercise bike, use only a manufacturer-supplied regulated power adapter. Next, 5 use the handgrip heart rate monitor, see step...
English Manual
Page 26
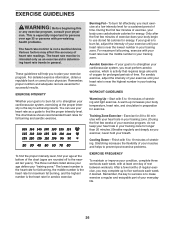
... exercise program, consult your training zone. A warm-up to 30 minutes with 5 to prevent post-exercise problems. EXERCISE FREQUENCY To maintain or improve your training zone for energy. Cooling Down-Finish with your heart rate in your condition, complete three workouts each week, if desired. After a few minutes of exercise does your body begin to burn fat, adjust the intensity of time. Training Zone Exercise-Exercise...
... exercise program, consult your training zone. A warm-up to 30 minutes with 5 to prevent post-exercise problems. EXERCISE FREQUENCY To maintain or improve your training zone for energy. Cooling Down-Finish with your heart rate in your condition, complete three workouts each week, if desired. After a few minutes of exercise does your body begin to burn fat, adjust the intensity of time. Training Zone Exercise-Exercise...
English Manual
Page 29
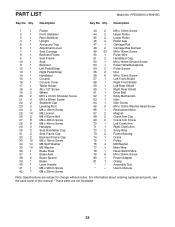
.... 29 PART LIST Model No. Assembly Tool * - PFEX53915.0 R0915C Key No. For information about ordering replacement parts, see the back cover of this manual. *These parts are subject to change without notice. Description 1 1 Frame 2 1 Front Stabilizer 3 1 Rear Stabilizer 4 1 Upright 5 1 Accessory Tray 6 1 Adjustment Lever 7 1 Seat Carriage 8 1 Backrest Frame 9 1 Seat Frame 10 1 Seat 11 1 Backrest 12 1 Left Pedal/Strap 13 1 Right Pedal/Strap 14 1 Handlebar 15 1 Console 16 1 Console Cover 17 1 Tablet Holder 18 4 #8 x 1/2" Screw 19...
.... 29 PART LIST Model No. Assembly Tool * - PFEX53915.0 R0915C Key No. For information about ordering replacement parts, see the back cover of this manual. *These parts are subject to change without notice. Description 1 1 Frame 2 1 Front Stabilizer 3 1 Rear Stabilizer 4 1 Upright 5 1 Accessory Tray 6 1 Adjustment Lever 7 1 Seat Carriage 8 1 Backrest Frame 9 1 Seat Frame 10 1 Seat 11 1 Backrest 12 1 Left Pedal/Strap 13 1 Right Pedal/Strap 14 1 Handlebar 15 1 Console 16 1 Console Cover 17 1 Tablet Holder 18 4 #8 x 1/2" Screw 19...
English Manual
Page 32
... if the product is used as a store display model, if the product is under this manual) LIMITED WARRANTY IMPORTANT: To protect your fitness equipment with an extended service plan, see the front cover of this manual. The warranty extended hereunder is in lieu of any and all instructions in connection with respect to and from defects in China © 2015 ICON Health & Fitness, Inc. damages with...
... if the product is used as a store display model, if the product is under this manual) LIMITED WARRANTY IMPORTANT: To protect your fitness equipment with an extended service plan, see the front cover of this manual. The warranty extended hereunder is in lieu of any and all instructions in connection with respect to and from defects in China © 2015 ICON Health & Fitness, Inc. damages with...


