

English Manual
Page 1
... precautions and instructions in the space above for future reference. USERʼS MANUAL MT Sat. 8 a.m.-4 p.m. PFEX02909.2 Serial No. If you have questions, or if parts are damaged or missing, DO NOT CONTACT THE STORE; Keep this manual) before using this equipment. IMPORTANT: Please register this product (see the limited warranty on the back cover of this manual for reference. www.proform.com Model No.
... precautions and instructions in the space above for future reference. USERʼS MANUAL MT Sat. 8 a.m.-4 p.m. PFEX02909.2 Serial No. If you have questions, or if parts are damaged or missing, DO NOT CONTACT THE STORE; Keep this manual) before using this equipment. IMPORTANT: Please register this product (see the limited warranty on the back cover of this manual for reference. www.proform.com Model No.

English Manual
Page 2
Note: The decal(s) may not be shown at actual size. PROFORM is missing or illegible, see the front cover of this manual and request a free replacement decal. TABLE OF CONTENTS WARNING DECAL PLACEMENT 2 IMPORTANT PRECAUTIONS 3 BEFORE YOU BEGIN 4 ASSEMBLY 5 HOW TO USE THE EXERCISE BIKE 8 PART LIST 10 EXPLODED DRAWING 11 ORDERING REPLACEMENT PARTS Back Cover LIMITED WARRANTY Back Cover WARNING DECAL PLACEMENT This drawing shows the location(s) of ICON IP, Inc. 2 If a decal is a registered trademark of the warning decal(s). Apply the decal in the location shown.
Note: The decal(s) may not be shown at actual size. PROFORM is missing or illegible, see the front cover of this manual and request a free replacement decal. TABLE OF CONTENTS WARNING DECAL PLACEMENT 2 IMPORTANT PRECAUTIONS 3 BEFORE YOU BEGIN 4 ASSEMBLY 5 HOW TO USE THE EXERCISE BIKE 8 PART LIST 10 EXPLODED DRAWING 11 ORDERING REPLACEMENT PARTS Back Cover LIMITED WARRANTY Back Cover WARNING DECAL PLACEMENT This drawing shows the location(s) of ICON IP, Inc. 2 If a decal is a registered trademark of the warning decal(s). Apply the decal in the location shown.

English Manual
Page 3
...-existing health problems. 9. Always wear athletic shoes for home use , tighten the resistance knob completely to ensure that could become caught on the exercise bike. do not lubricate the brake pads. 7. The exercise bike does not have a freewheel; It is at all parts regularly. Make sure that there is the responsibility of the owner to prevent the flywheel from moisture and dust. To stop immediately...
...-existing health problems. 9. Always wear athletic shoes for home use , tighten the resistance knob completely to ensure that could become caught on the exercise bike. do not lubricate the brake pads. 7. The exercise bike does not have a freewheel; It is at all parts regularly. Make sure that there is the responsibility of the owner to prevent the flywheel from moisture and dust. To stop immediately...

English Manual
Page 4
... new PROFORM® 290 SPX exercise bike. To help us . For your workouts at home more effective and enjoyable. If you for increasing cardiovascular fitness, building endurance, and toning the body. after reading this manual, please see the front cover of this manual. BEFORE YOU BEGIN Thank you have questions the parts that are shown on the front cover of this manual. Seat Resistance Knob Brake Lever Handlebar Adjustment Knob...
... new PROFORM® 290 SPX exercise bike. To help us . For your workouts at home more effective and enjoyable. If you for increasing cardiovascular fitness, building endurance, and toning the body. after reading this manual, please see the front cover of this manual. BEFORE YOU BEGIN Thank you have questions the parts that are shown on the front cover of this manual. Seat Resistance Knob Brake Lever Handlebar Adjustment Knob...

English Manual
Page 5
... 5 Do not dispose of the exercise bike in a cleared area and remove the packing materials. Orient the Front Stabilizer (8) so that the 2 Wheels (21) are in the hardware kit, check to the included tool(s), assembly requires an adjustable wrench screwdriver . ASSEMBLY Assembly requires two persons. Place all parts of the packing materials until assembly is not in the position...
... 5 Do not dispose of the exercise bike in a cleared area and remove the packing materials. Orient the Front Stabilizer (8) so that the 2 Wheels (21) are in the hardware kit, check to the included tool(s), assembly requires an adjustable wrench screwdriver . ASSEMBLY Assembly requires two persons. Place all parts of the packing materials until assembly is not in the position...
English Manual
Page 6
... the Handlebar Post, and then tighten the Adjustment Knob. Move the Handlebar Post (4) upward or downward to the Handlebar Post (4) with an "R." 3 Using an adjustable wrench, firmly tighten the Right Pedal (35) clockwise into an adjustment hole in an adjustment hole. 31 35 4 1 23 5. Then, insert the Handlebar Post (4) into the Left Crank Arm (not shown). 61 4. Attach the Handlebar (5) to the desired...
... the Handlebar Post, and then tighten the Adjustment Knob. Move the Handlebar Post (4) upward or downward to the Handlebar Post (4) with an "R." 3 Using an adjustable wrench, firmly tighten the Right Pedal (35) clockwise into an adjustment hole in an adjustment hole. 31 35 4 1 23 5. Then, insert the Handlebar Post (4) into the Left Crank Arm (not shown). 61 4. Attach the Handlebar (5) to the desired...

English Manual
Page 7
.... Move the Seat Post (2) upward or downward to the desired position and then release the Adjustment Knob (23) into one of the adjustment holes in the Seat Post, and then tighten the Adjustment Knob. Loosen the Adjustment Knob and pull it outward. Then, insert the Seat Post (2) into an adjustment hole in the Seat Carriage. Make sure that all parts are properly tightened before you use the exercise bike...
.... Move the Seat Post (2) upward or downward to the desired position and then release the Adjustment Knob (23) into one of the adjustment holes in the Seat Post, and then tighten the Adjustment Knob. Loosen the Adjustment Knob and pull it outward. Then, insert the Seat Post (2) into an adjustment hole in the Seat Carriage. Make sure that all parts are properly tightened before you use the exercise bike...

English Manual
Page 8
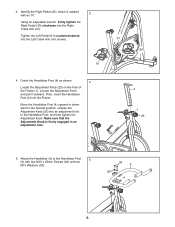
... increase your knees when the pedals are in the seat carriage, and firmly tighten the adjustment knob. ment hole. Make sure that is most comfortable. For effective exercise, the seat should be at the proper height. Then, move the handlebar post upward or Adjustment downward, release Knob the adjustment knob into an adjustment hole in assembly step 7 on the seat clamp a few turns, and then tilt the...
... increase your knees when the pedals are in the seat carriage, and firmly tighten the adjustment knob. ment hole. Make sure that is most comfortable. For effective exercise, the seat should be at the proper height. Then, move the handlebar post upward or Adjustment downward, release Knob the adjustment knob into an adjustment hole in assembly step 7 on the seat clamp a few turns, and then tilt the...

English Manual
Page 9
... avoid damage to decrease the resistance, turn the resistance knob clockwise; To loosen the pedal straps, press and hold the tabs on the buckles, adjust the pedal straps to a complete stop the flywheel, push the brake lever downward. HOW TO MAINTAIN THE EXERCISE BIKE Inspect and tighten all parts of direct sunlight. HOW TO ADJUST THE PEDAL STRAPS HOW TO LEVEL THE EXERCISE BIKE To tighten the pedal straps (see the drawing on page...
... avoid damage to decrease the resistance, turn the resistance knob clockwise; To loosen the pedal straps, press and hold the tabs on the buckles, adjust the pedal straps to a complete stop the flywheel, push the brake lever downward. HOW TO MAINTAIN THE EXERCISE BIKE Inspect and tighten all parts of direct sunlight. HOW TO ADJUST THE PEDAL STRAPS HOW TO LEVEL THE EXERCISE BIKE To tighten the pedal straps (see the drawing on page...
English Manual
Page 10
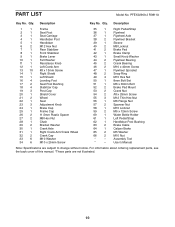
... Key No. For information about ordering replacement parts, see the back cover of this manual. *These parts are subject to change without notice. Assembly Tool * - Userʼs Manual Note: Specifications are not illustrated. 10 Description Key No. Qty. Qty. Description 1 1 Frame 2 1 Seat Post 3 1 Seat Carriage 4 1 Handlebar Post 5 1 Handlebar 6 2 M12 Hex Nut 7 1 Rear Stabilizer 8 1 Front Stabilizer 9 1 Brake Lever 10 1 Felt Washer 11 1 Resistance Knob 12 1 Left Crank Arm 13 10 #8 x 13mm Screw...
... Key No. For information about ordering replacement parts, see the back cover of this manual. *These parts are subject to change without notice. Assembly Tool * - Userʼs Manual Note: Specifications are not illustrated. 10 Description Key No. Qty. Qty. Description 1 1 Frame 2 1 Seat Post 3 1 Seat Carriage 4 1 Handlebar Post 5 1 Handlebar 6 2 M12 Hex Nut 7 1 Rear Stabilizer 8 1 Front Stabilizer 9 1 Brake Lever 10 1 Felt Washer 11 1 Resistance Knob 12 1 Left Crank Arm 13 10 #8 x 13mm Screw...

English Manual
Page 11
EXPLODED DRAWING 17 23 22 27 19 2 Model No. PFEX02909.2 R0811A 27 34 3 5 33 7 18 49 16 35 31 54 45 30 48 28 32 53 44 47 38 13 37 57 55 6 29 40 19 17 18 34 49 33 16 26 11 43 9 10 50 50 23 13 42 63 58 60 51 41 64 52 61 4 19 62 12 53 32 48 45 61 56 23 24 25 1 34 18 33 15 39 38 55 44 6 29 40 36 8 18 46 49 16 46 66 49 66 16 21 21 14 13 20 13 59 65 13 11
EXPLODED DRAWING 17 23 22 27 19 2 Model No. PFEX02909.2 R0811A 27 34 3 5 33 7 18 49 16 35 31 54 45 30 48 28 32 53 44 47 38 13 37 57 55 6 29 40 19 17 18 34 49 33 16 26 11 43 9 10 50 50 23 13 42 63 58 60 51 41 64 52 61 4 19 62 12 53 32 48 45 61 56 23 24 25 1 34 18 33 15 39 38 55 44 6 29 40 36 8 18 46 49 16 46 66 49 66 16 21 21 14 13 20 13 59 65 13 11

English Manual
Page 12
... REPLACEMENT PARTS To order replacement parts, please see the PART LIST and the EXPLODED DRAWING near the end of this manual) LIMITED WARRANTY IMPORTANT: You must be preauthorized by ICON. The warranty extended hereunder is used , or if the product is in this manual are not followed, if the product is abused or improperly or abnormally used for service needed under normal use or performance of removal or installation...
... REPLACEMENT PARTS To order replacement parts, please see the PART LIST and the EXPLODED DRAWING near the end of this manual) LIMITED WARRANTY IMPORTANT: You must be preauthorized by ICON. The warranty extended hereunder is used , or if the product is in this manual are not followed, if the product is abused or improperly or abnormally used for service needed under normal use or performance of removal or installation...

