
English Manual
Page 1
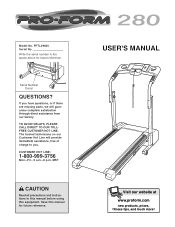
... LINE: 1-800-999-3756 Mon.-Fri., 6 a.m.-6 p.m. USER'S MANUAL Visit our website at www.proform.com new products, prizes, fitness tips, and much more! MST CAUTION Read all precautions and instructions in the space above for future reference. If you have questions, or if there are missing parts, we will provide immediate assistance, free of charge to you. Model No.
... LINE: 1-800-999-3756 Mon.-Fri., 6 a.m.-6 p.m. USER'S MANUAL Visit our website at www.proform.com new products, prizes, fitness tips, and much more! MST CAUTION Read all precautions and instructions in the space above for future reference. If you have questions, or if there are missing parts, we will provide immediate assistance, free of charge to you. Model No.
English Manual
Page 2
... while using the treadmill. TABLE OF CONTENTS IMPORTANT PRECAUTIONS 2 BEFORE YOU BEGIN 4 ASSEMBLY 5 OPERATION AND ADJUSTMENT 7 HOW TO FOLD AND MOVE THE TREADMILL 10 MAINTENANCE AND TROUBLE-SHOOTING 12 CONDITIONING GUIDELINES 14 ORDERING REPLACEMENT PARTS Back Cover LIMITED WARRANTY Back Cover Note: A PART IDENTIFICATION CHART, an EXPLODED DRAWING, and a PART LIST are recommended for both men and women. Keep children under the treadmill. 4. To purchase a surge suppressor, see page 8), plug the power cord...
... while using the treadmill. TABLE OF CONTENTS IMPORTANT PRECAUTIONS 2 BEFORE YOU BEGIN 4 ASSEMBLY 5 OPERATION AND ADJUSTMENT 7 HOW TO FOLD AND MOVE THE TREADMILL 10 MAINTENANCE AND TROUBLE-SHOOTING 12 CONDITIONING GUIDELINES 14 ORDERING REPLACEMENT PARTS Back Cover LIMITED WARRANTY Back Cover Note: A PART IDENTIFICATION CHART, an EXPLODED DRAWING, and a PART LIST are recommended for both men and women. Keep children under the treadmill. 4. To purchase a surge suppressor, see page 8), plug the power cord...
English Manual
Page 3
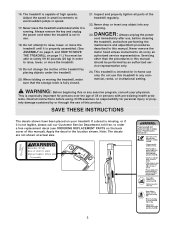
... treadmill. 20. This treadmill is not in the location shown. WARNING: Before beginning this manual). Never remove the motor hood unless instructed to raise, lower, or move the treadmill until it is running. Servicing other than the procedures in this manual should be able to order a free replacement decal (see ORDERING REPLACEMENT PARTS on your physician. Always unplug the power cord immediately after use of high speeds. Apply the decal in use...
... treadmill. 20. This treadmill is not in the location shown. WARNING: Before beginning this manual). Never remove the motor hood unless instructed to raise, lower, or move the treadmill until it is running. Servicing other than the procedures in this manual should be able to order a free replacement decal (see ORDERING REPLACEMENT PARTS on your physician. Always unplug the power cord immediately after use of high speeds. Apply the decal in use...
English Manual
Page 4
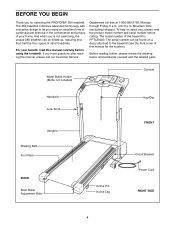
... questions after reading this manual, please call our Customer Service Department toll-free at 1-800-999-3756, Monday through Friday, 6 a.m. If you for the location). The model number of other treadmills. The 280 treadmill combines advanced technology with the labeled parts. Water Bottle Holder (Bottle not included) Console Handrails Lock Knob Uprights Walking Belt Foot Rails BACK Rear Roller Adjustment Bolts Key/Clip FRONT Incline Pin Incline Leg Circuit Breaker Power Cord RIGHT SIDE 4 Mountain Time...
... questions after reading this manual, please call our Customer Service Department toll-free at 1-800-999-3756, Monday through Friday, 6 a.m. If you for the location). The model number of other treadmills. The 280 treadmill combines advanced technology with the labeled parts. Water Bottle Holder (Bottle not included) Console Handrails Lock Knob Uprights Walking Belt Foot Rails BACK Rear Roller Adjustment Bolts Key/Clip FRONT Incline Pin Incline Leg Circuit Breaker Power Cord RIGHT SIDE 4 Mountain Time...

English Manual
Page 5
... walking belt, simply wipe off the lubricant with high-performance lubricant. If there is lubricant on top of the treadmill walking belt is completed. To identify small parts during assembly, use the PART IDENTIFICATION CHART in the center of the Left Upright). Do not fully fold the treadmill until assembly is coated with a soft cloth and a mild, non-abrasive cleaner. Refer to the Base (38) with a Wheel Bolt...
... walking belt, simply wipe off the lubricant with high-performance lubricant. If there is lubricant on top of the treadmill walking belt is completed. To identify small parts during assembly, use the PART IDENTIFICATION CHART in the center of the Left Upright). Do not fully fold the treadmill until assembly is coated with a soft cloth and a mild, non-abrasive cleaner. Refer to the Base (38) with a Wheel Bolt...

English Manual
Page 6
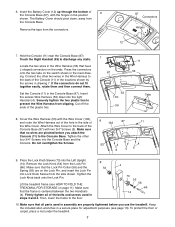
...Upright (15) as described above. Hold a Handrail Spacer (3) with two Handrail Bolts (1) and 5/16" Star Washers (101) as shown. After you have started all four Screws, tighten the Screws until it into the Base. sary, use needlenose pliers to avoid pinching the Wire Harness. Do not tighten the Handrail Bolts yet. Attach...Upright (15). do not overtighten the Screws. Plastic Shim and then insert the Right Upright. Do not tight- Note: If necessary, tap the Right Upright with three 1" Bolts (16) and three Star Washers (2). Set the Console Base (87) on the Console...
...Upright (15) as described above. Hold a Handrail Spacer (3) with two Handrail Bolts (1) and 5/16" Star Washers (101) as shown. After you have started all four Screws, tighten the Screws until it into the Base. sary, use needlenose pliers to avoid pinching the Wire Harness. Do not tighten the Handrail Bolts yet. Attach...Upright (15). do not overtighten the Screws. Plastic Shim and then insert the Right Upright. Do not tight- Note: If necessary, tap the Right Upright with three 1" Bolts (16) and three Star Washers (2). Set the Console Base (87) on the Console...
English Manual
Page 7
... any static. Attach the Wire Cover to the Console Base. Press the Lock Knob Sleeve (73) into Lock Knob Sleeve from slipping. Insert the Battery Cover (12) up through the bottom of the Console Base (87) with the Wire Cover (102), and route the Wire Harness out of the hole in the side of the bolts and screws used in assembly are properly tightened before you use the treadmill. The Battery Cover should pivot...
... any static. Attach the Wire Cover to the Console Base. Press the Lock Knob Sleeve (73) into Lock Knob Sleeve from slipping. Insert the Battery Cover (12) up through the bottom of the Console Base (87) with the Wire Cover (102), and route the Wire Harness out of the hole in the side of the bolts and screws used in assembly are properly tightened before you use the treadmill. The Battery Cover should pivot...

English Manual
Page 8
... electrically rated for 120 volts AC and 15 amps. Whenever the adapter is used only until a properly grounded outlet (drawing 1) can result in drawing 1 below. Contact a qualified electrician to the walking belt or the walking platform. OPERATION AND ADJUSTMENT THE PERFORMANT LUBETM WALKING BELT Your treadmill features a walking belt coated with your treadmill (see your home's power. This product is for electric current to the control...
... electrically rated for 120 volts AC and 15 amps. Whenever the adapter is used only until a properly grounded outlet (drawing 1) can result in drawing 1 below. Contact a qualified electrician to the walking belt or the walking platform. OPERATION AND ADJUSTMENT THE PERFORMANT LUBETM WALKING BELT Your treadmill features a walking belt coated with your treadmill (see your home's power. This product is for electric current to the control...
English Manual
Page 9
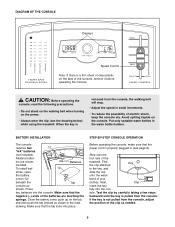
... steps backward until the key is removed from the console, adjust the position of the treadmill. ies are touching the springs. CAUTION: Before operating the console, read the following precautions. • Do not stand on the walking belt when turning on the console. Find Key the clip attached to the key, and slide the clip onto the waist- To install bat- 12 teries, open the battery cover (12...
... steps backward until the key is removed from the console, adjust the position of the treadmill. ies are touching the springs. CAUTION: Before operating the console, read the following precautions. • Do not stand on the walking belt when turning on the console. Find Key the clip attached to the key, and slide the clip onto the waist- To install bat- 12 teries, open the battery cover (12...
English Manual
Page 10
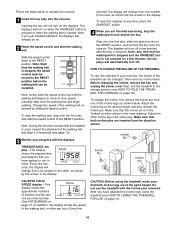
... both incline pins are finished exercising, stop the walking belt, step onto the foot rails and slide the speed control to the other incline leg in miles per hour. seconds, the display will already be restarted. The displays will automatically turn on page 11). 10 Make sure that you just installed batteries, the displays will change from the console. Incline Pin Incline Pin Incline Pin CALS/FAT CALS/ SPEED display-This Arrow display shows the approximate numbers of the treadmill can...
... both incline pins are finished exercising, stop the walking belt, step onto the foot rails and slide the speed control to the other incline leg in miles per hour. seconds, the display will already be restarted. The displays will automatically turn on page 11). 10 Make sure that you just installed batteries, the displays will change from the console. Incline Pin Incline Pin Incline Pin CALS/FAT CALS/ SPEED display-This Arrow display shows the approximate numbers of the treadmill can...

English Manual
Page 11
... latch knob. Refer to the floor. Do not drop the treadmill frame to drawing 1. HOW TO FOLD AND MOVE THE TREADMILL HOW TO FOLD THE TREADMILL FOR STORAGE Before folding the treadmill, unplug the power cord. Move your left and hold the treadmill firmly. Slowly release the latch knob. 2. Slowly release the latch knob. Keep the treadmill out of the handrails. Using your right hand to the left hand, pull the latch knob...
... latch knob. Refer to the floor. Do not drop the treadmill frame to drawing 1. HOW TO FOLD AND MOVE THE TREADMILL HOW TO FOLD THE TREADMILL FOR STORAGE Before folding the treadmill, unplug the power cord. Move your left and hold the treadmill firmly. Slowly release the latch knob. 2. Slowly release the latch knob. Keep the treadmill out of the handrails. Using your right hand to the left hand, pull the latch knob...
English Manual
Page 12
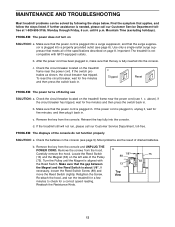
... holidays). c. c Tripped Reset PROBLEM: The power turns off during use SOLUTION: a. Check the circuit breaker located on the left side of drained batteries. above). Reinsert the key fully into the console. c. Remove the key from the console and UNPLUG THE POWER CORD. Locate the Reed Switch (13) and the Magnet (63) on the treadmill frame near the power cord. Turn the Pulley until 6 p.m. If necessary, loosen the Reed Switch Screw (89) and move the Reed Switch slightly. If...
... holidays). c. c Tripped Reset PROBLEM: The power turns off during use SOLUTION: a. Check the circuit breaker located on the left side of drained batteries. above). Reinsert the key fully into the console. c. Remove the key from the console and UNPLUG THE POWER CORD. Locate the Reed Switch (13) and the Magnet (63) on the treadmill frame near the power cord. Turn the Pulley until 6 p.m. If necessary, loosen the Reed Switch Screw (89) and move the Reed Switch slightly. If...
English Manual
Page 13
... left rear roller bolt clockwise 1/2 of a turn . Plug in the power cord, insert the key and carefully walk on SOLUTION: a. Use only a single-outlet surge suppressor that meets all of a turn. b 2"-3" Rear Roller Adjustment Bolts c. b. When the walking belt is properly tightened. 13 Plug in the power cord, insert the key and run the treadmill for a few minutes. Using b the allen wrench, turn both rear roller adjustment bolts counterclockwise, 1/4 of the specifications described on SOLUTION: a. PROBLEM: The walking belt slows when walked on page 8. Using...
... left rear roller bolt clockwise 1/2 of a turn . Plug in the power cord, insert the key and carefully walk on SOLUTION: a. Use only a single-outlet surge suppressor that meets all of a turn. b 2"-3" Rear Roller Adjustment Bolts c. b. When the walking belt is properly tightened. 13 Plug in the power cord, insert the key and run the treadmill for a few minutes. Using b the allen wrench, turn both rear roller adjustment bolts counterclockwise, 1/4 of the specifications described on SOLUTION: a. PROBLEM: The walking belt slows when walked on page 8. Using...
English Manual
Page 14
... speed or incline of the treadmill until your heart rate is to the nearest ten years). A proper warm-up Start each workout with 5 to exercise with pre-existing health problems. The following three important parts: A Warm-up increases your heart rate as shown. The lower two numbers are your body begin to burn fat, adjust the speed and incline of the treadmill accordingly. During the first few weeks of your exercise program...
... speed or incline of the treadmill until your heart rate is to the nearest ten years). A proper warm-up Start each workout with 5 to exercise with pre-existing health problems. The following three important parts: A Warm-up increases your heart rate as shown. The lower two numbers are your body begin to burn fat, adjust the speed and incline of the treadmill accordingly. During the first few weeks of your exercise program...

English Manual
Page 15
... wall. Hold for each leg. Hold for each leg. Keep your back leg straight and your hips toward your toes as far as possible. Stretches: Calves, achilles tendons, and ankles. 4. Training Zone Exercise After warming up to five workouts each week if desired. After a few weeks of your exercise program, do not keep your pulse in front of the...
... wall. Hold for each leg. Hold for each leg. Keep your back leg straight and your hips toward your toes as far as possible. Stretches: Calves, achilles tendons, and ankles. 4. Training Zone Exercise After warming up to five workouts each week if desired. After a few weeks of your exercise program, do not keep your pulse in front of the...
English Manual
Page 16
... REPLACEMENT PARTS To order replacement parts, call our Customer Service Department toll-free at ICON's option, the product through Friday, 6 a.m. LIMITED WARRANTY ICON Health & Fitness, Inc. (ICON), warrants this warranty is limited in lieu of any product or damage to a product caused by or attributable to give the following information: • The MODEL NUMBER of the product (PFTL29020) • The NAME of the product (PROFORM® 280 treadmill) • The SERIAL NUMBER of...
... REPLACEMENT PARTS To order replacement parts, call our Customer Service Department toll-free at ICON's option, the product through Friday, 6 a.m. LIMITED WARRANTY ICON Health & Fitness, Inc. (ICON), warrants this warranty is limited in lieu of any product or damage to a product caused by or attributable to give the following information: • The MODEL NUMBER of the product (PFTL29020) • The NAME of the product (PROFORM® 280 treadmill) • The SERIAL NUMBER of...

English Manual
Page 17
PART IDENTIFICATION CHART Remove this chart and the EXPLODED DRAWING/PART LIST for future reference. Star Washer (2)-6 5/16" Star Washer (101)-4 U-Nut (10)-4 3/4" Screw (5)-10 1" Tek Screw (31)-4 1" Bolt (16)-6 Wheel Bolt (41)-2 Handrail Bolt (1)-4 Wheel Nut (61)-2 Save this chart and use it to identify small parts during assembly.
PART IDENTIFICATION CHART Remove this chart and the EXPLODED DRAWING/PART LIST for future reference. Star Washer (2)-6 5/16" Star Washer (101)-4 U-Nut (10)-4 3/4" Screw (5)-10 1" Tek Screw (31)-4 1" Bolt (16)-6 Wheel Bolt (41)-2 Handrail Bolt (1)-4 Wheel Nut (61)-2 Save this chart and use it to identify small parts during assembly.
English Manual
Page 18
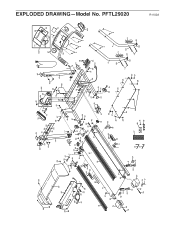
... (Right) 71 1 Walking Platform 72 2 Endcap 73 1 Lock Pin Sleeve 74 1 Sensor Clip 75 1 Front Roller/Pulley 76 10 Electronic Screw 77 1 Ground Wire 78 2 Rear Roller Adj. Description 1 4 Handrail Bolt 2 6 Star Washer 3 2 Handrail Spacer 4 2 Handrail 5 20 3/4" Screw 6 1 Key/Clip 7 1 Frame Guide 8 2 Incline Leg 9 2 Shim 10 4 U-nut 11 1 Console 12 1 Battery Cover 13 1 Reed Switch 14 1 Left Upright 15 1 Right Upright 16 6 1" Bolt 17 6 Cage Nut 18 1 Motor Belt 19 1 Motor Tension Bolt 20 1 Motor Tension Washer 21...
... (Right) 71 1 Walking Platform 72 2 Endcap 73 1 Lock Pin Sleeve 74 1 Sensor Clip 75 1 Front Roller/Pulley 76 10 Electronic Screw 77 1 Ground Wire 78 2 Rear Roller Adj. Description 1 4 Handrail Bolt 2 6 Star Washer 3 2 Handrail Spacer 4 2 Handrail 5 20 3/4" Screw 6 1 Key/Clip 7 1 Frame Guide 8 2 Incline Leg 9 2 Shim 10 4 U-nut 11 1 Console 12 1 Battery Cover 13 1 Reed Switch 14 1 Left Upright 15 1 Right Upright 16 6 1" Bolt 17 6 Cage Nut 18 1 Motor Belt 19 1 Motor Tension Bolt 20 1 Motor Tension Washer 21...
English Manual
Page 19
... 42 41 4 101 28 28 1 101 33 31 28 11 100* 85 87 96 5 5 5 4 3 101 93 1 101 98 99 5 12 5 102 5 3 93 R1102A EXPLODED DRAWING-Model No. PFTL29020
... 42 41 4 101 28 28 1 101 33 31 28 11 100* 85 87 96 5 5 5 4 3 101 93 1 101 98 99 5 12 5 102 5 3 93 R1102A EXPLODED DRAWING-Model No. PFTL29020


