
User Manual
Page 2
... leave a running machine unattended. Tires may lose control of the tractor. Do not make sudden changes in a large percentage of riding mower-related injuries. Keep clear of the discharge opening at the lowest possible speed when on wet grass. Material may ricochet back toward anyone ... operating machine with the instructions, to protect themselves and others from serious injury. • Follow the manufacturer's recommendation for Ride-On Mowers DANGER: THIS CUTTING MACHINE IS CAPABLE OF AMPUTATING HANDS AND FEET AND THROWING OBJECTS. Too heavy of a load, while on the slopes...
... leave a running machine unattended. Tires may lose control of the tractor. Do not make sudden changes in a large percentage of riding mower-related injuries. Keep clear of the discharge opening at the lowest possible speed when on wet grass. Material may ricochet back toward anyone ... operating machine with the instructions, to protect themselves and others from serious injury. • Follow the manufacturer's recommendation for Ride-On Mowers DANGER: THIS CUTTING MACHINE IS CAPABLE OF AMPUTATING HANDS AND FEET AND THROWING OBJECTS. Too heavy of a load, while on the slopes...
User Manual
Page 3
...extremely flammable and the vapors are sharp. Replace gas cap and tighten securely. Repair, if necessary, before operating a riding lawn mower. Do not attach towed equipment except at the hitch point. • Follow the manufacturer's recommendation for weight limits for towed ... running . • Check grass catcher components and the discharge chute frequently and replace with manufacturer's recommended parts, when necessary. • Mower blades are explosive. • • Extinguish all times until fueling is not alert to stop or shift while on towed equipment. ...
...extremely flammable and the vapors are sharp. Replace gas cap and tighten securely. Repair, if necessary, before operating a riding lawn mower. Do not attach towed equipment except at the hitch point. • Follow the manufacturer's recommendation for weight limits for towed ... running . • Check grass catcher components and the discharge chute frequently and replace with manufacturer's recommended parts, when necessary. • Mower blades are explosive. • • Extinguish all times until fueling is not alert to stop or shift while on towed equipment. ...
User Manual
Page 7
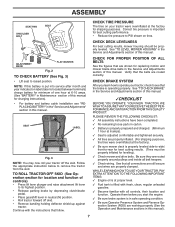
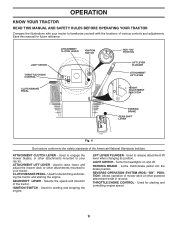
...is properly prepared and charged. (Minimum 1 hour at 6-10 amps. (See "BATTERY" in Maintenance section of this manual for replacing motion and mower blade drive belts in the Service and Adjustments section of controls) • Press lift lever plunger and raise attachment lift lever to operate your tractor... OPERATE YOUR NEW TRACTOR, WE WISH TO ASSURE THAT YOU RECEIVE THE BEST PERFORMANCE AND SATISFACTION FROM THIS QUALITY PRODUCT. See "TO LEVEL MOWER HOUSING" in this manual. ASSEMBLY SEAT PAN SHOULDER BOLT SEAT CHECK TIRE PRESSURE The tires on tires. NOTE: If this manual. CHECK...
...is properly prepared and charged. (Minimum 1 hour at 6-10 amps. (See "BATTERY" in Maintenance section of this manual for replacing motion and mower blade drive belts in the Service and Adjustments section of controls) • Press lift lever plunger and raise attachment lift lever to operate your tractor... OPERATE YOUR NEW TRACTOR, WE WISH TO ASSURE THAT YOU RECEIVE THE BEST PERFORMANCE AND SATISFACTION FROM THIS QUALITY PRODUCT. See "TO LEVEL MOWER HOUSING" in this manual. ASSEMBLY SEAT PAN SHOULDER BOLT SEAT CHECK TIRE PRESSURE The tires on tires. NOTE: If this manual. CHECK...
User Manual
Page 8
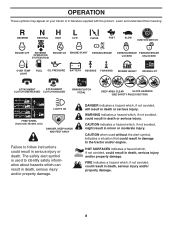
... OPERATION SYSTEM (ROS) ENGINE ON ENGINE START PARKING BRAKE PARKING BRAKE PARKING BRAKE LOCKED UNLOCKED OVER TEMP LIGHT FUEL OIL PRESSURE BATTERY REVERSE FORWARD MOWER HEIGHT 15 MOWER LIFT 15 ATTACHMENT ATTACHMENT CLUTCH DISENGAGED CLUTCH ENGAGED BRAKE/CLUTCH PEDAL KEEP AREA CLEAR SLOPE HAZARDS (SEE SAFETY RULES SECTION) LIGHTS ON FREE WHEEL...
... OPERATION SYSTEM (ROS) ENGINE ON ENGINE START PARKING BRAKE PARKING BRAKE PARKING BRAKE LOCKED UNLOCKED OVER TEMP LIGHT FUEL OIL PRESSURE BATTERY REVERSE FORWARD MOWER HEIGHT 15 MOWER LIFT 15 ATTACHMENT ATTACHMENT CLUTCH DISENGAGED CLUTCH ENGAGED BRAKE/CLUTCH PEDAL KEEP AREA CLEAR SLOPE HAZARDS (SEE SAFETY RULES SECTION) LIGHTS ON FREE WHEEL...
User Manual
Page 9
... - THROTTLE/CHOKE CONTROL - IGNITION SWITCH - ATTACHMENT CLUTCH LEVER - GEARSHIFT LEVER - Allows operation of mower deck or other attachments mounted to engage the mower blades, or other powered attachment while in reverse. Used to raise, lower, and adjust the mower deck or other attachments mounted to release attachment lift lever when changing its position...
... - THROTTLE/CHOKE CONTROL - IGNITION SWITCH - ATTACHMENT CLUTCH LEVER - GEARSHIFT LEVER - Allows operation of mower deck or other attachments mounted to engage the mower blades, or other powered attachment while in reverse. Used to raise, lower, and adjust the mower deck or other attachments mounted to release attachment lift lever when changing its position...

User Manual
Page 10
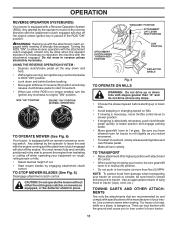
... tractor secure. CAUTION: Always stop engine when stopping tractor on grass areas. mance. Fig. 5 STOPPING (See Fig. 5) MOWER BLADES • To stop mower blades,move attachment clutch lever to empty grass catcher, etc. The heights are approximate and may vary depending upon soil conditions, ...• Operating engine at less than full throttle reduces the battery charging rate. • Full throttle offers the best bagging and mower perfor- TO ADJUST MOWER CUTTING HEIGHT (See Fig. 5) The position of the attachment lift lever determines the cutting height. • Grasp lift lever....
... tractor secure. CAUTION: Always stop engine when stopping tractor on grass areas. mance. Fig. 5 STOPPING (See Fig. 5) MOWER BLADES • To stop mower blades,move attachment clutch lever to empty grass catcher, etc. The heights are approximate and may vary depending upon soil conditions, ...• Operating engine at less than full throttle reduces the battery charging rate. • Full throttle offers the best bagging and mower perfor- TO ADJUST MOWER CUTTING HEIGHT (See Fig. 5) The position of the attachment lift lever determines the cutting height. • Grasp lift lever....
User Manual
Page 11
... engine. Be sure you have allowed room for tractor to tractor (rope, cord, etc.). Use an appropriate means of a load, while on mowers so equipped, or the deflector shield in the reverse direction with the attachment engaged. Too heavy of tying hood to roll slightly as you to... lever to 1st gear. OPERATION REVERSE OPERATION SYSTEM (ROS) Your tractor is equipped with an operator presence sensing switch. CAUTION: Do not operate the mower without either the entire grass catcher, on a slope, is in the ROS "ON" position. WARNING: Backing up or down hills with the attachment...
... engine. Be sure you have allowed room for tractor to tractor (rope, cord, etc.). Use an appropriate means of a load, while on mowers so equipped, or the deflector shield in the reverse direction with the attachment engaged. Too heavy of tying hood to roll slightly as you to... lever to 1st gear. OPERATION REVERSE OPERATION SYSTEM (ROS) Your tractor is equipped with an operator presence sensing switch. CAUTION: Do not operate the mower without either the entire grass catcher, on a slope, is in the ROS "ON" position. WARNING: Backing up or down hills with the attachment...
User Manual
Page 13
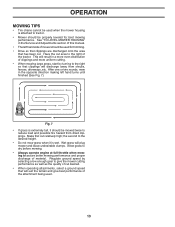
... trimming. • Drive so that clippings are discharged onto the area that will result in the opposite direction making left hand side of mower should be used for best mowing performance. This will suit the terrain and give best performance of cut relatively high; Fig. 7 •... and more uniform cutting. • When mowing large areas, start by selecting a low enough gear to the right so that clippings will plug mower and leave undesirable clumps. Wet grass will discharge away from dried clippings. Make first cut desired. • When operating attachments, select a ground...
... trimming. • Drive so that clippings are discharged onto the area that will result in the opposite direction making left hand side of mower should be used for best mowing performance. This will suit the terrain and give best performance of cut relatively high; Fig. 7 •... and more uniform cutting. • When mowing large areas, start by selecting a low enough gear to the right so that clippings will plug mower and leave undesirable clumps. Wet grass will discharge away from dried clippings. Make first cut desired. • When operating attachments, select a ground...
User Manual
Page 14
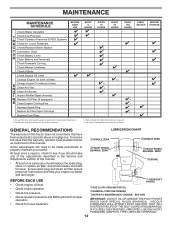
... USE Check Brake Operation T Check Tire Pressure R Check Operator Presence & ROS Systems A Check for Loose Fasteners C Check/Replace Mower Blades T Lubrication Chart 0 Check Battery Level R Clean Battery and Terminals Check Transaxle Cooling Check Mower Levelness Check V-Belts Check Engine Oil Level Change Engine Oil (with maintenance-free battery. Change more often when...
... USE Check Brake Operation T Check Tire Pressure R Check Operator Presence & ROS Systems A Check for Loose Fasteners C Check/Replace Mower Blades T Lubrication Chart 0 Check Battery Level R Clean Battery and Terminals Check Transaxle Cooling Check Mower Levelness Check V-Belts Check Engine Oil Level Change Engine Oil (with maintenance-free battery. Change more often when...
User Manual
Page 15
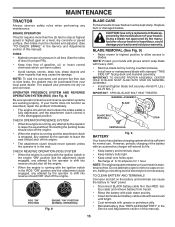
.... • Keep battery bolts tight. • Keep small vent holes open or remove caps or covers. BLADE REMOVAL (See Fig. 9) • Raise mower to highest position to allow access to stop at 6-10 amperes for normal use. ROS "ON" POSITION 02828 ENGINE "ON" POSITION (NORMAL OPERATING) Fig. ...8 BLADE CARE For best results mower blades must be checked and adjusted. (See "TO CHECK BRAKE" in highest gear on your warranty. NOTE: Protect your tractor does not function as...
.... • Keep battery bolts tight. • Keep small vent holes open or remove caps or covers. BLADE REMOVAL (See Fig. 9) • Raise mower to highest position to allow access to stop at 6-10 amperes for normal use. ROS "ON" POSITION 02828 ENGINE "ON" POSITION (NORMAL OPERATING) Fig. ...8 BLADE CARE For best results mower blades must be checked and adjusted. (See "TO CHECK BRAKE" in highest gear on your warranty. NOTE: Protect your tractor does not function as...
User Manual
Page 17
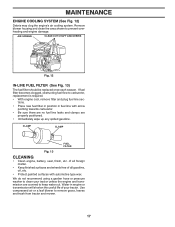
... a leaf blower to prevent overheating and engine damage. Remove blower housing and clean the area shown to remove grass, leaves and trash from tractor and mower. 17 If fuel filter becomes clogged, obstructing fuel flow to clean your tractor.
... a leaf blower to prevent overheating and engine damage. Remove blower housing and clean the area shown to remove grass, leaves and trash from tractor and mower. 17 If fuel filter becomes clogged, obstructing fuel flow to clean your tractor.
User Manual
Page 18
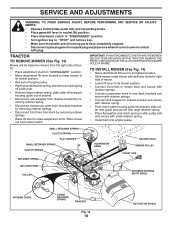
...MOUNTED ON THE TRACTOR, REMOVE THE FRONT LINKS AND HOOK THE CLUTCH SPRING INTO SQUARE HOLE IN FRAME. TRACTOR TO REMOVE MOWER (See Fig. 14) Mower will be easier to remove from under tractor with plug. SMALL RETAINER SPRING CLUTCH SPRING FLAT WASHER SMALL RETAINER SPRING CLUTCH... of tractor. • Place attachment clutch in "DISENGAGED" position. • Move attachment lift lever forward to lower mower to its lowest position. • Connect front links to mower deck and secure with retainer springs.. • Connect suspension arms to rear deck brackets and secure with retainer springs. ...
...MOUNTED ON THE TRACTOR, REMOVE THE FRONT LINKS AND HOOK THE CLUTCH SPRING INTO SQUARE HOLE IN FRAME. TRACTOR TO REMOVE MOWER (See Fig. 14) Mower will be easier to remove from under tractor with plug. SMALL RETAINER SPRING CLUTCH SPRING FLAT WASHER SMALL RETAINER SPRING CLUTCH... of tractor. • Place attachment clutch in "DISENGAGED" position. • Move attachment lift lever forward to lower mower to its lowest position. • Connect front links to mower deck and secure with retainer springs.. • Connect suspension arms to rear deck brackets and secure with retainer springs. ...
User Manual
Page 19
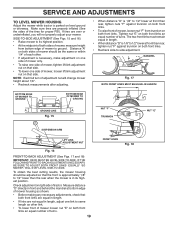
...rear, tighten nut "F" against trunnion on that side. SERVICE AND ADJUSTMENTS TO LEVEL MOWER HOUSING Adjust the mower while tractor is necessary, make adjustment on one side of mower only. • To raise one side of mower, tighten lift link adjustment nut on that side. • To lower one link...front links. • Recheck side-to ground. MANDREL "D" "D" Fig. 17 BOTH FRONT LINKS MUST BE EQUAL IN LENGTH BOTTOM EDGE OF MOWER TO GROUND BOTTOM EDGE OF MOWER TO GROUND A GROUND LINE A Fig. 15 NUT "F" TRUNNION NUT "E" SUSPENSION ARM LIFT LINK ADJUSTMENT NUT Fig. 16 FRONT-TO-BACK ...
...rear, tighten nut "F" against trunnion on that side. SERVICE AND ADJUSTMENTS TO LEVEL MOWER HOUSING Adjust the mower while tractor is necessary, make adjustment on one side of mower only. • To raise one side of mower, tighten lift link adjustment nut on that side. • To lower one link...front links. • Recheck side-to ground. MANDREL "D" "D" Fig. 17 BOTH FRONT LINKS MUST BE EQUAL IN LENGTH BOTTOM EDGE OF MOWER TO GROUND BOTTOM EDGE OF MOWER TO GROUND A GROUND LINE A Fig. 15 NUT "F" TRUNNION NUT "E" SUSPENSION ARM LIFT LINK ADJUSTMENT NUT Fig. 16 FRONT-TO-BACK ...

User Manual
Page 20
... or paved surface, depress clutch/brake pedal all belt guides and keepers. • Install mower (See "TO INSTALL MOWER" in this section of left footrest. BELT REMOVAL • Remove mower (See "TO REMOVE MOWER" in this manual). • Work belt off both mandrel pulleys and idler pulleys. &#...1. Park tractor on bottom side of manual). NOTE: Observe entire motion drive belt and position of all belt guides. • Install mower in neutral (N) position. ENGINE PULLEY CLUTCHING IDLER STATIONARY IDLER CENTER SPAN KEEPER TRANSAXLE PULLEY Fig. 20 20 Park the tractor on level ...
... or paved surface, depress clutch/brake pedal all belt guides and keepers. • Install mower (See "TO INSTALL MOWER" in this section of left footrest. BELT REMOVAL • Remove mower (See "TO REMOVE MOWER" in this manual). • Work belt off both mandrel pulleys and idler pulleys. &#...1. Park tractor on bottom side of manual). NOTE: Observe entire motion drive belt and position of all belt guides. • Install mower in neutral (N) position. ENGINE PULLEY CLUTCHING IDLER STATIONARY IDLER CENTER SPAN KEEPER TRANSAXLE PULLEY Fig. 20 20 Park the tractor on level ...
User Manual
Page 21
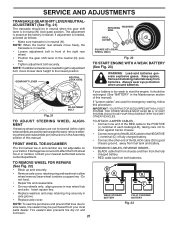
The adjustment is too weak to good chassis ground, away from batteries. NOTE: When the tractor rear wheels move mower deck height to slow leaks, tire sealant may be purchased from both batteries. If your nearest authorized service center/department. THE OTHER VEHICLE MUST ALSO ...
The adjustment is too weak to good chassis ground, away from batteries. NOTE: When the tractor rear wheels move mower deck height to slow leaks, tire sealant may be purchased from both batteries. If your nearest authorized service center/department. THE OTHER VEHICLE MUST ALSO ...
User Manual
Page 23
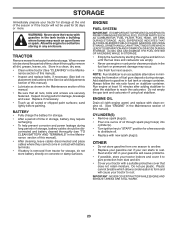
...engine warm) and replace with a suitable protective cover that all nuts, bolts and screws are empty. • Never use plastic. When mower is removed from tractor for damage, breakage and wear. placement instructions in the Service and Adjustments section of this manual). • Lubricate...tractor for storage at least 10 minutes after adding stabilizer to allow the stabilizer to rust. Add stabilizer to rust. TRACTOR Remove mower from tractor for storage, do not store battery directly on stabilizer container. sand lightly before storing in fuel tank or storage container...
...engine warm) and replace with a suitable protective cover that all nuts, bolts and screws are empty. • Never use plastic. When mower is removed from tractor for damage, breakage and wear. placement instructions in the Service and Adjustments section of this manual). • Lubricate...tractor for storage at least 10 minutes after adding stabilizer to allow the stabilizer to rust. Add stabilizer to rust. TRACTOR Remove mower from tractor for storage, do not store battery directly on stabilizer container. sand lightly before storing in fuel tank or storage container...
User Manual
Page 24
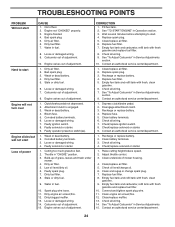
Engine not "CHOKED" properly. 3. Bad spark plug. 5. Dirty air filter. 6. Carburetor out of mower housing. 4. Bad spark plug. 3. Weak or dead battery. 4. Attachment clutch is engaged. 3. Blown fuse. 5. Faulty solenoid or starter. 9. Loose or damaged... 6. Check/replace solenoid or starter. 1. Water in Service Adjustments section. 10. Weak or dead battery. 2. Engine valves out of grass, leaves and trash under mower. 4. See "To Adjust Carburetor" in fuel. 8. Replace fuse. 5. Empty fuel tank and carburetor, refill tank with fresh, clean gasoline. 9. Clutch/brake pedal...
Engine not "CHOKED" properly. 3. Bad spark plug. 5. Dirty air filter. 6. Carburetor out of mower housing. 4. Bad spark plug. 3. Weak or dead battery. 4. Attachment clutch is engaged. 3. Blown fuse. 5. Faulty solenoid or starter. 9. Loose or damaged... 6. Check/replace solenoid or starter. 1. Water in Service Adjustments section. 10. Weak or dead battery. 2. Engine valves out of grass, leaves and trash under mower. 4. See "To Adjust Carburetor" in fuel. 8. Replace fuse. 5. Empty fuel tank and carburetor, refill tank with fresh, clean gasoline. 9. Clutch/brake pedal...
User Manual
Page 25
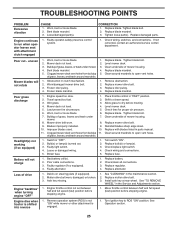
.... Tighten loose part(s). Check wiring, switches and connections. If not corrected, contact an authorized service center/ department. uneven Mower blades will not charge 1. Bent blade mandrel. 5. Frozen blade mandrel. 1. Replace blade mandrel. 5. Remove obstruction. 2.... Allow grass to open vent holes. Buildup of grass, leaves, and trash around mandrels. 1. Mower drive belt worn. 8. Replace mower drive belt. 9. Blades improperly installed. 9. Check wiring and connections. 5. Poor cable connections. 3. Debris on steering ...
.... Tighten loose part(s). Check wiring, switches and connections. If not corrected, contact an authorized service center/ department. uneven Mower blades will not charge 1. Bent blade mandrel. 5. Frozen blade mandrel. 1. Replace blade mandrel. 5. Remove obstruction. 2.... Allow grass to open vent holes. Buildup of grass, leaves, and trash around mandrels. 1. Mower drive belt worn. 8. Replace mower drive belt. 9. Blades improperly installed. 9. Check wiring and connections. 5. Poor cable connections. 3. Debris on steering ...
Parts Manual
Page 2
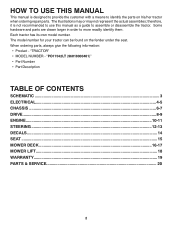
..., it is designed to provide the customer with a means to more readily identify them. Each tractor has its own model number. "PO17542LT (96018000401)" • Part Number • Part Description TABLE OF CONTENTS SCHEMATIC ...3 ELECTRICAL ...4-5 CHASSIS ...6-7 DRIVE...8-9 ENGINE ...10-11 STEERING ......12-13 DECALS...14 SEAT ...15 MOWER DECK ...16-17 MOWER LIFT...18 WARRANTY...19 PARTS & SERVICE 20 2 Some hardware and parts are drawn larger in order to identify the parts on...
..., it is designed to provide the customer with a means to more readily identify them. Each tractor has its own model number. "PO17542LT (96018000401)" • Part Number • Part Description TABLE OF CONTENTS SCHEMATIC ...3 ELECTRICAL ...4-5 CHASSIS ...6-7 DRIVE...8-9 ENGINE ...10-11 STEERING ......12-13 DECALS...14 SEAT ...15 MOWER DECK ...16-17 MOWER LIFT...18 WARRANTY...19 PARTS & SERVICE 20 2 Some hardware and parts are drawn larger in order to identify the parts on...
Parts Manual
Page 7
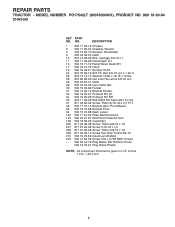
MODEL NUMBER PO17542LT (96018000401), PRODUCT NO. 960 18 00-04 CHASSIS KEY PART NO. Pivot Mower 39 532 18 75-68 Bracket Pivot 64 532 15 47-98 Dash Lower 142 532 17 57-02 Plate Reinforcement 145 532 40 91-...
MODEL NUMBER PO17542LT (96018000401), PRODUCT NO. 960 18 00-04 CHASSIS KEY PART NO. Pivot Mower 39 532 18 75-68 Bracket Pivot 64 532 15 47-98 Dash Lower 142 532 17 57-02 Plate Reinforcement 145 532 40 91-...


