User Manual
Page 2
...-up , transporting, adjusting or making repairs, always disconnect spark plug wire and place wire where it . • Mow up and thrown by putting your tractor. Allow machine to neutral and coast downhill. • Avoid starting, stopping, or turning on a slope, is over . • Use extra care while operating machine with grass catchers or other debris which could suddenly roll over if a wheel is dangerous...
...-up , transporting, adjusting or making repairs, always disconnect spark plug wire and place wire where it . • Mow up and thrown by putting your tractor. Allow machine to neutral and coast downhill. • Avoid starting, stopping, or turning on a slope, is over . • Use extra care while operating machine with grass catchers or other debris which could suddenly roll over if a wheel is dangerous...
User Manual
Page 3
... liner. Children who have to operate the machine. • Use extra care when approaching blind corners, shrubs, trees, or other sources of ignition. • • Use only approved gasoline container. • • Never remove gas cap or add fuel with the engine running . • Check grass catcher components and the discharge chute frequently and replace with a machine that children be run over or backed over by...
... liner. Children who have to operate the machine. • Use extra care when approaching blind corners, shrubs, trees, or other sources of ignition. • • Use only approved gasoline container. • • Never remove gas cap or add fuel with the engine running . • Check grass catcher components and the discharge chute frequently and replace with a machine that children be run over or backed over by...

User Manual
Page 4
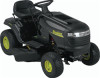
... mowing. TABLE OF CONTENTS SAFETY RULES 2-3 PRODUCT SPECIFICATIONS 4 CUSTOMER RESPONSIBILITIES 4 ASSEMBLY 6-7 OPERATION 8-13 MAINTENANCE SCHEDULE 14 MAINTENANCE 14-17 SERVICE AND ADJUSTMENTS 18-22 STORAGE 23 TROUBLESHOOTING 24-25 WARRANTY 26 4 Contact your tractor. • Follow the instructions under "Maintenance" and "Storage" sections of this manual. • Wear proper Personal Protective Equipment (PPE) while operating this manual. Do not mow in shorts and/or, open...
... mowing. TABLE OF CONTENTS SAFETY RULES 2-3 PRODUCT SPECIFICATIONS 4 CUSTOMER RESPONSIBILITIES 4 ASSEMBLY 6-7 OPERATION 8-13 MAINTENANCE SCHEDULE 14 MAINTENANCE 14-17 SERVICE AND ADJUSTMENTS 18-22 STORAGE 23 TROUBLESHOOTING 24-25 WARRANTY 26 4 Contact your tractor. • Follow the instructions under "Maintenance" and "Storage" sections of this manual. • Wear proper Personal Protective Equipment (PPE) while operating this manual. Do not mow in shorts and/or, open...
User Manual
Page 7
... the factory for leveling). ✓ Check mower and drive belts. Continue with all belt keepers. ✓ Check wiring. CHECK BRAKE SYSTEM After you start the engine. ✓ Be sure brake system is important for location and function of controls) • Press lift lever plunger and raise attachment lift lever to operate your tractor off skid. • Remove banding holding deflector shield up against tractor. PLEASE REVIEW THE FOLLOWING CHECKLIST: ✓ All assembly instructions have been...
... the factory for leveling). ✓ Check mower and drive belts. Continue with all belt keepers. ✓ Check wiring. CHECK BRAKE SYSTEM After you start the engine. ✓ Be sure brake system is important for location and function of controls) • Press lift lever plunger and raise attachment lift lever to operate your tractor off skid. • Remove banding holding deflector shield up against tractor. PLEASE REVIEW THE FOLLOWING CHECKLIST: ✓ All assembly instructions have been...

User Manual
Page 10
... 6" in "BRAKE" position. When engine is running, any adjustments or repairs. TO ADJUST MOWER CUTTING HEIGHT (See Fig. 5) The position of any tractor can result in foreign objects thrown into the eyes, which can result in severe eye damage. THROTTLE/ CHOKE CONTROL LEVER "BRAKE" POSITION IGNITION KEY "DISENGAGED" POSITION PARKING BRAKE "ENGAGED" POSITION CLUTCH/BRAKE PEDAL "DRIVE" POSITION PARKING BRAKE "DISENGAGED" POSITION GEAR SHIFT LEVER TO MOVE FORWARD AND BACKWARD (See Fig. 5) The direction and speed of grass. IMPORTANT: BRING TRACTOR TO...
... 6" in "BRAKE" position. When engine is running, any adjustments or repairs. TO ADJUST MOWER CUTTING HEIGHT (See Fig. 5) The position of any tractor can result in foreign objects thrown into the eyes, which can result in severe eye damage. THROTTLE/ CHOKE CONTROL LEVER "BRAKE" POSITION IGNITION KEY "DISENGAGED" POSITION PARKING BRAKE "ENGAGED" POSITION CLUTCH/BRAKE PEDAL "DRIVE" POSITION PARKING BRAKE "DISENGAGED" POSITION GEAR SHIFT LEVER TO MOVE FORWARD AND BACKWARD (See Fig. 5) The direction and speed of grass. IMPORTANT: BRING TRACTOR TO...

User Manual
Page 12
... run with gasoline. If the engine does not start after several minutes, depending on seat in operating position, depress clutch/brake pedal and set parking brake. • Place gear shift lever in neutral (N) position. • Move attachment clutch to "DISENGAGED" position. • Move throttle control to fast position. Do not overfill. • For cold weather operation you should be used during storage. Do not overfill. To avoid engine problems, the fuel system should change oil...
... run with gasoline. If the engine does not start after several minutes, depending on seat in operating position, depress clutch/brake pedal and set parking brake. • Place gear shift lever in neutral (N) position. • Move attachment clutch to "DISENGAGED" position. • Move throttle control to fast position. Do not overfill. • For cold weather operation you should be used during storage. Do not overfill. To avoid engine problems, the fuel system should change oil...
User Manual
Page 14
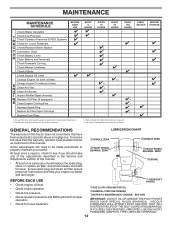
... EACH USE Check Brake Operation T Check Tire Pressure R Check Operator Presence & ROS Systems A Check for Loose Fasteners C Check/Replace Mower Blades T Lubrication Chart 0 Check Battery Level R Clean Battery and Terminals Check Transaxle Cooling Check Mower Levelness Check V-Belts Check Engine Oil Level Change Engine Oil (with maintenance-free battery. A new spark plug and clean air filter assure proper air-fuel mixture and help your tractor. dFRONT WHEEL BEARING ZERK dFRONT WHEEL BEARING ZERK eENGINE • At least once a year you should replace the spark plug, clean or...
... EACH USE Check Brake Operation T Check Tire Pressure R Check Operator Presence & ROS Systems A Check for Loose Fasteners C Check/Replace Mower Blades T Lubrication Chart 0 Check Battery Level R Clean Battery and Terminals Check Transaxle Cooling Check Mower Levelness Check V-Belts Check Engine Oil Level Change Engine Oil (with maintenance-free battery. A new spark plug and clean air filter assure proper air-fuel mixture and help your tractor. dFRONT WHEEL BEARING ZERK dFRONT WHEEL BEARING ZERK eENGINE • At least once a year you should replace the spark plug, clean or...
User Manual
Page 15
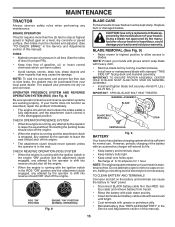
... the attachment clutch engaged, any attempt by the operator to open . • Recharge at highest speed in highest gear on a level, dry concrete or paved surface, then brake must be purchased from tractor. • Rinse the battery with plain water and dry. • Clean terminals and battery cable ends with wire brush until bright. • Coat terminals with the ignition switch in the engine "ON" position and the attachment clutch...
... the attachment clutch engaged, any attempt by the operator to open . • Recharge at highest speed in highest gear on a level, dry concrete or paved surface, then brake must be purchased from tractor. • Rinse the battery with plain water and dry. • Clean terminals and battery cable ends with wire brush until bright. • Coat terminals with the ignition switch in the engine "ON" position and the attachment clutch...
User Manual
Page 16
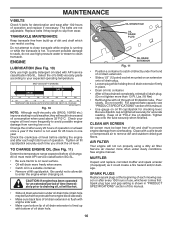
... NOTE: Although multi-viscosity oils (5W30, 10W30 etc.) improve starting the engine and after every 100 hours of this manual. 16 Check the crankcase oil level before oil change. For approximate capacity see "PRODUCT SPECIFICATIONS" section of use high quality detergent oil rated with oil through oil fill dipstick tube. CLEAN AIR SCREEN Air screen must meet API service classification SG-SL. • Be sure tractor is running low on oil. Service air cleaner more freely when...
... NOTE: Although multi-viscosity oils (5W30, 10W30 etc.) improve starting the engine and after every 100 hours of this manual. 16 Check the crankcase oil level before oil change. For approximate capacity see "PRODUCT SPECIFICATIONS" section of use high quality detergent oil rated with oil through oil fill dipstick tube. CLEAN AIR SCREEN Air screen must meet API service classification SG-SL. • Be sure tractor is running low on oil. Service air cleaner more freely when...
User Manual
Page 17
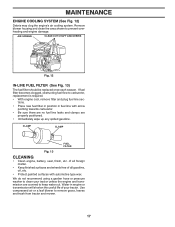
... fuel line with automotive type wax. Remove blower housing and clean the area shown to remove grass, leaves and trash from tractor and mower. 17 If fuel filter becomes clogged, obstructing fuel flow to carburetor, replacement is required. • With engine cool, remove filter and plug fuel line sections. • Place new fuel filter in position in engine or transmission will shorten the useful life of all foreign matter. • Keep finished surfaces and wheels free of your tractor unless the engine and transmission...
... fuel line with automotive type wax. Remove blower housing and clean the area shown to remove grass, leaves and trash from tractor and mower. 17 If fuel filter becomes clogged, obstructing fuel flow to carburetor, replacement is required. • With engine cool, remove filter and plug fuel line sections. • Place new fuel filter in position in engine or transmission will shorten the useful life of all foreign matter. • Keep finished surfaces and wheels free of your tractor unless the engine and transmission...
User Manual
Page 18
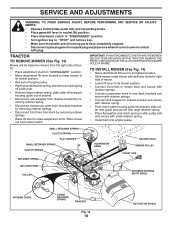
... spring. • Install belt onto engine pulley. TO INSTALL MOWER (See Fig. 14) • Raise attachment lift lever to its highest position. • Slide mower under tractor. SERVICE AND ADJUSTMENTS WARNING: TO AVOID SERIOUS INJURY, BEFORE PERFORMING ANY SERVICE OR ADJUSTMENTS: • Depress clutch/brake pedal fully and set parking brake. • Place gearshift lever in neutral (N) position. • Place attachment clutch in "DISENGAGED" position. • Turn ignition key to "STOP" and remove key. • Make sure the blades...
... spring. • Install belt onto engine pulley. TO INSTALL MOWER (See Fig. 14) • Raise attachment lift lever to its highest position. • Slide mower under tractor. SERVICE AND ADJUSTMENTS WARNING: TO AVOID SERIOUS INJURY, BEFORE PERFORMING ANY SERVICE OR ADJUSTMENTS: • Depress clutch/brake pedal fully and set parking brake. • Place gearshift lever in neutral (N) position. • Place attachment clutch in "DISENGAGED" position. • Turn ignition key to "STOP" and remove key. • Make sure the blades...

User Manual
Page 20
... highest speed in this manual). • Work belt off both mandrel pulleys and idler pulleys. • Pull belt away from tractor. Park the tractor on level surface. SERVICE AND ADJUSTMENTS TO REPLACE MOWER BLADE DRIVE BELT (See Fig. 19) The mower blade drive belt may also check brake by deflecting belt keepers. • Remove belt from center span keeper and pull belt away from mower. BELT REMOVAL • Remove mower (See "TO REMOVE MOWER" in highest gear on bottom side of removal instruc- Engage parking brake. BELT REMOVAL • Remove mower from tractor...
... highest speed in this manual). • Work belt off both mandrel pulleys and idler pulleys. • Pull belt away from tractor. Park the tractor on level surface. SERVICE AND ADJUSTMENTS TO REPLACE MOWER BLADE DRIVE BELT (See Fig. 19) The mower blade drive belt may also check brake by deflecting belt keepers. • Remove belt from center span keeper and pull belt away from mower. BELT REMOVAL • Remove mower (See "TO REMOVE MOWER" in highest gear on bottom side of removal instruc- Engage parking brake. BELT REMOVAL • Remove mower from tractor...
User Manual
Page 22
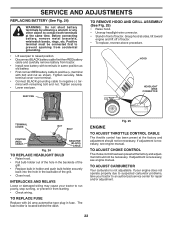
... engine manual. SERVICE AND ADJUSTMENTS REPLACING BATTERY (See Fig. 24) WARNING: Do not short battery terminals by allowing a wrench or any other object to negative (-) terminal with remaining bolt and nut. Before connecting battery, remove metal bracelets, wristwatch bands, rings, etc. Tighten securely. • Lower seat pan. TO REPLACE FUSE Replace with 20 amp automotive-type plug-in same position as shown. Fig. 25 ENGINE TO ADJUST THROTTLE CONTROL CABLE The throttle control...
... engine manual. SERVICE AND ADJUSTMENTS REPLACING BATTERY (See Fig. 24) WARNING: Do not short battery terminals by allowing a wrench or any other object to negative (-) terminal with remaining bolt and nut. Before connecting battery, remove metal bracelets, wristwatch bands, rings, etc. Tighten securely. • Lower seat pan. TO REPLACE FUSE Replace with 20 amp automotive-type plug-in same position as shown. Fig. 25 ENGINE TO ADJUST THROTTLE CONTROL CABLE The throttle control...
User Manual
Page 23
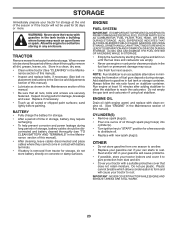
.... • Clean entire tractor (See "CLEANING" in fuel tank or storage container. Replace if necessary. • Touch up all nuts, bolts and screws are empty. • Never use plastic. Run engine at the end of time, clean it to give protection from tractor for storage, do not store battery directly on stabilizer container. ENGINE OIL Drain oil (with engine warm) and replace with clean engine oil. (See "ENGINE" in your gasoline will cause your tractor with new spark plug(s). STORAGE...
.... • Clean entire tractor (See "CLEANING" in fuel tank or storage container. Replace if necessary. • Touch up all nuts, bolts and screws are empty. • Never use plastic. Run engine at the end of time, clean it to give protection from tractor for storage, do not store battery directly on stabilizer container. ENGINE OIL Drain oil (with engine warm) and replace with clean engine oil. (See "ENGINE" in your gasoline will cause your tractor with new spark plug(s). STORAGE...
User Manual
Page 24
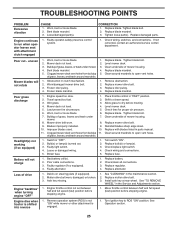
... Clean/replace air filter. 2. Check/replace solenoid or starter. 1. Raise cutting height/reduce speed. 2. Connect and tighten spark plug wire. 11. Contact an authorized service center/department. 24 CORRECTION 1. Clutch/brake pedal not depressed. 2. Attachment clutch is engaged. 3. Build-up of adjustment. Dirty/clogged muffler. 13. Check oil level/change spark plug. 7. Engine valves out of grass, leaves and trash under mower. 4. Recharge or replace battery. 2. See "To Adjust Carburetor" in "CHOKE" position. 3. Stale or dirty fuel. 6. Faulty ignition switch...
... Clean/replace air filter. 2. Check/replace solenoid or starter. 1. Raise cutting height/reduce speed. 2. Connect and tighten spark plug wire. 11. Contact an authorized service center/department. 24 CORRECTION 1. Clutch/brake pedal not depressed. 2. Attachment clutch is engaged. 3. Build-up of adjustment. Dirty/clogged muffler. 13. Check oil level/change spark plug. 7. Engine valves out of grass, leaves and trash under mower. 4. Recharge or replace battery. 2. See "To Adjust Carburetor" in "CHOKE" position. 3. Stale or dirty fuel. 6. Faulty ignition switch...
User Manual
Page 25
... 1. Check wiring, switches and connections. Worn, bent or loose blade. 2. Buildupofgrass,leaves,ortrashundermower. 4. Clean around mandrels to dry before stopping engine. 1. Replace mower drive belt. 3. Place throttle control in the Service and Adjustments section. 1. Low/uneven tire air pressure. 5. Replace with attachment clutch engaged 1. Bulb(s) or lamp(s) burned out. 3. Blown fuse. 1. Replace fuse. Axle key missing. 1. See "TO REMOVE WHEEL" in "FAST" position. 2. Tighten blade bolt. 2. Faulty operator-safety presence control system...
... 1. Check wiring, switches and connections. Worn, bent or loose blade. 2. Buildupofgrass,leaves,ortrashundermower. 4. Clean around mandrels to dry before stopping engine. 1. Replace mower drive belt. 3. Place throttle control in the Service and Adjustments section. 1. Low/uneven tire air pressure. 5. Replace with attachment clutch engaged 1. Bulb(s) or lamp(s) burned out. 3. Blown fuse. 1. Replace fuse. Axle key missing. 1. See "TO REMOVE WHEEL" in "FAST" position. 2. Tighten blade bolt. 2. Faulty operator-safety presence control system...
User Manual
Page 26
... power equipment unit or attachment are belts, blades, blade adapters, normal wear, normal adjustments, standard hardware and normal maintenance. 7. Transportation charges for the movement of purchase by the manufacturer. 3. Battery Warranty: On products equipped with a Battery, we will replace, without charge for any product which has been subjected to alteration, misuse, abuse, improper assembly or installation, delivery damage, or to the engine, transaxle/transmission components, battery...
... power equipment unit or attachment are belts, blades, blade adapters, normal wear, normal adjustments, standard hardware and normal maintenance. 7. Transportation charges for the movement of purchase by the manufacturer. 3. Battery Warranty: On products equipped with a Battery, we will replace, without charge for any product which has been subjected to alteration, misuse, abuse, improper assembly or installation, delivery damage, or to the engine, transaxle/transmission components, battery...
Parts Manual
Page 11
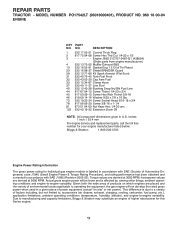
... 04-00 Nut Keps Hex 1/4-20 unc 122 532 42 19-22 Extension Drain Oil NOTE: All component dimensions given in accordance with SAE J1995 (Revision 2002-05). inches 1 inch = 25.4 mm For engine service and replacement parts, call the toll free number for your engine manufacturer listed below: Briggs & Stratton 1-800-233-3723 Engine Power Rating Information The gross power rating for individual gas engine models is affected...
... 04-00 Nut Keps Hex 1/4-20 unc 122 532 42 19-22 Extension Drain Oil NOTE: All component dimensions given in accordance with SAE J1995 (Revision 2002-05). inches 1 inch = 25.4 mm For engine service and replacement parts, call the toll free number for your engine manufacturer listed below: Briggs & Stratton 1-800-233-3723 Engine Power Rating Information The gross power rating for individual gas engine models is affected...
Parts Manual
Page 14
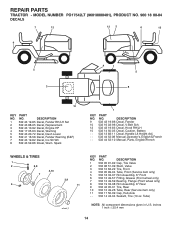
... Decal, Caution, Battery - - 532 13 83-11 Decal, Handle Lft Height Adj. - - 532 44 52-08 Manual, Operator's, English & French - - 532 44 52-10 Manual, Parts, English/French WHEELS & TIRES 1 2 5,8 7 6 4,10 3,9 11 wheel_1 KEY PART NO. NO. MODEL NUMBER PO17542LT (96018000401), PRODUCT NO. 960 18 00-04 DECALS 7 12 12 2 6 15 9 5 3 4 1 5 8 10 KEY PART NO. DESCRIPTION 1 532 05 91-92 Cap, Tire Valve 2 532...
... Decal, Caution, Battery - - 532 13 83-11 Decal, Handle Lft Height Adj. - - 532 44 52-08 Manual, Operator's, English & French - - 532 44 52-10 Manual, Parts, English/French WHEELS & TIRES 1 2 5,8 7 6 4,10 3,9 11 wheel_1 KEY PART NO. NO. MODEL NUMBER PO17542LT (96018000401), PRODUCT NO. 960 18 00-04 DECALS 7 12 12 2 6 15 9 5 3 4 1 5 8 10 KEY PART NO. DESCRIPTION 1 532 05 91-92 Cap, Tire Valve 2 532...
Parts Manual
Page 17
...-34 Head Asm Cable Clutch 208 817 67 06-08 Screw 3/8-16 x 1/2 - - 532 19 28-70 Mandrel Assembly (Includes hous- REPAIR PARTS TRACTOR - inches 1 inch = 25.4 mm 17 NO. Sway Bar 3/42 4 532 16 54-60 Bracket Asm Deck 42" Sway Bar 5 532 12 46-70 Retainer Spring 6 532 17 80-24 Bar Sway Deck 8 532 19 30-03 Bolt/Washer Asm. 7/16-20 unf (The following Blades are...
...-34 Head Asm Cable Clutch 208 817 67 06-08 Screw 3/8-16 x 1/2 - - 532 19 28-70 Mandrel Assembly (Includes hous- REPAIR PARTS TRACTOR - inches 1 inch = 25.4 mm 17 NO. Sway Bar 3/42 4 532 16 54-60 Bracket Asm Deck 42" Sway Bar 5 532 12 46-70 Retainer Spring 6 532 17 80-24 Bar Sway Deck 8 532 19 30-03 Bolt/Washer Asm. 7/16-20 unf (The following Blades are...


