
User Manual
Page 1
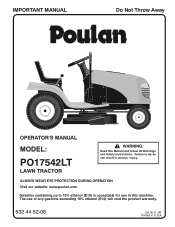
The use in U.S.A. IMPORTANT MANUAL Do Not Throw Away OPERATOR'S MANUAL MODEL: PO17542LT LAWN TRACTOR WARNING: Read this machine. ALWAYS WEAR EYE PROTECTION DURING OPERATION Visit our website: www.poulan.com Gasoline containing up to do so can result in serious injury. Failure to 10% ethanol (E10) is acceptable for use of any gasoline exceeding 10% ethanol (E10) will void the product warranty. 532 44 52-08 08.18.11 SR Printed in this Manual and follow all Warnings and Safety Instructions.
The use in U.S.A. IMPORTANT MANUAL Do Not Throw Away OPERATOR'S MANUAL MODEL: PO17542LT LAWN TRACTOR WARNING: Read this machine. ALWAYS WEAR EYE PROTECTION DURING OPERATION Visit our website: www.poulan.com Gasoline containing up to do so can result in serious injury. Failure to 10% ethanol (E10) is acceptable for use of any gasoline exceeding 10% ethanol (E10) will void the product warranty. 532 44 52-08 08.18.11 SR Printed in this Manual and follow all Warnings and Safety Instructions.
User Manual
Page 2
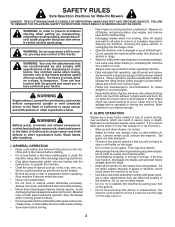
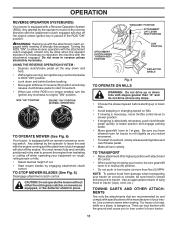
...in reverse unless absolutely necessary. If the tires lose traction, disengage the blades and proceed slowly straight down a hill in a large percentage of your tractor. they can hide obstacles. • Choose a low ground speed so that are involved in neutral, you will not have to roll over. &#...feel uneasy on wet grass. WARNING: Do not coast down the slope. • Keep all slopes requires extra caution. Keep clear of your tractor. Always look down slopes, not across. • Watch for Ride-On Mowers DANGER: THIS CUTTING MACHINE IS CAPABLE OF AMPUTATING HANDS AND FEET...
...in reverse unless absolutely necessary. If the tires lose traction, disengage the blades and proceed slowly straight down a hill in a large percentage of your tractor. they can hide obstacles. • Choose a low ground speed so that are involved in neutral, you will not have to roll over. &#...feel uneasy on wet grass. WARNING: Do not coast down the slope. • Keep all slopes requires extra caution. Keep clear of your tractor. Always look down slopes, not across. • Watch for Ride-On Mowers DANGER: THIS CUTTING MACHINE IS CAPABLE OF AMPUTATING HANDS AND FEET...

User Manual
Page 4
...on your purchase of the California Public Resources Code). We have similar laws. The instructions will enable you cannot easily remedy, please contact your tractor. • Follow the instructions under "Maintenance" and "Storage" sections of this manual. • Wear proper Personal Protective Equipment (PPE)... on federal lands. CCA: Case Size: 28 230 U1R Blade Torque: 45-55 FT. Should you experience any ). WARNING: This tractor is equipped with a spark arrester meeting applicable local or state laws (if any problem you to service or repair this manual. TABLE ...
...on your purchase of the California Public Resources Code). We have similar laws. The instructions will enable you cannot easily remedy, please contact your tractor. • Follow the instructions under "Maintenance" and "Storage" sections of this manual. • Wear proper Personal Protective Equipment (PPE)... on federal lands. CCA: Case Size: 28 230 U1R Blade Torque: 45-55 FT. Should you experience any ). WARNING: This tractor is equipped with a spark arrester meeting applicable local or state laws (if any problem you to service or repair this manual. TABLE ...
User Manual
Page 6
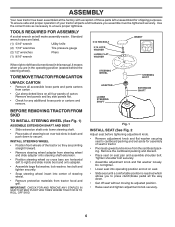
...is mentioned in this manual, it means when you assemble must be tightened securely. INSTALL STEERING WHEEL • Position front wheels of the tractor so they are pointing straight forward. • Remove steering wheel adapter from steering wheel and slide adapter onto steering shaft extension. •...panels and lay side panels flat. • Check for shipping purposes. To ensure safe and proper operation of your tractor all four panels of carton. BEFORE REMOVING TRACTOR FROM SKID TO INSTALL STEERING WHEEL (See Fig. 1) ASSEMBLE EXTENSION SHAFT AND BOOT • Slide extension shaft onto...
...is mentioned in this manual, it means when you assemble must be tightened securely. INSTALL STEERING WHEEL • Position front wheels of the tractor so they are pointing straight forward. • Remove steering wheel adapter from steering wheel and slide adapter onto steering shaft extension. •...panels and lay side panels flat. • Check for shipping purposes. To ensure safe and proper operation of your tractor all four panels of carton. BEFORE REMOVING TRACTOR FROM SKID TO INSTALL STEERING WHEEL (See Fig. 1) ASSEMBLE EXTENSION SHAFT AND BOOT • Slide extension shaft onto...
User Manual
Page 7
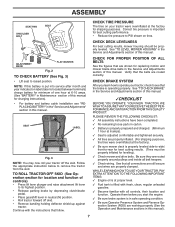
...this manual for charging instructions). • For battery and battery cable installation see that follow. Operate them before you learn how to operate your tractor, check to see "REPLACING BATTERY" in the "Service and Adjustments" section in carton. ✓ Battery is properly prepared and charged. (...All tires are working properly (See the Operation and Maintenance sections in this manual. ✓CHECKLIST BEFORE YOU OPERATE YOUR NEW TRACTOR, WE WISH TO ASSURE THAT YOU RECEIVE THE BEST PERFORMANCE AND SATISFACTION FROM THIS QUALITY PRODUCT. Correct tire pressure is located between...
...this manual for charging instructions). • For battery and battery cable installation see that follow. Operate them before you learn how to operate your tractor, check to see "REPLACING BATTERY" in the "Service and Adjustments" section in carton. ✓ Battery is properly prepared and charged. (...All tires are working properly (See the Operation and Maintenance sections in this manual. ✓CHECKLIST BEFORE YOU OPERATE YOUR NEW TRACTOR, WE WISH TO ASSURE THAT YOU RECEIVE THE BEST PERFORMANCE AND SATISFACTION FROM THIS QUALITY PRODUCT. Correct tire pressure is located between...

User Manual
Page 8
... KEEP AREA CLEAR SLOPE HAZARDS (SEE SAFETY RULES SECTION) LIGHTS ON FREE WHEEL (Automatic Models only) DANGER, KEEP HANDS AND FEET AWAY Failure to the tractor and/or engine. DANGER indicates a hazard which , if not avoided, could result in literature supplied with the product. OPERATION These symbols may appear on your...
... KEEP AREA CLEAR SLOPE HAZARDS (SEE SAFETY RULES SECTION) LIGHTS ON FREE WHEEL (Automatic Models only) DANGER, KEEP HANDS AND FEET AWAY Failure to the tractor and/or engine. DANGER indicates a hazard which , if not avoided, could result in literature supplied with the product. OPERATION These symbols may appear on your...
User Manual
Page 9
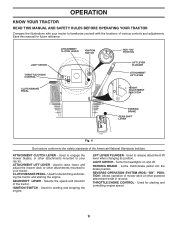
...PLUNGER - PARKING BRAKE - THROTTLE/CHOKE CONTROL - Used to raise, lower, and adjust the mower deck or other attachments mounted to your tractor. Used for future reference. Selects the speed and direction of mower deck or other powered attachment while in reverse. Locks clutch/brake pedal ...ON" POSITION LIFT LEVER PLUNGER ATTACHMENT LIFT LEVER HEIGHT ADJUSTMENT INDICATOR PARKING BRAKE GEAR SHIFT LEVER 02829 Fig. 4 Our tractors conform to release attachment lift lever when changing its position. ATTACHMENT LIFT LEVER - GEARSHIFT LEVER - IGNITION SWITCH - OPERATION KNOW YOUR...
...PLUNGER - PARKING BRAKE - THROTTLE/CHOKE CONTROL - Used to raise, lower, and adjust the mower deck or other attachments mounted to your tractor. Used for future reference. Selects the speed and direction of mower deck or other powered attachment while in reverse. Locks clutch/brake pedal ...ON" POSITION LIFT LEVER PLUNGER ATTACHMENT LIFT LEVER HEIGHT ADJUSTMENT INDICATOR PARKING BRAKE GEAR SHIFT LEVER 02829 Fig. 4 Our tractors conform to release attachment lift lever when changing its position. ATTACHMENT LIFT LEVER - GEARSHIFT LEVER - IGNITION SWITCH - OPERATION KNOW YOUR...

User Manual
Page 10
... (fast) position, before leaving the operator's position; The heights are approximate and may cause "browning" of grass. IMPORTANT: BRING TRACTOR TO A COMPLETE STOP BEFORE SHIFTING OR CHANGING GEARS. NOTE: Failure to move attachment clutch lever to desired position. IMPORTANT: LEAVING THE.... We recommend a wide vision safety mask over 6" in height should remain in "BRAKE" position. To eliminate this possibility, always stop tractor completely, as described above, before stopping may cause engine to "backfire". • Turn ignition key to over 3" during hot months. to...
... (fast) position, before leaving the operator's position; The heights are approximate and may cause "browning" of grass. IMPORTANT: BRING TRACTOR TO A COMPLETE STOP BEFORE SHIFTING OR CHANGING GEARS. NOTE: Failure to move attachment clutch lever to desired position. IMPORTANT: LEAVING THE.... We recommend a wide vision safety mask over 6" in height should remain in "BRAKE" position. To eliminate this possibility, always stop tractor completely, as described above, before stopping may cause engine to "backfire". • Turn ignition key to over 3" during hot months. to...
User Manual
Page 11
...slopes greater than five (5) MPH. ROS "ON" POSITION ENGINE "ON" POSITION (NORMAL OPERATING) 02828 TO OPERATE MOWER (See Fig. 6) Your tractor is equipped with the attachment clutch engaged will shut off the engine. Any attempt by and comply with the engine running , turn ignition key counterclockwise...8226; Select desired height of cut. • Start mower blades by the operator to leave the seat with specifications of the manufacturer of your tractor. Too heavy of a load, while on a slope, is necessary to reposition the machine with the ground and cause you restart movement. ...
...slopes greater than five (5) MPH. ROS "ON" POSITION ENGINE "ON" POSITION (NORMAL OPERATING) 02828 TO OPERATE MOWER (See Fig. 6) Your tractor is equipped with the attachment clutch engaged will shut off the engine. Any attempt by and comply with the engine running , turn ignition key counterclockwise...8226; Select desired height of cut. • Start mower blades by the operator to leave the seat with specifications of the manufacturer of your tractor. Too heavy of a load, while on a slope, is necessary to reposition the machine with the ground and cause you restart movement. ...

User Manual
Page 12
... choke as engine starts. OPERATION BEFORE STARTING THE ENGINE CHECK ENGINE OIL LEVEL The engine in your tractor has been shipped, from the factory, already filled with summer weight oil. • Check engine oil with tractor on level ground. • Remove oil fill cap/dipstick and wipe clean, reinsert the dipstick and...
... choke as engine starts. OPERATION BEFORE STARTING THE ENGINE CHECK ENGINE OIL LEVEL The engine in your tractor has been shipped, from the factory, already filled with summer weight oil. • Check engine oil with tractor on level ground. • Remove oil fill cap/dipstick and wipe clean, reinsert the dipstick and...
User Manual
Page 13
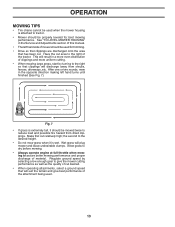
... uniform cutting. • When mowing large areas, start by selecting a low enough gear to assure better mowing performance and proper discharge of the tractor. Allow grass to dry before mowing. • Always operate engine at full throttle when mowing to give best performance of this manual. •... the terrain and give the mower cutting performance as well as the quality of mower should be used when the mower housing is attached to tractor. • Mower should be mowed twice to reduce load and possible fire hazard from shrubs, fences, driveways, etc. OPERATION MOWING TIPS &#...
... uniform cutting. • When mowing large areas, start by selecting a low enough gear to assure better mowing performance and proper discharge of the tractor. Allow grass to dry before mowing. • Always operate engine at full throttle when mowing to give best performance of this manual. •... the terrain and give the mower cutting performance as well as the quality of mower should be used when the mower housing is attached to tractor. • Mower should be mowed twice to reduce load and possible fire hazard from shrubs, fences, driveways, etc. OPERATION MOWING TIPS &#...
User Manual
Page 14
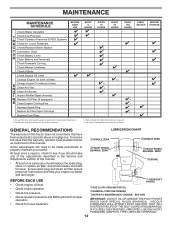
...The warranty on this manual. At least once a season, check to operator abuse or negligence. Service more often when operating in this tractor does not cover items that have been subjected to see if you should make any of this manual. A new spark plug and ...IMPORTANT: DO NOT OIL OR GREASE THE PIVOT POINTS WHICH HAVE SPECIAL NYLON BEARINGS. To receive full value from the warranty, operator must maintain tractor as instructed in dirty or dusty conditions. MAINTENANCE MAINTENANCE SCHEDULE BEFORE EACH USE Check Brake Operation T Check Tire Pressure R Check Operator Presence &...
...The warranty on this manual. At least once a season, check to operator abuse or negligence. Service more often when operating in this tractor does not cover items that have been subjected to see if you should make any of this manual. A new spark plug and ...IMPORTANT: DO NOT OIL OR GREASE THE PIVOT POINTS WHICH HAVE SPECIAL NYLON BEARINGS. To receive full value from the warranty, operator must maintain tractor as instructed in dirty or dusty conditions. MAINTENANCE MAINTENANCE SCHEDULE BEFORE EACH USE Check Brake Operation T Check Tire Pressure R Check Operator Presence &...
User Manual
Page 15
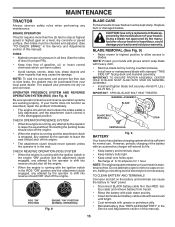
...8226; The attachment clutch should never operate unless the operator is maintenance free. IMPORTANT: SPECIAL BLADE BOLT HEAT TREATED. BRAKE OPERATION If tractor requires more than five (5) feet to shift into reverse should not start unless the brake pedal is fully depressed, and the attachment ...Replace bent or damaged blades. NOTE: The original equipment battery on a level, dry concrete or paved surface, then brake must be purchased from tractor. • Rinse the battery with plain water and dry. • Clean terminals and battery cable ends with wire brush until bright. •...
...8226; The attachment clutch should never operate unless the operator is maintenance free. IMPORTANT: SPECIAL BLADE BOLT HEAT TREATED. BRAKE OPERATION If tractor requires more than five (5) feet to shift into reverse should not start unless the brake pedal is fully depressed, and the attachment ...Replace bent or damaged blades. NOTE: The original equipment battery on a level, dry concrete or paved surface, then brake must be purchased from tractor. • Rinse the battery with plain water and dry. • Clean terminals and battery cable ends with wire brush until bright. •...
User Manual
Page 16
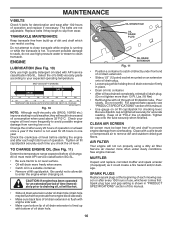
... of use high quality detergent oil rated with engine side wall. • Make sure bottom lip of operation or at least once a year if the tractor is hot. Check the crankcase oil level before oil change. Be careful not to allow dirt to draining oil, oil will result in place. •... (8) hours of oil drain hole. The belts are not adjustable. CLEAN AIR SCREEN Air screen must meet API service classification SG-SL. • Be sure tractor is shown in one year. Do not overfill. Lbs./18 Nm) • Refill engine with bottom of operation. OIL DRAIN HOLE OIL DRAIN PLUG OIL...
... of use high quality detergent oil rated with engine side wall. • Make sure bottom lip of operation or at least once a year if the tractor is hot. Check the crankcase oil level before oil change. Be careful not to allow dirt to draining oil, oil will result in place. •... (8) hours of oil drain hole. The belts are not adjustable. CLEAN AIR SCREEN Air screen must meet API service classification SG-SL. • Be sure tractor is shown in one year. Do not overfill. Lbs./18 Nm) • Refill engine with bottom of operation. OIL DRAIN HOLE OIL DRAIN PLUG OIL...
User Manual
Page 17
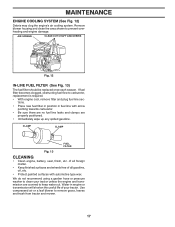
...8226; Protect painted surfaces with arrow pointing towards carburetor. • Be sure there are no fuel line leaks and clamps are covered to clean your tractor. CLAMP CLAMP FUEL FILTER Fig. 13 CLEANING • Clean engine, battery, seat, finish, etc. Use compressed air or a leaf blower to... Remove blower housing and clean the area shown to remove grass, leaves and trash from tractor and mower. 17 of all foreign matter. • Keep finished surfaces and wheels free of your tractor unless the engine and transmission are properly positioned. • Immediately wipe up any spilled ...
...8226; Protect painted surfaces with arrow pointing towards carburetor. • Be sure there are no fuel line leaks and clamps are covered to clean your tractor. CLAMP CLAMP FUEL FILTER Fig. 13 CLEANING • Clean engine, battery, seat, finish, etc. Use compressed air or a leaf blower to... Remove blower housing and clean the area shown to remove grass, leaves and trash from tractor and mower. 17 of all foreign matter. • Keep finished surfaces and wheels free of your tractor unless the engine and transmission are properly positioned. • Immediately wipe up any spilled ...
User Manual
Page 18
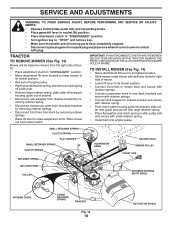
... and remove key. • Make sure the blades and all moving parts have completely stopped. • Disconnect spark plug wire from under tractor with deflector shield to right side of bracket. • Disconnect anti-swaybar from chassis bracket by removing retainer spring. • Disconnect suspension arms...pulley bolt. • Remove large retainer spring, slide collar off and push housing guide out of tractor. • Lower lift lever to its highest position. • Slide mower under tractor. TRACTOR TO REMOVE MOWER (See Fig. 14) Mower will be easier to remove from the right side ...
... and remove key. • Make sure the blades and all moving parts have completely stopped. • Disconnect spark plug wire from under tractor with deflector shield to right side of bracket. • Disconnect anti-swaybar from chassis bracket by removing retainer spring. • Disconnect suspension arms...pulley bolt. • Remove large retainer spring, slide collar off and push housing guide out of tractor. • Lower lift lever to its highest position. • Slide mower under tractor. TRACTOR TO REMOVE MOWER (See Fig. 14) Mower will be easier to remove from the right side ...
User Manual
Page 19
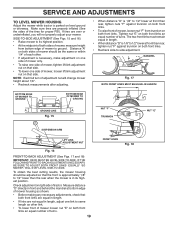
...-TO-SIDE. Check adjustment on both front links an equal number of both front links. Make sure tires are properly inflated (See the sides of tractor. The two front links must remain equal in length. • When distance "D" is 1/8" to 1/2" lower at bottom edge of mower housing as other link. •... front of mower loosen nut "E" on that side. Distance "A" on level ground or driveway. SERVICE AND ADJUSTMENTS TO LEVEL MOWER HOUSING Adjust the mower while tractor is parked on both front links. • Recheck side-to ground.
...-TO-SIDE. Check adjustment on both front links an equal number of both front links. Make sure tires are properly inflated (See the sides of tractor. The two front links must remain equal in length. • When distance "D" is 1/8" to 1/2" lower at bottom edge of mower housing as other link. •... front of mower loosen nut "E" on that side. Distance "A" on level ground or driveway. SERVICE AND ADJUSTMENTS TO LEVEL MOWER HOUSING Adjust the mower while tractor is parked on both front links. • Recheck side-to ground.

User Manual
Page 20
... belt and position of all belt guides and keepers. • Remove belt from stationary idler and clutching idler. • Remove belt downward from tractor. The rear wheels must be replaced without tools. For assistance, there is in all pulley grooves and inside all belt guides. • Install ... keepers. • Remove belt from center span keeper and pull belt away from around engine pulley. • Pull belt slack toward front of tractor and roll around the top groove of engine pulley. • Install belt through stationary idler and clutching idler. • Make sure belt is ...
... belt and position of all belt guides and keepers. • Remove belt from stationary idler and clutching idler. • Remove belt downward from tractor. The rear wheels must be replaced without tools. For assistance, there is in all pulley grooves and inside all belt guides. • Install ... keepers. • Remove belt from center span keeper and pull belt away from around engine pulley. • Pull belt slack toward front of tractor and roll around the top groove of engine pulley. • Install belt through stationary idler and clutching idler. • Make sure belt is ...
User Manual
Page 21
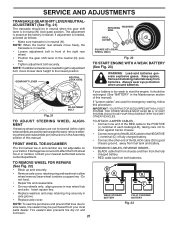
... bolt in front of the right rear wheel. • Position the gear shift lever in the Assembly section of this procedure: IMPORTANT: YOUR TRACTOR IS EQUIPPED WITH A 12 VOLT SYSTEM. Fig. 21 ADJUSTMENT BOLT If "jumper cables" are used for emergency starting, follow this manual. TO... cable last from fuel tank and battery. Insert square key. • Replace washers and snap retaining ring securely in or camber, contact your tractor. Keep sparks, flame and smoking materials away from your battery is in neutral (N) (lock gate) position. If damage has occurred to affect the...
... bolt in front of the right rear wheel. • Position the gear shift lever in the Assembly section of this procedure: IMPORTANT: YOUR TRACTOR IS EQUIPPED WITH A 12 VOLT SYSTEM. Fig. 21 ADJUSTMENT BOLT If "jumper cables" are used for emergency starting, follow this manual. TO... cable last from fuel tank and battery. Insert square key. • Replace washers and snap retaining ring securely in or camber, contact your tractor. Keep sparks, flame and smoking materials away from your battery is in neutral (N) (lock gate) position. If damage has occurred to affect the...
User Manual
Page 22
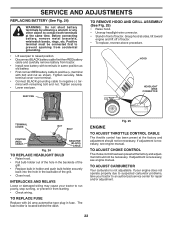
...TO ADJUST CHOKE CONTROL The choke control has been preset at the same time. INTERLOCKS AND RELAYS Loose or damaged wiring may cause your tractor to negative (-) terminal with remaining bolt and nut. SERVICE AND ADJUSTMENTS REPLACING BATTERY (See Fig. 24) WARNING: Do not short battery...dash. If adjustment is necessary, see engine manual. If your engine does not operate properly due to suspected carburetor problems, take your tractor to contact both terminals at the factory and adjustment should not be necessary. Slide terminal cover over terminal. • Connect BLACK ...
...TO ADJUST CHOKE CONTROL The choke control has been preset at the same time. INTERLOCKS AND RELAYS Loose or damaged wiring may cause your tractor to negative (-) terminal with remaining bolt and nut. SERVICE AND ADJUSTMENTS REPLACING BATTERY (See Fig. 24) WARNING: Do not short battery...dash. If adjustment is necessary, see engine manual. If your engine does not operate properly due to suspected carburetor problems, take your tractor to contact both terminals at the factory and adjustment should not be necessary. Slide terminal cover over terminal. • Connect BLACK ...

