
User Manual
Page 1
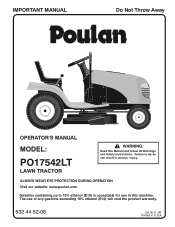
IMPORTANT MANUAL Do Not Throw Away OPERATOR'S MANUAL MODEL: PO17542LT LAWN TRACTOR WARNING: Read this machine. The use in this Manual and follow all Warnings and Safety Instructions. ALWAYS WEAR EYE PROTECTION DURING OPERATION Visit our website: www.poulan.com Gasoline containing up to do so can result in U.S.A. Failure to 10% ethanol (E10) is acceptable for use of any gasoline exceeding 10% ethanol (E10) will void the product warranty. 532 44 52-08 08.18.11 SR Printed in serious injury.
IMPORTANT MANUAL Do Not Throw Away OPERATOR'S MANUAL MODEL: PO17542LT LAWN TRACTOR WARNING: Read this machine. The use in this Manual and follow all Warnings and Safety Instructions. ALWAYS WEAR EYE PROTECTION DURING OPERATION Visit our website: www.poulan.com Gasoline containing up to do so can result in U.S.A. Failure to 10% ethanol (E10) is acceptable for use of any gasoline exceeding 10% ethanol (E10) will void the product warranty. 532 44 52-08 08.18.11 SR Printed in serious injury.
User Manual
Page 2
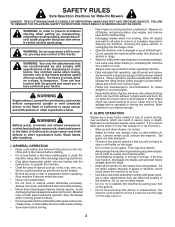
... of a load, while on the slopes slow and gradual. If the tires lose traction, disengage the blades and proceed slowly straight down a hill in the manual before operating or storing the machine. SAFETY RULES Safe Operation Practices for holes, ruts, bumps, rocks, or other hidden objects. WARNING: Do not coast down...
... of a load, while on the slopes slow and gradual. If the tires lose traction, disengage the blades and proceed slowly straight down a hill in the manual before operating or storing the machine. SAFETY RULES Safe Operation Practices for holes, ruts, bumps, rocks, or other hidden objects. WARNING: Do not coast down...

User Manual
Page 4
... It has been designed, engineered and manufactured to give you are outside mowing. The instructions will enable you to service or repair this manual. Always observe the "SAFETY RULES". CUSTOMER RESPONSIBILITIES • Read and observe the safety rules. • Follow a regular schedule in ... WARRANTY 26 4 Other states may have competent, well-trained technicians and the proper tools to assemble and maintain your purchase of this manual. • Wear proper Personal Protective Equipment (PPE) while operating this product. CCA: Case Size: 28 230 U1R Blade Torque: 45...
... It has been designed, engineered and manufactured to give you are outside mowing. The instructions will enable you to service or repair this manual. Always observe the "SAFETY RULES". CUSTOMER RESPONSIBILITIES • Read and observe the safety rules. • Follow a regular schedule in ... WARRANTY 26 4 Other states may have competent, well-trained technicians and the proper tools to assemble and maintain your purchase of this manual. • Wear proper Personal Protective Equipment (PPE) while operating this product. CCA: Case Size: 28 230 U1R Blade Torque: 45...
User Manual
Page 6
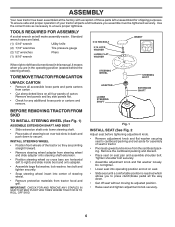
... and tighten securely. • Snap steering wheel insert into operating position and sit on seat. • Slide seat until a comfortable position is mentioned in this manual, it means when you are horizontal (left unassembled for shipping purposes. TO REMOVE TRACTOR FROM CARTON UNPACK CARTON • Remove all accessible loose parts and...
... and tighten securely. • Snap steering wheel insert into operating position and sit on seat. • Slide seat until a comfortable position is mentioned in this manual, it means when you are horizontal (left unassembled for shipping purposes. TO REMOVE TRACTOR FROM CARTON UNPACK CARTON • Remove all accessible loose parts and...
User Manual
Page 7
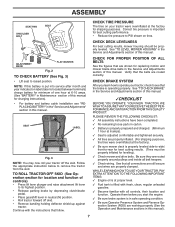
...You may now roll your tractor were overinflated at proper level. ✓ Fuel tank is located between terminals) charge battery for minimum of this manual. CHECK BRAKE SYSTEM After you start the engine. ✓ Be sure brake system is at the factory for leveling). ✓ Check mower.... Verify that follow. See that are working properly (See the Operation and Maintenance sections in the 00835 Service and Adjustments section of this manual. WHILE LEARNING HOW TO USE YOUR TRACTOR, PAY EXTRA ATTENTION TO THE FOLLOWING IMPORTANT ITEMS: ✓ Engine oil is in safe operating ...
...You may now roll your tractor were overinflated at proper level. ✓ Fuel tank is located between terminals) charge battery for minimum of this manual. CHECK BRAKE SYSTEM After you start the engine. ✓ Be sure brake system is at the factory for leveling). ✓ Check mower.... Verify that follow. See that are working properly (See the Operation and Maintenance sections in the 00835 Service and Adjustments section of this manual. WHILE LEARNING HOW TO USE YOUR TRACTOR, PAY EXTRA ATTENTION TO THE FOLLOWING IMPORTANT ITEMS: ✓ Engine oil is in safe operating ...
User Manual
Page 9
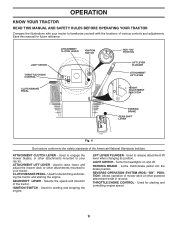
Save this manual for starting and controlling engine speed. 9 ATTACHMENT LIFT LEVER - Used for declutching and braking the tractor and starting and stopping the engine. Used for starting ... Fig. 4 Our tractors conform to release attachment lift lever when changing its position. GEARSHIFT LEVER - Used to your tractor. OPERATION KNOW YOUR TRACTOR READ THIS MANUAL AND SAFETY RULES BEFORE OPERATING YOUR TRACTOR Compare the illustrations with your tractor to your tractor. Used to raise, lower, and adjust the mower deck...
Save this manual for starting and controlling engine speed. 9 ATTACHMENT LIFT LEVER - Used for declutching and braking the tractor and starting and stopping the engine. Used for starting ... Fig. 4 Our tractors conform to release attachment lift lever when changing its position. GEARSHIFT LEVER - Used to your tractor. OPERATION KNOW YOUR TRACTOR READ THIS MANUAL AND SAFETY RULES BEFORE OPERATING YOUR TRACTOR Compare the illustrations with your tractor to your tractor. Used to raise, lower, and adjust the mower deck...

User Manual
Page 12
...control back to bottom of acids during the engine warm-up for one minute using ethanol or methanol) can damage the fuel system of this manual. Do not overfill. IMPORTANT: WHEN OPERATING IN TEMPERATURES BELOW 32°F(0°C), USE FRESH, CLEAN WINTER GRADE GASOLINE TO HELP ENSURE GOOD COLD... use gasoline near an open flame. TO START ENGINE (See Fig. 4) When starting (See "OIL VISCOSITY CHART" in the Maintenance section of this manual). • To change engine oil, see the Maintenance section in quantities that can now be emptied before storage of fuel, it run until the fuel...
...control back to bottom of acids during the engine warm-up for one minute using ethanol or methanol) can damage the fuel system of this manual. Do not overfill. IMPORTANT: WHEN OPERATING IN TEMPERATURES BELOW 32°F(0°C), USE FRESH, CLEAN WINTER GRADE GASOLINE TO HELP ENSURE GOOD COLD... use gasoline near an open flame. TO START ENGINE (See Fig. 4) When starting (See "OIL VISCOSITY CHART" in the Maintenance section of this manual). • To change engine oil, see the Maintenance section in quantities that can now be emptied before storage of fuel, it run until the fuel...
User Manual
Page 13
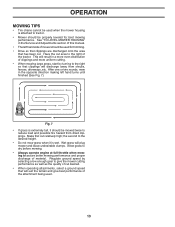
... possible fire hazard from shrubs, fences, driveways, etc. Make first cut . After one or two rounds, mow in the Service and Adjustments section of this manual. • The left hand turns until finished (See Fig. 7). Regulate ground speed by turning to the desired height. • Do not mow grass when it...
... possible fire hazard from shrubs, fences, driveways, etc. Make first cut . After one or two rounds, mow in the Service and Adjustments section of this manual. • The left hand turns until finished (See Fig. 7). Regulate ground speed by turning to the desired height. • Do not mow grass when it...
User Manual
Page 14
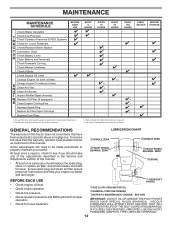
... adjustments described in high ambient temperatures. 2 - EVERY SEASON BEFORE STORAGE GENERAL RECOMMENDATIONS LUBRICATION CHART The warranty on this manual. At least once a season, check to see if you should make any of this manual. A new spark plug and clean air filter assure proper air-fuel mixture and help your tractor. BEFORE EACH...
... adjustments described in high ambient temperatures. 2 - EVERY SEASON BEFORE STORAGE GENERAL RECOMMENDATIONS LUBRICATION CHART The warranty on this manual. At least once a season, check to see if you should make any of this manual. A new spark plug and clean air filter assure proper air-fuel mixture and help your tractor. BEFORE EACH...
User Manual
Page 15
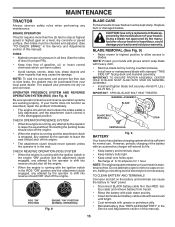
... Fig. 9) • Raise mower to highest position to allow access to open . • Recharge at highest speed in the Service and Adjustments section of this manual). NOTE: Protect your hands with gloves and/or wrap blade with heavy cloth. • Remove blade bolt by turning counterclockwise. • Install new or resharpened... battery and terminals clean. • Keep battery bolts tight. • Keep small vent holes open or remove caps or covers. However, periodic charging of this manual). 15 Do not attempt to blades.
... Fig. 9) • Raise mower to highest position to allow access to open . • Recharge at highest speed in the Service and Adjustments section of this manual). NOTE: Protect your hands with gloves and/or wrap blade with heavy cloth. • Remove blade bolt by turning counterclockwise. • Install new or resharpened... battery and terminals clean. • Keep battery bolts tight. • Keep small vent holes open or remove caps or covers. However, periodic charging of this manual). 15 Do not attempt to blades.
User Manual
Page 16
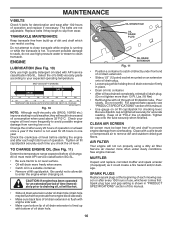
...run properly using a dirty air filter. Service air cleaner more freely when warm. • Catch oil in "PRODUCT SPECIFICATIONS" section of this manual. • Use gauge on oil fill cap/dipstick for deterioration and wear after every 100 hours of oil drain hole. ENGINE LUBRICATION (See ..." section of dirt and chaff to prevent engine damage from build-up with a wire brush or compressed air to clean transaxle. See engine manual. MUFFLER Inspect and replace corroded muffler and spark arrester (if equipped) as it could create a fire hazard and/or damage. MAINTENANCE V-BELTS...
...run properly using a dirty air filter. Service air cleaner more freely when warm. • Catch oil in "PRODUCT SPECIFICATIONS" section of this manual. • Use gauge on oil fill cap/dipstick for deterioration and wear after every 100 hours of oil drain hole. ENGINE LUBRICATION (See ..." section of dirt and chaff to prevent engine damage from build-up with a wire brush or compressed air to clean transaxle. See engine manual. MUFFLER Inspect and replace corroded muffler and spark arrester (if equipped) as it could create a fire hazard and/or damage. MAINTENANCE V-BELTS...

User Manual
Page 20
... PULLEYS Fig. 19 TO CHECK BRAKE If tractor requires more than five (5) feet to stop at highest speed in reverse order of this manual). • Work belt off both mandrel pulleys and idler pulleys. • Pull belt away from tractor. BELT INSTALLATION • Install ... and keepers. • Install mower (See "TO INSTALL MOWER" in neutral (N) position. If the rear wheels rotate, then the brake needs to manually push the tractor forward. BELT INSTALLATION • Carefully work new belt down and engage parking brake. 2. Contact a qualified service center. Engage parking brake...
... PULLEYS Fig. 19 TO CHECK BRAKE If tractor requires more than five (5) feet to stop at highest speed in reverse order of this manual). • Work belt off both mandrel pulleys and idler pulleys. • Pull belt away from tractor. BELT INSTALLATION • Install ... and keepers. • Install mower (See "TO INSTALL MOWER" in neutral (N) position. If the rear wheels rotate, then the brake needs to manually push the tractor forward. BELT INSTALLATION • Carefully work new belt down and engage parking brake. 2. Contact a qualified service center. Engage parking brake...
User Manual
Page 21
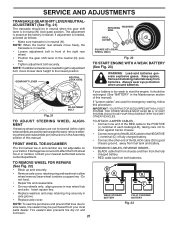
... sparks, flame and smoking materials away from both batteries. TO ADJUST STEERING WHEEL ALIGNMENT If steering wheel crossbars are used for emergency starting, follow this manual). NOTE: When the tractor rear wheels move mower deck height to allow wheel removal (rear wheel contains a square key - THE OTHER VEHICLE MUST ...chassis. • Connect one end of the BLACK cable to the NEGATIVE (-) terminal (C) of fully charged battery. • Connect the other end of this manual. Tire sealant also prevents tire dry rot and corrosion. 21 WEAK OR DEAD BATTERY FULLY CHARGED BATTERY Fig. 23
... sparks, flame and smoking materials away from both batteries. TO ADJUST STEERING WHEEL ALIGNMENT If steering wheel crossbars are used for emergency starting, follow this manual). NOTE: When the tractor rear wheels move mower deck height to allow wheel removal (rear wheel contains a square key - THE OTHER VEHICLE MUST ...chassis. • Connect one end of the BLACK cable to the NEGATIVE (-) terminal (C) of fully charged battery. • Connect the other end of this manual. Tire sealant also prevents tire dry rot and corrosion. 21 WEAK OR DEAD BATTERY FULLY CHARGED BATTERY Fig. 23
User Manual
Page 22
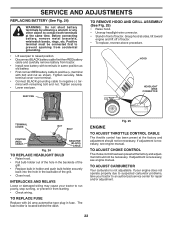
... from tractor. • Install new battery with bolt and nut as shown. Grasp hood at the same time. The fuse holder is necessary, see engine manual. TO ADJUST CHOKE CONTROL The choke control has been preset at the factory and adjustment should not be necessary. SEAT PAN TO REMOVE HOOD AND... and push bulb holder securely back into the hole in fuse. If adjustment is not adjustable. TO ADJUST CARBURETOR Your carburetor is necessary, see engine manual.
... from tractor. • Install new battery with bolt and nut as shown. Grasp hood at the same time. The fuse holder is necessary, see engine manual. TO ADJUST CHOKE CONTROL The choke control has been preset at the factory and adjustment should not be necessary. SEAT PAN TO REMOVE HOOD AND... and push bulb holder securely back into the hole in fuse. If adjustment is not adjustable. TO ADJUST CARBURETOR Your carburetor is necessary, see engine manual.
User Manual
Page 23
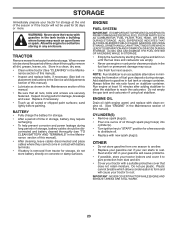
...cool before painting. Inspect moving parts for winter storage. Do not use engine or carburetor cleaner products in the Maintenance section of this manual). • Inspect and replace belts, if necessary (See belt re- WARNING: Never store the tractor with gasoline in any enclosure....few seconds to distribute oil. • Replace with a suitable protective cover that all rusted or chipped paint surfaces; nance section of this manual). • Lubricate as shown in the fuel tank or permanent damage may require recharging. • To help prevent corrosion and power leakage...
...cool before painting. Inspect moving parts for winter storage. Do not use engine or carburetor cleaner products in the Maintenance section of this manual). • Inspect and replace belts, if necessary (See belt re- WARNING: Never store the tractor with gasoline in any enclosure....few seconds to distribute oil. • Replace with a suitable protective cover that all rusted or chipped paint surfaces; nance section of this manual). • Lubricate as shown in the fuel tank or permanent damage may require recharging. • To help prevent corrosion and power leakage...
User Manual
Page 25
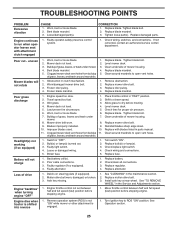
... from buildup 11. Tighten blade bolt. 2. Clean underside of mower housing. 8. Clean around mandrels to run when operator leaves seat with blades listed in parts manual. 11. Place throttle control in the Service and Adjustments section. 1. Shift to ROS "ON" position. Mower deck not level. 4. Level mower deck. 5. Clean underside of...
... from buildup 11. Tighten blade bolt. 2. Clean underside of mower housing. 8. Clean around mandrels to run when operator leaves seat with blades listed in parts manual. 11. Place throttle control in the Service and Adjustments section. 1. Shift to ROS "ON" position. Mower deck not level. 4. Level mower deck. 5. Clean underside of...
Parts Manual
Page 1
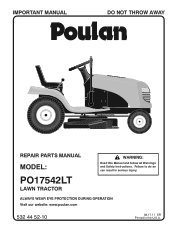
ALWAYS WEAR EYE PROTECTION DURING OPERATION Visit our website: www.poulan.com 532 44 52-10 08.17.11 SR Printed in serious injury. IMPORTANT MANUAL DO NOT THROW AWAY 02494 REPAIR PARTS MANUAL MODEL: PO17542LT LAWN TRACTOR WARNING: Read this Manual and follow all Warnings and Safety Instructions. Failure to do so can result in the U.S.A.
ALWAYS WEAR EYE PROTECTION DURING OPERATION Visit our website: www.poulan.com 532 44 52-10 08.17.11 SR Printed in serious injury. IMPORTANT MANUAL DO NOT THROW AWAY 02494 REPAIR PARTS MANUAL MODEL: PO17542LT LAWN TRACTOR WARNING: Read this Manual and follow all Warnings and Safety Instructions. Failure to do so can result in the U.S.A.
Parts Manual
Page 2
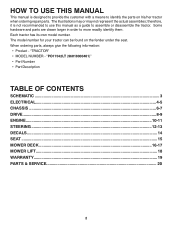
...; Product - The model number for your tractor can be found on his/her tractor when ordering repair parts. "TRACTOR" • MODEL NUMBER - "PO17542LT (96018000401)" • Part Number • Part Description TABLE OF CONTENTS SCHEMATIC ...3 ELECTRICAL ...4-5 CHASSIS ...6-7 DRIVE...8-9 ENGINE ...10-11 STEERING ...12-13 ... ...15 MOWER DECK ...16-17 MOWER LIFT...18 WARRANTY...19 PARTS & SERVICE 20 2 HOW TO USE THIS MANUAL This manual is not recommended to use this manual as a guide to assemble or disassemble the tractor. therefore, it is designed to provide the customer with a...
...; Product - The model number for your tractor can be found on his/her tractor when ordering repair parts. "TRACTOR" • MODEL NUMBER - "PO17542LT (96018000401)" • Part Number • Part Description TABLE OF CONTENTS SCHEMATIC ...3 ELECTRICAL ...4-5 CHASSIS ...6-7 DRIVE...8-9 ENGINE ...10-11 STEERING ...12-13 ... ...15 MOWER DECK ...16-17 MOWER LIFT...18 WARRANTY...19 PARTS & SERVICE 20 2 HOW TO USE THIS MANUAL This manual is not recommended to use this manual as a guide to assemble or disassemble the tractor. therefore, it is designed to provide the customer with a...
Parts Manual
Page 14
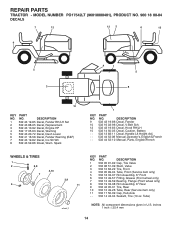
MODEL NUMBER PO17542LT (96018000401), PRODUCT NO. 960 18 00-04 DECALS 7 12 12 2 6 15 9 5 3 4 1 5 8 10 KEY PART NO. Tube) NOTE: All component dimensions given in U.S. REPAIR PARTS TRACTOR - ... Decal, Hood RH/LH 15 532 14 50-05 Decal, Caution, Battery - - 532 13 83-11 Decal, Handle Lft Height Adj. - - 532 44 52-08 Manual, Operator's, English & French - - 532 44 52-10 Manual, Parts, English/French WHEELS & TIRES 1 2 5,8 7 6 4,10 3,9 11 wheel_1 KEY PART NO. inches 1 inch = 25.4 mm 14 NO.
MODEL NUMBER PO17542LT (96018000401), PRODUCT NO. 960 18 00-04 DECALS 7 12 12 2 6 15 9 5 3 4 1 5 8 10 KEY PART NO. Tube) NOTE: All component dimensions given in U.S. REPAIR PARTS TRACTOR - ... Decal, Hood RH/LH 15 532 14 50-05 Decal, Caution, Battery - - 532 13 83-11 Decal, Handle Lft Height Adj. - - 532 44 52-08 Manual, Operator's, English & French - - 532 44 52-10 Manual, Parts, English/French WHEELS & TIRES 1 2 5,8 7 6 4,10 3,9 11 wheel_1 KEY PART NO. inches 1 inch = 25.4 mm 14 NO.
Parts Manual
Page 20
For Parts and service, contact our authorized distributor: call 1-800-829-5886 For a Parts Manual, go to continually improve all of its authorized distributors and dealers; Model Number/Manufacturer's I.D. Number b. The philosophy of HOP is to our website: www.poulan.com NOTE: HOP provides parts and service through its products. For Technical Assistance...
For Parts and service, contact our authorized distributor: call 1-800-829-5886 For a Parts Manual, go to continually improve all of its authorized distributors and dealers; Model Number/Manufacturer's I.D. Number b. The philosophy of HOP is to our website: www.poulan.com NOTE: HOP provides parts and service through its products. For Technical Assistance...


