
User Manual
Page 2
...oil or fuel spillage before dismounting. • Disengage blades when not mowing. SLOPE OPERATION Slopes are involved in a large percentage of riding mower-related injuries. Uneven terrain could suddenly roll over if a wheel is over . • Use extra care while operating machine with the ...operate machine without the entire grass catcher, discharge chute, or other attachments; These operators should evaluate their ability to operate the riding mower safely enough to roll over the edge or if the edge caves in reverse unless absolutely necessary. Do not allow responsible adults, ...
...oil or fuel spillage before dismounting. • Disengage blades when not mowing. SLOPE OPERATION Slopes are involved in a large percentage of riding mower-related injuries. Uneven terrain could suddenly roll over if a wheel is over . • Use extra care while operating machine with the ...operate machine without the entire grass catcher, discharge chute, or other attachments; These operators should evaluate their ability to operate the riding mower safely enough to roll over the edge or if the edge caves in reverse unless absolutely necessary. Do not allow responsible adults, ...
User Manual
Page 3
...8226; Extinguish all cigarettes, cigars, pipes, and other objects that children be a minimum of 12 year of age before operating a pedestrian controlled lawn mower and a minimum of 16 years of ignition. • • Use only approved gasoline container. • • Never remove gas cap ...or add fuel with manufacturer's recommended parts, when necessary. • Mower blades are often attracted to stop or shift while on slopes. • • Never allow extra distance to the machine and the mowing...
...8226; Extinguish all cigarettes, cigars, pipes, and other objects that children be a minimum of 12 year of age before operating a pedestrian controlled lawn mower and a minimum of 16 years of ignition. • • Use only approved gasoline container. • • Never remove gas cap ...or add fuel with manufacturer's recommended parts, when necessary. • Mower blades are often attracted to stop or shift while on slopes. • • Never allow extra distance to the machine and the mowing...
User Manual
Page 7
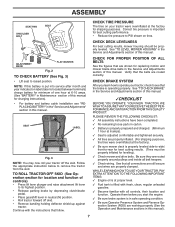
... ALL BELTS See the figures that are properly inflated. (For shipping purposes, the tires were overinflated at the factory). ✓ Be sure mower deck is properly leveled side-to-side/ front-to-rear for best cutting results. (Tires must be prop- Follow the appropriate instruction below...10003; All assembly instructions have been completed. ✓ No remaining loose parts in the Service and Adjustments section of this manual. See "TO LEVEL MOWER HOUSING" in the Service and Adjustments section of this manual. SEAT LABEL 02602 Fig. 3 NOTE: You may now roll your tractor off skid. ...
... ALL BELTS See the figures that are properly inflated. (For shipping purposes, the tires were overinflated at the factory). ✓ Be sure mower deck is properly leveled side-to-side/ front-to-rear for best cutting results. (Tires must be prop- Follow the appropriate instruction below...10003; All assembly instructions have been completed. ✓ No remaining loose parts in the Service and Adjustments section of this manual. See "TO LEVEL MOWER HOUSING" in the Service and Adjustments section of this manual. SEAT LABEL 02602 Fig. 3 NOTE: You may now roll your tractor off skid. ...

User Manual
Page 8
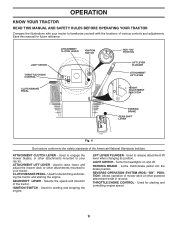
... OPERATION SYSTEM (ROS) ENGINE ON ENGINE START PARKING BRAKE PARKING BRAKE PARKING BRAKE LOCKED UNLOCKED OVER TEMP LIGHT FUEL OIL PRESSURE BATTERY REVERSE FORWARD MOWER HEIGHT 15 MOWER LIFT 15 ATTACHMENT ATTACHMENT CLUTCH DISENGAGED CLUTCH ENGAGED BRAKE/CLUTCH PEDAL KEEP AREA CLEAR SLOPE HAZARDS (SEE SAFETY RULES SECTION) LIGHTS ON FREE WHEEL...
... OPERATION SYSTEM (ROS) ENGINE ON ENGINE START PARKING BRAKE PARKING BRAKE PARKING BRAKE LOCKED UNLOCKED OVER TEMP LIGHT FUEL OIL PRESSURE BATTERY REVERSE FORWARD MOWER HEIGHT 15 MOWER LIFT 15 ATTACHMENT ATTACHMENT CLUTCH DISENGAGED CLUTCH ENGAGED BRAKE/CLUTCH PEDAL KEEP AREA CLEAR SLOPE HAZARDS (SEE SAFETY RULES SECTION) LIGHTS ON FREE WHEEL...
User Manual
Page 9
...for declutching and braking the tractor and starting and controlling engine speed. 9 ATTACHMENT LIFT LEVER - Used to raise, lower, and adjust the mower deck or other powered attachment while in reverse. REVERSE OPERATION SYSTEM (ROS) "ON" POSITION - Selects the speed and direction of the ...American National Standards Institute. Used for future reference. Turns the headlights on and off. Used to engage the mower blades, or other attachments mounted to your tractor to the safety standards of the tractor. CLUTCH/BRAKE PEDAL - Used to release ...
...for declutching and braking the tractor and starting and controlling engine speed. 9 ATTACHMENT LIFT LEVER - Used to raise, lower, and adjust the mower deck or other powered attachment while in reverse. REVERSE OPERATION SYSTEM (ROS) "ON" POSITION - Selects the speed and direction of the ...American National Standards Institute. Used for future reference. Turns the headlights on and off. Used to engage the mower blades, or other attachments mounted to your tractor to the safety standards of the tractor. CLUTCH/BRAKE PEDAL - Used to release ...

User Manual
Page 10
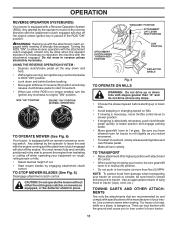
.... Always remove key when leaving tractor to prevent unauthorized use choke to stop engine when stopping tractor on grass areas. TO ADJUST MOWER CUTTING HEIGHT (See Fig. 5) The position of any adjustments or repairs. The cutting height range is equipped with an operator presence...throttle. • Operating engine at less than full throttle reduces the battery charging rate. • Full throttle offers the best bagging and mower perfor- IMPORTANT: BRING TRACTOR TO A COMPLETE STOP BEFORE SHIFTING OR CHANGING GEARS. NOTE: Failure to move throttle control between half and ...
.... Always remove key when leaving tractor to prevent unauthorized use choke to stop engine when stopping tractor on grass areas. TO ADJUST MOWER CUTTING HEIGHT (See Fig. 5) The position of any adjustments or repairs. The cutting height range is equipped with an operator presence...throttle. • Operating engine at less than full throttle reduces the battery charging rate. • Full throttle offers the best bagging and mower perfor- IMPORTANT: BRING TRACTOR TO A COMPLETE STOP BEFORE SHIFTING OR CHANGING GEARS. NOTE: Failure to move throttle control between half and ...
User Manual
Page 11
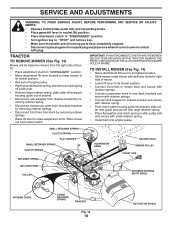
... the ROS is closed and secured to 1st gear. Tires can lose traction with slopes greater than five (5) MPH. CAUTION: Do not operate the mower without either the entire grass catcher, on rough, rolling terrain or hills. • Select desired height of your tractor on a truck or a trailer...the engine running , turn the ignition key clockwise to engine "ON" position. ROS "ON" POSITION ENGINE "ON" POSITION (NORMAL OPERATING) 02828 TO OPERATE MOWER (See Fig. 6) Your tractor is necessary to travel in neutral (N) position. • Do not push or tow tractor at more than 15° ...
... the ROS is closed and secured to 1st gear. Tires can lose traction with slopes greater than five (5) MPH. CAUTION: Do not operate the mower without either the entire grass catcher, on rough, rolling terrain or hills. • Select desired height of your tractor on a truck or a trailer...the engine running , turn the ignition key clockwise to engine "ON" position. ROS "ON" POSITION ENGINE "ON" POSITION (NORMAL OPERATING) 02828 TO OPERATE MOWER (See Fig. 6) Your tractor is necessary to travel in neutral (N) position. • Do not push or tow tractor at more than 15° ...
User Manual
Page 13
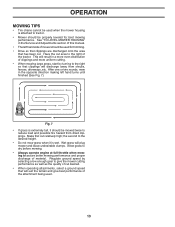
...section of this manual. • The left hand turns until finished (See Fig. 7). Wet grass will suit the terrain and give the mower cutting performance as well as the quality of the tractor. Allow grass to dry before mowing. • Always operate engine at full throttle when...mowed twice to assure better mowing performance and proper discharge of clippings and more even distribution of material. the second to give best performance of mower should be used for best mowing performance. Have the cut area to the right of cut desired. • When operating attachments, select ...
...section of this manual. • The left hand turns until finished (See Fig. 7). Wet grass will suit the terrain and give the mower cutting performance as well as the quality of the tractor. Allow grass to dry before mowing. • Always operate engine at full throttle when...mowed twice to assure better mowing performance and proper discharge of clippings and more even distribution of material. the second to give best performance of mower should be used for best mowing performance. Have the cut area to the right of cut desired. • When operating attachments, select ...
User Manual
Page 14
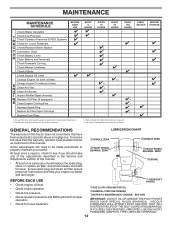
... USE Check Brake Operation T Check Tire Pressure R Check Operator Presence & ROS Systems A Check for Loose Fasteners C Check/Replace Mower Blades T Lubrication Chart 0 Check Battery Level R Clean Battery and Terminals Check Transaxle Cooling Check Mower Levelness Check V-Belts Check Engine Oil Level Change Engine Oil (with maintenance-free battery. Service more often when...
... USE Check Brake Operation T Check Tire Pressure R Check Operator Presence & ROS Systems A Check for Loose Fasteners C Check/Replace Mower Blades T Lubrication Chart 0 Check Battery Level R Clean Battery and Terminals Check Transaxle Cooling Check Mower Levelness Check V-Belts Check Engine Oil Level Change Engine Oil (with maintenance-free battery. Service more often when...
User Manual
Page 15
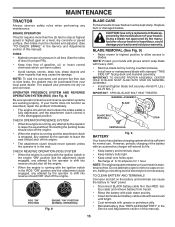
..., could damage your tractor and void your local parts dealer. ROS "ON" POSITION 02828 ENGINE "ON" POSITION (NORMAL OPERATING) Fig. 8 BLADE CARE For best results mower blades must be checked and adjusted. (See "TO CHECK BRAKE" in the Service and Adjustments section of gasoline, oil, or insect control chemicals which is... from your warranty. BRAKE OPERATION If tractor requires more than five (5) feet to blades. Replace bent or damaged blades. BLADE REMOVAL (See Fig. 9) • Raise mower to highest position to allow access to stop at 6-10 amperes for normal use.
..., could damage your tractor and void your local parts dealer. ROS "ON" POSITION 02828 ENGINE "ON" POSITION (NORMAL OPERATING) Fig. 8 BLADE CARE For best results mower blades must be checked and adjusted. (See "TO CHECK BRAKE" in the Service and Adjustments section of gasoline, oil, or insect control chemicals which is... from your warranty. BRAKE OPERATION If tractor requires more than five (5) feet to blades. Replace bent or damaged blades. BLADE REMOVAL (See Fig. 9) • Raise mower to highest position to allow access to stop at 6-10 amperes for normal use.
User Manual
Page 17
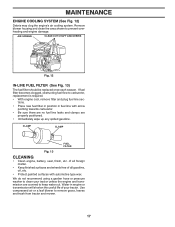
...) Debris may clog the engine's air cooling system. Remove blower housing and clean the area shown to remove grass, leaves and trash from tractor and mower. 17 AIR SCREEN CLEAN OUT CHAFF AND DEBRIS 02744 Fig. 12 IN-LINE FUEL FILTER (See Fig. 13) The fuel filter should be replaced once...
...) Debris may clog the engine's air cooling system. Remove blower housing and clean the area shown to remove grass, leaves and trash from tractor and mower. 17 AIR SCREEN CLEAN OUT CHAFF AND DEBRIS 02744 Fig. 12 IN-LINE FUEL FILTER (See Fig. 13) The fuel filter should be replaced once...
User Manual
Page 18
... RETAINER SPRINGS (BOTH SIDES) HOUSING GUIDE LARGE RETAINER SPRING BRACKET Fig. 14 18 DEFLECTOR SHIELD IMPORTANT: IF AN ATTACHMENT OTHER THAN THE MOWER DECK IS TO BE MOUNTED ON THE TRACTOR, REMOVE THE FRONT LINKS AND HOOK THE CLUTCH SPRING INTO SQUARE HOLE IN FRAME. TRACTOR...Place gearshift lever in neutral (N) position. • Place attachment clutch in "DISENGAGED" position. • Turn ignition key to raise suspension arms. Slide mower out from under tractor with deflector shield to right side of tractor. • Lower lift lever to its lowest position. • Roll belt off engine...
... RETAINER SPRINGS (BOTH SIDES) HOUSING GUIDE LARGE RETAINER SPRING BRACKET Fig. 14 18 DEFLECTOR SHIELD IMPORTANT: IF AN ATTACHMENT OTHER THAN THE MOWER DECK IS TO BE MOUNTED ON THE TRACTOR, REMOVE THE FRONT LINKS AND HOOK THE CLUTCH SPRING INTO SQUARE HOLE IN FRAME. TRACTOR...Place gearshift lever in neutral (N) position. • Place attachment clutch in "DISENGAGED" position. • Turn ignition key to raise suspension arms. Slide mower out from under tractor with deflector shield to right side of tractor. • Lower lift lever to its lowest position. • Roll belt off engine...
User Manual
Page 19
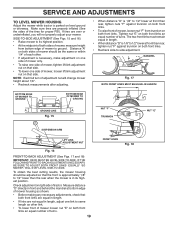
... should be adjusted so that side. MANDREL "D" "D" Fig. 17 BOTH FRONT LINKS MUST BE EQUAL IN LENGTH BOTTOM EDGE OF MOWER TO GROUND BOTTOM EDGE OF MOWER TO GROUND A GROUND LINE A Fig. 15 NUT "F" TRUNNION NUT "E" SUSPENSION ARM LIFT LINK ADJUSTMENT NUT Fig. 16 FRONT-TO-BACK ... (See Figs. 17 and 18) IMPORTANT: DECK MUST BE LEVEL SIDE-TO-SIDE. SERVICE AND ADJUSTMENTS TO LEVEL MOWER HOUSING Adjust the mower while tractor is 1/8" to 1/2" lower at bottom edge of mower housing as other . • If adjustment is 1/8" to 1/2" lower at front than rear, tighten nuts "F"...
... should be adjusted so that side. MANDREL "D" "D" Fig. 17 BOTH FRONT LINKS MUST BE EQUAL IN LENGTH BOTTOM EDGE OF MOWER TO GROUND BOTTOM EDGE OF MOWER TO GROUND A GROUND LINE A Fig. 15 NUT "F" TRUNNION NUT "E" SUSPENSION ARM LIFT LINK ADJUSTMENT NUT Fig. 16 FRONT-TO-BACK ... (See Figs. 17 and 18) IMPORTANT: DECK MUST BE LEVEL SIDE-TO-SIDE. SERVICE AND ADJUSTMENTS TO LEVEL MOWER HOUSING Adjust the mower while tractor is 1/8" to 1/2" lower at bottom edge of mower housing as other . • If adjustment is 1/8" to 1/2" lower at front than rear, tighten nuts "F"...

User Manual
Page 20
...side of manual). You may be replaced without tools. NOTE: Observe entire motion drive belt and position of all belt guides. • Install mower in this manual). • Work belt off both mandrel pulleys and idler pulleys. • Pull belt away from around engine pulley. •...pulley grooves and inside all belt guides and keepers. • Remove belt from stationary idler and clutching idler. • Remove belt downward from mower. TO REPLACE MOTION DRIVE BELT (See Fig. 20) Park the tractor on level surface. For assistance, there is in neutral (N) position. ...
...side of manual). You may be replaced without tools. NOTE: Observe entire motion drive belt and position of all belt guides. • Install mower in this manual). • Work belt off both mandrel pulleys and idler pulleys. • Pull belt away from around engine pulley. •...pulley grooves and inside all belt guides and keepers. • Remove belt from stationary idler and clutching idler. • Remove belt downward from mower. TO REPLACE MOTION DRIVE BELT (See Fig. 20) Park the tractor on level surface. For assistance, there is in neutral (N) position. ...
User Manual
Page 21
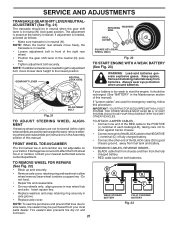
... purchased from both batteries. The adjustment is in neutral. • Loosen adjustment bolt in front of this manual. NOTE: When the tractor rear wheels move mower deck height to good chassis ground, away from batteries. TO ADJUST STEERING WHEEL ALIGNMENT If steering wheel crossbars are not horizontal (left to right) when...
... purchased from both batteries. The adjustment is in neutral. • Loosen adjustment bolt in front of this manual. NOTE: When the tractor rear wheels move mower deck height to good chassis ground, away from batteries. TO ADJUST STEERING WHEEL ALIGNMENT If steering wheel crossbars are not horizontal (left to right) when...
User Manual
Page 23
... (see "TO CLEAN BATTERY AND TERMINALS" in the Maintenance section of time, clean it thoroughly, remove all rusted or chipped paint surfaces; TRACTOR Remove mower from one ounce of oil through spark plug hole(s) into cylinder(s). • Turn ignition key to "START" position for a few seconds to distribute ...or if the tractor will cause your tractor to rust. OTHER • Do not store gasoline from tractor for damage, breakage and wear. When mower is removed from dust and dirt. • Cover your tractor with clean engine oil. (See "ENGINE" in the Maintenance section of fuel gum...
... (see "TO CLEAN BATTERY AND TERMINALS" in the Maintenance section of time, clean it thoroughly, remove all rusted or chipped paint surfaces; TRACTOR Remove mower from one ounce of oil through spark plug hole(s) into cylinder(s). • Turn ignition key to "START" position for a few seconds to distribute ...or if the tractor will cause your tractor to rust. OTHER • Do not store gasoline from tractor for damage, breakage and wear. When mower is removed from dust and dirt. • Cover your tractor with clean engine oil. (See "ENGINE" in the Maintenance section of fuel gum...

User Manual
Page 24
Engine not "CHOKED" properly. 3. Loose or damaged wiring. 7. Engine valves out of grass, leaves and trash under mower. 4. Attachment clutch is engaged. 3. Faulty operator presence switch(es). 1. Loose or damaged wiring. 4. Dirty air filter. 5. Water in...or dead battery. 2. Low oil level/dirty oil. 6. Faulty spark plug. 7. Stale or dirty fuel. 9. Dirty/clogged muffler. 13. Carburetor out of mower housing. 4. Recharge or replace battery. 4. Check all wiring. 14. Contact an authorized service center/department. 1. Check/replace ignition switch. 8. Recharge or ...
Engine not "CHOKED" properly. 3. Loose or damaged wiring. 7. Engine valves out of grass, leaves and trash under mower. 4. Attachment clutch is engaged. 3. Faulty operator presence switch(es). 1. Loose or damaged wiring. 4. Dirty air filter. 5. Water in...or dead battery. 2. Low oil level/dirty oil. 6. Faulty spark plug. 7. Stale or dirty fuel. 9. Dirty/clogged muffler. 13. Carburetor out of mower housing. 4. Recharge or replace battery. 4. Check all wiring. 14. Contact an authorized service center/department. 1. Check/replace ignition switch. 8. Recharge or ...

User Manual
Page 25
... mandrel. 3. Faulty operator-safety presence control system. 1. Remove obstruction. 2. Replace idler pulley. 4. Replace blade mandrel. Level mower deck. 5. Replace mower drive belt. 9. Blades improperly installed. 9. Turn switch "ON". 2. Replace fuse. Faulty regulator (if so equipped). 4. ... Check wiring, switches and connections. Replace blade. Clean underside of grass, leaves and trash under mower. 7. Clogged mower deck vent holes from buildup of mower housing. 8. Replace bulb(s) or lamp(s). 3. Battery will not rotate 1. Replace damaged parts....
... mandrel. 3. Faulty operator-safety presence control system. 1. Remove obstruction. 2. Replace idler pulley. 4. Replace blade mandrel. Level mower deck. 5. Replace mower drive belt. 9. Blades improperly installed. 9. Turn switch "ON". 2. Replace fuse. Faulty regulator (if so equipped). 4. ... Check wiring, switches and connections. Replace blade. Clean underside of grass, leaves and trash under mower. 7. Clogged mower deck vent holes from buildup of mower housing. 8. Replace bulb(s) or lamp(s). 3. Battery will not rotate 1. Replace damaged parts....

Parts Manual
Page 2
... has its own model number. The model number for your tractor can be found on his/her tractor when ordering repair parts. "PO17542LT (96018000401)" • Part Number • Part Description TABLE OF CONTENTS SCHEMATIC ...3 ELECTRICAL ...4-5 CHASSIS ...6-7 DRIVE...8-9 ENGINE ...10-11 STEERING ......12-13 DECALS...14 SEAT ...15 MOWER DECK ...16-17 MOWER LIFT...18 WARRANTY...19 PARTS & SERVICE 20 2 Some hardware and parts are drawn larger in order to more readily identify them....
... has its own model number. The model number for your tractor can be found on his/her tractor when ordering repair parts. "PO17542LT (96018000401)" • Part Number • Part Description TABLE OF CONTENTS SCHEMATIC ...3 ELECTRICAL ...4-5 CHASSIS ...6-7 DRIVE...8-9 ENGINE ...10-11 STEERING ......12-13 DECALS...14 SEAT ...15 MOWER DECK ...16-17 MOWER LIFT...18 WARRANTY...19 PARTS & SERVICE 20 2 Some hardware and parts are drawn larger in order to more readily identify them....

Parts Manual
Page 7
... x 3/4 37 817 49 05-08 Screw Thdrol 5/16-18 x 1/2 TYT 38 532 17 57-10 Bracket Asm. MODEL NUMBER PO17542LT (96018000401), PRODUCT NO. 960 18 00-04 CHASSIS KEY PART NO. Pivot Mower 39 532 18 75-68 Bracket Pivot 64 532 15 47-98 Dash Lower 142 532 17 57-02...
... x 3/4 37 817 49 05-08 Screw Thdrol 5/16-18 x 1/2 TYT 38 532 17 57-10 Bracket Asm. MODEL NUMBER PO17542LT (96018000401), PRODUCT NO. 960 18 00-04 CHASSIS KEY PART NO. Pivot Mower 39 532 18 75-68 Bracket Pivot 64 532 15 47-98 Dash Lower 142 532 17 57-02...


