

User Manual
Page 4
... remedy, please contact your nearest Sears store for and using your purchase of this manual. • Wear proper Personal Protective Equipment (PPE) while operating this product. Contact your nearest authorized service center/department. Federal laws apply on your tractor. • Follow the instructions under... 23 TROUBLESHOOTING 24-25 WARRANTY 26 4 Other states may have competent, well-trained technicians and the proper tools to service or repair this manual. Always observe the "SAFETY RULES". In the state of California the above 32°F/0°C) SAE 5W-30 (...
... remedy, please contact your nearest Sears store for and using your purchase of this manual. • Wear proper Personal Protective Equipment (PPE) while operating this product. Contact your nearest authorized service center/department. Federal laws apply on your tractor. • Follow the instructions under... 23 TROUBLESHOOTING 24-25 WARRANTY 26 4 Other states may have competent, well-trained technicians and the proper tools to service or repair this manual. Always observe the "SAFETY RULES". In the state of California the above 32°F/0°C) SAE 5W-30 (...
User Manual
Page 7
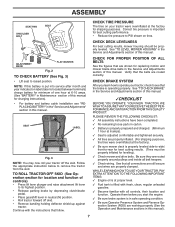
... function of controls) • Press lift lever plunger and raise attachment lift lever to see "REPLACING BATTERY" in the "Service and Adjustments" section in this manual. erly leveled. Verify that all belt keepers. ✓ Check wiring. CHECK BRAKE SYSTEM After you start the engine. &#... lever in neutral (N) position. • Roll tractor forward off the skid. See "TO LEVEL MOWER HOUSING" in the 00835 Service and Adjustments section of this manual. SEAT LABEL 02602 Fig. 3 NOTE: You may now roll your tractor off skid. • Remove banding holding deflector shield ...
... function of controls) • Press lift lever plunger and raise attachment lift lever to see "REPLACING BATTERY" in the "Service and Adjustments" section in this manual. erly leveled. Verify that all belt keepers. ✓ Check wiring. CHECK BRAKE SYSTEM After you start the engine. &#... lever in neutral (N) position. • Roll tractor forward off the skid. See "TO LEVEL MOWER HOUSING" in the 00835 Service and Adjustments section of this manual. SEAT LABEL 02602 Fig. 3 NOTE: You may now roll your tractor off skid. • Remove banding holding deflector shield ...

User Manual
Page 12
... move throttle control to the choke ( ) position and retry. Do not mix oil with gasoline. Acidic gas can damage the fuel system of this manual. NOTE: Before starting (See "OIL VISCOSITY CHART" in the Maintenance section of 30 days or longer. See "TO ADJUST CARBURETOR" in the... Service and Adjustments section of an engine while in this manual. 12 If necessary, add oil until the fuel lines and carburetor are empty. IMPORTANT: WHEN OPERATING IN TEMPERATURES BELOW 32&#...
... move throttle control to the choke ( ) position and retry. Do not mix oil with gasoline. Acidic gas can damage the fuel system of this manual. NOTE: Before starting (See "OIL VISCOSITY CHART" in the Maintenance section of 30 days or longer. See "TO ADJUST CARBURETOR" in the... Service and Adjustments section of an engine while in this manual. 12 If necessary, add oil until the fuel lines and carburetor are empty. IMPORTANT: WHEN OPERATING IN TEMPERATURES BELOW 32&#...
User Manual
Page 13
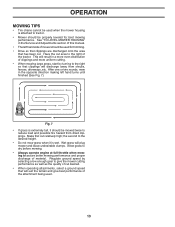
... twice to the right so that will plug mower and leave undesirable clumps. the second to assure better mowing performance and proper discharge of this manual. • The left hand turns until finished (See Fig. 7). Allow grass to dry before mowing. • Always operate engine at full throttle when mowing to... the desired height. • Do not mow grass when it should be used for best mowing performance. See "TO LEVEL MOWER HOUSING" in the Service and Adjustments section of material. OPERATION MOWING TIPS • Tire chains cannot be used when the mower housing is wet.
... twice to the right so that will plug mower and leave undesirable clumps. the second to assure better mowing performance and proper discharge of this manual. • The left hand turns until finished (See Fig. 7). Allow grass to dry before mowing. • Always operate engine at full throttle when mowing to... the desired height. • Do not mow grass when it should be used for best mowing performance. See "TO LEVEL MOWER HOUSING" in the Service and Adjustments section of material. OPERATION MOWING TIPS • Tire chains cannot be used when the mower housing is wet.
User Manual
Page 14
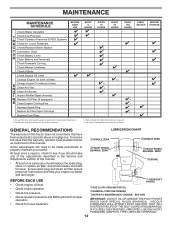
...TO MAINTENANCE "ENGINE" SECTION IMPORTANT: DO NOT OIL OR GREASE THE PIVOT POINTS WHICH HAVE SPECIAL NYLON BEARINGS. Service more often when mowing in this manual. EVERY SEASON BEFORE STORAGE GENERAL RECOMMENDATIONS LUBRICATION CHART The warranty on this tractor does not cover items that have... systems for proper operation. • Check for wear. Change more often when operating under a heavy load or in the Service and Adjustments section of this manual. At least once a season, check to see if you should make any of the adjustments described in high ambient temperatures....
...TO MAINTENANCE "ENGINE" SECTION IMPORTANT: DO NOT OIL OR GREASE THE PIVOT POINTS WHICH HAVE SPECIAL NYLON BEARINGS. Service more often when mowing in this manual. EVERY SEASON BEFORE STORAGE GENERAL RECOMMENDATIONS LUBRICATION CHART The warranty on this tractor does not cover items that have... systems for proper operation. • Check for wear. Change more often when operating under a heavy load or in the Service and Adjustments section of this manual. At least once a season, check to see if you should make any of the adjustments described in high ambient temperatures....
User Manual
Page 15
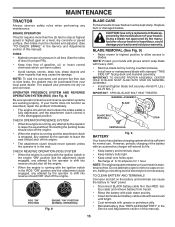
... 8) Be sure operator presence and reverse operation systems are working properly. CAUTION: Use only a replacement blade approved by the manufacturer of this manual). Lbs./ 62-75 Nm. ). MANDREL ASSEMBLY BLADE BLADE BOLT (SPECIAL) STAR CENTER HOLE BATTERY Fig. 9 Your tractor has a battery...BLACK battery cable first then RED battery cable and remove battery from your tractor. TIRES • Maintain proper air pressure in the Service and Adjustments section of your local parts dealer. CHECK OPERATOR PRESENCE SYSTEM • When the engine is running, any maintenance. ...
... 8) Be sure operator presence and reverse operation systems are working properly. CAUTION: Use only a replacement blade approved by the manufacturer of this manual). Lbs./ 62-75 Nm. ). MANDREL ASSEMBLY BLADE BLADE BOLT (SPECIAL) STAR CENTER HOLE BATTERY Fig. 9 Your tractor has a battery...BLACK battery cable first then RED battery cable and remove battery from your tractor. TIRES • Maintain proper air pressure in the Service and Adjustments section of your local parts dealer. CHECK OPERATOR PRESENCE SYSTEM • When the engine is running, any maintenance. ...
User Manual
Page 16
...more often under dusty conditions. For approximate capacity see "PRODUCT SPECIFICATIONS" section of oil drain extension is flush with API service classification SG-SL. See engine manual. MAINTENANCE V-BELTS Check V-belts for checking level. ENGINE LUBRICATION (See Fig. 10) Only use high pressure water or... hours of operation. TRANSAXLE MAINTENANCE Keep transaxle free from engine block side wall). • Make sure back face of this manual. 16 Service air cleaner more frequently to avoid possible engine damage from running or while the transaxle is lined up of dirt and chaff...
...more often under dusty conditions. For approximate capacity see "PRODUCT SPECIFICATIONS" section of oil drain extension is flush with API service classification SG-SL. See engine manual. MAINTENANCE V-BELTS Check V-belts for checking level. ENGINE LUBRICATION (See Fig. 10) Only use high pressure water or... hours of operation. TRANSAXLE MAINTENANCE Keep transaxle free from engine block side wall). • Make sure back face of this manual. 16 Service air cleaner more frequently to avoid possible engine damage from running or while the transaxle is lined up of dirt and chaff...

User Manual
Page 20
...between transaxle belt keepers and onto the input pulley. • Slide belt into the center span keeper. • Pull belt toward rear of manual). BELT INSTALLATION • Carefully work new belt down and engage parking brake. 2. tions. You may be replaced without tools. The rear wheels ... clutch/brake pedal all belt guides and keepers. • Install mower (See "TO INSTALL MOWER" in this section of tractor. Contact a qualified service center. NOTE: Observe entire motion drive belt and position of removal. • Make sure belt is in all pulley grooves and inside all belt ...
...between transaxle belt keepers and onto the input pulley. • Slide belt into the center span keeper. • Pull belt toward rear of manual). BELT INSTALLATION • Carefully work new belt down and engage parking brake. 2. tions. You may be replaced without tools. The rear wheels ... clutch/brake pedal all belt guides and keepers. • Install mower (See "TO INSTALL MOWER" in this section of tractor. Contact a qualified service center. NOTE: Observe entire motion drive belt and position of removal. • Make sure belt is in all pulley grooves and inside all belt ...
User Manual
Page 21
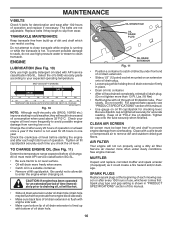
...straight forward, remove steering wheel and reassemble per instructions in and camber are used for emergency starting, follow this manual. If your nearest authorized service center/department. Tire sealant also prevents tire dry rot and corrosion. 21 WEAK OR DEAD BATTERY FULLY CHARGED BATTERY... square key - Do not lose). • Repair tire and reassemble. • On rear wheels only: align grooves in neutral (N). SERVICE AND ADJUSTMENTS TRANSAXLE GEAR SHIFT LEVER NEUTRALADJUSTMENT (See Fig. 21) The transaxle should be purchased from fuel tank and battery. Fig. 21 ...
...straight forward, remove steering wheel and reassemble per instructions in and camber are used for emergency starting, follow this manual. If your nearest authorized service center/department. Tire sealant also prevents tire dry rot and corrosion. 21 WEAK OR DEAD BATTERY FULLY CHARGED BATTERY... square key - Do not lose). • Repair tire and reassemble. • On rear wheels only: align grooves in neutral (N). SERVICE AND ADJUSTMENTS TRANSAXLE GEAR SHIFT LEVER NEUTRALADJUSTMENT (See Fig. 21) The transaxle should be purchased from fuel tank and battery. Fig. 21 ...
User Manual
Page 22
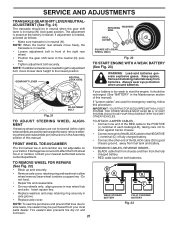
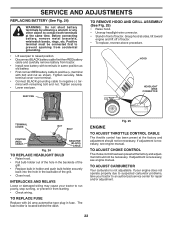
... REPLACING BATTERY (See Fig. 24) WARNING: Do not short battery terminals by allowing a wrench or any other object to an authorized service center for repair and/or adjustment. 22 HOOD HEADLIGHT WIRE CONNECTOR 02495 TERMINAL COVER 02602 NUT BOLT POSITIVE (RED) CABLE 02603 NEGATIVE (... Fig. 25) • Raise hood. • Unsnap headlight wire connector. • Stand in fuse. If adjustment is necessary, see engine manual. Before connecting battery, remove metal bracelets, wristwatch bands, rings, etc. The fuse holder is not adjustable. If adjustment is necessary, see engine...
... REPLACING BATTERY (See Fig. 24) WARNING: Do not short battery terminals by allowing a wrench or any other object to an authorized service center for repair and/or adjustment. 22 HOOD HEADLIGHT WIRE CONNECTOR 02495 TERMINAL COVER 02602 NUT BOLT POSITIVE (RED) CABLE 02603 NEGATIVE (... Fig. 25) • Raise hood. • Unsnap headlight wire connector. • Stand in fuse. If adjustment is necessary, see engine manual. Before connecting battery, remove metal bracelets, wristwatch bands, rings, etc. The fuse holder is not adjustable. If adjustment is necessary, see engine...
User Manual
Page 23
...for winter storage. NOTE: Fuel stabilizer is an acceptable alternative in minimizing the formation of fuel gum deposits during long periods of this manual). • Inspect and replace belts, if necessary (See belt re- Plastic cannot breathe which allows condensation to form and will cause ... battery may require recharging. • To help prevent corrosion and power leakage during storage. placement instructions in the Service and Adjustments section of this manual). • Lubricate as shown in any enclosure. sand lightly before storing in the Maintenance section of this...
...for winter storage. NOTE: Fuel stabilizer is an acceptable alternative in minimizing the formation of fuel gum deposits during long periods of this manual). • Inspect and replace belts, if necessary (See belt re- Plastic cannot breathe which allows condensation to form and will cause ... battery may require recharging. • To help prevent corrosion and power leakage during storage. placement instructions in the Service and Adjustments section of this manual). • Lubricate as shown in any enclosure. sand lightly before storing in the Maintenance section of this...
User Manual
Page 25
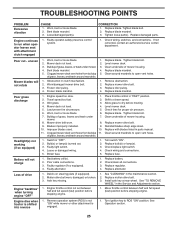
... deck. 5. Buildup of grass, leaves, and trash around mandrels to run when operator leaves seat with blades listed in parts manual. 11. Faulty light switch. 4. Check/replace light switch. 4. Check wiring and connections. 5. Poor cable connections. 3. Check/clean all ... not set between half and full speed (fast) position before mowing. 4. Bent blade mandrel. 3. If not corrected, contact an authorized service center/ department. Replace idler pulley. 4. Clean underside of grass, leaves, and trash around mandrels to dry before stopping engine. 1. Reinstall...
... deck. 5. Buildup of grass, leaves, and trash around mandrels to run when operator leaves seat with blades listed in parts manual. 11. Faulty light switch. 4. Check/replace light switch. 4. Check wiring and connections. 5. Poor cable connections. 3. Check/clean all ... not set between half and full speed (fast) position before mowing. 4. Bent blade mandrel. 3. If not corrected, contact an authorized service center/ department. Replace idler pulley. 4. Clean underside of grass, leaves, and trash around mandrels to dry before stopping engine. 1. Reinstall...
Parts Manual
Page 2
...parts on the fender under the seat. The model number for your tractor can be found on his/her tractor when ordering repair parts. "PO17542LT (96018000401)" • Part Number • Part Description TABLE OF CONTENTS SCHEMATIC ...3 ELECTRICAL ...4-5 CHASSIS ...6-7 DRIVE...8-9 ENGINE ...10-11 STEERING ......12-13 DECALS...14 SEAT ...15 MOWER DECK ...16-17 MOWER LIFT...18 WARRANTY...19 PARTS & SERVICE 20 2 Each tractor has its own model number. HOW TO USE THIS MANUAL This manual is not recommended to use this manual as a guide to more readily identify them.
...parts on the fender under the seat. The model number for your tractor can be found on his/her tractor when ordering repair parts. "PO17542LT (96018000401)" • Part Number • Part Description TABLE OF CONTENTS SCHEMATIC ...3 ELECTRICAL ...4-5 CHASSIS ...6-7 DRIVE...8-9 ENGINE ...10-11 STEERING ......12-13 DECALS...14 SEAT ...15 MOWER DECK ...16-17 MOWER LIFT...18 WARRANTY...19 PARTS & SERVICE 20 2 Each tractor has its own model number. HOW TO USE THIS MANUAL This manual is not recommended to use this manual as a guide to more readily identify them.
Parts Manual
Page 14
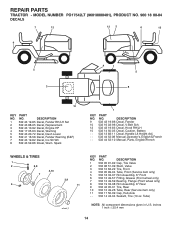
NO. Spark 1 KEY PART NO. MODEL NUMBER PO17542LT (96018000401), PRODUCT NO. 960 18 00-04 DECALS 7 12 12 2 6 15 9 5 3 4 1 5 8 10 KEY...52-10 Manual, Parts, English/French WHEELS & TIRES 1 2 5,8 7 6 4,10 3,9 11 wheel_1 KEY PART NO. DESCRIPTION 1 532 05 91-92 Cap, Tire Valve 2 532 06 51-39 Stem, Valve 3 532 10 62-22 Tire, Front 4 532 05 99-04 Tube, Front (Service item ...532 19 33-38 Rim Assembly, 8" Rear 9 532 42 05-31 Tire, Rear 10 532 12 49-26 Tube, Rear (Service item only) 11 532 17 50-39 Cap, Hub Axle - - 532 14 43-34 Sealant, Tire (10 oz. Tube) ...
NO. Spark 1 KEY PART NO. MODEL NUMBER PO17542LT (96018000401), PRODUCT NO. 960 18 00-04 DECALS 7 12 12 2 6 15 9 5 3 4 1 5 8 10 KEY...52-10 Manual, Parts, English/French WHEELS & TIRES 1 2 5,8 7 6 4,10 3,9 11 wheel_1 KEY PART NO. DESCRIPTION 1 532 05 91-92 Cap, Tire Valve 2 532 06 51-39 Stem, Valve 3 532 10 62-22 Tire, Front 4 532 05 99-04 Tube, Front (Service item ...532 19 33-38 Rim Assembly, 8" Rear 9 532 42 05-31 Tire, Rear 10 532 12 49-26 Tube, Rear (Service item only) 11 532 17 50-39 Cap, Hub Axle - - 532 14 43-34 Sealant, Tire (10 oz. Tube) ...
Parts Manual
Page 20
...dealers; If the operating characteristics or the appearance of your product differs from those described in this Manual, please contact your local dealer for parts and service should be necessary during the life of your local dealer(s). Number b. For Technical Assistance: call ...unit. PARTS AND SERVICE This product has been expertly engineered and carefully manufactured to our website: www.poulan.com NOTE: HOP provides parts and service through its products. For Parts and service, contact our authorized distributor: call 1-800-829-5886 For a Parts Manual, go to rigid ...
...dealers; If the operating characteristics or the appearance of your product differs from those described in this Manual, please contact your local dealer for parts and service should be necessary during the life of your local dealer(s). Number b. For Technical Assistance: call ...unit. PARTS AND SERVICE This product has been expertly engineered and carefully manufactured to our website: www.poulan.com NOTE: HOP provides parts and service through its products. For Parts and service, contact our authorized distributor: call 1-800-829-5886 For a Parts Manual, go to rigid ...


