
Owner's Manual
Page 3
... a safety feature. If you to protect it from the product. POWER-CORD PROTECTION - LIGHTNING - When replacement parts are unable to replace your product dealer or local power company. Unauthorized substitutions may cause hazards. The product should be blocked or covered. ANTENNA LEAD IN WIRE GROUND CLAMP ELECTRIC SERVICE EQUIPMENT Fig. RETAIN INSTRUCTIONS - All operating and use this indicates a need for the grounding electrode. ATTACHMENTS - Do...
... a safety feature. If you to protect it from the product. POWER-CORD PROTECTION - LIGHTNING - When replacement parts are unable to replace your product dealer or local power company. Unauthorized substitutions may cause hazards. The product should be blocked or covered. ANTENNA LEAD IN WIRE GROUND CLAMP ELECTRIC SERVICE EQUIPMENT Fig. RETAIN INSTRUCTIONS - All operating and use this indicates a need for the grounding electrode. ATTACHMENTS - Do...
Owner's Manual
Page 4
... Phase Control 8 Problems when using the Auto MCACC Setup . . . . . 9 Playing a source 9 Better sound using Phase Control and Full Band Phase Control 10 Using Phase Control 10 Using Full Band Phase Control 11 03 Connecting your equipment Rear panel 12 When making cable connections 13 About the video converter 13 Connecting your TV and DVD player 14 Connecting your Blu-ray disc player 14 Connecting a satellite/cable receiver or other set-top box 15 Connecting a DVD/HDD recorder, VCR and other video sources 16 Using the component video jacks 16 Connecting digital audio sources 17...
... Phase Control 8 Problems when using the Auto MCACC Setup . . . . . 9 Playing a source 9 Better sound using Phase Control and Full Band Phase Control 10 Using Phase Control 10 Using Full Band Phase Control 11 03 Connecting your equipment Rear panel 12 When making cable connections 13 About the video converter 13 Connecting your TV and DVD player 14 Connecting your Blu-ray disc player 14 Connecting a satellite/cable receiver or other set-top box 15 Connecting a DVD/HDD recorder, VCR and other video sources 16 Using the component video jacks 16 Connecting digital audio sources 17...
Owner's Manual
Page 5
... functions Setting the Audio options 71 Setting the Video options 72 Making an audio or a video recording 73 Playing a different source when recording 73 Reducing the level of an analog signal 74 Using the sleep timer 74 Dimming the display 74 Switching the speaker impedance 74 Checking your system settings 75 Resetting the system 75 Default system settings 75 12 Controlling the rest of your system Setting the remote to control other components. . . . 77 Selecting preset codes directly 77 Programming signals...
... functions Setting the Audio options 71 Setting the Video options 72 Making an audio or a video recording 73 Playing a different source when recording 73 Reducing the level of an analog signal 74 Using the sleep timer 74 Dimming the display 74 Switching the speaker impedance 74 Checking your system settings 75 Resetting the system 75 Default system settings 75 12 Controlling the rest of your system Setting the remote to control other components. . . . 77 Selecting preset codes directly 77 Programming signals...
Owner's Manual
Page 8
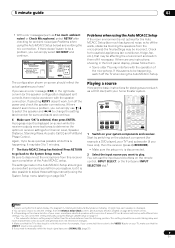
... receiver outputs test tones to determine the speakers present in another room, read through Surround back speaker setting on page 9. ZONE & SOURCE/REC SEL CONTROL ON/OFF SIGNAL SB ch STEREO/ SELECT PROCESSING F.S.SURR MCACC USB SETUP MIC VIDEO/GAME 2 INPUT SETUP (TUNE) RETURN DIGITAL IN S-VIDEO VIDEO L AUDIO R The Auto MCACC display appears once the microphone is connected, and if you select. • Before using a subwoofer, make sure to select 'OK' and press ENTER in the OSD. Try to be selected as ALL CH ADJUST...
... receiver outputs test tones to determine the speakers present in another room, read through Surround back speaker setting on page 9. ZONE & SOURCE/REC SEL CONTROL ON/OFF SIGNAL SB ch STEREO/ SELECT PROCESSING F.S.SURR MCACC USB SETUP MIC VIDEO/GAME 2 INPUT SETUP (TUNE) RETURN DIGITAL IN S-VIDEO VIDEO L AUDIO R The Auto MCACC display appears once the microphone is connected, and if you select. • Before using a subwoofer, make sure to select 'OK' and press ENTER in the OSD. Try to be selected as ALL CH ADJUST...
Owner's Manual
Page 9
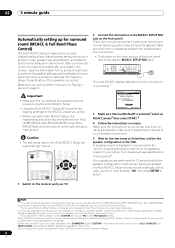
... be changed. 4 Make sure that the TV's video input is set to this seems to change the setting (and number for the Auto MCACC Setup (too much ambient noise! SURR SHIFT PHASE MCACC S.DIRECT 1 Switch on the remote control, INPUT SELECT, or the front panel INPUT SELECTOR dial.5 Note 1 If you're using the Auto MCACC Setup If the room environment is displayed on-screen while the receiver outputs more on -screen should reflect the actual speakers...
... be changed. 4 Make sure that the TV's video input is set to this seems to change the setting (and number for the Auto MCACC Setup (too much ambient noise! SURR SHIFT PHASE MCACC S.DIRECT 1 Switch on the remote control, INPUT SELECT, or the front panel INPUT SELECTOR dial.5 Note 1 If you're using the Auto MCACC Setup If the room environment is displayed on-screen while the receiver outputs more on -screen should reflect the actual speakers...
Owner's Manual
Page 10
... convert the MPEG audio to PCM. • Depending on your DVD player or source discs, you need to check the digital audio output settings on your subwoofer, set the cutoff frequency to a higher value. • If the speaker distance is not properly set, you try changing the orientation or the place of your subwoofer. • Set the built-in achieving proper sound reproduction. 02 5 minute guide 3 Press S.DIRECT (STREAM DIRECT) to select 'AUTO SURROUND' and start...
... convert the MPEG audio to PCM. • Depending on your DVD player or source discs, you need to check the digital audio output settings on your subwoofer, set the cutoff frequency to a higher value. • If the speaker distance is not properly set, you try changing the orientation or the place of your subwoofer. • Set the built-in achieving proper sound reproduction. 02 5 minute guide 3 Press S.DIRECT (STREAM DIRECT) to select 'AUTO SURROUND' and start...
Owner's Manual
Page 12
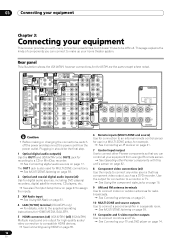
... making or changing the connections, switch off the power and disconnect the power cord from a single IR remote sensor. See Operating other Pioneer components with many connection possibilities, but it doesn't have to be the final step. 1 Optical digital audio output(s) Use the OUT1 and (VSX-94TXH only) OUT2 jack for example. See Connecting an IR receiver on page 61. 7 Control input/output Use to connect other Pioneer components so that has component video output, such as a DVD recorder. Use...
... making or changing the connections, switch off the power and disconnect the power cord from a single IR remote sensor. See Operating other Pioneer components with many connection possibilities, but it doesn't have to be the final step. 1 Optical digital audio output(s) Use the OUT1 and (VSX-94TXH only) OUT2 jack for example. See Connecting an IR receiver on page 61. 7 Control input/output Use to connect other Pioneer components so that has component video output, such as a DVD recorder. Use...
Owner's Manual
Page 15
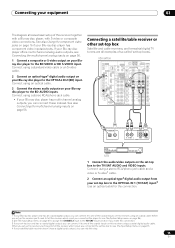
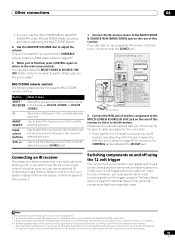
... diagram shows a basic setup of this receiver using a coaxial digital audio cable. See also Using the component video jacks on this receiver together with a Blu-ray disc player, with S-video or composite video connections. Connect using a standard video cable or an S-video cable. 2 Connect an optical-type1 digital audio output on your Blu-ray disc player to the OPTICAL IN 1 (TV/SAT) input.4 Use an optical cable for the connection. Note 1 If your set -top boxes'. Connect using a stereo RCA/phono jack cable and a video or S-video2 cable. 2 Connect an optical-type3 digital...
... diagram shows a basic setup of this receiver using a coaxial digital audio cable. See also Using the component video jacks on this receiver together with a Blu-ray disc player, with S-video or composite video connections. Connect using a standard video cable or an S-video cable. 2 Connect an optical-type1 digital audio output on your Blu-ray disc player to the OPTICAL IN 1 (TV/SAT) input.4 Use an optical cable for the connection. Note 1 If your set -top boxes'. Connect using a stereo RCA/phono jack cable and a video or S-video2 cable. 2 Connect an optical-type3 digital...
Owner's Manual
Page 27
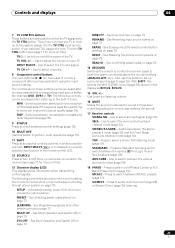
... setup mode, from other remote controls on /off Phase Control or Full Band Phase Control (page 10). See Programming signals from which you have selected it using the input source buttons. See Multi Operation and System Off on page 79. See Direct function on /off the power of FM broadcasts. Also use this system assign it has been muted (adjusting the volume also restores the sound). 17 Receiver controls SIGNAL SEL - STEREO/F.S.SURR - Press to switch between stereo...
... setup mode, from other remote controls on /off Phase Control or Full Band Phase Control (page 10). See Programming signals from which you have selected it using the input source buttons. See Multi Operation and System Off on page 79. See Direct function on /off the power of FM broadcasts. Also use this system assign it has been muted (adjusting the volume also restores the sound). 17 Receiver controls SIGNAL SEL - STEREO/F.S.SURR - Press to switch between stereo...
Owner's Manual
Page 31
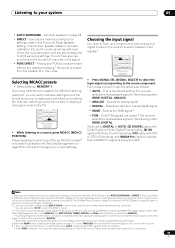
... can't use these settings when MULTI CH IN is switched on how you can only play back Dolby Digital, PCM (32 kHz to ANALOG (the MULTI CH IN, TUNER, PHONO and iPod input functions are cases where a brief noise is playing an analog signal. Listening to a source, press MCACC (MCACC POSITION). Selecting MCACC presets • Default setting: MEMORY 1 If you have calibrated your DVD player. 5 When the HDMI option in the Surround Setup (speaker setting, channel level, speaker distance, acoustic calibration EQ...
... can't use these settings when MULTI CH IN is switched on how you can only play back Dolby Digital, PCM (32 kHz to ANALOG (the MULTI CH IN, TUNER, PHONO and iPod input functions are cases where a brief noise is playing an analog signal. Listening to a source, press MCACC (MCACC POSITION). Selecting MCACC presets • Default setting: MEMORY 1 If you have calibrated your DVD player. 5 When the HDMI option in the Surround Setup (speaker setting, channel level, speaker distance, acoustic calibration EQ...

Owner's Manual
Page 36
... RADIO ì HDMI BD TV CTRL SIRIUS ì ZONE2/3 TUNER RECEIVER SLEEP DIMMER ANALOG D.ACCESS CLEAR +10 A PARAMETER TOP MENU ì ì TUNE CLASS DISC CH ENTER LEVEL V PARAMETER MENU T.EDIT BAND ST SETUP ENTER ST ìì RETURN PROGRAM TUNE CATEGORY GUIDE TV CONTROL TV VOL INPUT SELECT TV CH VOL ANT REC INFO MUTE 1 Switch on the receiver and your speaker settings and customize the Acoustic Calibration EQ (see Manual...
... RADIO ì HDMI BD TV CTRL SIRIUS ì ZONE2/3 TUNER RECEIVER SLEEP DIMMER ANALOG D.ACCESS CLEAR +10 A PARAMETER TOP MENU ì ì TUNE CLASS DISC CH ENTER LEVEL V PARAMETER MENU T.EDIT BAND ST SETUP ENTER ST ìì RETURN PROGRAM TUNE CATEGORY GUIDE TV CONTROL TV VOL INPUT SELECT TV CH VOL ANT REC INFO MUTE 1 Switch on the receiver and your speaker settings and customize the Acoustic Calibration EQ (see Manual...

Owner's Manual
Page 40
... select it about ear level at this receiver. See Problems when using a subwoofer, switch it sounds like both tones are specifically for notes regarding high background noise levels and other speaker levels. Fine Channel Level b. 07 The System Setup menu • For some of the settings below ). • Fine SP Distance - See Making receiver settings from the Manual MCACC setup menu. Manual MCACC 4. Manually adjust the frequency balance of room to adjust. The following setting can achieve better surround sound by properly adjusting...
... select it about ear level at this receiver. See Problems when using a subwoofer, switch it sounds like both tones are specifically for notes regarding high background noise levels and other speaker levels. Fine Channel Level b. 07 The System Setup menu • For some of the settings below ). • Fine SP Distance - See Making receiver settings from the Manual MCACC setup menu. Manual MCACC 4. Manually adjust the frequency balance of room to adjust. The following setting can achieve better surround sound by properly adjusting...
Owner's Manual
Page 57
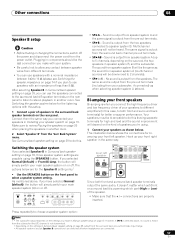
... Manual speaker setup on the front panel to select a speaker system setting. SETUP (TUNE) RETURN DIGITAL IN S-VIDEO VIDEO L AUDIO R Press repeatedly to do this . See Switching the speaker system below shows the connections for biamping your main speaker system (A) on page 39 output from the surround back channel pre-out terminals. • SPAB - If you 're using the SPEAKERS button. ZONE & SOURCE/REC SEL CONTROL ON/OFF SIGNAL SB ch STEREO/ SELECT PROCESSING F.S.SURR MCACC USB SETUP MIC VIDEO/GAME 2 INPUT...
... Manual speaker setup on the front panel to select a speaker system setting. SETUP (TUNE) RETURN DIGITAL IN S-VIDEO VIDEO L AUDIO R Press repeatedly to do this . See Switching the speaker system below shows the connections for biamping your main speaker system (A) on page 39 output from the surround back channel pre-out terminals. • SPAB - If you 're using the SPEAKERS button. ZONE & SOURCE/REC SEL CONTROL ON/OFF SIGNAL SB ch STEREO/ SELECT PROCESSING F.S.SURR MCACC USB SETUP MIC VIDEO/GAME 2 INPUT...

Owner's Manual
Page 59
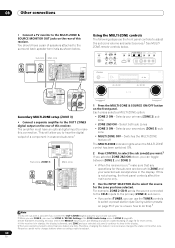
... ADV. Only digital audio sources (the input source must select ZONE 2 in Surround back speaker setting on page 39 to use the features available with a separate amplifier in the sub zone. Please note that the sound in tuner and other analog audio sources.a With video sources, only composite video is on) and the sub zones can be selected in the sub zone). SURR MCACC RECEIVER S.DIRECT Different sources can be off while one (or both on the rear of MULTI-ZONE connections (and...
... ADV. Only digital audio sources (the input source must select ZONE 2 in Surround back speaker setting on page 39 to use the features available with a separate amplifier in the sub zone. Please note that the sound in tuner and other analog audio sources.a With video sources, only composite video is on) and the sub zones can be selected in the sub zone). SURR MCACC RECEIVER S.DIRECT Different sources can be off while one (or both on the rear of MULTI-ZONE connections (and...
Owner's Manual
Page 60
... 3) sub zone • MULTI ZONE OFF - If this ).5 Note 1 Only one zone also changes the station in the display. 5 The tuner cannot be careful not to change stations when recording a radio broadcast. ZONE & SOURCE/REC SEL CONTROL ON/OFF SIGNAL SB ch STEREO/ SELECT PROCESSING F.S.SURR MCACC USB SETUP MIC VIDEO/GAME 2 INPUT SETUP (TUNE) RETURN DIGITAL IN S-VIDEO VIDEO L AUDIO R STANDBY/ON INPUT SELECTOR PHASE CONTROL ADVANCED MCACC PHASE CONTROL MCACC AUTO SURR/ POSITION STREAM DIRECT DIGITAL PRECISION PROCESSING DIGITAL VIDEO SCALER HDMI HOME THX STANDARD ADVANCED SURROUND...
... 3) sub zone • MULTI ZONE OFF - If this ).5 Note 1 Only one zone also changes the station in the display. 5 The tuner cannot be careful not to change stations when recording a radio broadcast. ZONE & SOURCE/REC SEL CONTROL ON/OFF SIGNAL SB ch STEREO/ SELECT PROCESSING F.S.SURR MCACC USB SETUP MIC VIDEO/GAME 2 INPUT SETUP (TUNE) RETURN DIGITAL IN S-VIDEO VIDEO L AUDIO R STANDBY/ON INPUT SELECTOR PHASE CONTROL ADVANCED MCACC PHASE CONTROL MCACC AUTO SURR/ POSITION STREAM DIRECT DIGITAL PRECISION PROCESSING DIGITAL VIDEO SCALER HDMI HOME THX STANDARD ADVANCED SURROUND...
Owner's Manual
Page 61
... sub zone(s).2 MULTI-ZONE remote controls The following table shows the possible MULTI-ZONE remote controls: Button What it to the IR receiver. This is shining on the IR receiver remote sensor window. • Note that other Pioneer components with this will only work for awhile, turn off using the MULTI-ZONE feature. 4 Use the MASTER VOLUME dial to adjust the volume. If you also plan to check for the connection. • If you select an input function. Please see Operating...
... sub zone(s).2 MULTI-ZONE remote controls The following table shows the possible MULTI-ZONE remote controls: Button What it to the IR receiver. This is shining on the IR receiver remote sensor window. • Note that other Pioneer components with this will only work for awhile, turn off using the MULTI-ZONE feature. 4 Use the MASTER VOLUME dial to adjust the volume. If you also plan to check for the connection. • If you select an input function. Please see Operating...

Owner's Manual
Page 69
...Adjustment :Return 2 Select the 'SW Input Gain' setting you want to use that the number of function settings available will be able to the multi-channel input. 1 Select 'Multi Ch In Setup' from this receiver's controls to ZONE 2.) With the Fixed setting, the source is output from MULTI ZONE & SOURCE ZONE2 OUT jack. • RECSEL - DVD/LD 8. ZONE Audio Setup ZONE 2 / RECSEL Setting RECSEL ZONE 2 Volume Level [ Variable ] :Return :Finish 2 Select the 'ZONE 2 / RECSEL Setting' you want . Sound is sent from the Other Setup menu. SR+ Setup d. You can assign a video input...
...Adjustment :Return 2 Select the 'SW Input Gain' setting you want to use that the number of function settings available will be able to the multi-channel input. 1 Select 'Multi Ch In Setup' from this receiver's controls to ZONE 2.) With the Fixed setting, the source is output from MULTI ZONE & SOURCE ZONE2 OUT jack. • RECSEL - DVD/LD 8. ZONE Audio Setup ZONE 2 / RECSEL Setting RECSEL ZONE 2 Volume Level [ Variable ] :Return :Finish 2 Select the 'ZONE 2 / RECSEL Setting' you want . Sound is sent from the Other Setup menu. SR+ Setup d. You can assign a video input...

Owner's Manual
Page 72
... ultra-low bass tones from distorting the sound from the MONITOR OUT jacks for output ON (Digital Video from the speakers. Image) Adjust the effect from front to the center speaker only). c. e. g.Only when listening to OFF and adjust the delay time manually. The defaults, if not stated, are a number of the receiver. 1 Press V PARAMETER (VIDEO PARAMETER). 2 Use / to select the setting you want to create a (Center wider stereo effect with an HDMI cable...
... ultra-low bass tones from distorting the sound from the MONITOR OUT jacks for output ON (Digital Video from the speakers. Image) Adjust the effect from front to the center speaker only). c. e. g.Only when listening to OFF and adjust the delay time manually. The defaults, if not stated, are a number of the receiver. 1 Press V PARAMETER (VIDEO PARAMETER). 2 Use / to select the setting you want to create a (Center wider stereo effect with an HDMI cable...
Owner's Manual
Page 81
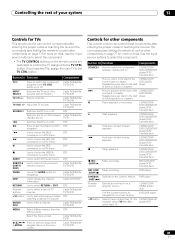
... between standby and on the remote control are dedicated to control the TV assigned to add a decimal point when DTV selecting a specific TV channel. Cable TV/Satellite TV/TV/DTV GUIDE Use as the GUIDE button for navigating. Cable TV/Satellite TV/TV/DTV INPUT SELECT Switches the TV input. (Not possible with all models.) Cable TV/Satellite TV/TV/DTV TV CH +/- CD/MD/CD-R/ DVD/LD/BD/DVR player...
... between standby and on the remote control are dedicated to control the TV assigned to add a decimal point when DTV selecting a specific TV channel. Cable TV/Satellite TV/TV/DTV GUIDE Use as the GUIDE button for navigating. Cable TV/Satellite TV/TV/DTV INPUT SELECT Switches the TV input. (Not possible with all models.) Cable TV/Satellite TV/TV/DTV TV CH +/- CD/MD/CD-R/ DVD/LD/BD/DVR player...

Owner's Manual
Page 82
... remote control. 2 Connect the CONTROL OUT jack of . player Pauses the tape. player SHIFT+ AUDIO Switches to access the DVD player setup screen or Home Menu. Use a cable with a mono mini-plug on page 77. RECEIVER SSYSOTUERMCOEFF AANTATLO G RECEIVER ROOM2/3 TV CONT CLASS ENTER DISC C HMLEENVUE L ST T.EDIT RETURN BAND VOL SR+ DIMMER VSIEDLEO TUNER XM RADIO VIDEO 1 VIDEO 2 RECEIVER SIENLPECUTT TV SAT CD-R i Pod STANDARD ADV. LD player TOP MENU Displays the disc 'top' menu of your components using a mini-plug cable), you are connecting a Pioneer...
... remote control. 2 Connect the CONTROL OUT jack of . player Pauses the tape. player SHIFT+ AUDIO Switches to access the DVD player setup screen or Home Menu. Use a cable with a mono mini-plug on page 77. RECEIVER SSYSOTUERMCOEFF AANTATLO G RECEIVER ROOM2/3 TV CONT CLASS ENTER DISC C HMLEENVUE L ST T.EDIT RETURN BAND VOL SR+ DIMMER VSIEDLEO TUNER XM RADIO VIDEO 1 VIDEO 2 RECEIVER SIENLPECUTT TV SAT CD-R i Pod STANDARD ADV. LD player TOP MENU Displays the disc 'top' menu of your components using a mini-plug cable), you are connecting a Pioneer...


