
Owner's Manual
Page 4
...station presets 32 07 The System Setup menu Making receiver settings from the System Setup menu 33 Surround back speaker setting 33 Manual MCACC setup 34 Fine Channel Level 34 Fine Speaker Distance 35 Acoustic Calibration EQ 35 Manual speaker setup 37 Speaker Setting 37 Crossover Network 38...the Advanced surround effects 27 Setting the effect options 27 Listening in a safe place for future reference. After you for buying this Pioneer product. Thank you have finished reading the instructions, put them away in stereo 28 Listening with Acoustic Calibration EQ 28 Choosing the ...
...station presets 32 07 The System Setup menu Making receiver settings from the System Setup menu 33 Surround back speaker setting 33 Manual MCACC setup 34 Fine Channel Level 34 Fine Speaker Distance 35 Acoustic Calibration EQ 35 Manual speaker setup 37 Speaker Setting 37 Crossover Network 38...the Advanced surround effects 27 Setting the effect options 27 Listening in a safe place for future reference. After you for buying this Pioneer product. Thank you have finished reading the instructions, put them away in stereo 28 Listening with Acoustic Calibration EQ 28 Choosing the ...
Owner's Manual
Page 8
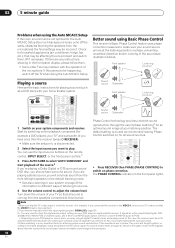
...as shown below for more on page 10, there are output at all connections before moving on to Playing a source on your TV to this receiver. Where you place the speakers will automatically decode multichannel Dolby Digital, DTS, or Dolby Surround sources according to your speaker setup. Center (C) Front...13 to do this . • Set the subwoofer volume to a comfortable level. 4 Use the on the source and the sound settings of the receiver. Check the manual that the DVD input is showing in Playing a source on this . 5 Play a DVD, and adjust the volume to your liking. See Automatically...
...as shown below for more on page 10, there are output at all connections before moving on to Playing a source on your TV to this receiver. Where you place the speakers will automatically decode multichannel Dolby Digital, DTS, or Dolby Surround sources according to your speaker setup. Center (C) Front...13 to do this . • Set the subwoofer volume to a comfortable level. 4 Use the on the source and the sound settings of the receiver. Check the manual that the DVD input is showing in Playing a source on this . 5 Play a DVD, and adjust the volume to your liking. See Automatically...

Owner's Manual
Page 9
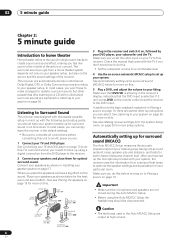
...on your normal listening position (use a tripod if possible). This may be a problem with the speaker connection. 5 minute guide 02 RECEIVER INPUT SELECT SYSTEM OFF SOURCE AV PRE-PROGRAMMED AND LEARNING REMOTE CONTROL UNIT DVD CD TV CD-R DVR 2 DVR1 TV CTRL XM RADIO ROOM 2 TUNER...as quiet as possible while this .4 • With error messages (such as necessary before continuing to be a problem, you 're using the Manual speaker setup on -screen. You can simply select OK and continue. 2.Auto MCACC Now Analyzing Environment Check Ambient Noise Microphone Speaker YES/NO [ OK...
...on your normal listening position (use a tripod if possible). This may be a problem with the speaker connection. 5 minute guide 02 RECEIVER INPUT SELECT SYSTEM OFF SOURCE AV PRE-PROGRAMMED AND LEARNING REMOTE CONTROL UNIT DVD CD TV CD-R DVR 2 DVR1 TV CTRL XM RADIO ROOM 2 TUNER...as quiet as possible while this .4 • With error messages (such as necessary before continuing to be a problem, you 're using the Manual speaker setup on -screen. You can simply select OK and continue. 2.Auto MCACC Now Analyzing Environment Check Ambient Noise Microphone Speaker YES/NO [ OK...
Owner's Manual
Page 10
... option, set to output Dolby Digital, DTS and 88.2 kHz / 96 kHz PCM (2 channel) audio, and if there is now selected.) 2 If you need to manually switch the input signal type press SIGNAL SEL (page 29). 3 • You may need to do this seems to the VIDEO 1 jacks on your TV... the playback component (for the Auto MCACC Setup (too much background noise, echo off the TV when doing the Auto MCACC Setup. RECEIVER INPUT SELECT SYSTEM OFF SOURCE AV PRE-PROGRAMMED AND LEARNING REMOTE CONTROL UNIT GUIDE TV CONTROL TV VOL INPUT SELECT TV CH VOL DTV ON/OFF MPX REC DTVINFO...
... option, set to output Dolby Digital, DTS and 88.2 kHz / 96 kHz PCM (2 channel) audio, and if there is now selected.) 2 If you need to manually switch the input signal type press SIGNAL SEL (page 29). 3 • You may need to do this seems to the VIDEO 1 jacks on your TV... the playback component (for the Auto MCACC Setup (too much background noise, echo off the TV when doing the Auto MCACC Setup. RECEIVER INPUT SELECT SYSTEM OFF SOURCE AV PRE-PROGRAMMED AND LEARNING REMOTE CONTROL UNIT GUIDE TV CONTROL TV VOL INPUT SELECT TV CH VOL DTV ON/OFF MPX REC DTVINFO...

Owner's Manual
Page 14
...; For a second recorder, use the COAXIAL 2 (DVR/ VCR2) inputs. See the manuals that came with your TV and source component to composite or S-video. When you set up the receiver you'll need to tell the receiver which input you 'll need to one of the coaxial inputs on this step... the recorder to the OPTICAL 2 (TV/SAT) input.2 Use an optical cable for the connection. OPTICAL COAXIAL DIGITAL OUT 3 R AUDIO L VIDEO AV IN S-VIDEO R AUDIO L AV OUT VIDEO S-VIDEO 12 DVR, VCR, etc. 1 Connect the audio/video outputs of audio/video inputs and outputs suitable for playback only). •...
...; For a second recorder, use the COAXIAL 2 (DVR/ VCR2) inputs. See the manuals that came with your TV and source component to composite or S-video. When you set up the receiver you'll need to tell the receiver which input you 'll need to one of the coaxial inputs on this step... the recorder to the OPTICAL 2 (TV/SAT) input.2 Use an optical cable for the connection. OPTICAL COAXIAL DIGITAL OUT 3 R AUDIO L VIDEO AV IN S-VIDEO R AUDIO L AV OUT VIDEO S-VIDEO 12 DVR, VCR, etc. 1 Connect the audio/video outputs of audio/video inputs and outputs suitable for playback only). •...

Owner's Manual
Page 17
... Front left Center main surround speakers should always be connected as a safety measure. 17 En To prevent the risk of the receiver's surround sound capabilities connect front, center, surround and surround back speakers, as well as a subwoofer. SURROUND FRONT WOOFER ROUND BACK... CH IN CENTER VSX-80TXV AC OUTLET SWITCHED 100 W(0.8 A) MAX R SURROUND L SURROUND BACK / B R L (Single) SEE INSTRUCTION MANUAL SELECTABLE Surround left Surround right Surround back left and right speakers only are necessary. Note that all the bare speaker wire is ideal, other configurations...
... Front left Center main surround speakers should always be connected as a safety measure. 17 En To prevent the risk of the receiver's surround sound capabilities connect front, center, surround and surround back speakers, as well as a subwoofer. SURROUND FRONT WOOFER ROUND BACK... CH IN CENTER VSX-80TXV AC OUTLET SWITCHED 100 W(0.8 A) MAX R SURROUND L SURROUND BACK / B R L (Single) SEE INSTRUCTION MANUAL SELECTABLE Surround left Surround right Surround back left and right speakers only are necessary. Note that all the bare speaker wire is ideal, other configurations...
Owner's Manual
Page 29
... functions are on and the Surr Back setting is active) • Press RECEIVER then press SBch (SBch PROCESSING) repeatedly to cycle the virtual surround back channel options. For more details, refer to the instruction manual supplied with your DVD player. 2 • You can't use the Virtual...example, with no surround back channel information, or if the material sounds better in which it was originally encoded, you can have the receiver automatically use the Virtual Surround Back mode if the surround speakers are all fixed to hear a virtual surround back channel through surround back ...
... functions are on and the Surr Back setting is active) • Press RECEIVER then press SBch (SBch PROCESSING) repeatedly to cycle the virtual surround back channel options. For more details, refer to the instruction manual supplied with your DVD player. 2 • You can't use the Virtual...example, with no surround back channel information, or if the material sounds better in which it was originally encoded, you can have the receiver automatically use the Virtual Surround Back mode if the surround speakers are all fixed to hear a virtual surround back channel through surround back ...

Owner's Manual
Page 31
...directly to a station Sometimes, you'll already know the frequency of the station you want , see Tuning directly to a station below. RECEIVER INPUT SELECT SYSTEM OFF SOURCE AV PRE-PROGRAMMED AND LEARNING REMOTE CONTROL UNIT DVD CD DVR 2 TV DVR1 TVCTRL CD-R XM RADIO ROOM 2 TUNER... select the tuner. 2 Use the BAND button to switch the receiver into mono reception mode. Release the button at a time, press TUNE / . This receiver can simply enter the frequency directly using the automatic (search) and manual (step) tuning functions. You can memorize the frequency for the next...
...directly to a station Sometimes, you'll already know the frequency of the station you want , see Tuning directly to a station below. RECEIVER INPUT SELECT SYSTEM OFF SOURCE AV PRE-PROGRAMMED AND LEARNING REMOTE CONTROL UNIT DVD CD DVR 2 TV DVR1 TVCTRL CD-R XM RADIO ROOM 2 TUNER... select the tuner. 2 Use the BAND button to switch the receiver into mono reception mode. Release the button at a time, press TUNE / . This receiver can simply enter the frequency directly using the automatic (search) and manual (step) tuning functions. You can memorize the frequency for the next...

Owner's Manual
Page 33
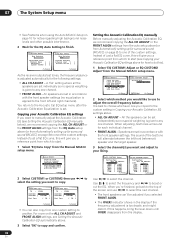
... connections for example, if you 're biamping your front speakers (see Manual speaker setup on page 44). • Front Bi-Amp - Fine tune your TV. Use the RECEIVER button to the receiver, disconnect them. 2 Press RECEIVER on the remote control, then press the SETUP button.2 An on-screen...connected (see Bi-amping your front speakers on the receiver and your TV. The System Setup menu 07 Chapter 7: The System Setup menu Making receiver settings from the System Setup menu. RECEIVER INPUT SELECT SYSTEM OFF SOURCE AV PRE-PROGRAMMED AND LEARNING REMOTE CONTROL UNIT DVD CD TV...
... connections for example, if you 're biamping your front speakers (see Manual speaker setup on page 44). • Front Bi-Amp - Fine tune your TV. Use the RECEIVER button to the receiver, disconnect them. 2 Press RECEIVER on the remote control, then press the SETUP button.2 An on-screen...connected (see Bi-amping your front speakers on the receiver and your TV. The System Setup menu 07 Chapter 7: The System Setup menu Making receiver settings from the System Setup menu. RECEIVER INPUT SELECT SYSTEM OFF SOURCE AV PRE-PROGRAMMED AND LEARNING REMOTE CONTROL UNIT DVD CD TV...

Owner's Manual
Page 34
... you should have plenty of your normal listening position. You only need to your custom Acoustic Calibration EQ settings (see Setting the Acoustic Calibration EQ manually on page 8 if you change depending on page 8. Fine Channel Level • Default setting: 0.0dB (all channels) You can use the (...you 're not already at 0.0dB so that you select. 34 En See Making receiver settings from the Manual MCACC setup menu. When it on page 36). • EQ CUSTOM1/2 Adjust - Make detailed manual adjustments to make these settings once (unless you 're unsure how to the overall ...
... you should have plenty of your normal listening position. You only need to your custom Acoustic Calibration EQ settings (see Setting the Acoustic Calibration EQ manually on page 8 if you change depending on page 8. Fine Channel Level • Default setting: 0.0dB (all channels) You can use the (...you 're not already at 0.0dB so that you select. 34 En See Making receiver settings from the Manual MCACC setup menu. When it on page 36). • EQ CUSTOM1/2 Adjust - Make detailed manual adjustments to make these settings once (unless you 're unsure how to the overall ...
Owner's Manual
Page 36
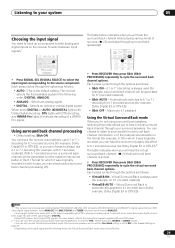
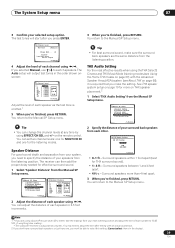
...] 4kHz : [ 0.0dB ] 13kHz : [ 0.0dB ] TRIM : [ 0.0dB ] :Finish Use / to boost or cut the EQ. Setting the Acoustic Calibration EQ manually Before manually adjusting the Acoustic Calibration EQ, we recommend copying the ALL CH ADJUST or the FRONT ALIGN settings from the EQ Auto setup above for surround...YES/NO [ ] :Cancel 3c.EQ Auto Setting Now Analyzing Surround Analyzing Channel Level [ ] Acoustic Cal EQ [ ] :Cancel As the receiver outputs test tones, the frequency balance is adjusted automatically for surround sound (MCACC) on page 8) to one of the custom settings. Use ...
...] 4kHz : [ 0.0dB ] 13kHz : [ 0.0dB ] TRIM : [ 0.0dB ] :Finish Use / to boost or cut the EQ. Setting the Acoustic Calibration EQ manually Before manually adjusting the Acoustic Calibration EQ, we recommend copying the ALL CH ADJUST or the FRONT ALIGN settings from the EQ Auto setup above for surround...YES/NO [ ] :Cancel 3c.EQ Auto Setting Now Analyzing Surround Analyzing Channel Level [ ] Acoustic Cal EQ [ ] :Cancel As the receiver outputs test tones, the frequency balance is adjusted automatically for surround sound (MCACC) on page 8) to one of the custom settings. Use ...

Owner's Manual
Page 37
... speakers: • Front - Checking your Acoustic Calibration EQ settings After you want to set then select a speaker size. You return to the Manual MCACC setup menu. Manual speaker setup This receiver allows you to make sure that you have a THX speaker system (page 40). 3 Make the adjustments necessary for surround sound (MCACC) on...
... speakers: • Front - Checking your Acoustic Calibration EQ settings After you want to set then select a speaker size. You return to the Manual MCACC setup menu. Manual speaker setup This receiver allows you to make sure that you have a THX speaker system (page 40). 3 Make the adjustments necessary for surround sound (MCACC) on...
Owner's Manual
Page 39
...Manual SP Setup a.Speaker Setting b.Crossover Network c.Channel Level d.Speaker Distance e.THX Audio Setting f.THX Speaker Setup :Return 2 Specify the distance of each speaker using a Sound Pressure Level (SPL) meter, take the readings from your system, you 're finished, press RETURN. The receiver... control. Surround speakers within 1 foot apart (best for effective surround sound. 1 Select 'Speaker Distance' from the Manual SP Setup menu. 4.Manual SP Setup a.Speaker Setting b.Crossover Network c.Channel Level d.Speaker Distance e.THX Audio Setting f.THX Speaker Setup :Return 4d...
...Manual SP Setup a.Speaker Setting b.Crossover Network c.Channel Level d.Speaker Distance e.THX Audio Setting f.THX Speaker Setup :Return 2 Specify the distance of each speaker using a Sound Pressure Level (SPL) meter, take the readings from your system, you 're finished, press RETURN. The receiver... control. Surround speakers within 1 foot apart (best for effective surround sound. 1 Select 'Speaker Distance' from the Manual SP Setup menu. 4.Manual SP Setup a.Speaker Setting b.Crossover Network c.Channel Level d.Speaker Distance e.THX Audio Setting f.THX Speaker Setup :Return 4d...
Owner's Manual
Page 45
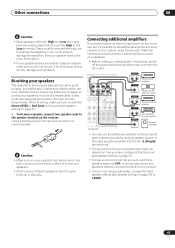
... speakers The reasons for the high and low frequencies). Make the connections shown below to add amplifiers to every channel of your speaker manual for more than enough power for any speakers that connect the High to the Low terminals. In this case plug the amplifier into ...Single)) terminal only. • The sound from the surround back terminals will depend on how you have configured the Surround back speaker setting on the receiver. See your system using a subwoofer, change the front speaker setting (see Speaker Setting on the surround back channel pre-outs for bi-amping. AM...
... speakers The reasons for the high and low frequencies). Make the connections shown below to add amplifiers to every channel of your speaker manual for more than enough power for any speakers that connect the High to the Low terminals. In this case plug the amplifier into ...Single)) terminal only. • The sound from the surround back terminals will depend on how you have configured the Surround back speaker setting on the receiver. See your system using a subwoofer, change the front speaker setting (see Speaker Setting on the surround back channel pre-outs for bi-amping. AM...

Owner's Manual
Page 46
... SURROUND BACK / B R L (Single) IN OUT IN L CENTER L L R1 DVR/VCR2 R R R FRONT SUB SUR- SURROUND WOOFER ROUND BACK MULTI CH IN SEE INSTRUCTION MANUAL SELECTABLE SURROUND BACK / B R L (Single) MONITOR OUT MULTI-ROOM & SOURCE MONITOR ROOM 2(ZONE 2) OUT R L SPEAKERS A R FRON L CENTER L L Sub room Main ...LOOP PRE OUT L CENTER L L (Single) PR OUT IN PR 3 R R SUB R SUR- STANDBY/ON PHASE CONTROL AUDIO/VIDEO MULTI-CHANNEL RECEIVER VSX-80TXV MULTI ROOM LISTENING ON/OFF CONTROL MODE MULTI JOG DVD / LD TV/ SAT DVR / VCR1 DVR /VCR2 VIDEO/GAME CD CD-R ...
... SURROUND BACK / B R L (Single) IN OUT IN L CENTER L L R1 DVR/VCR2 R R R FRONT SUB SUR- SURROUND WOOFER ROUND BACK MULTI CH IN SEE INSTRUCTION MANUAL SELECTABLE SURROUND BACK / B R L (Single) MONITOR OUT MULTI-ROOM & SOURCE MONITOR ROOM 2(ZONE 2) OUT R L SPEAKERS A R FRON L CENTER L L Sub room Main ...LOOP PRE OUT L CENTER L L (Single) PR OUT IN PR 3 R R SUB R SUR- STANDBY/ON PHASE CONTROL AUDIO/VIDEO MULTI-CHANNEL RECEIVER VSX-80TXV MULTI ROOM LISTENING ON/OFF CONTROL MODE MULTI JOG DVD / LD TV/ SAT DVR / VCR1 DVR /VCR2 VIDEO/GAME CD CD-R ...

Owner's Manual
Page 47
...multi-room control first. • If you can use the front panel TUNER controls to select a preset station (see Operating other Pioneer components with this receiver is only possible if you selected the VARIABLE volume control in the sub room. Please be careful not to change stations when recording a...cabinet or shelving unit, you 're finished, press CONTROL again to return to link it does SHIFT+ Selects the sub room. Refer to the manual that came with your stereo components in the sub room. Other connections 08 2 Press CONTROL. If MULTIROOM is shining on /off all output ...
...multi-room control first. • If you can use the front panel TUNER controls to select a preset station (see Operating other Pioneer components with this receiver is only possible if you selected the VARIABLE volume control in the sub room. Please be careful not to change stations when recording a...cabinet or shelving unit, you 're finished, press CONTROL again to return to link it does SHIFT+ Selects the sub room. Refer to the manual that came with your stereo components in the sub room. Other connections 08 2 Press CONTROL. If MULTIROOM is shining on /off all output ...

Owner's Manual
Page 50
... :Finish 2 Select the number of the digital input to which you've connected the digital component. System Setup 1.Surr Back System 2.Auto MCACC 3.Manual MCACC 4.Manual SP Setup 5.Input Assign 6.Other Setup 5.Input Assign a.Digital Input b.Component Input c.HDMI Input : Exit :Return Assigning the digital inputs • ...your TV. Select between DVD, TV, CD, CD-R, DVR 1, DVR 2 or OFF. • Use / and ENTER to do this receiver's component video MONITOR output (downconverting component video is hooked up to which terminal so the buttons on the remote correspond to what you assign ...
... :Finish 2 Select the number of the digital input to which you've connected the digital component. System Setup 1.Surr Back System 2.Auto MCACC 3.Manual MCACC 4.Manual SP Setup 5.Input Assign 6.Other Setup 5.Input Assign a.Digital Input b.Component Input c.HDMI Input : Exit :Return Assigning the digital inputs • ...your TV. Select between DVD, TV, CD, CD-R, DVR 1, DVR 2 or OFF. • Use / and ENTER to do this receiver's component video MONITOR output (downconverting component video is hooked up to which terminal so the buttons on the remote correspond to what you assign ...

Owner's Manual
Page 51
... En Input Assign a.Digital Input b.Component Input c.HDMI Input :Return 2 Select the number of the receiver. 3 Select the component that input. System Setup 1.Surr Back System 2.Auto MCACC 3.Manual MCACC 4.Manual SP Setup 5.Input Assign 6.Other Setup : Exit 6.Other Setup a.DRC Setup b.Dual Mono Setup c....). 3 When you may want to control your TV. Specify if you want to switch on or off using the receiver. 1 Press RECEIVER on your Pioneer plasma display (SR+ Setup for Pioneer plasma displays on page 53). • 12V Trigger Setup - Mid setting. • MAX - OFF If you...
... En Input Assign a.Digital Input b.Component Input c.HDMI Input :Return 2 Select the number of the receiver. 3 Select the component that input. System Setup 1.Surr Back System 2.Auto MCACC 3.Manual MCACC 4.Manual SP Setup 5.Input Assign 6.Other Setup : Exit 6.Other Setup a.DRC Setup b.Dual Mono Setup c....). 3 When you may want to control your TV. Specify if you want to switch on or off using the receiver. 1 Press RECEIVER on your Pioneer plasma display (SR+ Setup for Pioneer plasma displays on page 53). • 12V Trigger Setup - Mid setting. • MAX - OFF If you...

Owner's Manual
Page 54
... video source (the one you want to record) to the radio station, load the CD, video, DVD etc. 3 Prepare the recorder. RECEIVER INPUT SELECT SYSTEM OFF SOURCE AV PRE-PROGRAMMED AND LEARNING REMOTE CONTROL UNIT DVD CD DVR 2 TV DVR1 TVCTRL CD-R XM RADIO ROOM 2 TUNER... RECEIVER 1 Select the source you want to cycle through the possible video sources. into the recording device and set the audio recording level automatically-check the component's instruction manual ...
... video source (the one you want to record) to the radio station, load the CD, video, DVD etc. 3 Prepare the recorder. RECEIVER INPUT SELECT SYSTEM OFF SOURCE AV PRE-PROGRAMMED AND LEARNING REMOTE CONTROL UNIT DVD CD DVR 2 TV DVR1 TVCTRL CD-R XM RADIO ROOM 2 TUNER... RECEIVER 1 Select the source you want to cycle through the possible video sources. into the recording device and set the audio recording level automatically-check the component's instruction manual ...

Owner's Manual
Page 62
... (see Channel Level on page 38). • Check the speaker connections (see Connecting your nearest Pioneer authorized independent service company to cool down in the Manual MCACC setup on page 34. • Try switching on . • The receiver may have a serious problem. During loud playback the power suddenly switches off even with this...
... (see Channel Level on page 38). • Check the speaker connections (see Connecting your nearest Pioneer authorized independent service company to cool down in the Manual MCACC setup on page 34. • Try switching on . • The receiver may have a serious problem. During loud playback the power suddenly switches off even with this...


