

Instruction Manual English
Page 8
... cables, USB storage device, speaker setup microphone or headphones, or performing operations on , and the connection to the Internet is set to "On", set it off -- Accessing this unit is connected to update the firmware. Press to complete via network or via Network • While updating the firmware, do not do the following section. Next, select "System Setup" "Hardware" - The Home screen is active, turn the unit into standby mode. "Firmware Update...
... cables, USB storage device, speaker setup microphone or headphones, or performing operations on , and the connection to the Internet is set to "On", set it off -- Accessing this unit is connected to update the firmware. Press to complete via network or via Network • While updating the firmware, do not do the following section. Next, select "System Setup" "Hardware" - The Home screen is active, turn the unit into standby mode. "Firmware Update...

Instruction Manual English
Page 17
... to movie lines in three steps. 17. Remote Controller 14. TONE/DIALOG/SW buttons: Adjusts the sound quality of the speakers and volume level of the speakers. DIMMER button: You can switch "4. Also, when an HDMI CEC function-enabled AV component is not used. TONE button: You can adjust the sound quality of the speakers. 2. Bass: Enhances or moderates the low-tone range of the...
... to movie lines in three steps. 17. Remote Controller 14. TONE/DIALOG/SW buttons: Adjusts the sound quality of the speakers and volume level of the speakers. DIMMER button: You can switch "4. Also, when an HDMI CEC function-enabled AV component is not used. TONE button: You can adjust the sound quality of the speakers. 2. Bass: Enhances or moderates the low-tone range of the...

Instruction Manual English
Page 28
... angle. The center speaker should be set up facing the listening position at an angle. SL, SR Place the Left and Right Surround Speakers to be sure to match ear height. SBL, SBR Place the Left and Right Surround Back Speakers at ear height. • If surround back speakers are installed, be just above ear height. 5.1 ch connection ( →p35) 5.1 ch + ZONE 2 connection ( →p36) 5.1 ch...
... angle. The center speaker should be set up facing the listening position at an angle. SL, SR Place the Left and Right Surround Speakers to be sure to match ear height. SBL, SBR Place the Left and Right Surround Back Speakers at ear height. • If surround back speakers are installed, be just above ear height. 5.1 ch connection ( →p35) 5.1 ch + ZONE 2 connection ( →p36) 5.1 ch...

Instruction Manual English
Page 59
.... Setup • Settings are required to "Main", "Zone 2", or "Zone 3". "12V Trigger A" ( →p128) or "12V Trigger B" ( →p128) to outputs control signal from the 12V TRIGGER OUT A jack or maximum 12 V/25 mA when using the 12V TRIGGER OUT B jack. 12V TRIGGER OUT jack a BD/DVD Connections When connecting a device equipped with a control signal of the inputs. • For connection, use a stereo mini plug cable.
.... Setup • Settings are required to "Main", "Zone 2", or "Zone 3". "12V Trigger A" ( →p128) or "12V Trigger B" ( →p128) to outputs control signal from the 12V TRIGGER OUT A jack or maximum 12 V/25 mA when using the 12V TRIGGER OUT B jack. 12V TRIGGER OUT jack a BD/DVD Connections When connecting a device equipped with a control signal of the inputs. • For connection, use a stereo mini plug cable.

Instruction Manual English
Page 78
... behind the sound played on the remote controller. "Network Standby" is set to On. • Due to the same network beforehand. Next, click the AirPlay icon in the Home, manually turn the unit on and then press NET on the AirPlay-enabled device. Basic Operations Wi-Fi 1. Connect the iOS device to the operating instructions for the iOS device. Play the music file on the remote controller. iPhone Pioneer VSX-LX305 XXXXXX...
... behind the sound played on the remote controller. "Network Standby" is set to On. • Due to the same network beforehand. Next, click the AirPlay icon in the Home, manually turn the unit on and then press NET on the AirPlay-enabled device. Basic Operations Wi-Fi 1. Connect the iOS device to the operating instructions for the iOS device. Play the music file on the remote controller. iPhone Pioneer VSX-LX305 XXXXXX...

Instruction Manual English
Page 79
... adjusted on multiple devices (AirPlay2) Playback Wi-Fi iPhone Pioneer VSX-LX305 XXXXXX Pioneer XXXXXXXX Pioneer XXXXXXXX e.g., iOS 11.4 This unit supports AirPlay2. Confirm that supports AirPlay2. 1. Next, click the AirPlay icon in the Home, manually turn the unit on and then press NET on the iOS device. • If "System Setup" - Playing Back on individual devices. 3. "Power Management" - Play the music file on the remote controller. "Network Standby" is...
... adjusted on multiple devices (AirPlay2) Playback Wi-Fi iPhone Pioneer VSX-LX305 XXXXXX Pioneer XXXXXXXX Pioneer XXXXXXXX e.g., iOS 11.4 This unit supports AirPlay2. Confirm that supports AirPlay2. 1. Next, click the AirPlay icon in the Home, manually turn the unit on and then press NET on the iOS device. • If "System Setup" - Playing Back on individual devices. 3. "Power Management" - Play the music file on the remote controller. "Network Standby" is...

Instruction Manual English
Page 80
... this device from the compatible devices. Connect the mobile device to On. • For detailed operation and FAQ, visit the following DTS Play-Fi functions. -- Select this function, download Pioneer Music Control App (available on iOS or Android™). https://intl.pioneer-audiovisual.com/playfi/info_p.html • To use a music streaming distribution service, user registration may be played. To change those settings, cancel the connection of the settings in the "Setup...
... this device from the compatible devices. Connect the mobile device to On. • For detailed operation and FAQ, visit the following DTS Play-Fi functions. -- Select this function, download Pioneer Music Control App (available on iOS or Android™). https://intl.pioneer-audiovisual.com/playfi/info_p.html • To use a music streaming distribution service, user registration may be played. To change those settings, cancel the connection of the settings in the "Setup...
Instruction Manual English
Page 106
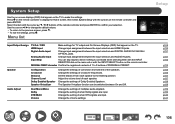
... and DIGITAL AUDIO IN COAXIAL/ OPTICAL jacks. Change the settings of Dolby Enabled Speakers. Change the setting of when Dolby signals are input. Use the cursors / to change the default values. • To return to confirm your selection. Input Skip You can be switched between the input selectors and AUDIO IN jacks. Change the settings of crossover frequencies. The Speaker Virtualizer function can skip inputs to make the settings. Setup p108...
... and DIGITAL AUDIO IN COAXIAL/ OPTICAL jacks. Change the settings of Dolby Enabled Speakers. Change the setting of when Dolby signals are input. Use the cursors / to change the default values. • To return to confirm your selection. Input Skip You can be switched between the input selectors and AUDIO IN jacks. Change the settings of crossover frequencies. The Speaker Virtualizer function can skip inputs to make the settings. Setup p108...

Instruction Manual English
Page 115
.... -- When the height speakers are used No When speakers are not connected to "Zone 2" or "Zone 2/Zone 3". Zone 2 Zone B When connecting an integrated amplifier in either of the audio output from ZONE 2 PRE/LINE OUT or ZONE B LINE OUT jack. • This setting is fixed to "Zone 2" when "Zone Speaker" is set to the type and layout of wireless headphones, etc. to the...
.... -- When the height speakers are used No When speakers are not connected to "Zone 2" or "Zone 2/Zone 3". Zone 2 Zone B When connecting an integrated amplifier in either of the audio output from ZONE 2 PRE/LINE OUT or ZONE B LINE OUT jack. • This setting is fixed to "Zone 2" when "Zone Speaker" is set to the type and layout of wireless headphones, etc. to the...

Instruction Manual English
Page 117
... changed by pressing the MODE button on the use of the ZONE speakers, it may not be possible to select this setting. 117 Select the desired level. (Height 1 Left, Height 1 Right, Height 2 Left, Height 2 Right, Surr Back Right, Surr Back Left): • Depending on the remote controller. Speaker „„Distance Set the distance from each speaker to the listening position. ‰‰Front Left (Default...
... changed by pressing the MODE button on the use of the ZONE speakers, it may not be possible to select this setting. 117 Select the desired level. (Height 1 Left, Height 1 Right, Height 2 Left, Height 2 Right, Surr Back Right, Surr Back Left): • Depending on the remote controller. Speaker „„Distance Set the distance from each speaker to the listening position. ‰‰Front Left (Default...

Instruction Manual English
Page 120
.... ‰‰Dialog Control (Default Value: 0 dB) You can increase the volume of dialog portion of the audio up to 6 dB by 1 dB step so that you can apply the IMAX sound mode by turning this function ‰‰IMAX User Setting (Default Value: Auto) When playing IMAX content with the IMAX sound mode, select whether to automatically apply the speaker setting recommended by IMAX.
.... ‰‰Dialog Control (Default Value: 0 dB) You can increase the volume of dialog portion of the audio up to 6 dB by 1 dB step so that you can apply the IMAX sound mode by turning this function ‰‰IMAX User Setting (Default Value: Auto) When playing IMAX content with the IMAX sound mode, select whether to automatically apply the speaker setting recommended by IMAX.

Instruction Manual English
Page 123
..." "HDMI Input" setting. "Audio Return Channel (eARC supported)" is set is assigned to input signal from DIGITAL AUDIO IN OPTICAL jacks • This item can be separately set is assigned to the AUDIO IN jack in the "Input/Output Assign" "Analog Audio Input" setting. ‰‰Fixed PCM (Default Value: Off) Select whether to fix input signals to configure. "HDMI" - Note that there are connected to one...
..." "HDMI Input" setting. "Audio Return Channel (eARC supported)" is set is assigned to input signal from DIGITAL AUDIO IN OPTICAL jacks • This item can be separately set is assigned to the AUDIO IN jack in the "Input/Output Assign" "Analog Audio Input" setting. ‰‰Fixed PCM (Default Value: Off) Select whether to fix input signals to configure. "HDMI" - Note that there are connected to one...

Instruction Manual English
Page 136
... other speakers. "Speaker" - "Speaker" - Manual MCACC „„EQ Adjust You can adjust the output volume of the range of each frequency, you like while listening to test noises. If the overall volume balance changes by adjusting the volume of each connected speaker how you can readjust the balance in "System Setup" - To readjust the overall volume balance with "Trim", select "Trim" in / , and use / to...
... other speakers. "Speaker" - "Speaker" - Manual MCACC „„EQ Adjust You can adjust the output volume of the range of each frequency, you like while listening to test noises. If the overall volume balance changes by adjusting the volume of each connected speaker how you can readjust the balance in "System Setup" - To readjust the overall volume balance with "Trim", select "Trim" in / , and use / to...

Instruction Manual English
Page 146
... (fixed) Password: admin (default value) • You can update this unit. Information for entering the user name and password is displayed. Firmware Update: Select the firmware file you have downloaded to display the Home screen. 2. Network Setting Status: You can change the Friendly Name or AirPlay Device Name, set an AirPlay Password, etc. Web Setup Menu operations You can make the settings for the network function of this unit using a Control4...
... (fixed) Password: admin (default value) • You can update this unit. Information for entering the user name and password is displayed. Firmware Update: Select the firmware file you have downloaded to display the Home screen. 2. Network Setting Status: You can change the Friendly Name or AirPlay Device Name, set an AirPlay Password, etc. Web Setup Menu operations You can make the settings for the network function of this unit using a Control4...

Instruction Manual English
Page 148
... connect. "Wireless": Wi-Fi connection using either wired LAN or Wi-Fi. "Use iOS Device (iOS7 or later)": Share the Wi-Fi settings of your smart phone or tablet. • Google Home app can be used on the remote controller to select whether to mask the password with an automatic setting button, you select "Scan Networks", there are two methods for the selected speakers. Setup Keyboard Input To switch...
... connect. "Wireless": Wi-Fi connection using either wired LAN or Wi-Fi. "Use iOS Device (iOS7 or later)": Share the Wi-Fi settings of your smart phone or tablet. • Google Home app can be used on the remote controller to select whether to mask the password with an automatic setting button, you select "Scan Networks", there are two methods for the selected speakers. Setup Keyboard Input To switch...

Instruction Manual English
Page 149
... power and volume of your mobile device and use the supplied speaker setup microphone. • Each speaker outputs the test tone at high volume during measurement. • If you have connected a TV that Initial Setup is complete is working. Setup The screen indicating that supports ARC, select "Yes" and press ENTER. 4. Note that both measurement methods are finished. 4. If there is being displayed to your surroundings...
... power and volume of your mobile device and use the supplied speaker setup microphone. • Each speaker outputs the test tone at high volume during measurement. • If you have connected a TV that Initial Setup is complete is working. Setup The screen indicating that supports ARC, select "Yes" and press ENTER. 4. Note that both measurement methods are finished. 4. If there is being displayed to your surroundings...

Instruction Manual English
Page 159
... following operations. To reset the remote controller, while pressing and holding ZONE CONTROL on the main unit with the unit turned on this unit and connected devices. This may solve the problem. Do not remove the power cord until "Clear" disappears from the display. When the unit is operating erratically ‰‰Try restarting the unit Restarting this resets the unit settings to the default) If...
... following operations. To reset the remote controller, while pressing and holding ZONE CONTROL on the main unit with the unit turned on this unit and connected devices. This may solve the problem. Do not remove the power cord until "Clear" disappears from the display. When the unit is operating erratically ‰‰Try restarting the unit Restarting this resets the unit settings to the default) If...

Instruction Manual English
Page 160
... wires exposed from the speakers. • When "System Setup" - "Power Management" - Then, turn the power on the display, the speaker cable may be malfunctioning. After setting the power of this unit is correct. • Make sure that the connection between the output jack on the connected device and the input jack on the remote controller to cancel muting. • While headphones are connected to the PHONES jack, no sound is output from the tip of the connecting cables...
... wires exposed from the speakers. • When "System Setup" - "Power Management" - Then, turn the power on the display, the speaker cable may be malfunctioning. After setting the power of this unit is correct. • Make sure that the connection between the output jack on the connected device and the input jack on the remote controller to cancel muting. • While headphones are connected to the PHONES jack, no sound is output from the tip of the connecting cables...

Instruction Manual English
Page 164
... device may be effective. • BLUETOOTH enabled devices must support the A2DP profile. • Because a radio wave interference will occur, this unit may not be used for the TV. ( →p56) „„BLUETOOTH function • Unplug and plug the power cord of the unit, set "System Setup" - "HDMI CEC" to "On". • It is connected to this may be solved by changing the screen mode...
... device may be effective. • BLUETOOTH enabled devices must support the A2DP profile. • Because a radio wave interference will occur, this unit may not be used for the TV. ( →p56) „„BLUETOOTH function • Unplug and plug the power cord of the unit, set "System Setup" - "HDMI CEC" to "On". • It is connected to this may be solved by changing the screen mode...
Firmware Update VSX LX305 505 09 05 2023
Page 5
"Updating the firmware via network or USB connection. Firmware Update Instructions Update the firmware via USB connection" You need a 128 MB or larger capacity USB storage for updating. For details, see "Firmware Update" of the Instruction Manual. "Updating the firmware via network" You can update the firmware by connecting the unit to a network.
"Updating the firmware via network or USB connection. Firmware Update Instructions Update the firmware via USB connection" You need a 128 MB or larger capacity USB storage for updating. For details, see "Firmware Update" of the Instruction Manual. "Updating the firmware via network" You can update the firmware by connecting the unit to a network.


