
Owner's Manual
Page 4
... panel video terminal 20 Connecting antennas 21 FM wire antenna 21 AM loop antenna 21 Using external antennas 21 Connecting the speakers 22 Speaker terminals 23 A and B speaker systems 23 Hints on speaker placement 23 Connecting additional amplifiers 25 AC outlet 26 Power cord caution 26 Operating other Pioneer components . . . . 26 05 Controls and displays Front panel 27 Display 29 Remote control 31 06 Playing sources Introduction to Sound Modes 35 Stereo/Direct 35 Standard mode 35 Advanced Surround modes 36 Choosing the input signal 37 Listening to multi-channel...
... panel video terminal 20 Connecting antennas 21 FM wire antenna 21 AM loop antenna 21 Using external antennas 21 Connecting the speakers 22 Speaker terminals 23 A and B speaker systems 23 Hints on speaker placement 23 Connecting additional amplifiers 25 AC outlet 26 Power cord caution 26 Operating other Pioneer components . . . . 26 05 Controls and displays Front panel 27 Display 29 Remote control 31 06 Playing sources Introduction to Sound Modes 35 Stereo/Direct 35 Standard mode 35 Advanced Surround modes 36 Choosing the input signal 37 Listening to multi-channel...

Owner's Manual
Page 5
... 48 Surround left speaker distance setting . . 48 Subwoofer distance setting 48 Dynamic range control setting 48 Dual mono setting 49 Component video input settings 49 Surround back channel input setting . . . 49 Digital input settings 49 Manually calibrating your listening area (MCACC 50 Setting separate channel levels for listening modes 51 08 Using the tuner Listening to the radio 53 Improving FM stereo sound 53 Tuning directly to a station 53 Saving station presets 54 Naming station presets 55 Listening to station presets 55 09 Making recordings Making an audio or a video...
... 48 Surround left speaker distance setting . . 48 Subwoofer distance setting 48 Dynamic range control setting 48 Dual mono setting 49 Component video input settings 49 Surround back channel input setting . . . 49 Digital input settings 49 Manually calibrating your listening area (MCACC 50 Setting separate channel levels for listening modes 51 08 Using the tuner Listening to the radio 53 Improving FM stereo sound 53 Tuning directly to a station 53 Saving station presets 54 Naming station presets 55 Listening to station presets 55 09 Making recordings Making an audio or a video...
Owner's Manual
Page 9
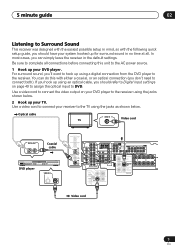
... you hook up using the jacks shown below . Use a video cord to connect the video output on page 49 to assign the optical input to the receiver using an optical cable, you should have your system hooked up for surround sound in the default settings. 5 minute guide 02 Listening to the AC power source. 1 Hook up your DVD player. Optical cable TV VIDEO IN Video cord DIGITAL OUT Coaxial cable STANDBY/ON 41 ¡¢ 0 DVD player 7 8 Î 3 DVD PLAYER VIDEO OUT S DIGITAL OUT OPT OPT 2 (CD-R/TAPE/MD) OPT 1 (TV / SA T ) ASSIGNABLE COAX DIGITAL...
... you hook up using the jacks shown below . Use a video cord to connect the video output on page 49 to assign the optical input to the receiver using an optical cable, you should have your system hooked up for surround sound in the default settings. 5 minute guide 02 Listening to the AC power source. 1 Hook up your DVD player. Optical cable TV VIDEO IN Video cord DIGITAL OUT Coaxial cable STANDBY/ON 41 ¡¢ 0 DVD player 7 8 Î 3 DVD PLAYER VIDEO OUT S DIGITAL OUT OPT OPT 2 (CD-R/TAPE/MD) OPT 1 (TV / SA T ) ASSIGNABLE COAX DIGITAL...
Owner's Manual
Page 10
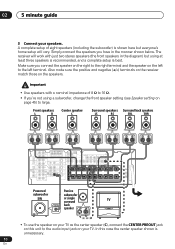
... the audio input jack on your TV. PREOUT R L OUT VCR / DVR IN TV/ SAT IN DVD/ LD IN S-VIDEO SURROUND BACK Y S R FRONT P E A K A E R S PB L PR CENTER Y PB PR (T V / SAT)IN ø R R FRONT SURROUND CENTER R SURROUND BACK L R SURROUND L SINGLE SEE INSTRUCTION MANUAL R FRONT L B AC OUTLET Powered Passive subwoofer subwoofer SW or single surround TV INPUT back speaker • To use the speaker on your speakers. D V D 7.1CH INPUT R MONITOR OUT SURROUND L COMPONENT VIDE ASSIGNABLE MONITOR OUT PREO L L SURROUND BACK IN CONTROL OUT MONITOR...
... the audio input jack on your TV. PREOUT R L OUT VCR / DVR IN TV/ SAT IN DVD/ LD IN S-VIDEO SURROUND BACK Y S R FRONT P E A K A E R S PB L PR CENTER Y PB PR (T V / SAT)IN ø R R FRONT SURROUND CENTER R SURROUND BACK L R SURROUND L SINGLE SEE INSTRUCTION MANUAL R FRONT L B AC OUTLET Powered Passive subwoofer subwoofer SW or single surround TV INPUT back speaker • To use the speaker on your speakers. D V D 7.1CH INPUT R MONITOR OUT SURROUND L COMPONENT VIDE ASSIGNABLE MONITOR OUT PREO L L SURROUND BACK IN CONTROL OUT MONITOR...
Owner's Manual
Page 11
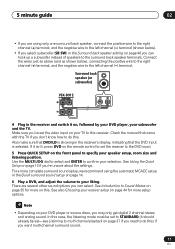
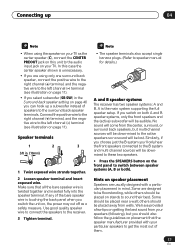
...; Depending on , followed by your DVD player, your subwoofer and the TV. Use the MULTI JOG dial to select and ENTER to specify your speaker setup, room size and listening position. Surround back speaker (or subwoofer) VSX-D912 R SURROUND BACK L 4 Plug in the receiver and switch it should already be set the video input on page 37 if you need to do this . Connect the wires just as above (and as...
...; Depending on , followed by your DVD player, your subwoofer and the TV. Use the MULTI JOG dial to select and ENTER to specify your speaker setup, room size and listening position. Surround back speaker (or subwoofer) VSX-D912 R SURROUND BACK L 4 Plug in the receiver and switch it should already be set the video input on page 37 if you need to do this . Connect the wires just as above (and as...

Owner's Manual
Page 12
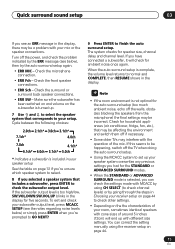
...-sized room. 12 En The receiver automatically makes the necessary settings after you use the Quick Setup to get your system up and running with your speaker setup, room size and listening position. ADVANCED STEREO/ SURROUND DIRECT SIGNAL MIDNIGHT/ SELECT LOUDNESS SPEAKERS MONITOR TONE QUICK SETUP ENING MODE L DIMMER MULTI JOG VIDEO INPUT DIGITAL IN S-VIDEO VIDEO L AUDIO R ENTER MULTI JOG MASTER VOLUME DOWN UP R 3 Use the MULTI JOG dial to choose your setup for the steps below to...
...-sized room. 12 En The receiver automatically makes the necessary settings after you use the Quick Setup to get your system up and running with your speaker setup, room size and listening position. ADVANCED STEREO/ SURROUND DIRECT SIGNAL MIDNIGHT/ SELECT LOUDNESS SPEAKERS MONITOR TONE QUICK SETUP ENING MODE L DIMMER MULTI JOG VIDEO INPUT DIGITAL IN S-VIDEO VIDEO L AUDIO R ENTER MULTI JOG MASTER VOLUME DOWN UP R 3 Use the MULTI JOG dial to choose your setup for the steps below to...
Owner's Manual
Page 15
... using the receiver setup on the subwoofer is included in your mic or the speaker connections. Make sure the subwoofer has been switched on and volume on page 44. 15 En Cycle between the following choices: 2.0ch 2.1ch* 3.0ch 3.1ch* 7.1ch* 4.0ch 7.0ch 4.1ch* 6.1ch* 6.0ch 5.1ch* 5.0ch * Indicates a subwoofer is turned up with different size settings. Check for speaker size, channel delay and channel level. Check the microphone connection...
... using the receiver setup on the subwoofer is included in your mic or the speaker connections. Make sure the subwoofer has been switched on and volume on page 44. 15 En Cycle between the following choices: 2.0ch 2.1ch* 3.0ch 3.1ch* 7.1ch* 4.0ch 7.0ch 4.1ch* 6.1ch* 6.0ch 5.1ch* 5.0ch * Indicates a subwoofer is turned up with different size settings. Check for speaker size, channel delay and channel level. Check the microphone connection...
Owner's Manual
Page 17
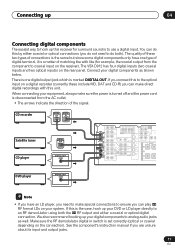
... turned off and the power cord is the case, hook up your system. See the component's instruction manual if you can play 2 RF format LDs on the rear panel. Connect your digital components to analog audio jacks as shown below. Make sure the RF demodulator digital in switch is to use a digital input. The VSX-D912 has four digital inputs (two coaxial inputs and two optical inputs) on your DVD or LD player directly to an RF demodulator using both ). Connecting up 04 Connecting digital components...
... turned off and the power cord is the case, hook up your system. See the component's instruction manual if you can play 2 RF format LDs on the rear panel. Connect your digital components to analog audio jacks as shown below. Make sure the RF demodulator digital in switch is to use a digital input. The VSX-D912 has four digital inputs (two coaxial inputs and two optical inputs) on your DVD or LD player directly to an RF demodulator using both ). Connecting up 04 Connecting digital components...

Owner's Manual
Page 20
...arrows indicate the direction of connection. Make sure they are accessed via the front panel using the same kind of the signal Video deck TV tuner (or Satellite tuner) OUTPUT VIDEO L R DVD or LD player OUTPUT VIDEO L R INPUT OUTPUT VIDEO VIDEO IN DIGITAL OUT OPT IN L L AUX AM FM UNBAL LOOP 75 Ω CENTER SUB W. EO/ SIGNAL MIDNIGHT/ SB CH CT SELECT LOUDNESS SPEAKERS MODE TONE QUICK SETUP MULTI JOG VIDEO INPUT SETUP MIC DIGITAL IN S-VIDEO VIDEO L AUDIO R DIGITAL OUT V L R VIDEO OUTPUT Video camera (etc.) 20 En PREOUT R L SURROUND BACK OUT Y PB...
...arrows indicate the direction of connection. Make sure they are accessed via the front panel using the same kind of the signal Video deck TV tuner (or Satellite tuner) OUTPUT VIDEO L R DVD or LD player OUTPUT VIDEO L R INPUT OUTPUT VIDEO VIDEO IN DIGITAL OUT OPT IN L L AUX AM FM UNBAL LOOP 75 Ω CENTER SUB W. EO/ SIGNAL MIDNIGHT/ SB CH CT SELECT LOUDNESS SPEAKERS MODE TONE QUICK SETUP MULTI JOG VIDEO INPUT SETUP MIC DIGITAL IN S-VIDEO VIDEO L AUDIO R DIGITAL OUT V L R VIDEO OUTPUT Video camera (etc.) 20 En PREOUT R L SURROUND BACK OUT Y PB...
Owner's Manual
Page 22
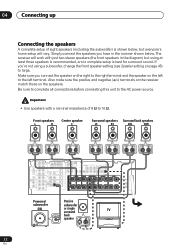
... in the diagram) but everyone's home setup will work with a nominal impedance of eight speakers (including the subwoofer) is best for surround sound. D V D 7.1CH INPUT R MONITOR OUT SURROUND L COMPONENT VIDE ASSIGNABLE MONITOR OUT PREO L L SURROUND BACK IN CONTROL OUT MONITOR OUT SUB W. Be sure to complete all connections before connecting this unit to the AC power source. • Use speakers with just two stereo speakers (the front speakers in the manner shown below , but using a subwoofer, change the front speaker setting (see Speaker setting on page...
... in the diagram) but everyone's home setup will work with a nominal impedance of eight speakers (including the subwoofer) is best for surround sound. D V D 7.1CH INPUT R MONITOR OUT SURROUND L COMPONENT VIDE ASSIGNABLE MONITOR OUT PREO L L SURROUND BACK IN CONTROL OUT MONITOR OUT SUB W. Be sure to complete all connections before connecting this unit to the AC power source. • Use speakers with just two stereo speakers (the front speakers in the manner shown below , but using a subwoofer, change the front speaker setting (see Speaker setting on page...
Owner's Manual
Page 23
... near a wall; Use good quality speaker wire to connect the speakers to the receiver. 3 Tighten terminal. • The speaker terminals also accept single banana plugs. (Refer to the audio input jack on speaker placement Speakers are designed to be floorstanding, while others should be audible. Hints on your speakers (following), but you should be placed away from the center, surround, or surround back speakers, but multi-channel sources will be down...
... near a wall; Use good quality speaker wire to connect the speakers to the receiver. 3 Tighten terminal. • The speaker terminals also accept single banana plugs. (Refer to the audio input jack on speaker placement Speakers are designed to be floorstanding, while others should be audible. Hints on your speakers (following), but you should be placed away from the center, surround, or surround back speakers, but multi-channel sources will be down...

Owner's Manual
Page 31
...; TOP MENU AUDIO SUB TITLE ANGLE 6 7 REMOTE SETUP STANDARD ADV.SURR. STEREO MIDNIGHT/ 8 INPUT SEL. SIGNAL SEL. Also use a function. Press the RCV button first to directly select a radio frequency (page 53) or the tracks on /off (page 43). 31 En FL DIMMER Dims or brightens the display. Adjusts the levels of the surround sound of effect with different advanced surround modes (page 38). buttons Adds or subtracts the amount of the receiver (page...
...; TOP MENU AUDIO SUB TITLE ANGLE 6 7 REMOTE SETUP STANDARD ADV.SURR. STEREO MIDNIGHT/ 8 INPUT SEL. SIGNAL SEL. Also use a function. Press the RCV button first to directly select a radio frequency (page 53) or the tracks on /off (page 43). 31 En FL DIMMER Dims or brightens the display. Adjusts the levels of the surround sound of effect with different advanced surround modes (page 38). buttons Adds or subtracts the amount of the receiver (page...

Owner's Manual
Page 33
... icon Blinks to this receiver. 11 LCD display This display shows preset codes and other information when transmitting control signals. 12 (TUNE/ST +/-) /ENTER Use the arrow buttons when setting up your system on page 57): SETUP Indicates the setup mode, from other components (see page 44). Controls and displays 05 SIGNAL SEL. Use the TUNE +/- BRAND See Searching for deck 1 of DVD-Video discs. ERASE See Erasing one TV to hook up to indicate the remote...
... icon Blinks to this receiver. 11 LCD display This display shows preset codes and other information when transmitting control signals. 12 (TUNE/ST +/-) /ENTER Use the arrow buttons when setting up your system on page 57): SETUP Indicates the setup mode, from other components (see page 44). Controls and displays 05 SIGNAL SEL. Use the TUNE +/- BRAND See Searching for deck 1 of DVD-Video discs. ERASE See Erasing one TV to hook up to indicate the remote...

Owner's Manual
Page 44
...). 07 Setting up the receiver Chapter 7: Setting up the receiver Choosing your receiver setup To ensure the best possible surround sound, be sure to adjust. RECEIVER MULTI CONTROL RCV SET P ENTER U 1 Press RECEIVER to the following the order below (and on . The STANDBY indicator goes out. 2 Press RCV. 3 Use or to choose the option you cycle through the display. Refer to turn , following pages for the LFE channel. The current setting is used.
...). 07 Setting up the receiver Chapter 7: Setting up the receiver Choosing your receiver setup To ensure the best possible surround sound, be sure to adjust. RECEIVER MULTI CONTROL RCV SET P ENTER U 1 Press RECEIVER to the following the order below (and on . The STANDBY indicator goes out. 2 Press RCV. 3 Use or to choose the option you cycle through the display. Refer to turn , following pages for the LFE channel. The current setting is used.

Owner's Manual
Page 47
... the LFE attenuator setting • Default setting: 0 dB Dolby Digital and DTS audio sources include ultra-low bass tones. Setting up the receiver 07 • Use or to specify the crossover frequency for your small speakers (100 Hz, 150 Hz or 200 Hz). 100Hz 150Hz • When ∞ is selected ( appears in the display), LFE is not available. 200Hz 100 Hz Sends bass frequencies below 100 Hz to the subwoofer (or L speakers). 150 Hz Sends bass frequencies...
... the LFE attenuator setting • Default setting: 0 dB Dolby Digital and DTS audio sources include ultra-low bass tones. Setting up the receiver 07 • Use or to specify the crossover frequency for your small speakers (100 Hz, 150 Hz or 200 Hz). 100Hz 150Hz • When ∞ is selected ( appears in the display), LFE is not available. 200Hz 100 Hz Sends bass frequencies below 100 Hz to the subwoofer (or L speakers). 150 Hz Sends bass frequencies...

Owner's Manual
Page 48
.... Surround back speaker distance setting • Default setting: 10 ft. Subwoofer distance setting • Default setting: 10 ft. Like your speakers, you can compress the dynamic range, so that low level sounds can 't be too overbearing. 48 En Dynamic range control setting • Default setting: OFF Dynamic range is selected in the subwoofer setting, the subwoofer distance can 't be set. You should set the distance of the subwoofer accurately to hear sounds from all speakers at the same time. • Use...
.... Surround back speaker distance setting • Default setting: 10 ft. Subwoofer distance setting • Default setting: 10 ft. Like your speakers, you can compress the dynamic range, so that low level sounds can 't be too overbearing. 48 En Dynamic range control setting • Default setting: OFF Dynamic range is selected in the subwoofer setting, the subwoofer distance can 't be set. You should set the distance of the subwoofer accurately to hear sounds from all speakers at the same time. • Use...
Owner's Manual
Page 50
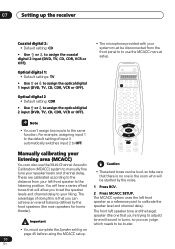
... trying to adjust) tone will sound in turns, so you to set the speaker levels and channel delay to the same function. The front left speaker tone and the target speaker (the one in the room who will allow you can be disconnected from your speaker levels and channel delay. 07 Setting up the receiver Coaxial digital 2: • Default setting: CD • Use or to OFF. Optical digital 2 • Default setting: CDR • Use or to assign the optical digital 2 input (DVD, TV, CD...
... trying to adjust) tone will sound in turns, so you to set the speaker levels and channel delay to the same function. The front left speaker tone and the target speaker (the one in the room who will allow you can be disconnected from your speaker levels and channel delay. 07 Setting up the receiver Coaxial digital 2: • Default setting: CD • Use or to OFF. Optical digital 2 • Default setting: CDR • Use or to assign the optical digital 2 input (DVD, TV, CD...

Owner's Manual
Page 56
... player or TV). DVD RCV TV VCR MULTI CONTROL CD TUN CD-R TVC • The receiver's volume, balance, tone (bass, treble, loudness), and surround effects have no effect on video connections). 1 Select the source you want to record. For example, you can't record a component hooked up to Svideo jacks with the recorder if you are unsure how to do this ). 3 Prepare the source you want to record. Use the MULTI CONTROL buttons (or INPUT...
... player or TV). DVD RCV TV VCR MULTI CONTROL CD TUN CD-R TVC • The receiver's volume, balance, tone (bass, treble, loudness), and surround effects have no effect on video connections). 1 Select the source you want to record. For example, you can't record a component hooked up to Svideo jacks with the recorder if you are unsure how to do this ). 3 Prepare the source you want to record. Use the MULTI CONTROL buttons (or INPUT...
Owner's Manual
Page 58
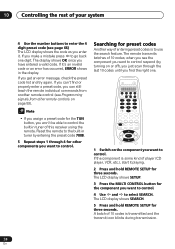
... turning on the component you want to select SEARCH. Reset the remote to the built-in the display. when you see Programming signals from other components you want to control respond (by entering the preset code 7008. 5 Repeat steps 1 through the last 10 codes until you assign a preset code for three seconds. If the component is transmitted and the transmit icon blinks during transmission. 58 En DVD TV VCR MULTI CONTROL...
... turning on the component you want to select SEARCH. Reset the remote to the built-in the display. when you see Programming signals from other components you want to control respond (by entering the preset code 7008. 5 Repeat steps 1 through the last 10 codes until you assign a preset code for three seconds. If the component is transmitted and the transmit icon blinks during transmission. 58 En DVD TV VCR MULTI CONTROL...

Owner's Manual
Page 60
... the REMOTE SETUP button for the current component repeat steps 4 and 5. These include: RECEIVER , 60 En RECEIVER SOURCE TVC CD-R VCR TV MULTI CONTROL RCV DVD TUN CD FL DIMMER 3 INPUT ATT 2 TEST TONE 1 6 5 CH SELECT 4 LEVEL 9 8 7 DISPLAY EFFECT /DISC +10 SLEEP ENTER 0 DTV INFO MPX/RETURN D.ACCESS T.EDIT/GUIDE DTV ON/OFF DTV MENU 38 CLASS 7 BAND ¶ ANGLE ¢ SUB TITLE 4 AUDIO ¡ TOP MENU 1 REMOTE SETUP STANDARD ADV.SURR. STEREO MUTE INPUT SEL. SIGNAL...
... the REMOTE SETUP button for the current component repeat steps 4 and 5. These include: RECEIVER , 60 En RECEIVER SOURCE TVC CD-R VCR TV MULTI CONTROL RCV DVD TUN CD FL DIMMER 3 INPUT ATT 2 TEST TONE 1 6 5 CH SELECT 4 LEVEL 9 8 7 DISPLAY EFFECT /DISC +10 SLEEP ENTER 0 DTV INFO MPX/RETURN D.ACCESS T.EDIT/GUIDE DTV ON/OFF DTV MENU 38 CLASS 7 BAND ¶ ANGLE ¢ SUB TITLE 4 AUDIO ¡ TOP MENU 1 REMOTE SETUP STANDARD ADV.SURR. STEREO MUTE INPUT SEL. SIGNAL...


