Installation Manual
Page 4
... and B speaker systems 22 Hints on speaker placement 22 Connecting additional amplifiers 24 AC outlet 25 Operating other Pioneer components . . . . 25 Using this receiver with a Pioneer plasma display 26 05 Controls and displays Front panel 27 Display 29 Remote control 31 06 Listening to your ...41 Using the sleep timer 41 07 Setting up the receiver Choosing your receiver setup 42 Speaker setting 43 Surround back speaker setting 44 Subwoofer setting 44 Crossover frequency setting 44 LFE attenuator setting 45 Front left speaker distance setting . . . . . 45 Center speaker distance...
... and B speaker systems 22 Hints on speaker placement 22 Connecting additional amplifiers 24 AC outlet 25 Operating other Pioneer components . . . . 25 Using this receiver with a Pioneer plasma display 26 05 Controls and displays Front panel 27 Display 29 Remote control 31 06 Listening to your ...41 Using the sleep timer 41 07 Setting up the receiver Choosing your receiver setup 42 Speaker setting 43 Surround back speaker setting 44 Subwoofer setting 44 Crossover frequency setting 44 LFE attenuator setting 45 Front left speaker distance setting . . . . . 45 Center speaker distance...

Installation Manual
Page 5
Surround left speaker distance setting . . 46 Subwoofer distance setting 46 Dynamic range control setting 47 Dual mono setting 47 Component video input settings 47 Digital input settings 47 SR+ control for Pioneer plasma displays 48 Manually calibrating your listening area (MCACC 49 Setting separate channel levels for ...listening modes 50 Using the SR+ mode with a Pioneer plasma display 51 08 Using the tuner Listening to the radio 53 Improving FM stereo sound 53 Tuning directly to a station 53...
Surround left speaker distance setting . . 46 Subwoofer distance setting 46 Dynamic range control setting 47 Dual mono setting 47 Component video input settings 47 Digital input settings 47 SR+ control for Pioneer plasma displays 48 Manually calibrating your listening area (MCACC 49 Setting separate channel levels for ...listening modes 50 Using the SR+ mode with a Pioneer plasma display 51 08 Using the tuner Listening to the radio 53 Improving FM stereo sound 53 Tuning directly to a station 53...
Installation Manual
Page 10
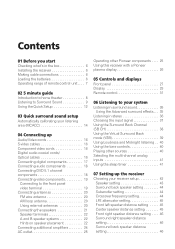
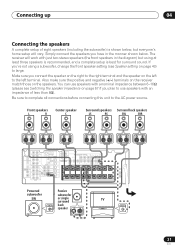
...the CENTER PREOUT jack on this case the center speaker shown is unnecessary. • If you 're not using a subwoofer, change the front speaker setting (see Switching the speaker impedance on your speakers. Front speakers L R Center speaker C ...S R FRONT L P E A K A E R CENTER R SURROUND BACK L R SURROUND L SINGLE SEE INSTRUCTION MANUAL R FRONT L B IN PLAY S R AUDIO L AC OUTLET Powered Passive subwoofer subwoofer SW or single surround INPUT back speaker TV AUDIO IN • If you are using at least three speakers is recommended, and a complete setup is...
...the CENTER PREOUT jack on this case the center speaker shown is unnecessary. • If you 're not using a subwoofer, change the front speaker setting (see Switching the speaker impedance on your speakers. Front speakers L R Center speaker C ...S R FRONT L P E A K A E R CENTER R SURROUND BACK L R SURROUND L SINGLE SEE INSTRUCTION MANUAL R FRONT L B IN PLAY S R AUDIO L AC OUTLET Powered Passive subwoofer subwoofer SW or single surround INPUT back speaker TV AUDIO IN • If you are using at least three speakers is recommended, and a complete setup is...

Installation Manual
Page 11
... to confirm your TV to this . Also make sure that DVD/LD is selected. There are several other sound options you can hook up a subwoofer instead of speakers to the surround back speaker terminals. Make sure you've set the video input on your selection. See Listening to your system... on page 35 for more setup options. • Depending on your speaker setup, room size and listening position. VSX-D914 model only - Check the manual that the DVD input is showing in the Quick surround sound setup on page 14. 6 Play a DVD, and...
... to confirm your TV to this . Also make sure that DVD/LD is selected. There are several other sound options you can hook up a subwoofer instead of speakers to the surround back speaker terminals. Make sure you've set the video input on your selection. See Listening to your system... on page 35 for more setup options. • Depending on your speaker setup, room size and listening position. VSX-D914 model only - Check the manual that the DVD input is showing in the Quick surround sound setup on page 14. 6 Play a DVD, and...
Installation Manual
Page 12
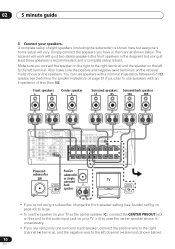
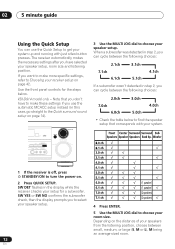
...distance of your speakers from the listening position, choose between small, medium, or large (S, M or L), M being an average-sized room. 12 En When a subwoofer was detected in step 2, you can cycle between the following choices: 2.0ch 7.0ch 6.0ch 3.0ch 5.0ch 4.0ch • Check the table below . If you to... system up and running with your system. 1 If the receiver is off, press STANDBY/ON to turn the power on. 2 Press QUICK SETUP. VSX-D914 model only - 02 5 minute guide Using the Quick Setup You can cycle between the following choices: 2.1ch 3.1ch 7.1ch 6.1ch 5.1ch 4.1ch...
...distance of your speakers from the listening position, choose between small, medium, or large (S, M or L), M being an average-sized room. 12 En When a subwoofer was detected in step 2, you can cycle between the following choices: 2.0ch 7.0ch 6.0ch 3.0ch 5.0ch 4.0ch • Check the table below . If you to... system up and running with your system. 1 If the receiver is off, press STANDBY/ON to turn the power on. 2 Press QUICK SETUP. VSX-D914 model only - 02 5 minute guide Using the Quick Setup You can cycle between the following choices: 2.1ch 3.1ch 7.1ch 6.1ch 5.1ch 4.1ch...
Installation Manual
Page 14
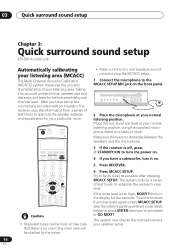
After you have a subwoofer, turn the power on. 4 If you 're prompted to optimize the speaker settings and equalization for your particular room. RECEIVER INPUT SELECT SOURCE • Make ... your system, the receiver uses the information from a series of test tones to GO NEXT? 03 Quick surround sound setup Chapter 3: Quick surround sound setup VSX-D914 model only Automatically calibrating your listening area (MCACC) The Multi-Channel Acoustic Calibration (MCACC) system measures the acoustic characteristics of your listening area, taking...
After you have a subwoofer, turn the power on. 4 If you 're prompted to optimize the speaker settings and equalization for your particular room. RECEIVER INPUT SELECT SOURCE • Make ... your system, the receiver uses the information from a series of test tones to GO NEXT? 03 Quick surround sound setup Chapter 3: Quick surround sound setup VSX-D914 model only Automatically calibrating your listening area (MCACC) The Multi-Channel Acoustic Calibration (MCACC) system measures the acoustic characteristics of your listening area, taking...
Installation Manual
Page 15
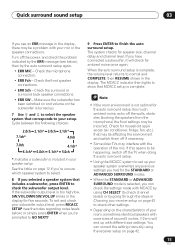
.... • ERR Sch - The system checks for five seconds. Check the microphone connection. • ERR Fch - To exit and check your subwoofer output level, press MCACC SETUP (see the notes regarding noise levels below ), then try the auto surround setup again. • ERR MIC - ...Cycle between the following choices: 2.0ch 2.1ch* 3.0ch 3.1ch* 7.1ch* 4.0ch 7.0ch 4.1ch* 6.1ch* 6.0ch 5.1ch* 5.0ch * Indicates a subwoofer is turned up your speaker system overwrites any previous settings you had for the STANDARD or ADVANCED SURROUND modes. • When the STANDARD or ADVANCED...
.... • ERR Sch - The system checks for five seconds. Check the microphone connection. • ERR Fch - To exit and check your subwoofer output level, press MCACC SETUP (see the notes regarding noise levels below ), then try the auto surround setup again. • ERR MIC - ...Cycle between the following choices: 2.0ch 2.1ch* 3.0ch 3.1ch* 7.1ch* 4.0ch 7.0ch 4.1ch* 6.1ch* 6.0ch 5.1ch* 5.0ch * Indicates a subwoofer is turned up your speaker system overwrites any previous settings you had for the STANDARD or ADVANCED SURROUND modes. • When the STANDARD or ADVANCED...
Installation Manual
Page 21
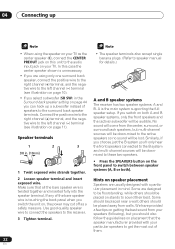
... in the manner shown below , but everyone's home setup will work with an impedance of eight speakers (including the subwoofer) is best for surround sound. You can use speakers with a nominal impedance between 6-16Ω (please see Speaker...PREOUT S R FRONT L P E A K A E R CENTER R SURROUND BACK L R SURROUND L SINGLE SEE INSTRUCTION MANUAL R FRONT L B IN PLAY S R AUDIO L AC OUTLET Powered Passive subwoofer subwoofer SW or single surround INPUT back speaker TV AUDIO IN 21 En The receiver will vary. Also make sure the positive and negative (+/-) terminals on...
... in the manner shown below , but everyone's home setup will work with an impedance of eight speakers (including the subwoofer) is best for surround sound. You can use speakers with a nominal impedance between 6-16Ω (please see Speaker...PREOUT S R FRONT L P E A K A E R CENTER R SURROUND BACK L R SURROUND L SINGLE SEE INSTRUCTION MANUAL R FRONT L B IN PLAY S R AUDIO L AC OUTLET Powered Passive subwoofer subwoofer SW or single surround INPUT back speaker TV AUDIO IN 21 En The receiver will vary. Also make sure the positive and negative (+/-) terminals on...
Installation Manual
Page 22
... wire to the right channel (+) terminal, and the negative wire to the left channel (-) terminal (see illustration on page 10). • If you select subwoofer (SB SW) in the Surround back speaker setting on page 44 you can hook up • When using the speaker on your TV as the... back panel when you 'll only hear the front speakers connected to the B system and multi channel sources will be audible. 04 Connecting up a subwoofer instead of speakers to the surround back speaker terminals. Similarly, if you choose just the B system you switch the unit on placement that all the...
... wire to the right channel (+) terminal, and the negative wire to the left channel (-) terminal (see illustration on page 10). • If you select subwoofer (SB SW) in the Surround back speaker setting on page 44 you can hook up • When using the speaker on your TV as the... back panel when you 'll only hear the front speakers connected to the B system and multi channel sources will be audible. 04 Connecting up a subwoofer instead of speakers to the surround back speaker terminals. Similarly, if you choose just the B system you switch the unit on placement that all the...
Installation Manual
Page 23
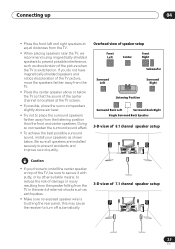
... event of external shocks such as discoloration of 7.1 channel speaker setup 23 En Overhead view of speaker setup Front Left Center Front Right Surround Left Subwoofer Surround Right Listening Position Surround Back Left Surround Back Right Single Surround Back Speaker 3-D view of 6.1 channel speaker setup • If you do not have...
... event of external shocks such as discoloration of 7.1 channel speaker setup 23 En Overhead view of speaker setup Front Left Center Front Right Surround Left Subwoofer Surround Right Listening Position Surround Back Left Surround Back Right Single Surround Back Speaker 3-D view of 6.1 channel speaker setup • If you do not have...
Installation Manual
Page 24
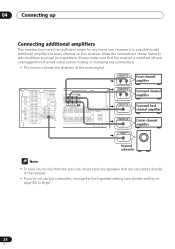
... to power your speakers. Always make sure that are connected directly to the receiver. • If you're not using a subwoofer, change the front speaker setting (see Speaker setting on this receiver. 04 Connecting up Connecting additional amplifiers This receiver has more than...R ANALOG IN L R ANALOG IN Front channel amplifier Surround channel amplifier Surround back channel amplifier ANALOG IN Center channel amplifier INPUT Powered subwoofer • To hear sound only from the wall outlet before making or changing any speakers that the receiver is possible to add additional...
... to power your speakers. Always make sure that are connected directly to the receiver. • If you're not using a subwoofer, change the front speaker setting (see Speaker setting on this receiver. 04 Connecting up Connecting additional amplifiers This receiver has more than...R ANALOG IN L R ANALOG IN Front channel amplifier Surround channel amplifier Surround back channel amplifier ANALOG IN Center channel amplifier INPUT Powered subwoofer • To hear sound only from the wall outlet before making or changing any speakers that the receiver is possible to add additional...
Installation Manual
Page 36
... +/- . MUSIC - This is especially designed to give multi-channel sound to stereo. It works especially well with alot of overall surround. • Depending on your subwoofer depending on the source and the sound mode you have selected, you hear two-channel (stereo) signals as possible. 36 En This mode is designed...
... +/- . MUSIC - This is especially designed to give multi-channel sound to stereo. It works especially well with alot of overall surround. • Depending on your subwoofer depending on the source and the sound mode you have selected, you hear two-channel (stereo) signals as possible. 36 En This mode is designed...

Installation Manual
Page 42
...setting is shown for the LFE channel. Crossover frequency setting (page 44) Determine which frequencies will be sent to your listening position to the subwoofer (or large speakers). LFE attenuator setting (page 45) Choose the attenuator level for each of the settings. • If you are ...the display. It will be easiest to adjust each option as you want to FS-CS-SS. Subwoofer setting (page 44) Specify how the subwoofer is particularly important when using the Pioneer S-FCRW730 speaker system, make these settings once (unless you change the placement of speakers you have to...
...setting is shown for the LFE channel. Crossover frequency setting (page 44) Determine which frequencies will be sent to your listening position to the subwoofer (or large speakers). LFE attenuator setting (page 45) Choose the attenuator level for each of the settings. • If you are ...the display. It will be easiest to adjust each option as you want to FS-CS-SS. Subwoofer setting (page 44) Specify how the subwoofer is particularly important when using the Pioneer S-FCRW730 speaker system, make these settings once (unless you change the placement of speakers you have to...
Installation Manual
Page 43
...is sent from your listening position to the speakers. In the display, F, C, and S refer to discs with dual mono encoding. Subwoofer distance setting (page 46) Specify the distance from your listening position to your surround left speaker distance setting (page 46) Specify the distance...8226; Optical digital input 1 setting • Optical digital input 2 setting SR+ control settings (page 48) Specify how you want to control your Pioneer plasma display. • Control mode setting • Volume control setting • Function setting for DVD input • Function setting for TV input ...
...is sent from your listening position to the speakers. In the display, F, C, and S refer to discs with dual mono encoding. Subwoofer distance setting (page 46) Specify the distance from your listening position to your surround left speaker distance setting (page 46) Specify the distance...8226; Optical digital input 1 setting • Optical digital input 2 setting SR+ control settings (page 48) Specify how you want to control your Pioneer plasma display. • Control mode setting • Volume control setting • Function setting for DVD input • Function setting for TV input ...

Installation Manual
Page 44
... back speaker setting • Default setting: S You must have been connected, and how big they are sent to select the subwoofer setting. • YES - Choose (asterisk) if no speaker is automatically set to small (S) in your system) instead of the following configurations should match your setup:...-CS-SS FL-CL-SS FL-CS-SL FL-CL-S • To select SB L, you should select the surround back subwoofer setting (SB SW) from the small (S) speakers are sent to the subwoofer. • PLUS - SB S SB • If you chose the small front speaker setting, SW YES is connected. • Use...
... back speaker setting • Default setting: S You must have been connected, and how big they are sent to select the subwoofer setting. • YES - Choose (asterisk) if no speaker is automatically set to small (S) in your system) instead of the following configurations should match your setup:...-CS-SS FL-CL-SS FL-CS-SL FL-CL-S • To select SB L, you should select the surround back subwoofer setting (SB SW) from the small (S) speakers are sent to the subwoofer. • PLUS - SB S SB • If you chose the small front speaker setting, SW YES is connected. • Use...

Installation Manual
Page 45
...8734;)). 0 dB 10 dB ∞ (displays ) 200Hz 100 Hz Sends bass frequencies below 100 Hz to the subwoofer (or L speakers). 150 Hz Sends bass frequencies below 150 Hz to the subwoofer (or L speakers). 200 Hz Sends bass frequencies below 200 Hz to 45 ft.). • If all speakers... (front, center, and surround) are no S speakers ( display). appears in the front of 0.5 ft. to the subwoofer (or L speakers). • When ∞ is selected ( appears in the display), LFE is normally placed directly in the LFE attenuator setting • Default setting...
...8734;)). 0 dB 10 dB ∞ (displays ) 200Hz 100 Hz Sends bass frequencies below 100 Hz to the subwoofer (or L speakers). 150 Hz Sends bass frequencies below 150 Hz to the subwoofer (or L speakers). 200 Hz Sends bass frequencies below 200 Hz to 45 ft.). • If all speakers... (front, center, and surround) are no S speakers ( display). appears in the front of 0.5 ft. to the subwoofer (or L speakers). • When ∞ is selected ( appears in the display), LFE is normally placed directly in the LFE attenuator setting • Default setting...

Installation Manual
Page 46
... surround speaker distance can't be set. • When S is selected in the speaker setting, the surround speaker distance can 't be set . Subwoofer distance setting • Default setting: 10 ft. to 45 ft.). You should set the distance of the surround speakers accurately to hear sounds coming ...distance of the surround back speakers from the main listening position (within the range of 0.5 ft. You should set the distance of the subwoofer accurately to hear sounds from the main listening position (within the range of 0.5 ft. Like your speakers, you should set the distance ...
... surround speaker distance can't be set. • When S is selected in the speaker setting, the surround speaker distance can 't be set . Subwoofer distance setting • Default setting: 10 ft. to 45 ft.). You should set the distance of the surround speakers accurately to hear sounds coming ...distance of the surround back speakers from the main listening position (within the range of 0.5 ft. You should set the distance of the subwoofer accurately to hear sounds from the main listening position (within the range of 0.5 ft. Like your speakers, you should set the distance ...

Installation Manual
Page 47
..., DVR or OFF). Dual mono setting • Default setting: ch1 The dual mono setting can only be used when it is selected in the subwoofer setting, the subwoofer distance can compress the dynamic range, so that component, (for maximum dynamic range compression. • Dynamic range control is the difference between the loudest... front speaker will hear the channel you can be heard more easily (sounding relatively louder) yet louder sounds won't be set the distance of the subwoofer from the main listening position (within the range of the receiver.
..., DVR or OFF). Dual mono setting • Default setting: ch1 The dual mono setting can only be used when it is selected in the subwoofer setting, the subwoofer distance can compress the dynamic range, so that component, (for maximum dynamic range compression. • Dynamic range control is the difference between the loudest... front speaker will hear the channel you can be heard more easily (sounding relatively louder) yet louder sounds won't be set the distance of the subwoofer from the main listening position (within the range of the receiver.
Installation Manual
Page 51
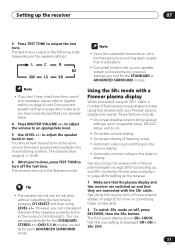
... the receiver. • The speaker volume can be adjusted without outputting the test tone by pressing CH SELECT and then using this receiver with a Pioneer plasma display When connected using an SR+ cable, a number of your speakers, please refer to Speaker setting on page 43 and Surround back speaker..., such as for each speaker when seated in the following order (depending on the speaker setting): L C SW LS R RS SB • Since the subwoofer transmits an ultralow frequency its sound may seem quieter than it actually is displayed (SR+ ON or SR+ OFF). 51 En The channel level range...
... the receiver. • The speaker volume can be adjusted without outputting the test tone by pressing CH SELECT and then using this receiver with a Pioneer plasma display When connected using an SR+ cable, a number of your speakers, please refer to Speaker setting on page 43 and Surround back speaker..., such as for each speaker when seated in the following order (depending on the speaker setting): L C SW LS R RS SB • Since the subwoofer transmits an ultralow frequency its sound may seem quieter than it actually is displayed (SR+ ON or SR+ OFF). 51 En The channel level range...
Installation Manual
Page 66
...setting on page 43 to check the speaker settings. • Refer to Manually calibrating your listening area (MCACC) on page 49 or the (VSX-D914 model only) Quick surround sound setup on page 14 to check the speaker levels. • Refer to Using the Surround Back Channel ... properly (refer to the instruction manual supplied with position. No sound from your receiver, until the noise cassette deck. No sound from subwoofer. • Make sure the subwoofer is output or a noise • Set the digital volume level of a • Move the cassette deck further from surround back speakers...
...setting on page 43 to check the speaker settings. • Refer to Manually calibrating your listening area (MCACC) on page 49 or the (VSX-D914 model only) Quick surround sound setup on page 14 to check the speaker levels. • Refer to Using the Surround Back Channel ... properly (refer to the instruction manual supplied with position. No sound from your receiver, until the noise cassette deck. No sound from subwoofer. • Make sure the subwoofer is output or a noise • Set the digital volume level of a • Move the cassette deck further from surround back speakers...


